Right Now, It’s Just Me!
Gatorland has been so good this season that my plan–despite the fact that no one is signed up for tomorrow’s In-the-Field Workshop–is to have a great day there by myself. I will be using lots of flash and doing some video. Do considering joining me at the last minute. Feel free to apply a $50 late registration discount to the March 29 workshop only.
|
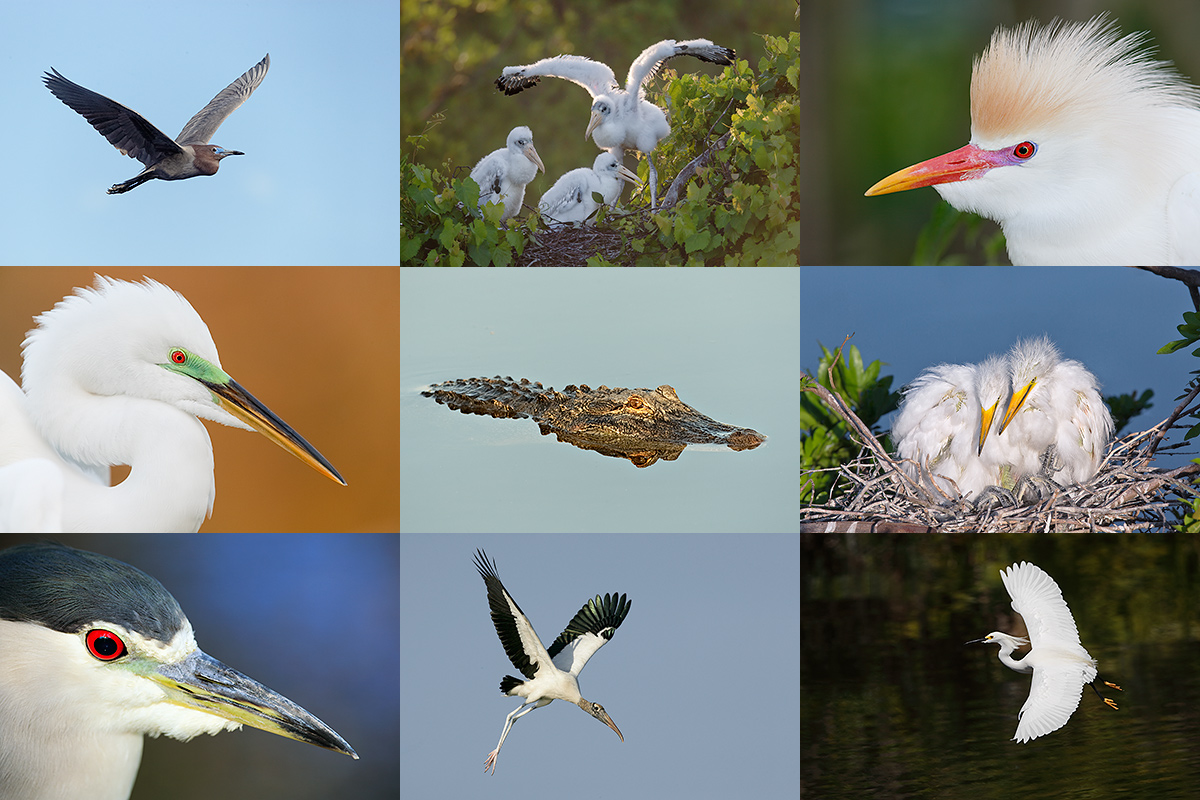
On Saturday, March 29th, it is only me. I hope that you can make it. The weather for Saturday is looking fine. Click on the composite to enjoy a larger version. |
Gatorland Short Notice Saturday Full-Day In-the-Field Workshops
Saturday March 29 and Saturday April 4, 2014. 7:15am till 10:15am & 4:00pm till dusk. Lunch, image review, and Photoshop session included. Limit 6. Small groups are likely: $399. Both: $749.
The cost of your Gatorland Photographer’s Pass is not included.
Gatorland is so good right now that I am going back the next two Saturdays (March 29 & April 4). The Snowy and Cattle Egrets are in way early and there are many in full breeding plumage. Here’s the story: last week there were about two dozen photographers at Gatorland on Saturday past. Aside from two decent photographers–I can tell by where you are pointing your lens…, nobody had a clue as to how to make a good image…. Yesterday it was even worse; pretty much no one had a clue. Most folks just stand in one spot and point and shoot. Without regard for light angle or background. Join me on this, the 3rd Gatorland Short Notice Saturday Full-Day In-the-Field Workshop and you will learn to spot the good situations, to choose the best perspective, to see and understand the light, to get the right exposure every time after making a single test exposure, and to design pleasing images by mastering your camera’s AF system. A big part of the above is that you will learn how and why you must work in Manual mode 90% of the time at Gatorland. That is exactly what Jim Weerts learned on Saturday past.
At lunch we will review my images, take a look at five of your best images from the morning session (for those who opt to bring their laptops), and process a few of my images in Photoshop after converting them in DPP. That followed by Instructor Nap Time. Last Saturday all 3 folks had a great time and learned a ton. And the weather for this coming Saturday is looking good.
Payment in full via credit card is due upon registering. Please call Jim or Jennifer at 863-692-0906 to register. Ask for me if you have any questions.
Last Saturday’s Gatorland Kudos
Via e-mail from multiple IPT veteran Peter Hawrylyshyn:
Artie, Just wanted to say thanks. I really enjoyed the Saturday IPT at Gatorland. It was a great one-day refresher course on composition, lighting/sun angles, exposure settings, birds in flight, and fill-flash, … I also learnt a lot watching your workflow and new processing tips over lunch. I thought you’d post that great Black-crowned Night-Heron that you found for us on your blog. I guessed wrong. Peter
Note. I will be devoting a whole post to that bird soon; have not had time to process them yet….
Via e-mail from Jim Weerts:
Thanks, Artie, for your kind hospitality, the Gatorland adventure, and sharing your expertise! I did indeed fall into it and for that I’m most appreciative. My father told me a long time ago that when I retire, I must retire to something else! Well, photography has filled the bill for me and the challenge to keep learning is the best part of it. You certainly pushed me hard last weekend and I hope to keep up with this adventure including with your blog. I did review the “Working in Manual Mode” material on your blog and will focus on this more as time allows.
The best part of the week-end included learning to look for the distractions in the background, understanding the wind direction and what it presents, and lining up my shadow with the target. Using Manual mode is a new favorite particularly with the changing situations like lighting, background and birds or wildlife. Learning new techniques with the 5D MK III (like rear focus and changing AF points), plus adding more knowledge about some of the rear buttons on the camera all added to the experience. Previously, I had not been able to make any changes on the fly that finally happening now, thanks to somebody teaching me how to do that! Beyond all of this, seeing the subject in new ways and new dimensions just opens up more fun! Thanks my new friend, for so much! I loved it! And “Thanks” for your talents! Jim Weerts
Note: Jim just signed up for the Holland IPT!
119
This post marks 119 straight days with a new educational blog post. With so many folks getting in the habit of using our B&H and Amazon links why quit now? To show your appreciation for my efforts here, we do ask that you use our the B&H and Amazon affiliate links on the right side of the blog for all of your online shopping. Please check the availability of all photographic accessories in the BIRDS AS ART Online Store. We, meaning BAA, sell only what I use and depend on. We will not sell you junk. We know what you need to make creating great images easy and fun. And we are always glad to answer your gear questions via e-mail
This log post took 3 hours to prepare. Enjoy and learn.
|
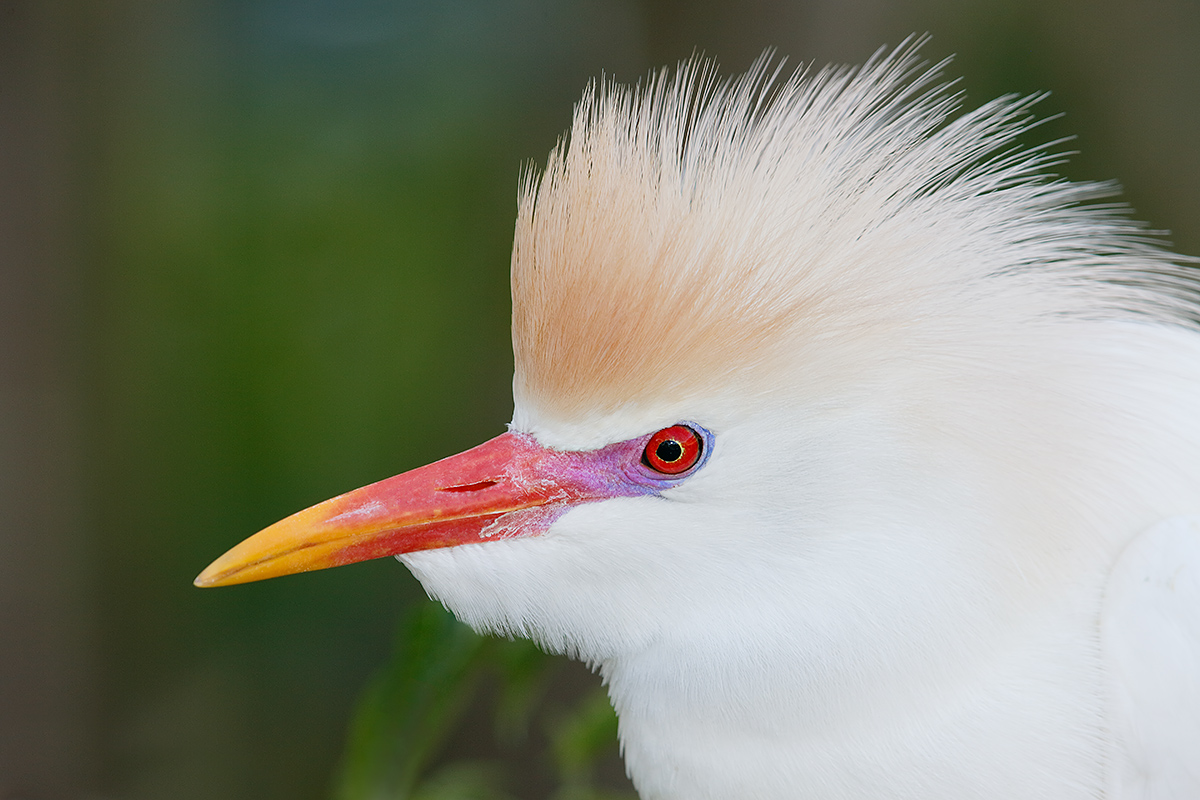
This Cattle Egret head portrait was created with the Gitzo 3532 LS carbon fiber tripod, the Mongoose M3.6 head, the Canon EF 600mm f/4L IS II USM lens, the Canon 2x EF Extender III (Teleconverter), and the Canon EOS 5D Mark III. ISO 400. Evaluative metering +1 1/3 stops as framed: 1/80 sec. at f/10 in Manual mode. Color Temperature: AWB. Fill flash with the Better Beamer at -3 stops in ETTL, the Canon Speedlite 600EX-RT with the Canon CP-E4 Compact Battery Pack for faster re-charging times. Mongoose Integrated Flash Arm with the Canon OC-E3 Off Camera Shoe Cord 3. Central sensor (by necessity) Expand/AI Servo/Rear Focus on the bird’s eye and re-compose. Click here if you missed the Rear Focus Tutorial. Be sure to click on the image to see a larger version. Image #1: Classic Cattle Egret Head Portrait
|
Classic Fill Flash
The image above illustrates the classic use of fill flash: set the right exposure for the situation as if you were not using flash. Work in ETTL. Dial back the flash to add just a splash of light that adds a bit of fine detail sharpness and a pinpoint eye highlight, restores the color balance in low light situations, and reduces or eliminates any shadows. A flash bracket is needed with tripod-mounted super-telephoto lenses to prevent or reduce eye shine, purple eye, flash eye, or steel eye, all very close relatives.
|
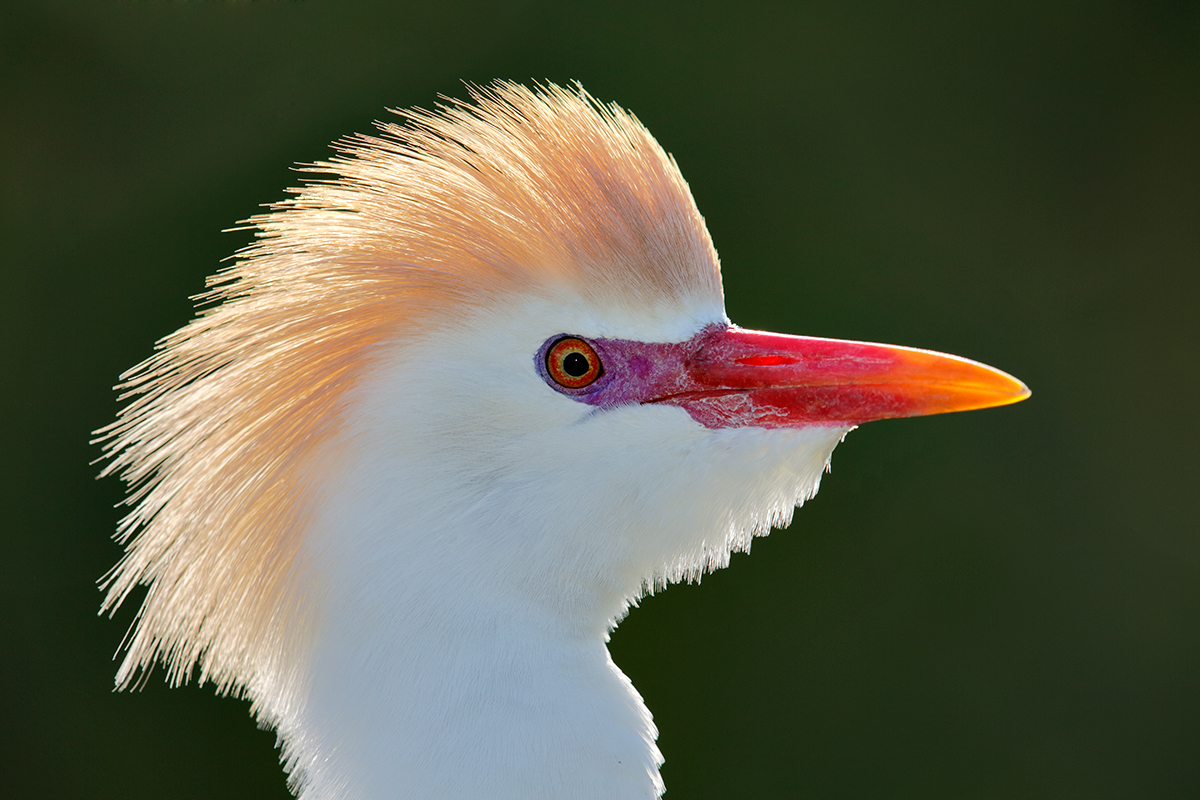
This strongly backlit Cattle Egret head portrait was created with the Gitzo 3532 LS carbon fiber tripod, the Mongoose M3.6 head, the Canon EF 600mm f/4L IS II USM lens, the Canon 2x EF Extender III (Teleconverter), and the Canon EOS 5D Mark III. ISO 400. Evaluative metering +1/3 stop as framed: 1/320 sec. at f/10 in Manual mode. Color Temperature: AWB. Fill flash with a Better Beamer at -3 stops in ETTL and the Canon Speedlite 600EX-RT with the Canon CP-E4 Compact Battery Pack for faster re-charging times. Mongoose Integrated Flash Arm with the Canon OC-E3 Off Camera Shoe Cord 3. Central sensor (by necessity) Expand/AI Servo/Rear Focus just a bit in front of and below the bird’s eye active at the moment of exposure. Click here if you missed the Rear Focus Tutorial. Be sure to click on the image to see a larger version. Image #2: Backlit Cattle Egret Head Portrait
|
Using Flash to Light the Shaded Side of a Backlit Subject
Flash is commonly used to light the shaded side of a backlit subject. Note that despite my post-processing efforts with this image that the WHITEs are not as bright as the WHITEs in the first image. My bad…. I should have increased flash setting from -3 stops to about -1/3 stop. As I said here, it had been a long time since I used flash and I was a bit rusty.
Exposure Question
Why +1 1/3 stops for Image #1 but only +1/3 stop for image #2?
|
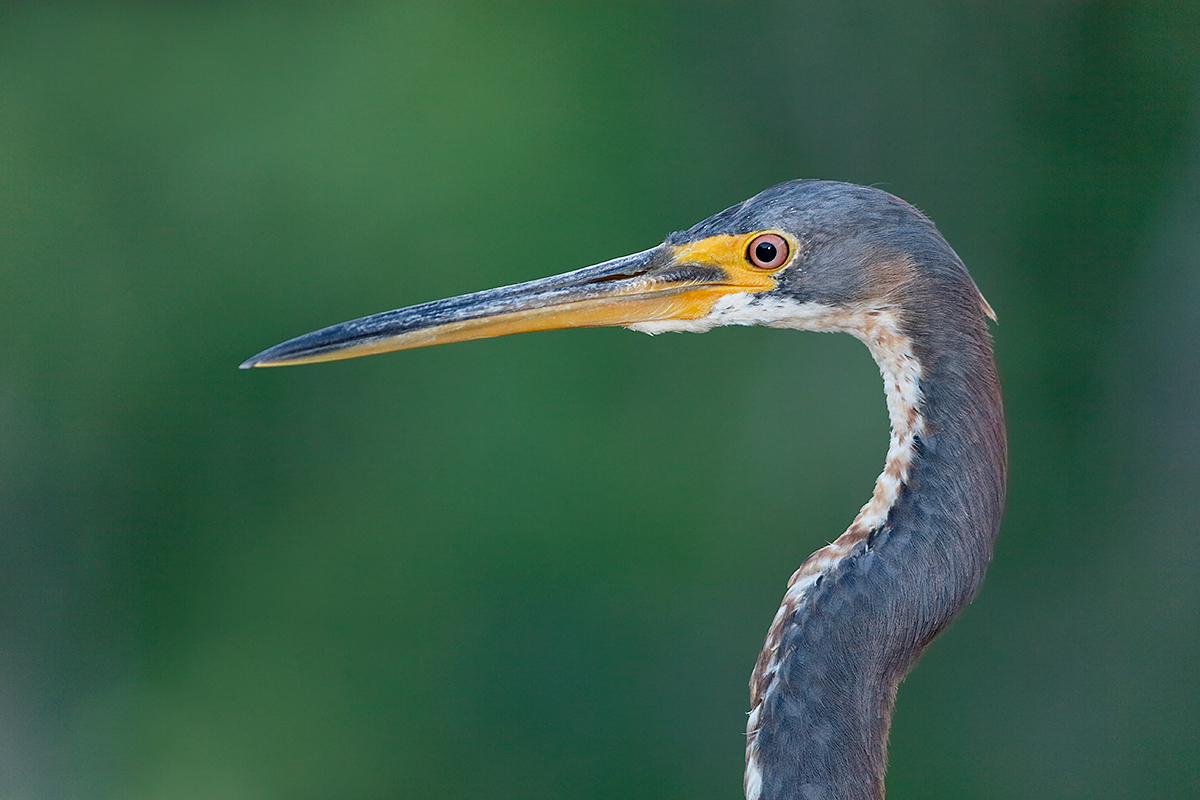
This Tricolored Heron head portrait was created at 6:47pm on a very dark, cloudy afternoon with the Canon EF 200-400mm f/4L IS USM Lens with Internal 1.4x Extender (hand held with the internal extender in place at 560mm) and the Canon EOS-1D X. ISO 800. Evaluative metering -2/3 stop as framed was one stop underexposure error: 1/320 sec. at f/5.6 in Manual mode. AWB. Fill flash with Better Beamer at -1 stop in ETTL. Canon Speedlite 600EX-RT with the Canon CP-E4 Compact Battery Pack for faster re-charging times. Mongoose Integrated Flash Arm with the Canon OC-E3 Off Camera Shoe Cord 3. 61-point/AI Servo-Surround/Rear Focus AF did a nice job of selecting two sensors at the base of the bill and a third adjacent sensor that fell on the white feathers of the chin. All three sensors were of course active at the moment of exposure. Click here to see the latest version of the Rear Focus Tutorial. Click on the image to see a larger version. Image #3: Low Light Tricolored Heron
|
Low Light/Long Lens/Hand Holding Flash Tactics…
With the very low light conditions and me working at 560mm and not wanting to go to ISO 1600 or use a slower shutter speed, I opted to under-expose (i.e., shoot too dark) but opted to use more flash: -1 stop yields four times as much flash as -3 stops. In any case I lightened the image 1 full stop during the DPP conversion and a bit more in Photoshop. The background was still quite noisy so I selected it using the Magic Wand Tool, ran a Refine Edge on the selection, placed it on its own layer, and ran Filter/Blur/Surface Blur as taught to me by Denise Ippolito. The Surface Blur rendered the background smooth as the proverbial baby’s tush.
The DPP RAW Conversion Guide
After seeing the accurate colors that I get from my DPP RAW conversions, Japan in Winter co-leader Paul McKenzie switched to DPP conversions and Denise Ippolito is consider doing the same. Now that is amazing…. To learn why I use Canon’s Digital Photo Professional (DPP) to convert every image that I work on, click here.
Digital Basics
Learn the settings for Filter/Blur/Surface Blur and tons more in this best-selling eGuide. Are you tired of making your images look worse in Photoshop? Do you have no clue as to how I optimized the images here? All is detailed in my Digital Basics File, an instructional PDF that is sent via e-mail. It includes my complete digital workflow, dozens of great Photoshop tips, the use of Contrast Masks, several different ways of expanding canvas, all of my time-saving Keyboard Shortcuts, Using Adjustment Layers, Quick Masking, Layer Masking, and NIK Color Efex Pro basics, my killer image clean-up techniques, Digital Eye Doctor, creating time-saving actions, and lots more.
|
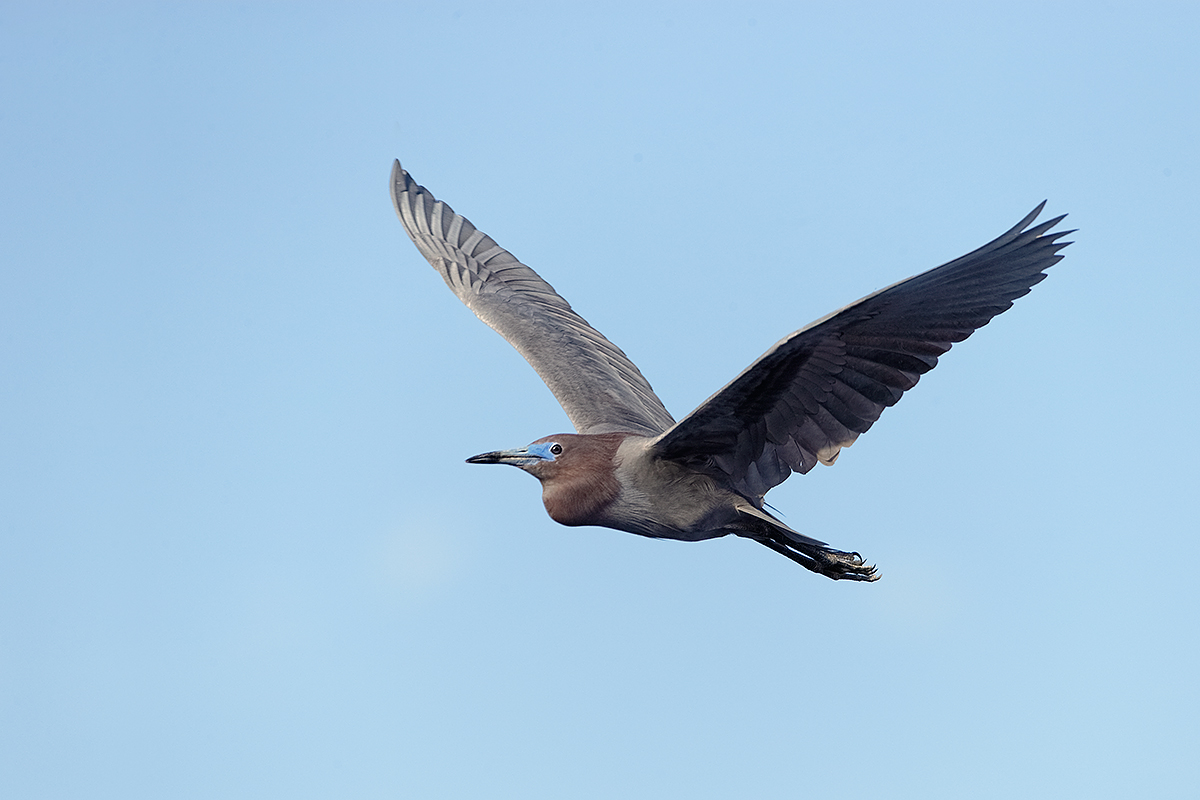
This Little Blue Heron in flight was photographed at 6:30pm on a cloudy afternoon with the Canon EF 200-400mm f/4L IS USM Lens with Internal 1.4x Extender (hand held with the internal extender in place at 560mm) and the Canon EOS-1D X. ISO 800. Evaluative metering + 2 2/3 stops off the sky: 1/1250 sec. at f/7.1 in Manual mode. AWB. Manual flash at 1:2 with a Better Beamer, the Canon Speedlite 600EX-RT with the Canon CP-E4 Compact Battery Pack for faster re-charging times. Mongoose Integrated Flash Arm with the Canon OC-E3 Off Camera Shoe Cord 3. Central sensor/AI Servo-Surround/Rear Focus AF on the bird’s rear belly (can you say pan faster or operator error?) active at the moment of exposure. Click here to see the latest version of the Rear Focus Tutorial. Click on the image to see a larger version. Image #4: Little Blue Heron Flash Flight
|
Flash Flight
It had been so long since I used flash flight that I had to ask an old friend from Vero Beach how to set High Speed Synch on the Canon Speedlite 600EX-RT. (It’s the fourth round button on the right just below the LCD screen on the back of the flash. With the flash on, it is right below the small black rectangle with the word SYNC in it. Duh! Press this button to toggle between High Speed Synch (used to create this image), Rear Curtain Synch, and the nothing setting that limits the fastest shutter speed to 1/250 second.
To create flash flight images, you first need to set High Speed Synch so that you can set a shutter speed that is fast enough to give you a shot at creating a sharp image. In low light I go to Manual flash. In really low light I go back to ETTL.
Flash Simplified
If you are clueless when it comes to flash you are advised to study the “Flash Simplified” section in The Art of Bird Photography II. ABP II: 916 pages on CD only with 900+ great images each with one of our legendary BAA educational captions. Just like the ones you see here on the blog. Topics covered include flash gear and set-up, Better Beamer basics, telephoto fill flash, flash as main light, and the use of Manual flash. The use of High Speed Synch for flash flight photography and additional flash flight strategies are detailed in various ABP II image captions as is the use of Rear Curtain Synch for creating flash blurs.
I had several ABP IIs for sale on the bench at the Gator Breeding Marsh these last two weekends. Though virtually every single photographer there would have benefited greatly by getting a copy and studying this amazing resource, I sold not a one….
|
This Tricolored Heron image was created at 7:35pm on a cloudy evening with the Canon EF 200-400mm f/4L IS USM Lens with Internal 1.4x Extender (hand held with the internal extender in place at 560mm) and the Canon EOS-1D X. ISO 1600. Evaluative metering + 1/3 stop: 1/320 sec. at f/5.6 in Manual mode. AWB. Manual flash at 1:2 with a Better Beamer, the Canon Speedlite 600EX-RT with the Canon CP-E4 Compact Battery Pack for faster re-charging times. Mongoose Integrated Flash Arm with the Canon OC-E3 Off Camera Shoe Cord 3. 61-point/AI Servo-Surround/Rear Focus AF did a stellar job of selecting a tight array of 6 sensors just forward of but including 2 on the bird’s eye that were active at the moment of exposure. Click here to see the latest version of the Rear Focus Tutorial. Click on the image to see a larger version. Image #5: Tricolored Heron Flash Disaster
|
Flash Disaster
Though the image above is pretty cool, the mega-overexposed RAW file from which it was created was a result of operator error. Take a close look at the image captions for Images #4 and 5 and leave a comment if you can figure out what I did that was so wrong.
Your Favorite?
Please take a moment to leave a comment and let us know which of the 5 images here is your favorite. And as always, please let us know why.
Support the BAA Blog. Support the BAA Bulletins: Shop B&H here!
We want and need to keep providing you with the latest free information, photography and Photoshop lessons, and all manner of related information. Show your appreciation by making your purchases immediately after clicking on any of our B&H or Amazon Affiliate links in this blog post. Remember, B&H ain’t just photography!


Amazon
Everyone buys something from Amazon, be it a big lens or deodorant. Support the blog by starting your search by clicking on the logo-link below. No purchase is too small to be appreciated; they all add up. Why make it a habit? Because I make it a habit of bringing you new images and information on an almost daily basis.
Typos
In all blog posts and Bulletins, feel free to e-mail or to leave a comment regarding any typos, wrong words, misspellings, omissions, or grammatical errors. Just be right. 🙂



The situation with image #5 has happened to me too many times. Flash set on “bird far away” and all of a sudden there’s a headshot opportunity. The shutter is pressed without setting the flash to “bird close by” (i.e. reducing flash output as intensity is proportional to the square of distance)
Hi Artie,
In a recent blog post entitled “It’s a strange, strange business indeed” you made the statement that “Today, it is difficult to sell an image.” I am very intrigued by this statement and I’m wondering what the basis for it is. To what do you attribute the decline in your ability to sell images?
Regards,
Richard
Hi Richard, My abilities are fine :). It is the market that has changed. There are several reasons. Things started to go downhill for no apparent reason right after 9-11. The number of new book projects fell off to near zero, possibly due to more stuff being done online…. Big bird book projects often resulted in large sales; selling 50 to several hundred images even for a low price, $35 to $75 made for a substantial check. Things got worse with the economic downturn.
And then there was digital photography. Digital opened up bird an nature photography to the masses for a variety of reasons. And with digital the learning curve is greatly reduced. Before long pretty much anyone who was serious was capable of creating high quality, sale-able images. The big problem is that the number of folks who wanted to see their images published above their name were willing to give their images away either for nothing or for pennies.
Here is a perfect example. VIREO, Visual Resources for Ornithology at The Academy of Natural Sciences (Philadelphia) was creative as a repository for good and rare bird photographs. It quickly became a fairly good stock agency. In the latter half of the 1990s we would receive two checks a year from VIREO, often totaling $10-$15,000 annually. One of their big clients was Thayer Birding Software. They sold CDs with bird songs and photos. And they paid fairly for photo rights. And they paid fairly for reprints after a given press run sold out.
And then along came i-Bird. I got that first e-mail: Give us your best bird images for free. We will use them in our bird song apps and include a credit line. What’s in it for you? Buyers will see your photo and your credit line and flock to buy your images.” I saw through that in one second flat, but dozens if not hundreds of of photographers signed up. All gave away their images for not one cent. The ‘credit lines” were in a microscopic font. As far as I know not a single photographer was ever contact as a result of their donations to iBird.
While this may be an over-estimate, iBird has exploded with sales at least in the many millions of dollars. Without having to pay for images, the original iBird was priced at $15. The expansion of iBird apps and other products has been huge. With iBird not having to pay photographers, the Thayer CDs cost roughly 5 times the price of the iBird stuff. Thayer Birding Software is still in business, but I have not seen any payments from them to VIREO in ages. In any case, this new scenario of talented folks giving their images away out of ignorance has pretty much killed one aspect of the market.
I will see if I can get Doug Wechsler, the director of VIREO, to chime in here as there may well be other factors involved.
Artie: Thanks for sharing this fascinating story, with the hope of more to come. You have told us that you’ve adapted to the new market conditions with your books, guides, IPTs, BAA store, and links to B&H, Amazon, and so on (all of which I’ve used at one time or another). I know of at least some other photographers who have gone the same route. I have no intention of trying to do any of that; I’m content to try to improve my photographic skills and continue to sell a few images here and there for a few dollars. But I’d love to know how you see this business evolving, if you don’t think sharing those thoughts would adversely affect your own business. In any case, thanks again for being such an educational force in photography.
For the last image the problem is distance. You are much closer to the bird in it. The manual setting will be much stronger on it than the flying bird.
You are too smart :). Well done Greg.
Oh, what the heck…I’ll take a stab at #5.
Simply, the ambient exposure was wrong. So the
flash only had enough power to cover the bird,
which was to hot at 1:2.
Doug
The ambient exposure was correct 🙂 artie
” In low light I go to Manual flash. In really low light I go back to ETTL.”
Can you explain a little more why the change to manual then back to ETTL? I’m assuming on a bright day you use ETTL? Just realized I don’t know the why of this. In very low light, less flash is needed so ETTL works best?
For that answer you will need to go to the Flash Simplified section of ABP II. artie
I skimmed the Flash Simplified section of ABP II before sending the question. Went back and read same today but couldn’t ferret out the answer. Am I overlooking it?
See Greg Payne’s answer; he nailed it…
Just now I went back and looked at #3 again. Looks like the same bird as #5 and with same f stop (with your correction of adding 1/3 stop) and shutter. But you opened ISO 1 stop because of less light about 45 min. later? You kept the Better Beamer but forgot in “really low light ” to set the flash back to ETTL and -1 fill after using the “low light” manual flash in #4 ? Anyway I’m using your rule of “In low light I go to Manual flash. In really low light I go back to ETTL.” to try to figure this out now.
Nope 🙂
OK my guess for the “flash disaster” in #5 was that the Better Beamer was still attached after photographing the distant flying bird. Then with #5 much closer, the flash with BB was too strong ? BTW I think #5 being labeled “This Little Blue Heron in flight was photographed at 7:35pm” was a copy and paste error? It looks as if #5 was not flying.
Thanks for making me think .
Thanks for the typo/cut and paste error. It has been fixed. YAW but the Better Beamer was not the problem 🙂 artie
You added exposure to first image because of the majority of white in frame. The camera wants to make it grey. If you did the same to #2, you would have blown out the back lit highlights. That’s the reason you wish you would have added to the flash exposure. It would have brought the bird’s face out of the shadows more.
Bingo! Well done. artie
Amazing colours on the cattle egrets, I have never seen such colours in Europe, I presume that is down to timing, how long do they keep those colours?
The last picture has the same text as the previous.
Thanks. The FL birds are much brighter than others from various locations…. They come even brighter :). They keep the really bright colors for less than a week before they begin to fade.
The text was similar but not identical. I think that all the typos and cut and paste errors have been corrected :).
artie
Hi, Artie. I know Elinor knows this stuff so well, but I’m not sure I understand her answers, so here are mine. In image 1, the full bright sun was on the bird, and if you’d used what the meter was telling you, everything but the whites would have been too dark. So you added light (exposure). I’m not sure how you managed to retain detail in the whites anyway, and I know, I should buy APB II. When I get some things figured out, I plan to. On image 2, because the bird was backlit, you were no longer (as) worried about underexposing if you exposed for the whites, so you added only 1/3 stop. As for the overexposed heron’s head, well, I’m confused. The caption says “little blue heron in flight,” and the bird doesn’t seem to be flying and I’m not even sure it’s a LBH with that very long bill. Then there are the times of day and weather; the tricolored heron was 6.47 on a “very dark, cloudy afternoon,” the flying LBH at “6.30 pm on a cloudy afternoon,” and then the overexpose “LBH in flight” at “7.35 pm on a cloudy evening.” If all those shots were taken in March, then it should have been dark enough at 7.35 pm under clouds that even at ISO 1600 you weren’t overexposed, especially comparing the exposures and results for the other images, and so, again, I have no idea.
I forgot to add, my favorites are images 1 and 2. I love the detail, the color, the composition, and the detail in the whites.
David,
Thanks. Yes for #1. Wrong for #2. 🙂
Yes, you need Digital Basics fast :).
That was a cut and paste brain typo that has been fixed.
Confused by your comments on night. We were photographing flash flight last Saturday till almost 8pm tanks to DST.
Thanks, Artie. Isn’t my answer to # 2 is similar in spirit to Greg Payne’s? He said you didn’t want to blow the highlights, I said you weren’t worried about underexposing. Don’t those both get you to the same place? My comments about night; I thought that sunset would have been around 7.35 EDT down there, and so with heavy clouds it would have been quite dark; but maybe I failed to consider how far west you are of us in Washington DC, where sunset was around 7.20. As I said, I was confused….
The correct answer for #2 is simple: you use much less +EC to avoid burning the rim light 🙂
#1 A bright white bird in the shade and filling half the frame needed lots of light to come out white. Therefore + 1 1/3. “In shade the meter is dumb”
#2. “In sun, the meter is smart” and 0 works on medium tone. But this bird had 1/3 lighter-than-medium-tone gold feathers so +1/3 for correct exposure of the sunlit feathers. Then fill flash added to bring up the whites in the shaded feathers
Figurng out your question on images #4 and 5 may take forever.
My favorite is #2 for the beautiful gold backlit feathers and bill. And if you had increased fill flash (as you wish now) to bring out the colors around the eye, it would be even more beautiful. I tried the Exposure/gamma adjustment in PS just on those colors and liked it. Maybe try NIK for slightly more detail in the shaded white feathers? No time to try that right now.
E,
1-right.
2-wrong 🙂
#s 4 & 5: should not be hard for folks who understand flash as main light. Few do….
On my monitor the lores look bright and colorful. I used NIK on the WHITEs for Image #2 but am careful not to over do it. In retrospect I could have used one of several ways to brighten the WHITEs in #2.