The Streak Continues: 259
This item was published just before 8:30am from my home at Indian Lake Estates, FL. This blog post took me 2 hours to prepare; it makes 259 consecutive days with a new enjoyable and educational blog post. As always, I would appreciate your using the BIRDS AS ART B&H affiliate links for all of your major gear, video, and electronic purchases, using our Amazon logo-link for all of your household purchases, and visiting the BAA Online Store for your tripod, tripod head, LensCoat, miscellaneous, accessories, and eGuide purchases as well.
Your Help Needed
Sales for the first half of August, 2014 via our BIRDS AS ART B&H affiliate links have been microscopically abysmal at best. If you need to purchase some new camera gear, please remember to use either our B&H logo link below or one of the product-specific links in the blog or the Bulletins. All should feel free to write me via e-mail for gear advice.
|
The Art of Flower Photography, a 203 page eBook/a link to the PDF will be sent via e-mail: $29.00. |
The Art of Flower Photography
Click here if you missed the recent eBook announcement.
|
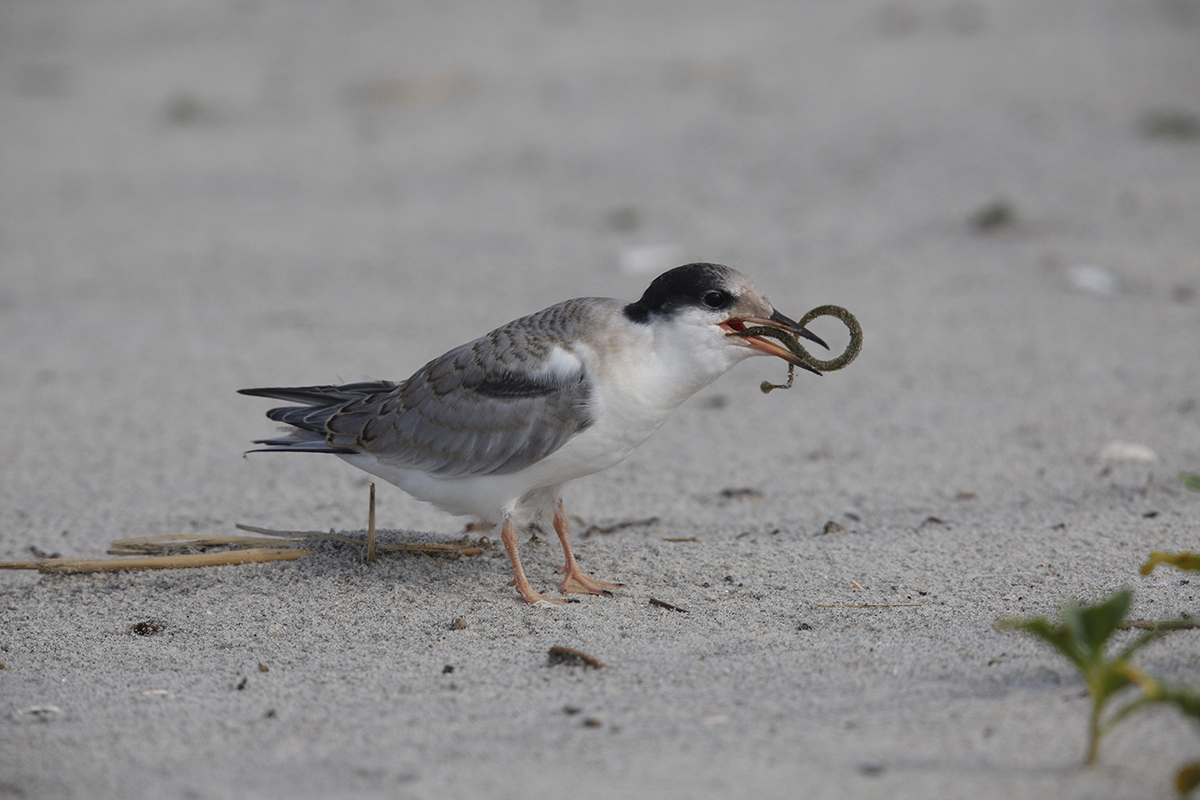
This image was created on July 15, 2014 at 5:40pm on a partly mostly cloudy afternoon on the first day last July’s Nickerson Beach IPT. I used the Gitzo 3532 LS carbon fiber tripod, the Mongoose M3.6 head, the Canon EF 600mm f/4L IS II USM lens, the Canon Extender EF 2X III, and the Canon EOS-1D X. ISO 400. Evaluative metering +2/3 stop as framed: 1/1600 sec. at f/9 in Av mode was a large under-exposure. See below for the explanation. AWB. Central Sensor (by necessity)/AI Servo-Expand/Rear Focus AF on the leading edge of the folded wing as framed was active at the moment of exposure. When you add the 2X TC to an f/4 lens with the 1DX or the 5D III hit the MFn button once to toggle to AF Expand and enjoy 4 extra AF sensors. Learn everything there is to know about the 1D X and 5D III AF systems including how to manage the various AF Area Selection Modes, when to use which one, and several ways to move the AF sensor around in the 1D X AF Guide and the 5D Mark III User’s Guide. Click here to see the latest version of the Rear Focus Tutorial. Click on the image to see a larger version. . s |
The Root of the Exposure Error
When I spotted the recently fledged Common Tern chick grab a squirming pipefish from one of its parents I moved quickly into position. I thought that I had been working in Manual mode and wanted to go a bit lighter so I turned the thumb wheel two clicks counter-clockwise. In a rush, I did not realize that I was in Av mode. In Av mode two counter-clockwise clicks of the thumb wheel gets you two clicks darker (by setting a faster shutter speed in response to the 2/3 stop of negative exposure compensation that you dialed in)…. Thus the under-exposure is about a full stop.
There are those who would argue “That’s why you should be in Manual mode 100% of the time.” I’d say, “Heck. You can screw up in Manual mode just as easily as you can screw up in Av mode. I do not want to give up the speed that comes with being in Av mode when you have no clue as to what the next situation will be. In addition, this is the first time that I have been bitten in this fashion.”
The lesson for all of us: a quick glance at the viewfinder details can save you in action situations when you cannot afford to take the time to do a histogram check. There are no excuses in photography. 🙂
More Criticism
Others might say, “With all that distracting crap on the ground you should have either been seated behind your lowered tripod or been flat down on the ground.” They’d be right in that getting lower is a great way to minimize distracting background crap. There are however, mitigating circumstances…. In situations where you are not sure where the next action will be, you are a lot more mobile than you are when seated or lying flat on the ground. There were several young terns just on the other side of the colony ropes and there was no way to know which one was going to be the next to get fed. In addition, getting low when working birds in the beach grasses will often introduce image wrecking foreground grasses.
What to Do?
Would you keep or delete the image above with all its flaws?
Image Creation Question
In the un-cropped original image above, the bird is too centered. A crop from behind and below was needed to move the bird back in the frame. Why didn’t I simply point the lens down and to the right so as to include all of the small green beach plant in the lower right corner? There were two factors in play….
|
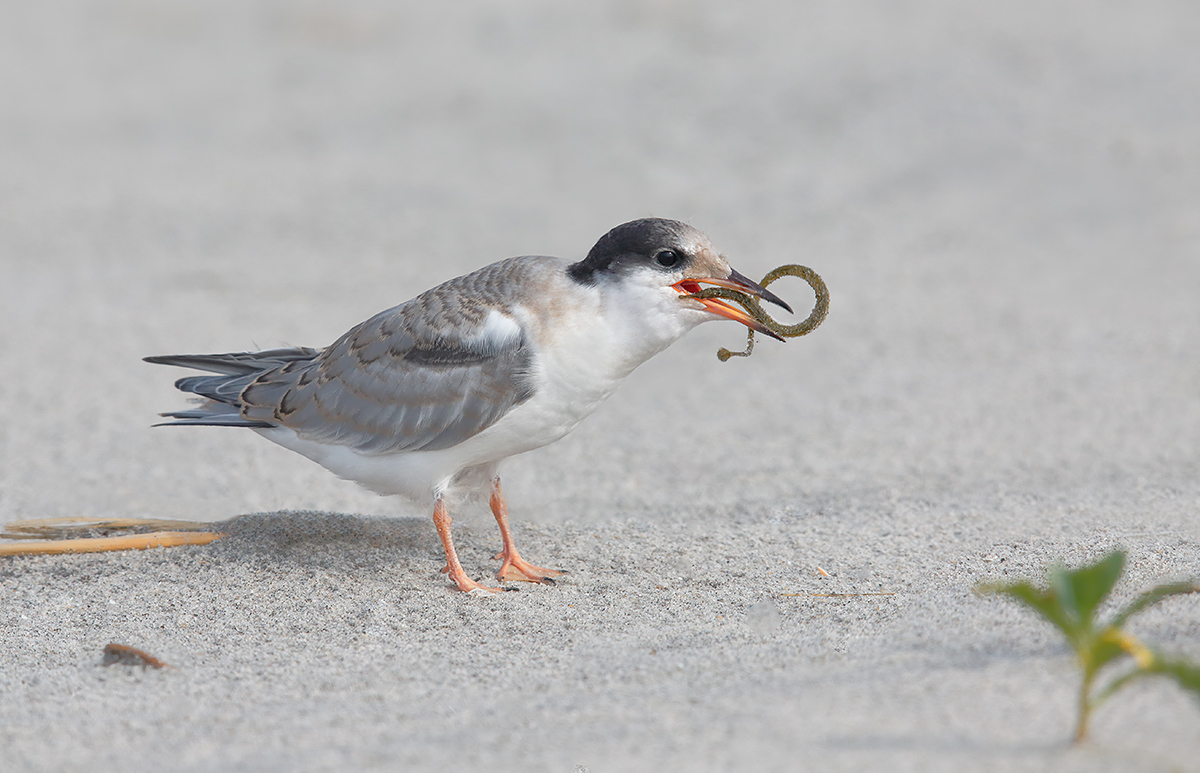
This is the lightened, optimized TIF file that was created from the original image above. Click on the image to enjoy a larger version. |
The Editing
I wound up keeping six frames despite the under-exposure and the slew of distracting bits of beach stuff that littered both the background and the foreground. I kept the images where the pipefish struck a neat pose. Today’s featured image had the neatest pipefish pose. How do you like that funky tail? Pipefish struggle a lot more than most other baitfish thus giving the photographer more opportunities to make a really good image.
The Image Optimization Process
I lightened the image during conversion in DPP 4.0 by moving the Brightness adjustment slider to 0.83 (+5/6 stop) while moving the Highlight slider to -1 to bring back some highlight detail. I viewed the image at 100% while applying the noise reduction. Once in Photoshop CS-6 I did the extensive beach clean-up with the Patch Tool, the Spot Healing Brush, and the Clone Stamp Tool. In several situations where the results were less than ideal, I painted a Quick Mask to ensure detail in the repaired area and then fine-tuned that later with a Regular Layer Mask. I used a Quick Mask to copy the the small, dark rock in front of the bird (where it was a major distraction) to a more pleasing spot in the lower left corner of the frame. Then I painted another Quick Mask, this one of pure sand, to cover the offending rock.
Once the clean-up was complete I painted a large Quick Mask of the lower right corner, put it on it’s own layer (CTRL J), and moved that layer up a bit with the Move Tool. That allowed me to execute a small crop from below to tighten things up while keeping the base of the beach plant in the frame. Then I used my new NIK Color Efex Pro 25-25 pre-set on the bird only at 100% and followed that up by applying a Contrast Mask to selectively sharpen the bird’s face and bill as well as the pipefish. Both selections were made with the Quick Selection Tool.
The DPP RAW Conversion Guide
To learn why I use Canon’s Digital Photo Professional (DPP) to convert every image that I work on, click here. Coming soon: the DPP 4.0 RAW Conversion Guide by Arash Hazeghi with Arthur Morris.
Digital Basics
Most everything that I did to optimize today’s image above is detailed in my Digital Basics File–written in my easy-to-follow, easy-to-understand style. Are you tired of making your images look worse in Photoshop? Digital Basics File is an instructional PDF that is sent via e-mail. It includes my complete digital workflow, dozens of great Photoshop tips, details on using all of my killer image clean-up tools, the use of Contrast Masks, several different ways of expanding and filling in canvas, all of my time-saving Keyboard Shortcuts, Quick Masking, Layer Masking, and NIK Color Efex Pro basics, Digital Eye Doctor, Tim Grey Dodge and Burn, how to create time-saving actions, and lots more.
APTATS I & II
Learn the details of advanced Quick Masking techniques in APTATS I. Learn Advanced Layer Masking Techniques in APTATS I. Mention this blog post and apply a $5 discount to either with phone orders only. Buy both APTATS I and APTATS II and we will be glad to apply at $15 discount with phone orders only. Please call Jim or Jennifer at 863-692-0906 weekdays to order.
Used Photography Gear for Sale
The “Old 600” that was featured in yesterday’s blog post sold right then and there. Though have sold a boatload of great gear recently, there are still some great buys available. Click here to see the complete listings. Below s today’s featured item.
Featured Lens
Used Canon 300mm f/4L IS USM Lens
Chris Callahan is offering a used Canon 300mm f/4L IS USM Lens in good to very good condition for $900. There is some wear on the finish. The sale includes the heavy duty fabric carrying case that is moderately worn, the tripod ring (tripod collar), and the rear cap. The seller will pay insured UPS shipping within continental US. The lens will ship after the check clears.
Please contact Chris via e-mail or by phone at 1-850-516-7155 (eastern time).
The Canon EF 300mm f/4L IS USM lens is still in production; it sells for $1449 new from B&H; buy Chris’s lens today and save $549! I have long recommended this lens as the best Canon bird photography starter lens, a clear choice over my old “toy lens,” the Canon EF 400mm f/5.6L. Why? It is faster at f/4. It has IS. And it autofocuses with a 7D (or other pro-sumer body) and a 1.4X teleconverter. The 300 f/4 L IS offers a minimum focusing distance of only 1.5 meters (less than 5 feet). This makes it a great lens for for frogs, butterflies, medium-sized and large flowers, and large insects like dragonflies. It is a great flight lens either alone or with the 1.4X TC. It is deadly sharp and great on a tripod with the Mongoose M3.6.
|
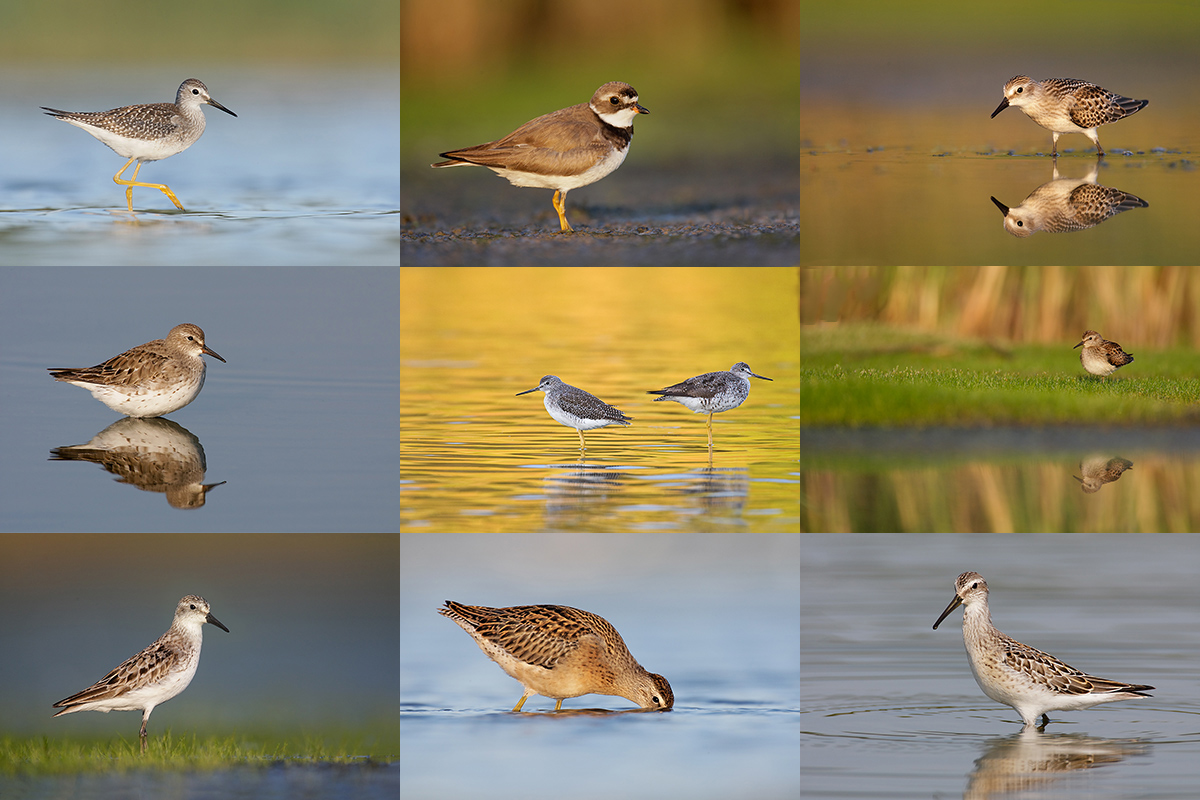
For me, the coolest thing about learning to identify shorebirds is that once you learn the basics it is actually easier to age a shorebird, that is, to tell if it an adult or a juvenile, than it is to identify it as to species. And with a bit of experience, study, and practice, identifying the common North American migrant shorebirds is nowhere as difficult as it is reputed to be. Advice: get yourself a copy of my Shorebirds: Beautiful Beachcombers, study, and get out to local ponds, estuaries, beaches, and mudflats as much as possible for the next month. Mid-August through early September is the best time of year to see both adult and fresh juvenile shorebirds together on migration. Better yet, join me at JBWR for two great mornings of shorebird photography while honing your identification and ageing skills and learning a ton about my favorite bird family. See below for details. For the correct ageing and ID of each of the birds in the composite above, see the comments here. |
JBWR Short-Notice Shorebird Photography and ID In-the-Field Morning Workshop
Saturday August 23: sunrise till 10am followed by brunch and image review at a local diner: $299/morning session.
Join me at Jamaica Bay Wildlife Refuge in Queens, NY for a morning of shorebird photography in the mud. You will learn to age and identify the common shorebirds that we will encounter. You will learn the best times, tides, and locations to visit for the very best shorebird photography on the east coast and why only a very few days each year offer the best chances for success. I will teach you how to get close; we will either be sitting in or lying on the hard mud. This morning session will offer you a chance to learn from someone who has spent more time studying and photographing the shorebirds of JBWR than anyone alive. Join me and you are invited to pick my brain; as is usual, I share everything that I know.
Payment in full is due when you register and is non-refundable. Call me on weekends or Jim or Jen weekdays at 863-692-0906 with a credit card in hand to register. Please print, complete, and sign the form that is linked to here and shoot us a scanned copy via e-mail or a hard copy via snail mail to BIRDS AS ART, PO Box 7245, Indian Lake Estates, FL 33855.
Nickerson Beach Short-notice Weekday Beach-nesting Birds IPT: 2-Full Days/August 25-26, 2014: $749*. Leader: Arthur Morris
Join me on Long Island, NY soon to photograph Black Skimmers with chicks and young of all sizes, adult and juvenile Common Terns, and American Oystercatchers with grown young. The skimmers will be the stars of the show. Mid- to late August is prime time for photographing young skimmers. Chances are great to witness Great Black-backed Gull predation. The will also be chances to photograph a variety of shorebird species including large flocks of southbound migrant Sanderlings. Car-pooling is recommended; if we opt to return to the beach before 5pm there is a $30/vehicle parking fee that is not included so it is best to share that expense. Parking in the morning is free.
Call me this weekends or Jim or Jen weekdays at 863-692-0906 with a credit card in hand to register and leave a non-refundable $200 deposit. We will hold your spot pending the arrival of a check for your $549 balance. Checks should be made out to “Arthur Morris” and mailed to us at BIRDS AS ART, PO Box 7245, Indian Lake Estates, FL 33855. Please print, complete, and sign the form that is linked to here and shoot us a scanned copy via email or a hard copy via snail mail to the PO Box above.
If you have any questions please feel free to contact me via e-mail or by phone this weekend at 863-692-0906.
Be sure to like and follow BAA on Facebook by clicking on the logo link upper right. Tanks a stack!
Support the BAA Blog. Support the BAA Bulletins: Shop B&H here!
We want and need to keep providing you with the latest free information, photography and Photoshop lessons, and all manner of related information. Show your appreciation by making your purchases immediately after clicking on any of our B&H or Amazon Affiliate links in this blog post. Remember, B&H ain’t just photography!
Amazon Canada
Many kind folks from north of the border, ay, have e-mailed stating that they would love to help us out by using one of our affiliate links but that living in Canada and doing so presents numerous problems. Now, they can help us out by using our Amazon Canada affiliate link by starting their searches by clicking here. Many thanks to those who have written.
Typos
In all blog posts and Bulletins, feel free to e-mail or to leave a comment regarding any typos, wrong words, misspellings, omissions, or grammatical errors. Just be right. 🙂




Hi, Artie. Would I have kept that image? Of course I would have! Should you have? Well, that depends on what’s in your files already, doesn’t it? I’ve just been going through old hummingbird shoots and deleting many images I kept before I’d got so many better ones. But I think the optimized image makes the above moot; I think anyone should have kept it. Now, some heresy. Given the richness of files from cameras like yours, and the power of post-processing programs, one full stop of under-exposure (or over-exposure) really isn’t fatal. Of course one should get it right in the photograph, but you’ve proved my point above. As for the clutter, the only thing I’d have been really bothered by is the little stick the bird seems about to sit on… Thanks, as always, for your wonderful examples and making us think.
Don’t forget, I kept it 🙂 artie
Artie, you said “In Av mode two counter-clockwise clicks of the thumb wheel gets you two clicks darker (by setting a smaller aperture)”
Did you mean the finger wheel (which changes the aperture in Av mode) or are you referring to accidentally taking the exposure compensation (thumb wheel in Av mode) down 2 clicks? In manual mode 2 ccw clicks on the thumb wheel would open the aperture 2 stops, while 2 ccw clicks of the exposure compensation would only bring you down 2/3 of a stop (depending on how you have those clicks set I suppose; mine is 1/3 per click). If you had the EC set to the right anyway this image shouldn’t have come out so underexposed, should it?
Sorry, not trying to be a nit-picker but I’m confused.
Sean
Hi Sean, You did catch one good error. With regards to “two counter-clockwise clicks of the thumb wheel in Av mode” I correct that to this:
In Av mode two counter-clockwise clicks of the thumb wheel gets you two clicks darker (by setting a faster shutter speed in response to the 2/3 stop of negative exposure compensation that you dialed in)….
You should have your camera set up so that one click of anything represent 1/3 stop not 1 full stop as your comment seems to indicate….
Furthermore, by default, turning the thumbwheel counter-clockwise while in Av (or Tv mode) will make the image darker (not lighter…)
I appreciate your bringing my original error to light but now you need to go back and re-think the rest :). So thanks! artie
Thanks. So (and bear with me because I’ve never had any photography training) when I’m in Manual mode at f3.5 and I move the thumb wheel 2 clicks counterclockwise to f2.8, that doesn’t mean 2 stops more light? How can you set the clicks of aperture change to be 1/3 of a stop? I do find the whole thing fairly confusing but I can usually blunder through by trial and error. I’m lucky that I’m not learning with film; back in the film days I was purely a point-and-shoot guy 🙂
Artie in DPP 4 I am of the impression that the NR sets itself automatically according to ISO used. Do you always adjust the noise manually??
Hi Jon, DPP does suggest both NR settings but a quick experiment this morning showed that the results are dependent on several other factors not just the ISO setting…. This is a topic that we will be exploring in depth in the new guide. artie
Personally, I like the shot, including the distracting bits left on the beach for realism. I often look at paintings of birds – JF Lansdowne and Audubon of course, I am often most impressed by the paintings with birds tucked among the clutter of a forest. They put me there in the moment. An interesting comment on the 400 vs 300 F4. I bought the 400 F5.6 several years ago based on your early book. I have both lenses but that 400 has been a constant and loved companion. One more thing. Should you have kept the image of the tern chick? I am sitting on a couch dealing with the side effects of chemotherapy. I really enjoyed the image – one of many bird images I will look at until I can grab my 400 again. So thanks for posting it. How important are imperfections when you have an image that puts the viewer on the beach to share a moment in a tern chick’s life?
Am sending love, strength, and energy. Good luck getting out again soon with your “toy lens.” If you would like to consider some alternative medicine routes to boosting your immune system shoot me an e-mail and I wlll put you in touch with Dr. Oliver.
Artie, you certainly did not screw up the new book by you and Denise. I downloaded it immediately and I am enjoying it. Your images are beautiful!
Thanks Catherine. I my memory serves me correctly we will see you on the Palouse IPT next June…. artie
Would you keep or delete the image above with all its flaws?
If this were my image, I’d keep it just for the space around the tern alone. Then after that I’d work on the exposure. If so far so good, I’d move onto other things like removing distractions, etc. Doug