The Streak Continues: 314
Yesterday was a typical day of work and relaxation with another nice 1/2 mile swim. I got out both morning and afternoon with the 7D II and enjoyed some bird photography in the sun. Today I drive over to St. Pete for the DeSoto In-the-field Meet and Greet afternoon Workshop followed by the DeSoto IPT. This blog post, the 314th in a row, took me about 3 hours to prepare. It was published just before 7:15am from my home in Indian Lake Estates, FL.
To show your appreciation for my efforts here, we do ask that you use our the B&H and Amazon affiliate links on the right side of the blog for all of your purchases. Please check the availability of all photographic accessories in the BIRDS AS ART Online Store, especially Gitzo tripods, Wimberley tripod heads, and the like. We sell only what I have used, have tested, and can depend on. We will not sell you junk. We know what you need to make creating great images easy and fun. And we are always glad to answer your gear questions via e-mail.
Fort DeSoto October Updates
The Friday Afternoon October 10 BAA Fort DeSoto In-the-Field Workshop meet-up is now sold out.
For information on the October Fort DeSoto IPT and the highest ever late registration discount please scroll down in this blog post.
Join us for a day on Saturday, Sunday, or Monday for $299 including lunch and image review. Or join us for a morning on Saturday, Sunday, or Monday for $199 including lunch and image review.
|
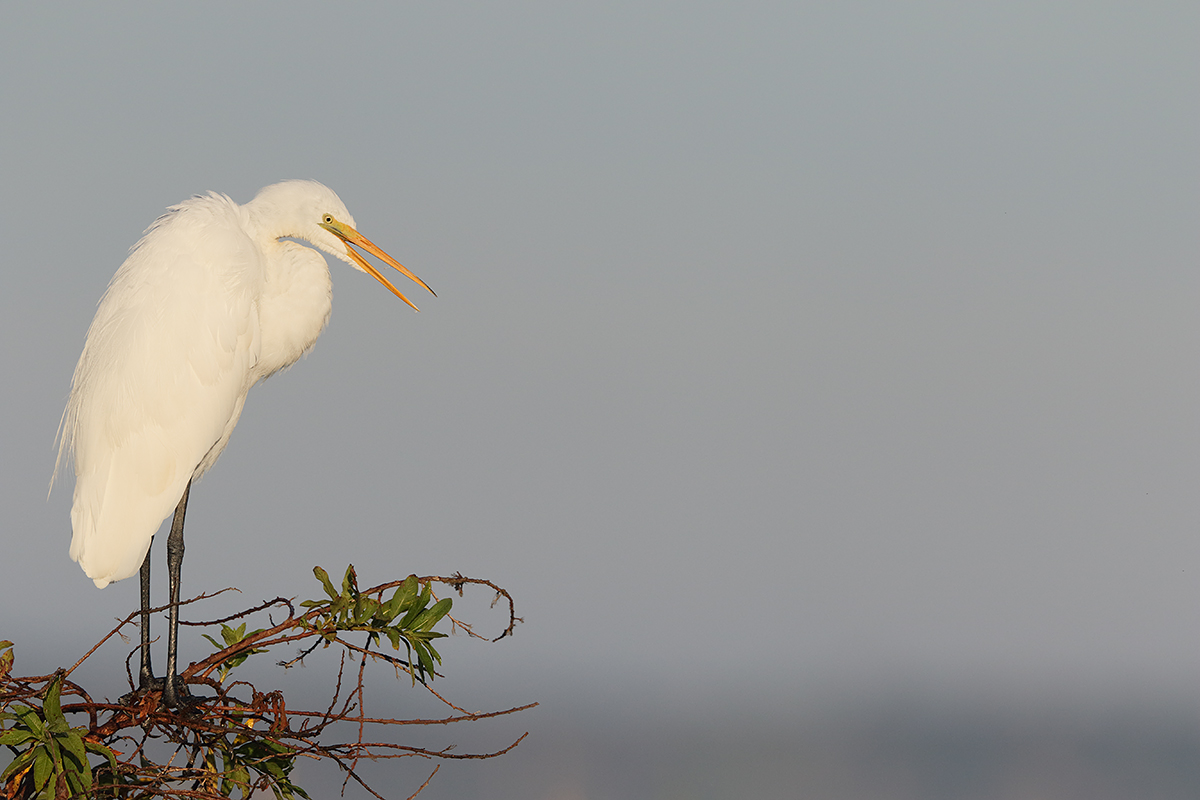
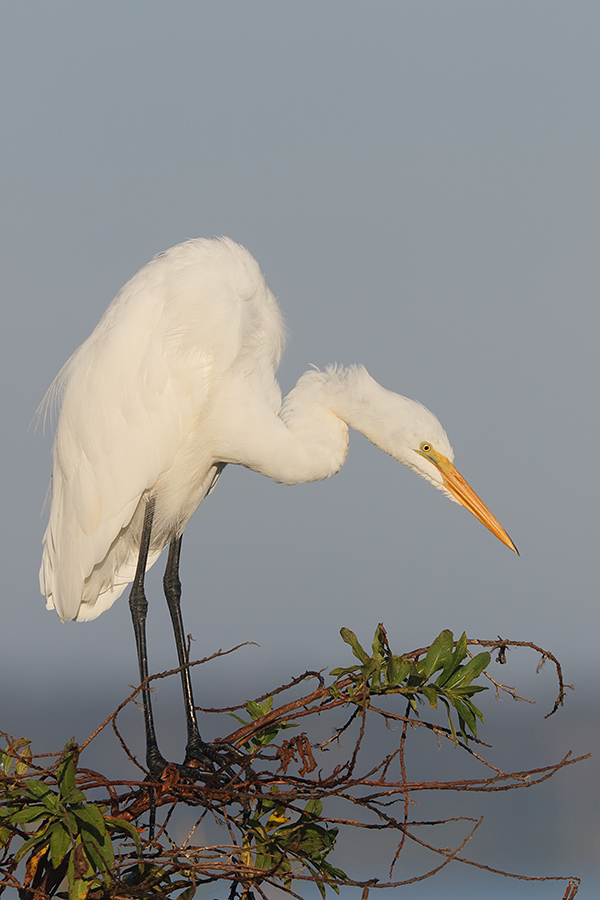
This Great Egret image was created at 8:04:02am on October 9, a clear sunny morning 2014 here at Indian Lake Estates. I used the Canon EF 600mm f/4L IS II USM lens, the Canon Extender EF 1.4X III, and a beta version of the Canon EOS 7D Mark II . ISO 400. Evaluative metering -1/3 stop as framed: 1/1600 sec. at f/7.1 in Manual mode. Four sensors to the left and two rows up from the central sensor/AI Servo/Rear Focus AF on the bird’s neck just below the chin was active at the moment of exposure. Click here to see the latest version of the Rear Focus Tutorial. Click on the image to see a larger version. From the Sequoia with the lens supported by the BLUBB (my custom-designed, hand made Big Lens Ultimate Bean Bag). When working on a beanbag with a long lens and re-composing be absolutely sure that the focusing ring does not rest on the beanbag lest you throw off accurate focus when re-composing. If that is unavoidable you must work in AI Servo AF with AF active at the moment of exposure as I did here. Image #1: Non-breeding plumage Great Egret laughing |
7D II Exposure Heads Up
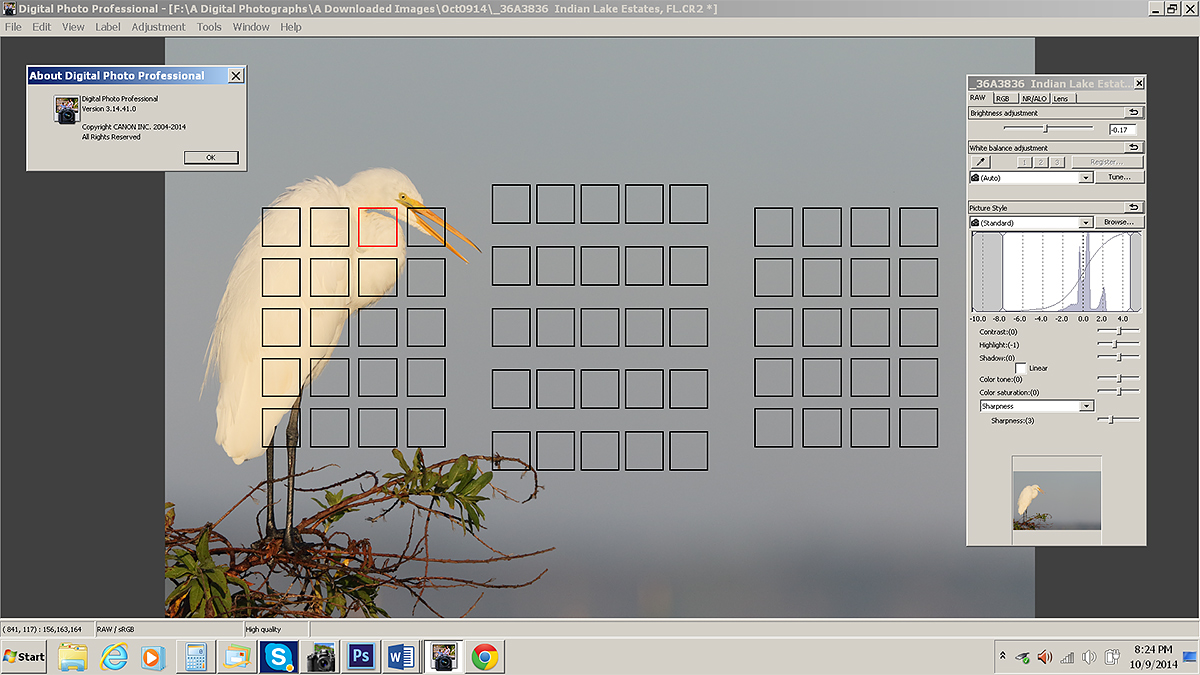
I learned quickly that in many situations the 7D Mark II needs less light for a proper exposure than either the 1D X or the 5D III. Just forty minutes after sunrise +2/3 stop would have been perfect with either the 1D X or the 5D III yet -1/3 here left me with some RGB values for the WHITEs in the mid-240s. I’d prefer them no higher than the mid-230s. Check out Brightness and Highlight sliders in the DPP v3.14.41.0 screen capture below to see how I toned down the WHITEs.
|
This is the DPP 3.41.14.0 screen capture for today’s opening image. |
Digital Photo Professional 3.14.41 Updater
The screen capture above shows that from side to side the 7D II has the widest AF array of any Canon digital camera body ever. And for whatever reasons the outer AF points function seemingly as well as the central sensor. The new wide array allows you to place your subjects pretty much as far off center as you wish.
The latest version of DPP is V3.14.41; it will support 7D Mark II files. It is currently available for download here. Click on Drivers and Software and then on Software. Then click directly on the Digital Photo Professional 3.14.41 Updater for Windows (or Mac), check the Disclaimer box, and then click on the Download arrow. When the file is downloaded double-click on it and follow the prompts.
Note: if you do not have a previous version of DPP 3.whatever installed you will need to either download the entire software suite or first install any prior version of DPP to install DPP 3.14.41 from scratch. There is a version of DPP on the CD that came in the box with your Canon digital camera.
As I understand it, the word from Canon Japan is that DPP 4.0 will not supportEOS-7D Mark II image files….
|
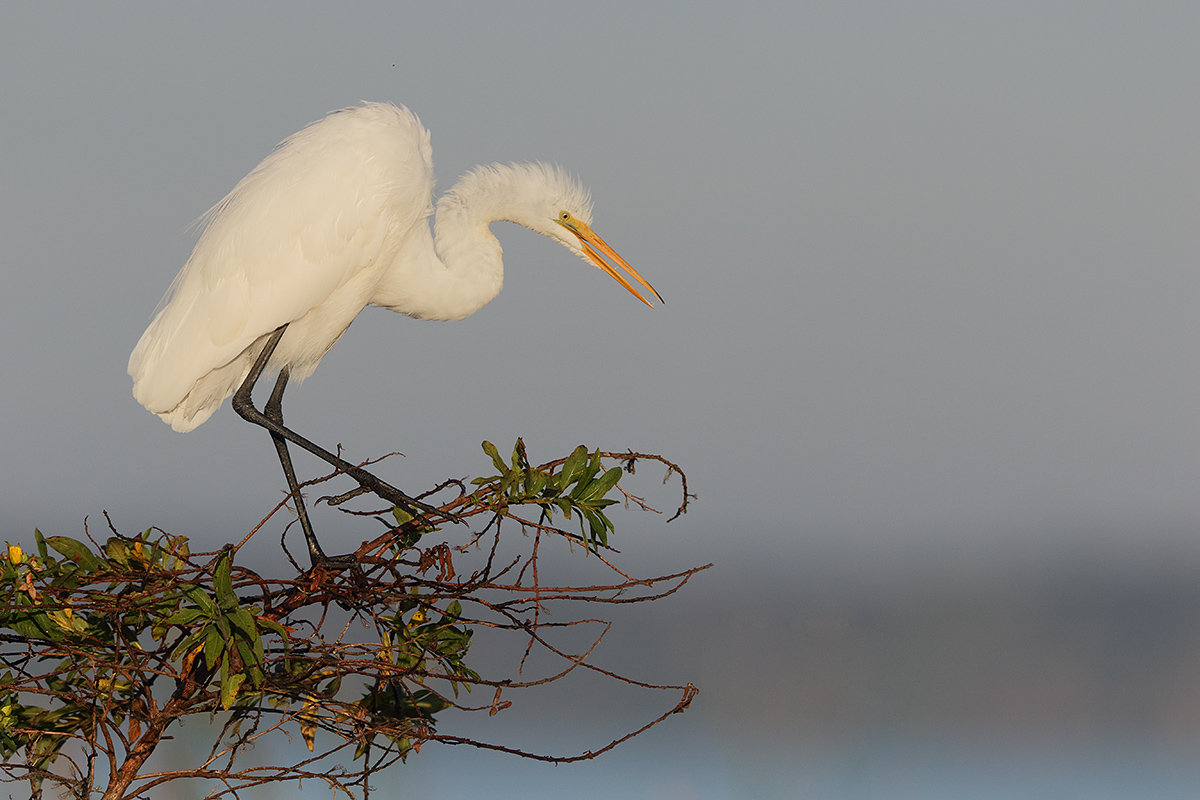
This Great Egret image was created 20 seconds later at 8:04:22am on October 9, a clear sunny morning 2014 here at Indian Lake Estates. Again I used the Canon EF 600mm f/4L IS II USM lens, the Canon Extender EF 1.4X III, and a beta version of the Canon EOS 7D Mark II . ISO 400. Evaluative metering -1/3 stop as framed: 1/1600 sec. at f/7.1 in Manual mode. Three sensors to the left and two rows up from the central sensor/AI Servo/Rear Focus AF on the bird’s folded wing just behind the base of the neck was active at the moment of exposure. Click here to see the latest version of the Rear Focus Tutorial. Click on the image to see a larger version. From the Sequoia with the lens supported by the BLUBB (my custom-designed, hand made Big Lens Ultimate Bean Bag). When working on a beanbag with a long lens and re-composing be absolutely sure that the focusing ring does not rest on the beanbag lest you throw off accurate focus when re-composing. If that is unavoidable you must work in AI Servo AF with AF active at the moment of exposure as I did here. Image #2: Non-breeding plumage Great Egret leaning forward horizontal |
How to Handle “Too YELLOW”
YELLOWs, like REDs, often become over-saturated in early morning or late afternoon light and that was the case for the four images here. My solution? I put the whole image on a layer (Ctrl + J), opened Hue/Saturation on that layer (Ctrl + U), selected YELLOWs from the drop down menu, and moved the Saturation slider to about -25. The white feathers and the face and bill looked much better but the vegetation had lost its pop. Most folks do not realize that there is always a ton of YELLOW in the GREENs. I added a regular Layer Mask, chose a large, soft, brush, and painted the YELLOWs back into the GREENs.
Additional Image Optimization
I did some Eye Doctor work on each image by painting a small Quick Mask and then pulling down the Curve (Ctrl + M) to darken the pupil. In addition, I used the Quick Selection Tool (my keyboard shortcut W–I use M for the Magic Wand Tool) to select the eyes, lores, and bill of each bird, put the selection on a layer (Ctrl + J), and then applied a Contrast Mask to selectively sharpen the layer.
The DPP RAW Conversion Guide
To learn why I use Canon’s Digital Photo Professional (DPP) to convert every image that I work on, click here. The current guide will teach you how to best convert all of your Canon images in all 3 point something versions of Canon Digital Photo Professional including the current v.3.14.41.0.
Coming soon: The DPP 4.0 RAW Conversion Guide by Arash Hazeghi and Arthur Morris. The more that I use DPP 4.0 for my 1D X and 5D III RAW conversions the more I learn about it. And the more I learn about it the more I am impressed with it. Note: at present, DPP 4.0 will work only with 1D X, 5D III, and 6D images. Scroll down for the latest DPP/7D Mark II info.
Digital Basics
Everything that I did to optimize today’s image is covered in detail in my Digital Basics File–written in my easy-to-follow, easy-to-understand style. Are you tired of making your images look worse in Photoshop? Digital Basics File is an instructional PDF that is sent via e-mail. It includes my complete digital workflow, dozens of great Photoshop tips (including Surface Blur settings), details on using all of my image clean-up tools, the use of Contrast Masks, several different ways of expanding and filling in canvas, all of my time-saving Keyboard Shortcuts, Quick Masking, Layer Masking, and NIK Color Efex Pro basics, Digital Eye Doctor, Tim Grey Dodge and Burn, how to create time-saving actions, and tons more.
APTATS I & II
Learn the details of advanced Quick Masking techniques in APTATS I. Learn Advanced Layer Masking Techniques in APTATS II. Mention this blog post and apply a $5 discount to either with phone orders only. Buy both APTATS I and APTATS II and we will be glad to apply at $15 discount with phone orders only. Please call Jim or Jennifer at 863-692-0906 weekdays to order.
|
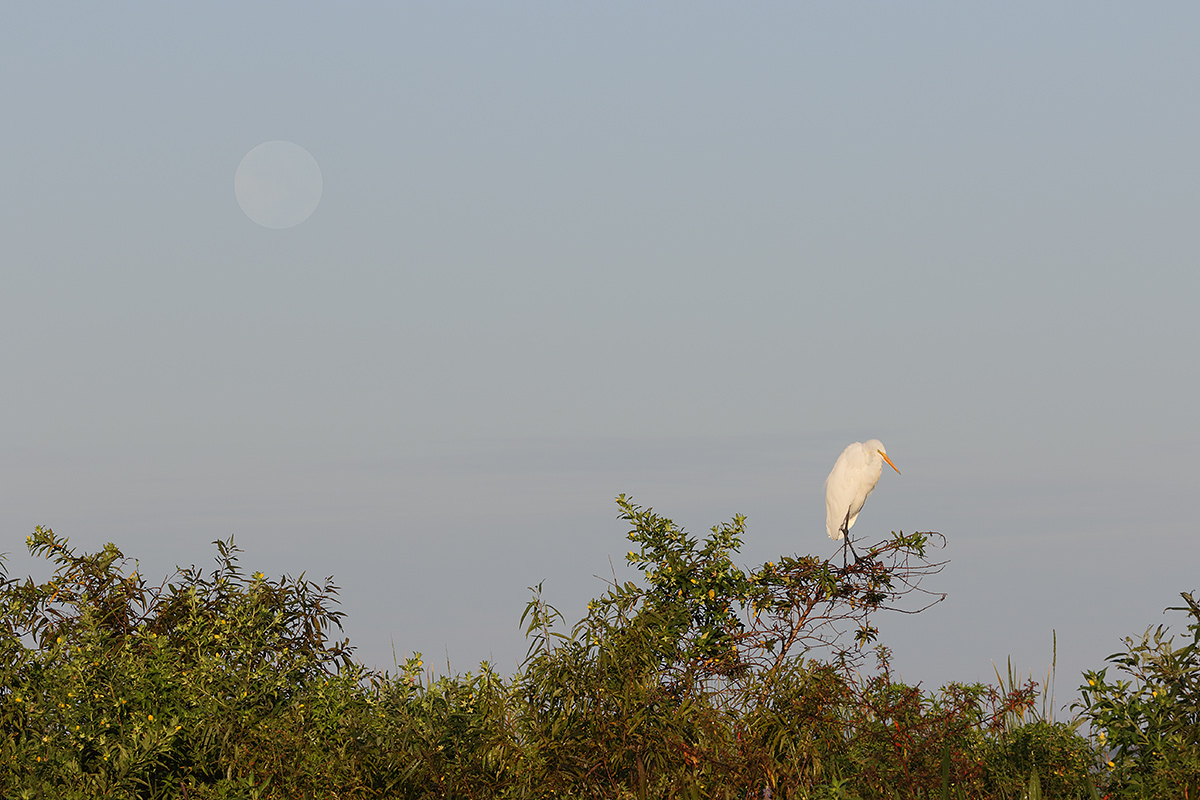
This Great Egret image was created at 8:09:33am on October 9, a clear sunny morning 2014 here at Indian Lake Estates. I used the Canon EF 70-200mm f/2.8L IS II USM lens (hand held at 200mm) and a beta version of the Canon EOS 7D Mark II . ISO 400. Evaluative metering at zero as framed: 1/400 sec. at f/14 in Manual mode. Central sensor/AI Servo Surround/Rear Focus AF on the bird and recompose. Click here to see the latest version of the Rear Focus Tutorial. Click on the image to see a larger version. Image #3: Non-breeding plumage Great Egret and full moon
|
Full Moon Trick
When you find it necessary to select a perfect full moon for whatever reason, use the Elliptical Marquee Tool and hold the Shift key down to produce a perfect circle….
Here, I darkened the sky with a Curves adjustment on a layer but that left the moon too dark. I added a Regular Layer Mask and used a hard brush at 20% opacity to lighten the moon one click. That worked perfectly but I was not happy with the edges of the circle. To rectify that situation I selected the moon with the Elliptical Marquee Tool as described above, placed that selection on its own layer, went back to my Background layer, used a large soft Clone Stamp Tool brush to get rid of the original misshapen moon, and then moved the new full moon back to its original position. Much much better.
As usual, all of the techniques that I used are described in detail in my Digital Basics File.
|
This Great Egret image was created at 8:14:31am on October 9, a clear sunny morning 2014 here at Indian Lake Estates. I used the Canon EF 600mm f/4L IS II USM lens, the Canon Extender EF 2X III, and a beta version of the Canon EOS 7D Mark II . ISO 400. Evaluative metering at zero as framed: 1/320 sec. at f/16 in Manual mode. Central sensor (by necessity)/AI Servo Expand/Rear Focus AF on the middle of the lowest curve of the bird’s neck was active at the moment of exposure. Click here to see the latest version of the Rear Focus Tutorial. Click on the image to see a larger version. From the Sequoia with the lens supported by the BLUBB (my custom-designed, hand made Big Lens Ultimate Bean Bag). When working on a beanbag with a long lens and re-composing be absolutely sure that the focusing ring does not rest on the beanbag lest you throw off accurate focus when re-composing. If that is unavoidable you must work in AI Servo AF with AF active at the moment of exposure as I did here. Image #4: Non-breeding plumage Great Egret leaning forward vertical |
Compositional Principles
Consider the image design for each of today’s photographs. I began with the window of my Sequoia raised too much. That left a pretty large strip of lake below the dark strip that was the distant shore on the other side of the lake. You can see a bit of that in image #2 and just a hint of it at the bottom of the frame in Image #4. What to do? I simply lowered the window so that the lens was pointing more up. This eliminated the large strip of lake that had been at the bottom of the frame. I love the amount of the dark strip in Image #1. Many folks don’t like it when I include a strip of this or that in the frame to act as somewhat of a border. But I do and that is all that matters to me. You are the artist. Only you get to make the compositional choices. Also with regards to Image #1, I love the new wide array for AF sensors in the 7D II as they open up many more image design options while allowing you to keep AI Servo AF active.
Comparing Images #1 and #2 note that as the bird changed its position by learning forward, I opted to re-design the image by pointing the lens down. That I was able to include all of the the curved branch at the bottom center of the frame with a small border was a big plus. It took me nearly ten minutes to spot the setting full moon but once I did I grabbed the 70-200, mounted the 7D II on it, got out of the SUV very slowly and made about six images. The design choice here is obvious to the experienced eye. With the bird in the lower right corner and the moon in the upper left, perfect compositional balance was achieved. The result was a diagonally balanced rule of thirds composition.
Once I went to the 2X III TC I needed to go vertical in order to fit the bird in the frame. In retrospect I wish that I had pointed the lens down to include the curved branch that I mentioned above with a small border and to reduce the amount of sky above the bird.
Image Question
Why did I opt not to re-compose Image #4?
Improving Your Image Design Skills
To learn to create pleasingly designed images, look at as many good images as humanly possible. Study them. Ask lots of questions. Even better, learn the basics by studying Chapter Seven, Designing the Image, pages 102-113, in the original The Art of Bird Photography, (160 pages in soft cover). Next, master the principles detailed in Chapter II, Advanced Composition and Image Design, pages 164-254 in the single pages for easy reading version of The Art of Bird Photography II. ABP II: 916 pages, 900+ images on CD only. You can save $10 by ordering the two book combo.


7D Mark II RAW File Offer
If you would like to receive a link to one or more the RAW files for today’s featured images for inspection and study only, please send a Paypal to us at birdsasart@verizon.net for $5.00 each (to cover our handling costs) or give Jim or Jennifer a buzz at 863-692-0906 during weekday business hours with a credit card in hand. Whether by Paypal or phone be sure to specify which file or files you want by both Image # and name. We will send your links (s) via Hightail. You can then download and save the RAW file. Note: you may need to download and install DPP v3.14.41.0 in order to view the images and you will surely need to have that on your computer if you wish to convert them. Thanks to all who ordered yesterday’s RAW file. I will be offering additional RAW files in the coming days and weeks. Please note that all rights remain with Arthur Morris/BIRDS AS ART.
|
Obviously folks attending the IPT will be out in the field early and stay late to take advantage of sunrise and sunset colors. The good news is that the days are relatively short in October. Click on the composite to enjoy a larger version. |
Fort DeSoto Fall IPT/October 11-13, 2014. 3 FULL DAYs: $1099. Limit 8/Openings: 5.
$300 Last Minute Registration Discount!
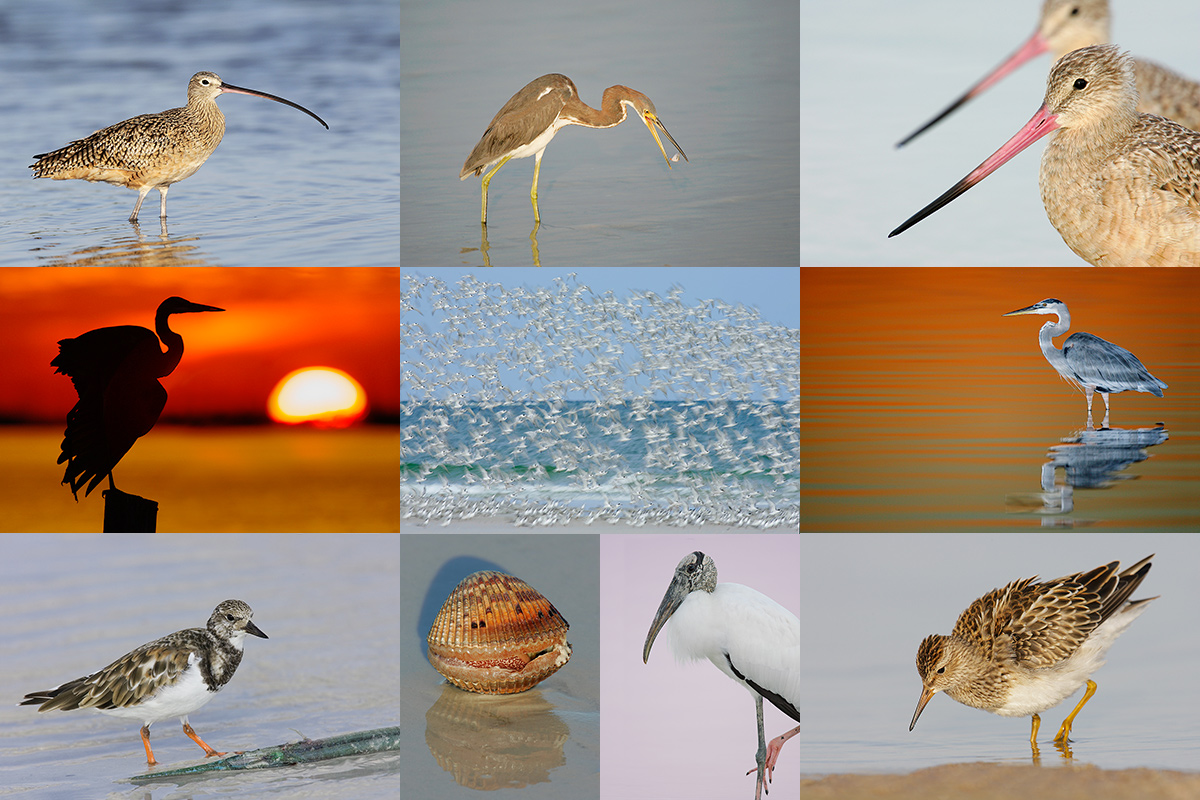
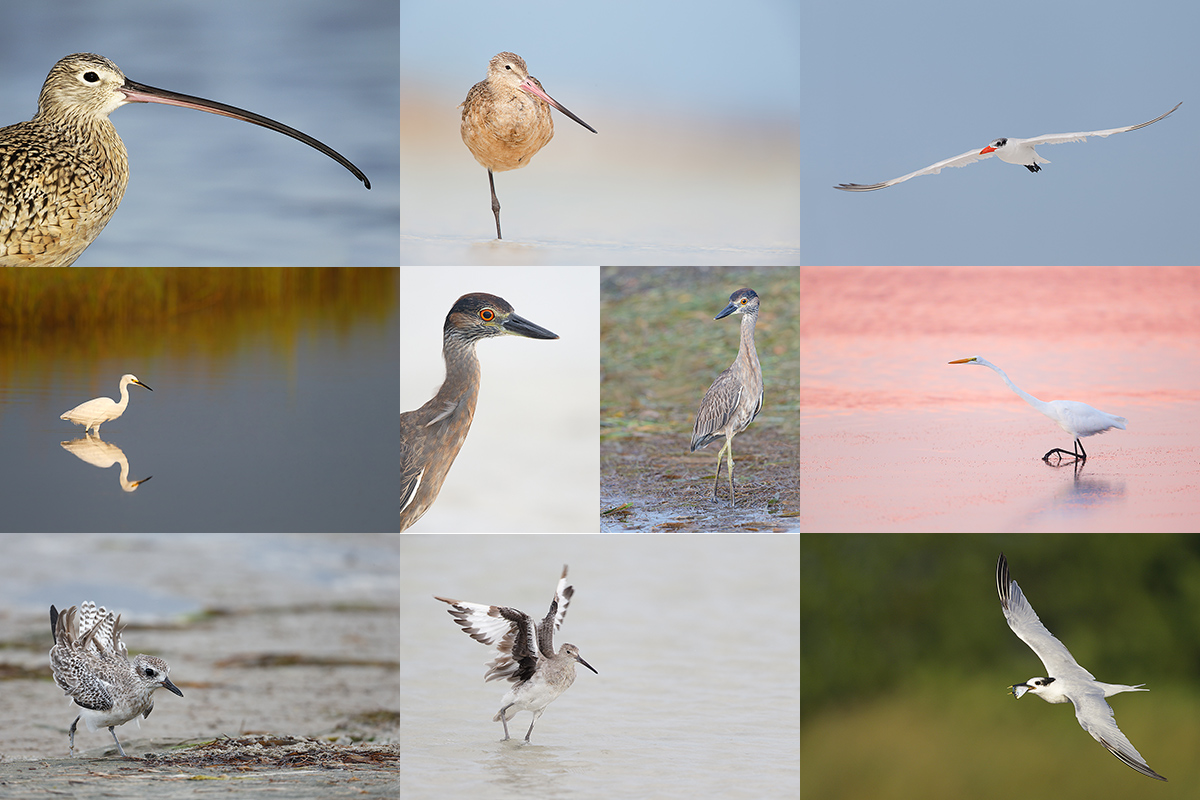
Fort DeSoto, located just south of St. Petersburg, FL, is a mecca for migrant shorebirds in fall. There they join hundreds of egrets, herons, night-herons, gulls, and terns who winter on the T-shaped peninsula that serves as their wintering grounds. With any luck, we should get to photograph two of Florida’s most desirable shorebird species: Marbled Godwit and the spectacular Long-billed Curlew. Black-bellied Plover and Willet are easy, American Oystercatcher likely. Great Egret, Snowy Egret, Great Blue Heron, and Tricolored Heron are easy as well and we will almost surely come up with a tame Yellow-crowned Night-Heron or two. We should get to do some Brown Pelican flight photography. And Royal, Sandwich, Forster’s, and Caspian Terns will likely provide us with some good flight opportunities as well. Though not guaranteed Roseate Spoonbill and Wood Stork would not be unexpected.
|
Fort DeSoto in fall is rich with tame birds. All of the images in this card were created at Fort DeSoto in either late September or early October. I hope that you can join me there this October. Click on the composite to enjoy a larger version. |
More on the DeSoto IPT
On the IPT you will learn basics and fine points of digital exposure and to get the right exposure every time after making a single test exposure, how to approach free and wild birds without disturbing them, to understand and predict bird behavior, to identify many species of shorebirds, to spot the good situations, to choose the best perspective, to see and understand the light, to, and to design pleasing images by mastering your camera’s AF system. And you will learn learn how and why to work in Manual mode (even if you’re scared of it).
At lunch (included) we will review my images–folks learn a ton watching me edit–why keep this one and delete that one. If you opt to bring your laptop, we will take a look at five of your best images from the morning session. We will process a few of my images in Photoshop after converting them in DPP. That followed by Instructor Nap Time.
If you decide to register and are traveling to attend this IPT, please make your reservations at the Beachcomber Beach Resort, 6200 Gulf Blvd, St. Petersburg (St. Pete Beach), FL 33706 (727-367-1902) as soon as possible as rooms for the weekend days are scarce: ARR: 10 OCT/DEP 14 OCT. I stayed there on my last DeSoto visit and was quite happy with it. Lodging is tough in Florida at this season…. The best airport is Tampa (TPA). It is always best if IPT folks stay in the same hotel so if you are interested it would be a good idea to register now and make your hotel reservations as well. We can, however, coordinate easily with local folks who opt to stay at home either by cell phone or e-mail.
Because of the relatively late date, payment is full is due upon registration either by check or credit card. If the former, please e-mail us immediately so that we can save you a spot. If the latter, please call Jim or Jennifer during weekday business hours at 863-692-0906 with a credit card in hand to register . Your registration fee is non-refundable unless the IPT sells out with eight so please check your plans carefully before committing. You will receive a confirmation e-mail with detailed instructions, gear advice, and first morning meeting place about one month before this IPT.
|
BAA Site Guides are the next best thing to being on an IPT. |
Fort DeSoto Site Guide
Can’t make the IPT? Get yourself a copy of the Fort DeSoto Site Guide. Learn the best spots, where to be when in what season in what weather. Learn the best wind directions for the various locations. BAA Site Guides are the next best thing to being on an IPT. You can see all of them here.
Be sure to like and follow BAA on Facebook by clicking on the logo link upper right. Tanks a stack!
Support the BAA Blog. Support the BAA Bulletins: Shop B&H here!
We want and need to keep providing you with the latest free information, photography and Photoshop lessons, and all manner of related information. Show your appreciation by making your purchases immediately after clicking on any of our B&H or Amazon Affiliate links in this blog post. Remember, B&H ain’t just photography!
Amazon.com
Those who prefer to support BAA by shopping with Amazon may use this link:
Amazon Canada
Many kind folks from north of the border, ay, have e-mailed stating that they would love to help us out by using one of our affiliate links but that living in Canada and doing so presents numerous problems. Now, they can help us out by using our Amazon Canada affiliate link by starting their searches by clicking here. Many thanks to those who have written.
Typos
In all blog posts and Bulletins, feel free to e-mail or to leave a comment regarding any typos, wrong words, misspellings, omissions, or grammatical errors. Just be right. 🙂



Dear Boys and Girls, When it says, “Central Sensor Surround” it should be clear that I chose the AF point. With the 7D II (and with previous bodies as well) the camera selects the active AF point or points only with the all points active AF Area Selection Mode or with Zone AF…. artie
Artie: I have the same question as the others; did the camera choose the AF point in the screen capture of the first image or did you? As for recomposing image #4, I can’t figure it out. You would have raised the dark horizontal part (water?) and got some more twigs, but I can’t see why that would have bothered you. I think if I’d been taking the photograph I might have gone back to a landscape orientation to give the bird more room in front of it (on the viewer’s right). I like the other images framed that way.
Just purchased The Art of Flower Photography. So many inspirational images. Thanks to you and Denise.
You are most welcome. Thanks for your kind words. And later and love, artie
Nice shots, but we know the 7D II is going to look good at 200-400 ISO. I want to see stuff shot at 800-3200 ISO. Thanks for all the work you do with putting these blogs together everyday.
Did you not recompose because the dark strip of land would have then been been cutting the image more toward the middle and through the beak of the bird? I’m assuming you mean recomposing before you took the photo and not recomposing after the fact in Photoshop adding canvas.
I am also curious if you are keeping all the focus points active and letting camera choose which points to use. I would think that would only be effective in certain situations where the bird is either in the sky or such as the image above where there is really nothing else in the frame besides the bird on the branch on one side of the frame. I’ve never had much luck letting my 60D choose focus points in flight shots.
Also watched a review by Scott Kelby and 2 other guys discussing the 7D and showing images. He used the camera at a football game and also showed wedding photos. He raved about the camera and was overjoyed with how little noise it has at high ISOs. He said the camera performed much better than he expected. Really is sounding like a great camera!
Thanks again Artie for reviewing this camera, it is much appreciated!
Hi Artie,
Thank you for sharing your observations on the new 7Dii as a camera for bird photography. Today’s post suggests that the light metering system might be smarter. Almost all the images that others have posted are JPEGs, so I’m anxious to learn what you think of the IQ and noise in RAW at ISO 3200 and below, relative to the 5Diii. Also, one of the bonuses of the 1.6x crop factor is that it allows folks to use the 300/2.8+2x, and the 400/5.6+1.4x which are more affordable L lenses. I do hope you will give those combos a spin while you have the camera. How fast and accurate is the AF with these combos relative to the 5Diii? Thank you and have a great day. Glen
No camera meter is as smart as a photographer who understands histograms and exposure theory…. 3200 and above??? I have posted one ISO 3200 image and will be sharing some more. I’d be glad to send you any 7D II RAW file after getting a $5 Paypal from you. Be sure to specify.
I would love to be able to test every Canon lens and teleconverter ever manufactured but I simply do not have the time. While I am deeply engrossed in testing the new camera I am trying not to miss to many potentially great images… artie
ps: AF speed is about the same as with the 5D III. But the AF system is better.
Why did you not re-compose #4? Because it is beautifully composed and needed no fussing. With the egret’s head and bill pointing down to the left and the foliage on the right coming up you have a beautiful, stable triangle happening in the photo. And if you trimmed some of the sky out of the top you would have lost the dynamic energy. Love your photos and always look forward to reading your blog.
Thanks but disagree. It would have been better for me with the bird higher in the frame. The question is why was I reluctant to recompose?
Thanks for your kind words.
I like the images very much, I am looking at the screen grab, it doesn’t look as though you have adjusted the blacks, is that right???
Thanks. I am confused as to why you would ask… artie
I am unclear on how you are using focus points. It reads like you are keeping all points active and letting the camera choose which points to use. Is this correct? If so, have you noticed AF actuation to be slowed down versus using a single AF point? Also, can the 7D2 be set up so the active AF point is bright red like in the 1D4? Thanks.
Loving your reviews of the 7D II, the intel and the images you are showing us.
As for picture #4, I’d say you didn’t recompose because the bird’s head and neck position guide the viewer to look down so that you didn’t need a landscape composition. That is my guess.
Best Regards!
Andre
Brazil
Thanks Andre. Good try from Brazil but nope :). Actually, putting the bird higher in the frame would have accentuated the fact that it was looking down….