What’s Up?
I enjoyed a nice swim but otherwise spent a good part of the day relaxing in front of the TV. I was glad that Notre Dame edged out a very game South Carolina team in the Women’s NCAA basket ball tournament. The Irish scored the winning basket with about ten seconds left in the game. Two Gamecock stars were left sobbing for a a good while after the final whistle. It is halftime in the second semi-final as I type with Connecticut up by 11 over Maryland so it looks like a Connecticut vs. Notre Dame final on Tuesday night. It is hard to imagine Connecticut losing.
In the Men’s final I am going with Wisconsin over Duke on Monday night.
This blog post was published very early on Monday morning while I slept. This one is 88 straight.
|
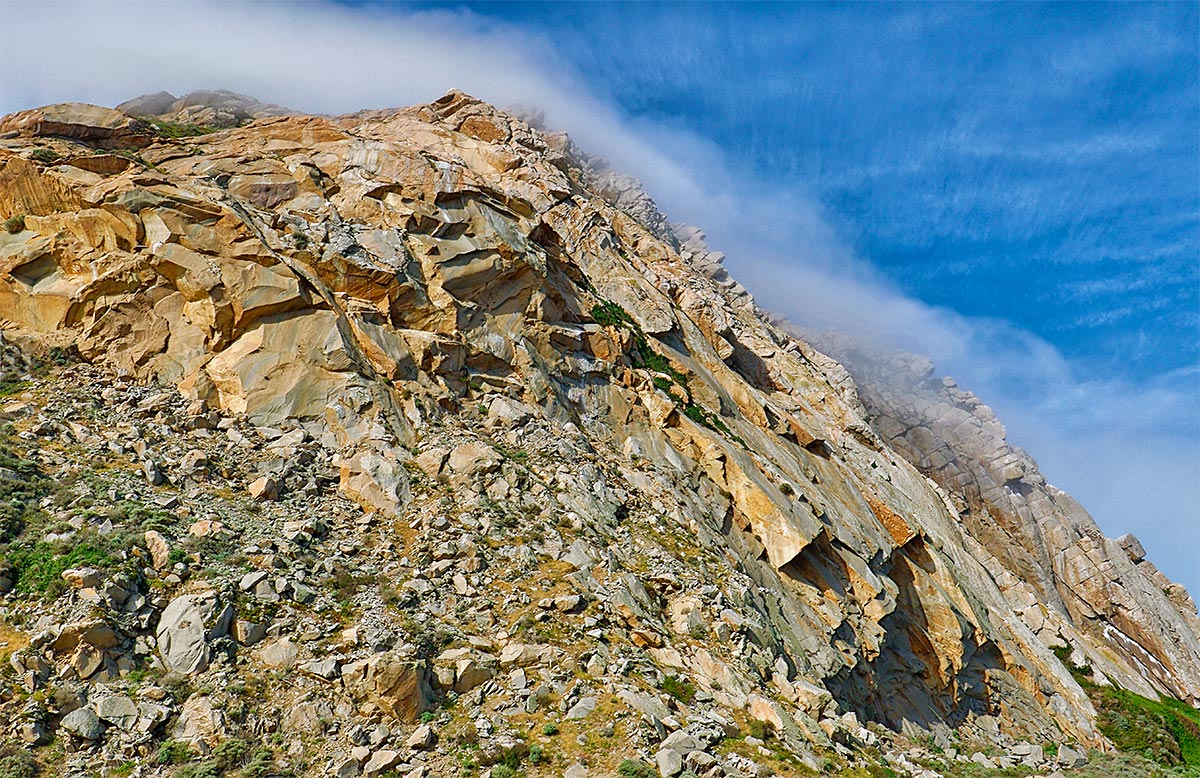
This in-camera HDR image was created at Morro Bay with the hand held Canon EF 16-35mm f/4L IS USM lens (at 16mm) and the amazing Canon EOS 7D Mark II. ISO 400. Evaluative metering +2/3 stop yielded a base exposure of: 1/100 sec. at f/22 in Av mode. AWB. With the 77mm Singh-Ray warming circular polarizer set to dark. Center AF point/AI Servo Expand/Rear Focus AF one-third of the way up the rock on the right side and re-compose. Click here to see the latest version of the Rear Focus Tutorial. Click on the image to see a larger version. Image: Morro Rock with fog. |
The Situation
At about 9:30am some heavy localized fog appeared in the immediate vicinity of Morro Rock. By 10am we were ready to head back but as we got in the vehicles some patches of blue sky began to show above the Rock. I thought that there might be a shot with some purple flowers in the foreground but that one did not work out; when we stopped we saw that there was a snow fence, too many signs, and a parking lot in the way. A few of the folks on the Canon Destination Workshop requested a potty stop. That brought us the parking lot just to the east of Morro Rock. By now only a bit of fog was left to crown the 21 million year old volcanic plug, one of the Nine Sisters formation.
The Problems
It was now 10:20am and the sun was out at full strength. The light was harsh, far less than ideal for landscape photography. But I had a plan to combat the contrasty light. I grabbed the 16-35mm, screwed on the Singh-Ray warming circular polarizer and set it to dark, and set up to make an in-camera Art Vivid HDR. Working a bit off sun angle I knew that the polarizer would juice up the sky nicely and that the warming filter would tame the harsh light just a bit. And the in-camera HDR would reduce the contrast by evening out the exposure.
As far as framing, when you photograph Morro Rock at close range you still have to deal with all manner of telephone poles, signs, cars, light stanchions, and the restrooms. If you head into town you face the same distractions and in addition you need to deal with a harbor full of fishing boats, sailboats, and other water craft. I got pretty close to the rock, zoomed out to 16mm, and opted to include the roof of a car in the lower right corner so that I could maximize the size of the green patch in that same corner.
HDR Tips
When hand holding for HDR remember to make sure that Auto Align is set to enable or your images simply will not align properly. And realize that when Auto Align is enabled that the image will be cropped about 4% from what you see in the viewfinder. Thus, you must frame a bit wider than if you were working on a tripod with Auto Align set to Off.
The Image Optimization
I brought the JPEG into Photoshop and executed the planned for crop from below and the left. Next I reduced the YELLOW saturation 10 points to negate a bit of the over-the-top colors that often come with an Art Vivid HDR. Next I ran my NIK Color Efex Pro 50-50 recipe to the whole image and painted out the effect on rock only at 33% via a Regular Layer Mask. Then I ran a layer of Filter > Blur > Surface Blur on the whole image, added a Hide-All (or Inverse) Layer Mask, and painted the effect in on the sky and the fog only, again with a large, soft brush. I eliminated a few patches of really bright Western Gull whitewash with the Patch Tool or the Spot Healing Brush. Not bad for bright sun and harsh light in mid-morning.
Image Question
Why should I have been on a tripod? (One reason is obvious, the other not so obvious.)
Digital Basics
Everything that I did to optimize today’s image is covered in detail in our Digital Basics File–written in my easy-to-follow, easy-to-understand style. Are you tired of making your images look worse in Photoshop? Digital Basics File is an instructional PDF that is sent via e-mail. It includes my complete digital workflow, dozens of great Photoshop tips, details on using all of my image clean-up tools, the use of Contrast Masks, several different ways of expanding and filling in canvas, all of my time-saving Keyboard Shortcuts, Quick Masking, Layer Masking, and NIK Color Efex Pro basics, Contrast Masks, Digital Eye Doctor techniques, using Gaussian Blurs, Tim Grey Dodge and Burn, a variety of ways to make selections, how to create time-saving actions, the Surface Blur (background noise reduction) settings, and tons more.
APTATS I & II
Learn the details of advanced Quick Masking techniques in APTATS I. Learn Advanced Layer Masking Techniques in APTATS II. Mention this blog post and apply a $5 discount to either with phone orders only. Buy both APTATS I and APTATS II and we will be glad to apply at $15 discount either with phone orders or here in the BAA Online Store. For phone orders, call Jim or Jennifer at 863-692-0906 weekdays.
|
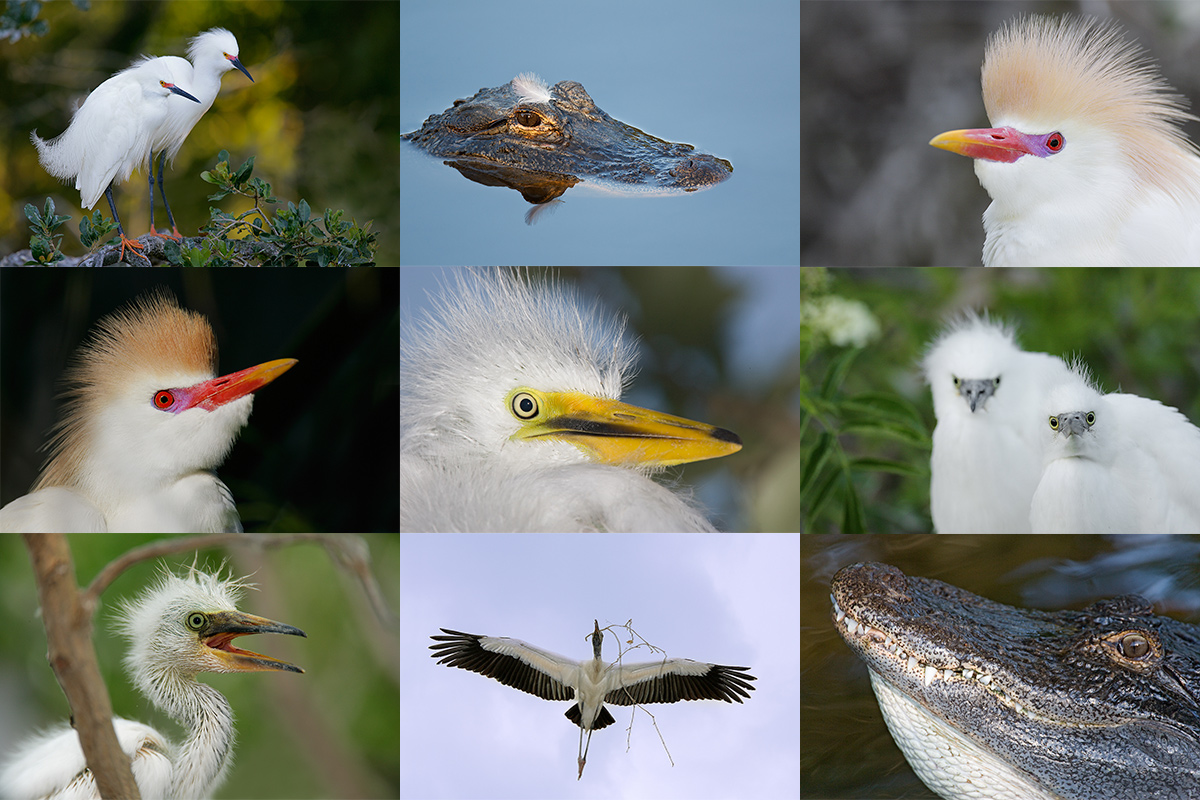
Clockwise from upper left to center: Snowy Egrets/breeding plumage pair, American Alligator with egret feather on head, Cattle Egret in breeding plumage (with fill flash), large Snowy Egret chicks, displaying gator, Wood Stork in flight carrying nesting material (fill flash), begging Snowy Egret chick, another Cattle Egret in breeding plumage (with fill flash), and Great Egret chick. |
Date Change: St. Augustine Alligator Farm Short-Notice Spoonbill and Wading Bird Chicks IPT: May 4-6, 2015.
St. Augustine Alligator Farm Short-Notice Spoonbill and Wading Bird Chicks IPT: May 4-6, 2015. TWO FULL and TWO 1/2 DAYS: $1099. Limit 8/Openings 5.
St. Augustine in early May is a bird photographer’s paradise. With any luck we should have chicks of all sizes in the nests ranging from newly hatched Snowy Egrets and Tricolored Herons to nearly fledged Great Egrets. More than a few pairs of Roseate Spoonbills have nested at the Alligator Farm for the past several years. Photographing the spoonbill chicks in the nest is a huge challenge…. With any luck we will encounter a few Snowy and Cattle Egrets in stunning breeding plumage. We should have lots of flight photography ops especially late in the day. We will enjoy extra early entry on our three mornigs. Folks who will need a photographer’s pass ($89.95 includes full season early entry and late stay and submission fees for up to 5 photos in their annual contest; this works out to cheaper than four separate entry tickets). We will have those ready for pick-up on the first afternoon.
|
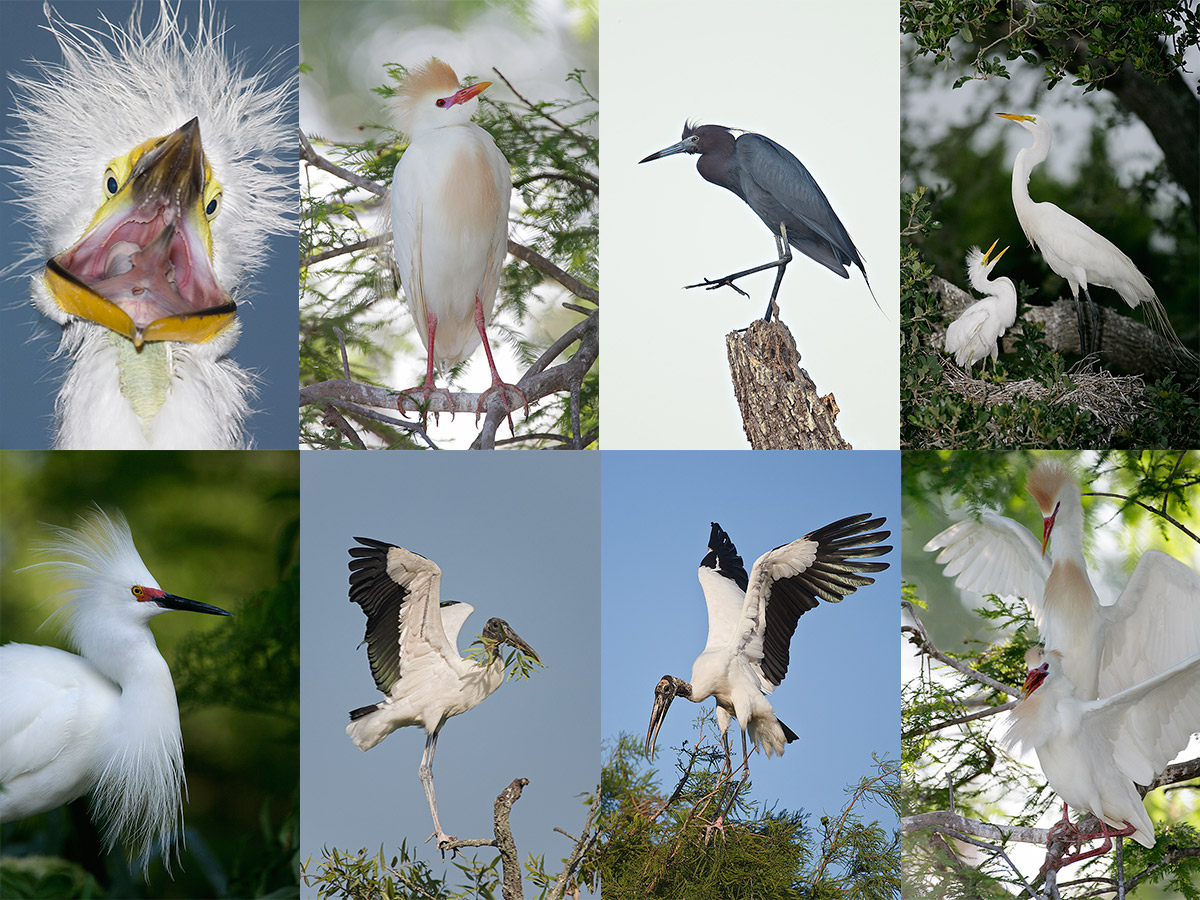
Clockwise from upper left: flash-as-main light Great Egret chick begging, breeding plumage Cattle Egret w/fill flash, Little Blue Heron, Great Egret chick in nest begging, Cattle Egrets copulating, Wood Stork with nesting material, another Wood Stork with nesting material, and breeding plumage Snowy Egret displaying. |
What You Will Learn
On this IPT you will the learn the basics and fine points of digital exposure and how to get the right exposure every time after making a single test exposure. You will learn to understand and predict bird behavior and to see and understand the light. You will learn to design pleasing images by mastering your camera’s AF system and how and why to work in Manual mode (even if you’re scared of it). Most importantly, you will learn to spot the good situations, to choose the best perspective. Rookeries are crowded, cluttered, white-washed places. Most folks who visit have no clue as to the difference of an image with tons of distractions and one with a clean line of sight and the best possible distant background. Join me and I will teach you to see like a pro.
I will be bringing my flash to the Alligator Farm (gasp!) I have not used flash for at least a year. I will be teaching you how to use flash as fill and how to use flash as main light. In addition, I will be reviewing the flash flight techniques that I developed at St. Augustine more than a few years ago.
|
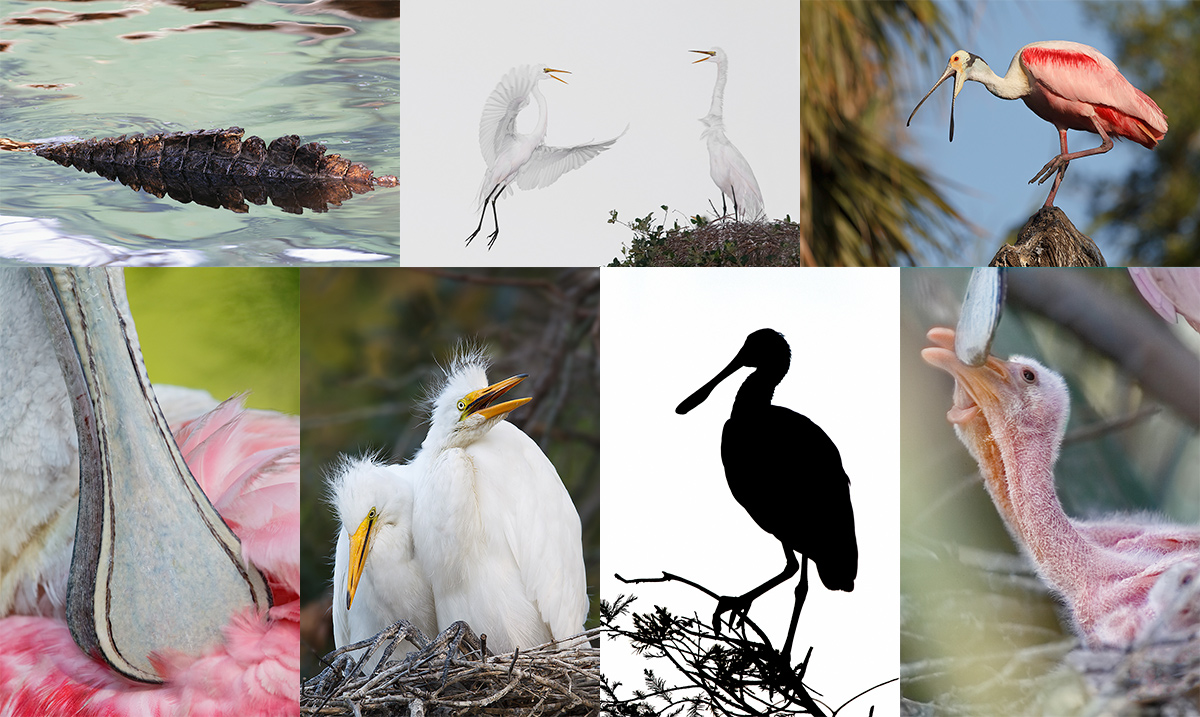
Clockwise from upper left: gator back, Great Egret returning to mate (with fill flash), Roseate Spoonbill with bill open, Roseate Spoonbill chick begging, Roseate Spoonbill 11am silhouette, large Great Egret chicks in nest, and bill of Roseate Spoonbill. |
Whats the Rest of the Deal?
Afternoon session on Monday, May 4. Then two full days with a morning and afternoon session each day, May 5 & 6. Then our last morning on May 7. At lunch on Tuesday and Wednesday (included) we will review my images; folks learn a ton watching me edit–why keep this one and delete that one? If you opt to bring your laptop, we can take a look at five of your best images from the morning or another session. We will process a few of my images in Photoshop after converting them in DPP. That followed by Instructor Nap Time.
A $499 non-refundable deposit is required to hold your spot. Your balance–$600, payable only by check, is due immediately. Please include a separate check for $89.95 so that we can purchase your pass in advance. Please click here to read our cancellation policy before committing. Then please print, read, and sign the necessary paperwork linked to here and get it to us. You can register by calling Jim or Jen at the office at 863-692-0906 and arranging for your deposit of $499. Balances are payable only by check. I hope to see you there.
Be sure to like and follow BAA on Facebook by clicking on the logo link upper right. Tanks a stack!
Support the BAA Blog. Support the BAA Bulletins: Shop B&H here!
We want and need to keep providing you with the latest free information, photography and Photoshop lessons, and all manner of related information. Show your appreciation by making your purchases immediately after clicking on any of our B&H or Amazon Affiliate links in this blog post. Remember, B&H ain’t just photography!
Amazon.com
Those who prefer to support BAA by shopping with Amazon may use this link:
Amazon Canada
Many kind folks from north of the border, eh, have e-mailed stating that they would love to help us out by using one of our affiliate links but that living in Canada and doing so presents numerous problems. Now, they can help us out by using our Amazon Canada affiliate link by starting their searches by clicking here. Many thanks to those who have written.
Typos
In all blog posts and Bulletins, feel free to e-mail or to leave a comment regarding any typos or errors. Just be right :).


I think I see just a bit of ghosting along the rock edges. If so, that would mean the handheld camera moved a smidgen during the bracketing and a tripod would have avoided that.
Hi Artie, Obvious reason is so the three images taken for HDR will more easily align without losing the edge crop so much.
Hi David, That is not exactly true…. That only happens if you remember to disable Auto Align….
I believe the second less obvious reason is that using your tripod would help you to frame or compose the subject more accurately.
For sure, but that would be #3 for me… Everyone is missing the most obvious; look at the shutter speed and ask yourself, What will happen to the shutter speed during the bracketing? That should make the always obvious answer more obvious.
With so many distractions to eliminate from the frame and going wide with that lens I think it may have been tricky to get a clean frame.
Getting close helped with that.
Reminds me of solving simultaneous equations at school.
🙂
Why did you elect not to use it ? Now there’s a question. Time perhaps? Was the bus waiting for you? Or convenience?
Perhaps it was just easier and quicker to get your frame without the tripod getting in the way.
All of the above but mostly laziness. I was the leader of the caravan but most of the group was in the john.
My two cents. Regards, David
Much appreciated. Thanks for stopping by. Be sure to visit off. later and love, artie
Reason to be on a tripod? 1st obvious reason is to keep the composition framing exactly the same. Less obvious reason? Focus drift, I’d say. Meaning that you should set your point of focus then switch your lens to MF. You also typically want to choose a set WB rather than AWB for all the shots. But I’m not familiar with in-camera HDR and that point may not be relevant.
Thanks Bill. You missed the #1 reason to be on a tripod and touched on the other but only barely :). Using rear focus achieves the same thing as turning off AF…. You WB suggestion pano is correct when you are creating stitched panos but does not affect in-camera HDRs. See you somewhere soon! artie