Stuff
I enjoyed an excellent cloudy Sunday morning on my my recent Fort DeSoto busman’s holiday, left early, and made it home for all the NFL games and my 48 length swim. Today I will be working on some BPN stuff and getting back to work on the 5D Mark IV User’s Guide. Lots more tomorrow on the The LensAlign/FocusTune Micro-Adjusting Tutorial e-Guide.
For Billy Joel/Beatles Fans
Want goose pimples, and maybe a few tears of joy and happiness? Click here to learn the backstory of Paul McCartney making it to Billy Joel’s Last Play at Shea concert at the last minute.
The Streak
Today makes eighty-eight days in a row with a new educational blog post! This blog post took less than an hour to prepare. With all of my upcoming free time (or not…), the plan right now is to break the current record streak of (I think) four hundred eighty something … Good health and good internet connections willing.,
Booking.Com
Booking.Com came through for me twice again recently with both the DeSoto Fall IPT and next July’s UK Puffins, Gannets, and Bempton Pre-trip room reservations. And all the rates were great. If you’d like to give Booking.Com a shot, click here and you will earn a $25 reward. Thanks to the many who have already tried and used this great service.


Gear Questions and Advice
Too many folks attending BAA IPTs and dozens of folks whom I see in the field, and on BPN, are–out of ignorance–using the wrong gear especially when it comes to tripods and more especially, tripod heads… Please know that I am always glad to answer your gear questions via e-mail.
The LensAlign/FocusTune Micro-Adjusting Tutorial e-Guide
If you missed the announcement of the The LensAlign/FocusTune Micro-Adjusting Tutorial e-Guide, click here.
|
|
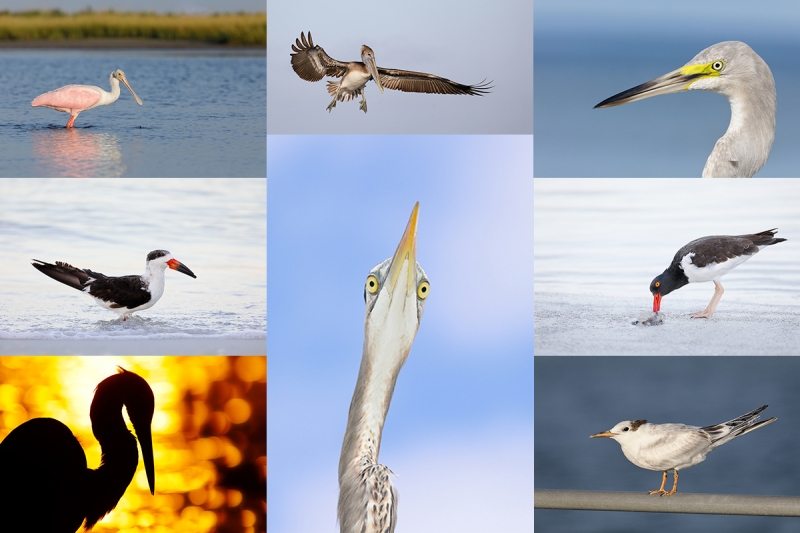
Very Recent Fort DeSoto ImagesFrom bottom left clockwise back to center: Great Egret, blasting sunrise highlights; Black Skimmer, winter plumage in pre-dawn light; Roseate Spoonbill foraging; Brown Pelican, juvenile landing; hybrid heron X egret; American Oystercatcher feeding; Royal Tern, worn juvenile; Great Blue Heron from below. |
Cheap Weekend Fort DeSoto In-the-Field Instruction
Saturday, October 28, 2017: Morning session — 6:45am for 3 1/2 hours: $149. Add lunch, image review, and Photoshop session: $249 (total).
Saturday, October 28, 2017: Afternoon session — 4:00pm for 3 1/2 hours: $99.
Saturday October 28, 2017, both sessions including lunch: $329.
Sunday, October 29, 2017: Morning session — 6:45am for 3 1/2 hours: $149.
Learn to see the great situations, get the right exposure every time (even when photographing into the blasting highlights!), to approach free and wild (and often tame!) birds, and to design pleasing images. Learn the location of my new Fort DeSoto hotspot and my favorite sunset spot. To register call Jim or Jen at 863-692-0906.
Canon lens rentals are available on a limited basis. Cheap but great instruction.
|
|
|
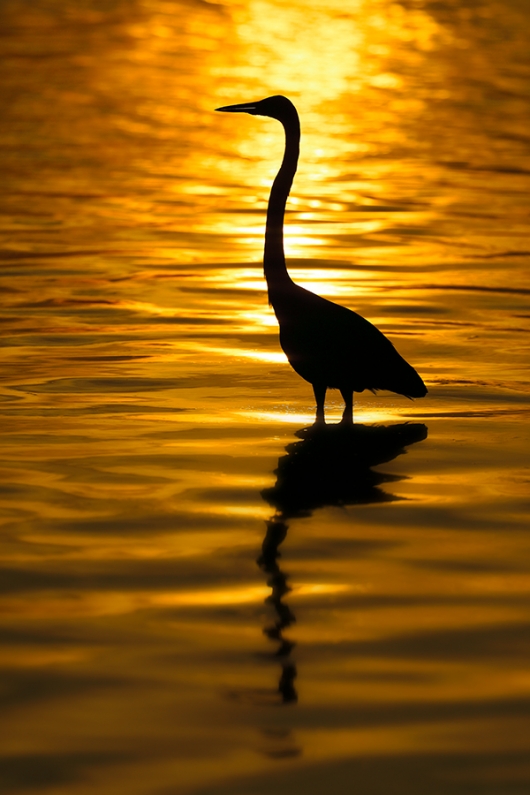
This image was created at Fort DeSoto on the late afternoon of Friday, October 20 with the hand held Canon EF 100-400mm f/4.5-5.6L IS II USM lens, the Canon Extender EF 1.4X III (at 401mm), and my favorite bird photography camera body, the Canon EOS 5D Mark IV. ISO 200. Evaluative metering -3 stops: 1/8000 sec. at f/7.1 in Manual mode. WB: K8000. LensAlign/FocusTune micro-adjustment: -1. Upper Large Zone AF/AI Servo/Shutter Button AF was active at the moment of exposure. The system selected a single AF point two rows up from the center AF point that caught the edge of the bird’s upper breast (as originally framed). Image #1: Great Egret sunset silhouette |
The Silhouette Situation
As I pulled into my favorite and secret sunset spot at DeSoto I was thrilled to see a Great Egret fishing in the still water in an opening between the mangroves. I drove past the bird, hung a quick U-ie, and re-positioned my SUV. I did an exposure check, went darker, and framed up a lovely image. Just as I went to push the shutter button after acquiring focus, the battery died. All of my spares were in the back of the car so I backed up behind the mangroves to avoid scaring the bird, got a fresh battery, drove back to the opening, and got back to work. After a bit I felt that the bird was tame enough for me to get out of the vehicle and enjoy some additional freedom. I was right. My two favorites, shared with you here today, were made while I was on foot. Note again how effective Upper Large Zone can be for verticals.
|
|
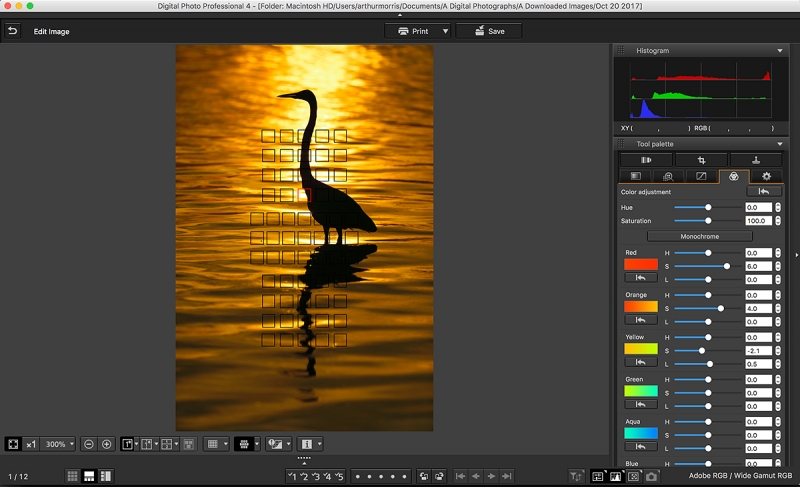
DPP 4 Adjust image colors tab |
A Rarely Used DPP 4 Tab
It is not often that I open the Adjust image colors tab in DPP 4. The problem was that brightest WHITE highlights in the swath behind the bird’s head and neck were all at 255, 255, 255. This is not a deal breaker in situations like this but I wanted to see if I could tone them down a bit. First I dragged the Color fine tune dot a bit toward BLUE but that did not help much. Nor did moving the Highlight slider to -2. So I tried the rarely used Adjust image colors tab; it took quite a bit of experimenting. The key move was to move the YELLOW saturation slider to -2.1. This really muted the colors. Though I am not sure why, this moved the RED histogram well to the left and away from the highlight axis. Once I did that I was able to boost the saturation in the REDs and ORANGEs and still keep the RED histogram just off of the axis. Success.
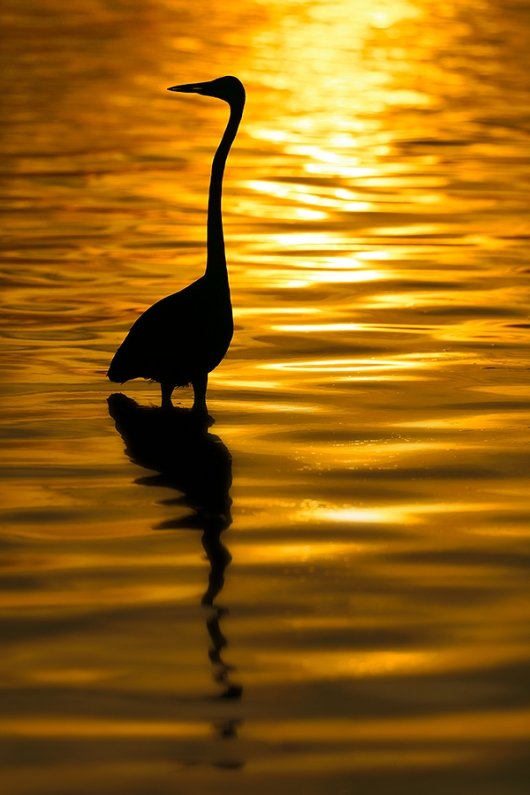
I copied the DPP 4 recipe from Image #1, pasted it into Image #2, and executed the second RAW conversion. Learn how and why I and other discerning Canon shooters convert nearly all of their Canon digital RAW files in DPP 4 using Canon Digital Photo Professional in the DPP 4 RAW conversion Guide here
Doing it in ACR
Folks using ACR (either in Photoshop or Lightroom) can make the same adjustments during (best) or after a RAW conversion. Click on the fourth tab from the left to open HSL/greyscale. The layout is a bit different as there are tabs for Hue, Saturation, and Luminance with the sliders for all the colors below.
|
|
|
This image was created at Fort DeSoto on the late afternoon of Friday, October 20 with the hand held Canon EF 100-400mm f/4.5-5.6L IS II USM lens, the Canon Extender EF 1.4X III (at 437mm), and my favorite bird photography camera body, the Canon EOS 5D Mark IV. ISO 200. Evaluative metering -2 1/3 stops: 1/8000 sec. at f/8 in Manual mode. WB: K8000. LensAlign/FocusTune micro-adjustment: -1. Upper Large Zone AF/AI Servo/Shutter Button AF was active at the moment of exposure. The system selected a single AF point that was two rows up ad two to the left of the center AF point that was squarely on the bird’s torso (as originally framed). Image #2: Great Egret sunset silhouette, looking back |
Both Image Optimizations
With each image, I spent a lot of time cleaning up the crud and specular highlights in the foreground. To cover my tracks, I first applied a 55 pixel Gaussian blur to the whole image and added an Inverse (Black or Hide-all) Layer Mask. Then I painted in the effect (B, D) in the top half of the image with a soft 100% opacity brush. Last I painted in half the effect (B, D) on the bottom half of the image with a soft 50% opacity brush. I did a much better job with the foreground in Image #1 than I did in Image #2. You can learn everything about my workflow and exactly how I optimize my images in The BIRDS AS ART Current Workflow e-Guide (Digital Basics II), an instructional PDF that is sent via e-mail.
The Stronger Image?
Which of today’s two featured images is the strongest? Please let us know why you made your choice. I feel that one of the images is far stronger than the other … Stay tuned.
If In Doubt …
If in doubt about using the BAA B&H affiliate link correctly, you can always start your search by clicking here. Please note that the tracking is invisible. Web orders only. Please, however, remember to shoot me your receipt via e-mail.


Please Remember to use my Affiliate Links and to Visit the New BAA Online Store 🙂
To show your appreciation for my continuing efforts here, we ask, as always, that you get in the habit of using my B&H affiliate links on the right side of the blog for all of your photo and electronics purchases. Please check the availability of all photographic accessories in the New BIRDS AS ART Online Store, especially the Mongoose M3.6 tripod head, Wimberley lens plates, Delkin flash cards and accessories, and LensCoat stuff.
As always, we sell only what I have used, have tested, and can depend on. We will not sell you junk. We know what you need to make creating great images easy and fun. And please remember that I am always glad to answer your gear questions via e-mail.
I would of course appreciate your using our B&H affiliate links for all of your major gear, video, and electronic purchases. For the photographic stuff mentioned in the paragraph above, and for everything else in the new store, we, meaning BAA, would of course greatly appreciate your business. Here is a huge thank you to the many who have been using our links on a regular basis and those who will be visiting the New BIRDS AS ART Online Store as well.
Amazon.com
Those who prefer to support BAA by shopping with Amazon may use the logo link above.
Amazon Canada
Many kind folks from north of the border, eh, have e-mailed stating that they would love to help us out by using one of our affiliate links but that living in Canada and doing so presents numerous problems. Now, they can help us out by using our Amazon Canada affiliate link by starting their searches by clicking here.
Be sure to like and follow BAA on Facebook by clicking on the logo link upper right. Tanks a stack.
Typos
In all blog posts and Bulletins, feel free to e-mail or to leave a comment regarding any typos or errors. Just be right :).


The first image is “classically” the better image, however I like the “looking back” image as my favorite. Who knows why, it just appeals to me. Maybe I’ll try to explain…..
It’s more off center visually than the first because of the turned back head, and the neck is very straight and parallel to the sides of the photograph. Just better for me. I don’t care about the crud in the water, in fact it kind of adds to the picture’s realism.
Time out: After a few minutes I got my Daughter to look to see which one she liked better, and she said the first. I asked why, and she said because the bird was in the path of the sun. Wow! am I an idiot? Why didn’t I see that first off!
Image #1 does it for me. I like the space the bird has to look into even though we can’t see his face, and the clincher is the contrast between the black head/neck and the bright golden sun reflection. #2 is nice, but the bird is no longer within the brightest part of the water, so you don’t have the same punch to the shot.
Agreed, #1 is the strongest composition of the two. Beautiful yellow/golds.
The hot links to the Lens Align info do not work for me….I get an error message. Anyone else having problems?
Thanks John, Not sure how I screwed that one up 🙂 I will fix it now and check it out.
with love, artie
I prefer Image #1 like the previous comments for the same reasons. I do like the brighter highlights around the head and neck in image #2.
I much prefer the first image. I agree with Jerry Fenwick and Elinor Ostrom. The bird in the second image seems to be drawing attention away from the loverly reflection by looking away from it.
Artie,
I like the first picture better. The reflection on the water highlights the bird rather than compete with it as it does in number 2. I also feel that the shape of the silhouette is more graceful.
My favorite is the image #1 with the head, neck and legs in the lightest area. It seems to be better balanced than the image with the bird looking back and emphasizes the bird as the subject. I do like the bird looking back–it’s a little more interesting pose but I’ll stick with image #1.