Stuff
After lunch on Saturday the weather was threatening so after a five minute pit stop at the motel we headed back out to make hay while the sun did not shine. We did well at several locations in a light but steady drizzle. We didn’t quit until after four pm. Then it was back to the motel for another hour of image review and Photoshop lessons.
On Sunday morning it was just Lee Sommie and me. The wind was howling from the north northwest with gusts higher than 40 mph. The Gulf seas were raging. There were few birds but the stormy skies were quite dramatic. I did Sea Oat blurs in the dark and and when things brightened up a bit I did Willet blurs and Laughing Gulls and Snowy Egrets with blurred wave backgrounds. Along with lots of slow shutter speed waves. And I played around with the circle lens, the Canon EF 8-15mm f/4L Fisheye USM lens.
We switched to a location that was more out of the wind and did well with some shorebirds until the sun broke through. Then it was wind against sun and time to drive home for and afternoon of NFL Sunday Ticket games and game 5 of the World Series.
An e-mail from Noel Heustis
I first met Noel on the beach during the Fort DeSoto Fall IPT. He was and is a nice young man and was very interested in learning bird photography despite his meager gear. The group and I befriended him. He wound up purchasing a 100-400 II and a 7D II. I was delighted that he was able to join us on Saturday. That evening I got this e-mail from Noel (one syllable).
Artie, Thank you! Thank you! Thank you! I had a great time yesterday. I was absolutely flooded with understanding, ideas, inspiration, and…a lot more questions. I think the most valuable takeaway I got from yesterday was learning to see different situations in the field, trying to photograph them myself, and then seeing your images of the same situation! Your ideas on getting the predawn Snowy Egret against the pink lighting in the water, or another one stretched out away from the rocks feeding in a horizontal position, and then seeing your treatment of the situation was amazing (especially as compared to my versions!)
Thank you for lunch as well. Great lunch, great place, great people, great stories. I loved seeing the process you go through from card reader to edits to DPP 4 to Photoshop. I will send a few edited images from my first week with the new set-up tomorrow. I’m excited to see some of the images the others got as well.
Your friend, Noel
More Cheap Weekend Fort DeSoto In-the-Field Instruction
If it Ain’t Broke, Don’t Fix It
Sign up for the full day Saturday and the Friday afternoon session is free!
Saturday, November 4, 2017: Morning session — 6:45am for 3 1/2 hours: $149. Add lunch, image review, and Photoshop session: $249 (total).
Saturday, November 4, 2017: Afternoon session — 4:30pm for 3 hours: $99.
Saturday, November 4, 2017, both sessions including lunch: $329. Sign up for the full day Saturday and enjoy a Friday afternoon session for free.
Sunday, November 5, 2017: Morning session — 6:45am for 3 1/2 hours: $149.
Learn to get the right exposure every time, to approach free and wild (and often tame!) birds, and to design a pleasing image. And learn the location of my new Fort DeSoto hotspot along with my favorite sunset location (sky conditions permitting). To register call Jim or Jen at the office at 863-692-0906 or shoot me an e-mail.
Canon lens rentals are available on a limited basis: 600 II, 500 II, 400 DO II, and 200-400 f/4 with Internal TC.
Cheap but great instruction.
The Streak
Today makes ninety-five days in a row with a new educational blog post! This one took two hours to prepare. With all of my upcoming free time (or not …), the plan right now is to break the current record streak of 480 … Good health and good internet connections willing.
Booking.Com
Booking.Com came through for me twice again recently with both the DeSoto Fall IPT and next July’s UK Puffins, Gannets, and Bempton Pre-trip room reservations. And all the rates were great. If you’d like to give Booking.Com a shot, click here and you will earn a $25 reward. Thanks to the many who have already tried and used this great service.


Gear Questions and Advice
Too many folks attending BAA IPTs and dozens of folks whom I see in the field, and on BPN, are–out of ignorance–using the wrong gear especially when it comes to tripods and more especially, tripod heads… Please know that I am always glad to answer your gear questions via e-mail.
|
|
|
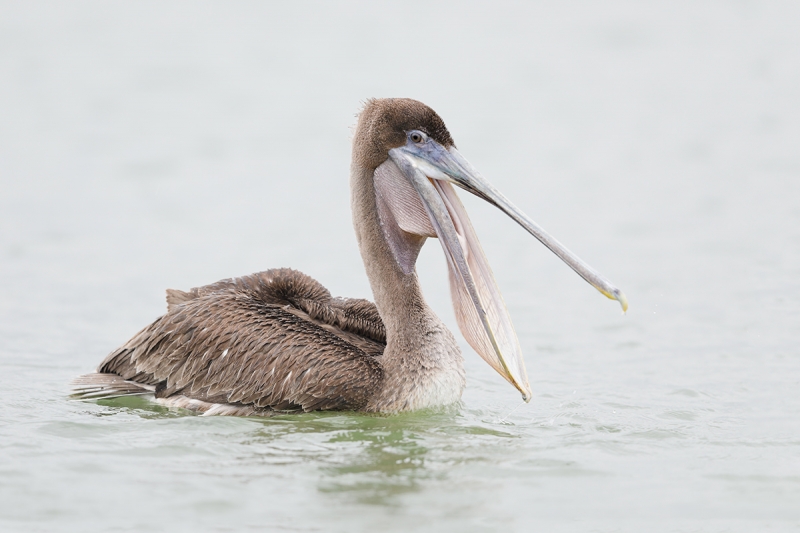
This image was created at Fort DeSoto with the Induro GIT304L Grand Series 3 Stealth Carbon Fiber Tripod/Mongoose M3.6-mounted Canon EF 600mm f/4L IS II USM lens and my favorite pelican photography camera body, the Canon EOS 5D Mark IV. ISO 800. Evaluative metering +2 stops off the water alone: 1/400 sec. at f/5 in Manual mode. AWB in totally overcast conditions. LensAlign/FocusTune micro-adjustment: -2. One row below and two AF points to the right of the center AF point/AI Servo/Expand/Shutter Button AF was active at the moment of exposure. The selected AF point caught the bottom of the bill pouch 2/3 of the way down the lower mandible. Brown Pelican, juvenile laughing |
AF Point Lessons and Action Shooting Strategies …
After explaining my reasoning to the group I selected a low right AF point for this right-facing bird because when the pelican lunge into the water they often extend their bills forward while distending their bill pouches, that to drain the water from them while leaving the fish. I had created several of those just prior to making this image but the head angle was just a tad away on each of them. When the bird opened its bill to swallow the greenbacks (baitfish not currency), I kept firing even though the AF point was not ideally placed.
That is the lesson; when the action happens, do not think to make any adjustments to your focus or exposure settings. Push the button. You might well be rewarded. If you try to make any changes, the only guarantee is that you will wind up with nothing …

|
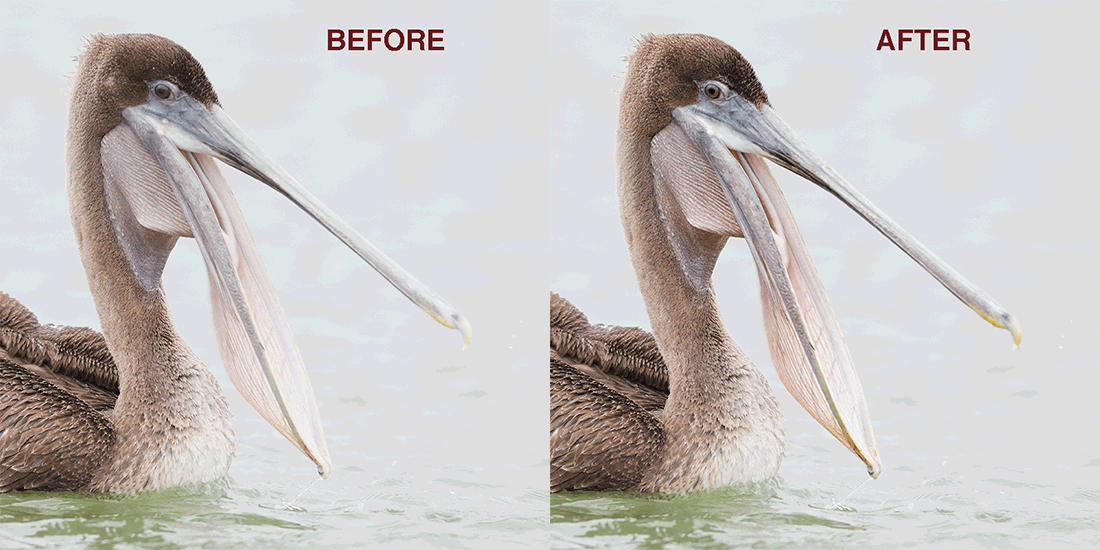
Adding Pop to the Laughing Pelican
As I’ve said here often (as recently as yesterday’s blog post), “If your RAW files look good on the back of your camera and on your laptop, they are under-exposed. Your properly exposed RAW files should look washed out, especially those made in low light and those that average to lighter than a middle tone.” Exposing to the right as I did with today’s featured image reduces noise in the dark tones and produces larger, higher quality image files.
I worked this image with the DeSoto In-the-Field group of four during our Saturday working lunch session. After converting the image in DPP 4 on my 15 inch Macbook Pro with Retina Display, I brought the TIF file into Photoshop and expanded the canvas just a bit in front of and below the bird using the Crop Tool as the pelican was a bit too crowded in the frame. I used John Haedo Content Aware Fill to populate the added canvas. As there was a bit of smudging along the seams I ran a 40 pixel Gaussian Blur on a new layer, added an Inverse (Black or Hide-all) Mask and painted in the effect (B, D) where needed along the lower frame edge. Next was some Eye Doctor work and a bit of messy face and head feather clean-up with the Patch Tool and a single Quick Mask to eliminate a substantial whitish smudge on the side of the head.
Next I set the black and white points with a Levels adjustment but even with that the bill was too light and lifeless so I selected the bill and most of the face, placed that on its own layer, and ran my NIK Color Efex Pro 40/40 recipe. Then I increased the Vibrance on that same layer 90 points. It was looking good but the brown feathers of the face had gotten too dark so I added a Regular Layer Mask and painted half the effect away on those feathers with a 50% opacity brush. At that point the image had been brought to life so I save the master file and created the JPEG and the animated GIF for this blog post.
Please note: the red cast and the background posterization are due to the formation of the animated GIF.
Color Balancing Trick on its own layer but still the background dirt and the sand on the beach below needed a lot more color and punch. To that end, I opened a new layer for the whole image and then went Image > Adjustments > Selective Color. I picked the WHIITe channel, added 90 points of black and five points of yellow. Voila.
Then I saved the master TIF file, cropped the image to 900 pixels high, sharpened it with Unsharp Mask at 80/.3/0 and save the JPEG, making sure to hit “D” for Don’t Save when asked if I wanted to save the changes made to _W5A7642. (If you hit save, you replace your master TIF file with a tiny JPEG …)
|
|
|
The BIRDS AS ART Current Workflow e-Guide (Digital Basics II) will teach you an efficient Mac/Photo Mechanic/Photoshop workflow that will make it easy for you to make your images better in Photoshop (rather than worse). That true whether you convert your images in DPP 4 or ACR. See the blog post here to learn lots more and to read a free excerpt. You can order your copy from the BAA Online Store here, by sending a Paypal for $40 here, or by calling Jim or Jennifer weekdays at 863-692-0906 with your credit card in hand. |
The BIRDS AS ART Current Workflow e-Guide (Digital Basics II)
Everything mentioned above is covered in detail in the BIRDS AS ART Current Workflow e-Guide (Digital Basics II), an instructional PDF that is sent via e-mail. Learn more and check out the free excerpt in the blog post here. The new e-Guide reflects my Macbook Pro/Photo Mechanic/DPP 4/Photoshop workflow. Do note that you will find the RGB Curves Adjustment Color Balancing tutorial only in the new e-guide. Note: folks working on a PC and/or those who do not want to miss anything Photoshop may wish to purchase the original Digital Basics along with DB II while saving $15 by clicking here to buy the DB Bundle.
The two most recent and many of the older MP4 Photoshop Tutorial videos releases go hand and hand with the information in DB II):
Folks who learn well by following along rather than by reading can check out the complete collection of MP 4 Photoshop Tutorial Videos by clicking here.
You can learn how and why I and other discerning Canon shooters convert nearly all of their Canon digital RAW files in DPP 4 using Canon Digital Photo Professional in the DPP 4 RAW conversion Guide here. And you can learn advanced Quick Masking and advanced Layer Masking techniques in APTATS I & II. You can save $15 by purchasing the pair. Folks can learn sophisticated sharpening and (NeatImage) Noise Reduction techniques in the The Professional Post Processing Guide by Arash Hazeghi and yours truly.
If In Doubt …
If in doubt about using the BAA B&H affiliate link correctly, you can always start your search by clicking here. Please note that the tracking is invisible. Web orders only. Please, however, remember to shoot me your receipt via e-mail.


Please Remember to use my Affiliate Links and to Visit the New BAA Online Store 🙂
To show your appreciation for my continuing efforts here, we ask, as always, that you get in the habit of using my B&H affiliate links on the right side of the blog for all of your photo and electronics purchases. Please check the availability of all photographic accessories in the New BIRDS AS ART Online Store, especially the Mongoose M3.6 tripod head, Wimberley lens plates, Delkin flash cards and accessories, and LensCoat stuff.
As always, we sell only what I have used, have tested, and can depend on. We will not sell you junk. We know what you need to make creating great images easy and fun. And please remember that I am always glad to answer your gear questions via e-mail.
I would of course appreciate your using our B&H affiliate links for all of your major gear, video, and electronic purchases. For the photographic stuff mentioned in the paragraph above, and for everything else in the new store, we, meaning BAA, would of course greatly appreciate your business. Here is a huge thank you to the many who have been using our links on a regular basis and those who will be visiting the New BIRDS AS ART Online Store as well.
Amazon.com
Those who prefer to support BAA by shopping with Amazon may use the logo link above.
Amazon Canada
Many kind folks from north of the border, eh, have e-mailed stating that they would love to help us out by using one of our affiliate links but that living in Canada and doing so presents numerous problems. Now, they can help us out by using our Amazon Canada affiliate link by starting their searches by clicking here.
Be sure to like and follow BAA on Facebook by clicking on the logo link upper right. Tanks a stack.
Typos
In all blog posts and Bulletins, feel free to e-mail or to leave a comment regarding any typos or errors. Just be right :).


Hi Artie, a great and humorous image – you definitely did this action justice. In your editing insight you mention adding a black-layer mask but I notice that (when doing selective processing on the bird) you often prefer to place the bird on it’s own layer rather than using a black-layer mask. Is there a practical reason for this?
Jake
Six of one, half dozen of another. Using a Hide-all Mask is always faster, making, feathering, and placing a selection is time consuming but usually yields more accurate results. With high contrast edges making a good selection does not require much work …
Thanks for commenting, with love,
artie