The FlexShooter Pro Video
Click on the Play Arrow above to view this 17 1/2 minute instructional video.
Click here for detailed written instructions on setting up and leveling the FlexShooter Pro, the ballhead that acts like a gimbal head only better.
Click here to learn about shooting flight with the FlexShooter Pro.
Click here to purchase.
FlexShooter Pro Update: May 22, 2019
For incomprehensible reasons, our DHL shipment is being delayed despite the fact that I paid the duties and taxes online over the weekend. It is likely that it will be here fairly soon … We are presently hoping for this Thursday …
We’ve now sold eight of the 20 FlexShooter Pro heads that we will be receiving when our next shipment arrives. To ensure getting theirs, folks are encouraged to place their orders asap by phone: 863-692-0906. Your card will not be charged until your head ships.
It is fun to be changing the world of nature photography one head at time …
|
|
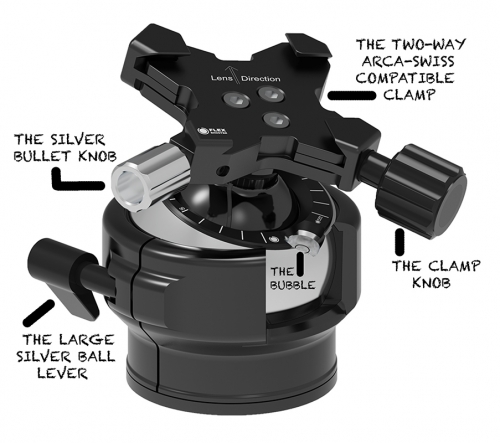
FlexShooter Pro labeled set-up diagram |
Where to Position the Bubble: a clarification
See the two photos below
In the video, I was a bit unclear as to when I position the bubble on the right (as in Image #1 below), and when I position it to the rear (as in Image #2 below). It takes a bit of wiggling and twisting to reposition the bubble. Here is a tip: start with both the Large Silver Ball Lever (unseen in both images below) and the Silver Bullet Knob loosened.
|
|
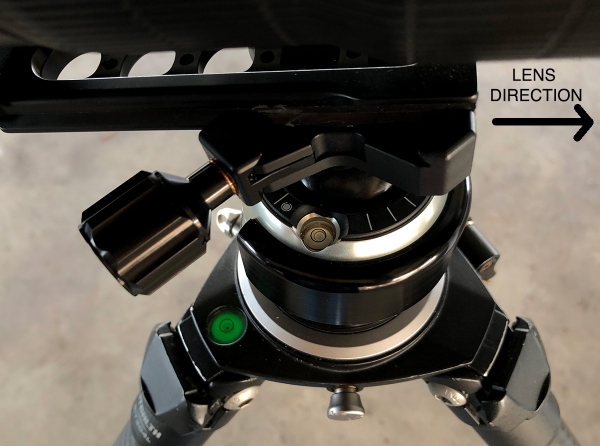
Side-view of FlexShooter Pro with the 600 VR on the tripod |
Image #1: Side-view of FlexShooter Pro with the 600 VR on the tripod
When I will be photographing with the lens on the FlexShooter Pro while standing behind my tripod, I will almost always position the bubble as shown above with the bubble to the right of the lens, the clamp knob on the near-right, and the silver bullet knob on the near-left (the latter unseen in the photo above). This allows me to simply lean to my right for a clear line of sight view when I need to center the bubble on the FlexShooter Pro in the scribed circle.
|
|
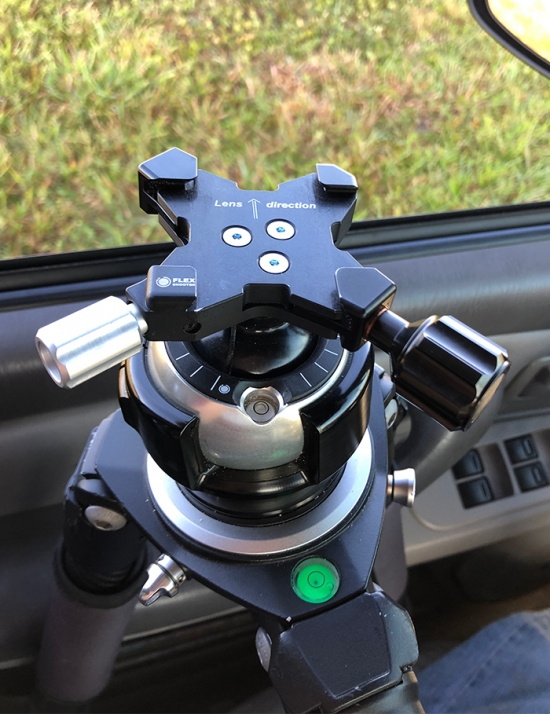
Image #2: Rear-view of FlexShooter Pro in the car without a lens mounted |
A Rear-view of FlexShooter Pro in the car without a lens mounted
When I am working off the tripod in a vehicle, seated behind the tripod in the field, or will be standing in one spot for a good while doing flight photography in a productive spot like Bosque del Apache NWR in New Mexico, it is easiest to level the FlexShooter Pro without the lens mounted with the bubble at the rear of the head (as seen in the photo above). Note that the clamp knob is positioned on my right with the silver bullet knob to my left. When seated on the ground or in a vehicle it is easiest to center the bubble in the scribed circle with the bubble positioned to the rear as seen in the photo above. If it is on the right (as in image #1), it is pretty impossible to see the bubble as it will be blocked by the lens …
Questions Welcome
All FlexShooter questions are welcome; please leave a comment below and I will get back to you.
Huge Late-registration Instructional Photo-Tour Discounts Made Public
I an effort to fill a very few remaining slots, I am offering a $3,000 late registration discount on the UK Puffins, Gannets, and Red Kite IPT (one slot) and a $4,000 late registration discount on the Galapagos Photo Cruise of a lifetime (one or two slots) — the world’s very best Galapagos photo trip. We do the three world-class landings twice each: North Seymour, Hood, and Tower … Click here and scroll down for the trip details. Please e-mail with questions.


Hi Arthur, How does the flex shooter handle frequent use in sandy beach conditions? Thanks
I try to avoid dropping the head in the sand but have done it on occasion. It did just fine.
with love, artie
Artie, awesome video. Thanks. A super minor typo in the FlexShooter Pro Update section. Oniline should read online. Thanks again for the introductory video.
Thanks, Dale. Belatedly fixed on 2/15/2022!
with love, artie
Hi Arthur
Nice video and thanks for your thoughts on the elevation limits. I usual just adjust the legs if I need to shoot up high.
I noticed your mention of using the Flexshooter and tripod in the vehicle. A description of how you set up the tripod would make a great blog topic. I have my own set up but would like to hear about yours and I think others might also.
Don’t DHL and Customs know who they are dealing with?
Ciao
Thanks Bill. And yes, pulling the legs in when you need to get high is always step one (if you have enought shutter speed to ensure sharpness).
I have been thinking of doing a video on setting up the tripod in a vehicle. I am pretty sure that there is a description of doing so in the original The Art of Bird Photography …
with love, artie
I am interested in this set up as well. Setting tripod in the car is something which I need to learn to do…
I have the audio turned up all the way on the video page and on my Mac Pro but it is still too low to hear well.
Bummer. It is too loud at max volume on my MacBook Pro … Try viewing it on another computer if possible.
with love, artie
ps: here is a thought: have you checked the volume control on the video player?
Nice video. I had the below question while I watched the video.
How do you get to add flash with this setup?
Do you have to add it to the head itself ?
You would never want to add a flash bracket to the head itself. I am working on the options for adding a flash bracket and do not want to get it wrong so folks will need to wait a bit longer until I get a complete understanding of the best solution.
with love, artie
Thanks Artie for the info..
Hey Arthur, Nice video with solid information. Do you still have the barely used Flex Shooter Pro with smaller knob for sale?
Yes. Please call Jim at 863-692-0906 asap this morning. With thanks. artie