What’s Up?
With the fields down by the lake flooded and a SW wind, Monday morning was pretty much a dud. I did make a very few images of the surviving Mother’s Day colt that included one keeper. My streak is still alive. I will provide details when the streak ends.
I’ve gotten back to swimming every day, but have dropped down from 72 lengths to 44 lengths (a half mile). As a result, I am enjoying my swims a lot more and my right shoulder is feeling a lot better.
We head over to Gulfport tomorrow for the Fort DeSoto COVID-Conscious Small Group IPT with three participants that begins on Thursday morning.
Thanks to the many who have sent Texas Coast info along via e-mail.
Today is Tuesday 13 OCT; we will be headed down to the lake as it starts to get light at about 7:30am.
I was glad to learn that Howard Mortman sold his Canon 1DX III and his 100-400 II within two days of their being listed on the Used Gear page. He actually sold the camera body elsewhere after listening to my pricing advice. He is kindly sending a check for the two sales as per the Items for Sale agreement.
Wanted to Buy
I have a potential buyer in search of a Canon EF 400mm f/4 DO II lens. If you have one that you would like to get rid of, please contact me immediately via e-mail.
The BAA Used Gear Page
The Used Gear page continues to be red hot! It is BAA Used Gear Page is the place to sell your used photographic equipment. We will help you to get your gear sold quickly for 20 to 60% or more than what the big guys are offering … Doubt me? Check out the Recent Sales list for the past year at the bottom of the page.
Please Remember
If you enjoy and learn from the blog, please remember to use one of my two affiliate programs when purchasing new gear. Doing so will not cost you a single penny and if you use Bedfords and remember to enter the BIRDSASART code at checkout, you will save at least $50.00 on all orders greater than $1000.00. In these crazy times — I am out at least forty to sixty thousand dollars so far due to COVID 19 (with lots more to come) — remembering to use my B&H link or to shop at Bedfords will help me out a ton and will be greatly appreciated. Overseas folks who cannot order from the US because of import fees, duties, and taxes can always help out by clicking here if they see fit.
BIRDS AS ART is registered in the U.S. Patent and Trademark Office
Great Topaz News!
Folks who use the BAA Topaz link to purchase Sharpen AI, DeNoise AI, or the Utility Bundle (or any other Topaz plugins) will receive a 15% discount by entering the ARTHUR15 code at checkout. To get the discount you must use my link and you must enter the discount code. Be sure to start with this link.
Topaz Stuff
As I said on Sunday and have said often many times before, I should have listened sooner. If you, like me, are new to the Topaz party, please use this link to purchase. Right now I can wholeheartedly recommend both Topaz Sharpen AI and Topaz DeNoise AI. Though I have not yet worked with JPEGtoRAW AI or Gigapixel AI, I have installed both of these plug-ins and look forward to trying them on some I-Phone 11 images fairly soon. If you are thinking like me, consider the Utility Bundle that includes all four plug-ins mentioned above at a money-saving price.
Again, those who purchase Sharpen AI or DeNoise AI using my link, can e-mail to request a short Getting Started with Topaz e-Guide. I had a bit of trouble getting the two plug-ins installed and having them appear in the Photoshop Filter Menu. In addition, I will explain how to best learn about the two plug-ins by applying them on a Layer (in Photoshop). I amazed myself yesterday by completing this guide in the car on the way to and from Sebastian. Huge thanks to Anita for doing the driving. Please include a copy of your Topaz order when requesting the guide.
RawDigger e-Guide and Video Advance Copy Available
Save $10 Now
The RawDigger e-Guide and Video is almost finished. It will sell for $51.00. If you are anxious to get started with RawDigger, learn to mega-Expose to the Right, and wind up with the highest quality image files, you can save $10.00 and have a chance to review a pre-publication copy of the guide by sending a PayPal for $41.00 to birdsasart@verizon.net with the words RawDigger e-Guide and Video Pre-publication Copy cut and pasted into the Subject line.
You will of course receive a link for the completed PDF when the guide is finished.
New and Better Bedfords Discount Policy!
You can now save 3% on all of your Bedfords photo gear purchases by entering the BIRDSASART coupon code at checkout. Your discount will be applied to your pre-tax total. In addition, by using the code you will get 2nd day air shipping via Fed Ex.
Grab a Nikon AF-S Teleconverter TC-14E III and save $14.99. Purchase a Canon EOS R5 and your discount will be $116.97. Purchase a Sony FE 600mm f/4 GM OSS lens and save a remarkable $389.94! Your Bedford’s purchase no longer needs to be greater than $1,000.00 for you to receive a discount. The more you spend, the more you save.
Money Saving Reminder
Many have learned that if you need a hot photo item that is out of stock at B&H and would enjoy free overnight shipping, your best bet is to click here, place an order with Bedfords, and enter the coupon code BIRDSASART at checkout. If an item is out of stock, contact Steve Elkins via e-mail or on his cell phone at (479) 381-2592 (Eastern time). Be sure to mention the BIRDSASART coupon code and use it for your online order. Steve has been great at getting folks the hot items that are out of stock at B&H and everywhere else. The wait lists at the big stores can be a year or longer for the hard to get items. Steve will surely get you your gear long before that. For the past year, he has been helping BAA Blog folks get their hands on items like the SONY a9 ii, the SONY 200-600 G OSS lens, the Canon EOS R5, the Canon RF 100-500mm lens, and the Nikon 500mm PF. Steve is personable, helpful, and eager to please.
SONY e-Guide Discount Program
Purchase a (new) qualifying SONY camera body (a7r iii, a7r iv, a9, a9 ii) from Bedfords or using a BIRDS AS ART B&H affiliate link, and you will receive a $40 discount on the SONY e-guide. Purchase a (new) SONY 200-600mm G lens from Bedfords or using a BIRDS AS ART B&H affiliate link, and you will receive a $25 discount on the SONY e-guide. Purchase a (new) SONY 600mm f/4 GM lens from Bedfords or using a BIRDS AS ART B&H affiliate link, and you will receive a free SONY e-guide with one or two videos.
Please send your Bedford’s or B&H receipts to me via e-mail to receive your discount and your ordering instructions. Folks purchasing from Bedfords and using the BIRDSASART code will save 3% on all orders. Folks sending their B&H receipts may need to wait a few days to have their purchases confirmed. Folks using Bedfords will have their purchases confirmed immediately.
|
|
|
114 sold to rave reviews. The SONY e-Guide by Patrick Sparkman and Arthur Morris |
The Sony Camera User’s e-Guide (and Videos)
Click here to purchase the guide with one Camera Set-up Video. Be sure to e-mail us by clicking here to specify your camera body so that we can send you a link for the correct video.
Click here to purchase the guide with two Camera Set-up Videos. Be sure to e-mail us by clicking here to specify your two camera bodies so that we can send you links for the correct videos.
Click here to learn more about the SONY e-Guide.


Gear Questions and Advice
Too many folks attending BAA IPTs and dozens of photographers whom I see in the field and on BPN, are–out of ignorance–using the wrong gear especially when it comes to tripods and more especially, tripod heads… Please know that I am always glad to answer your gear questions via e-mail. Those questions might deal with systems, camera bodies, accessories, and/or lens choices and decisions.
|
|
|
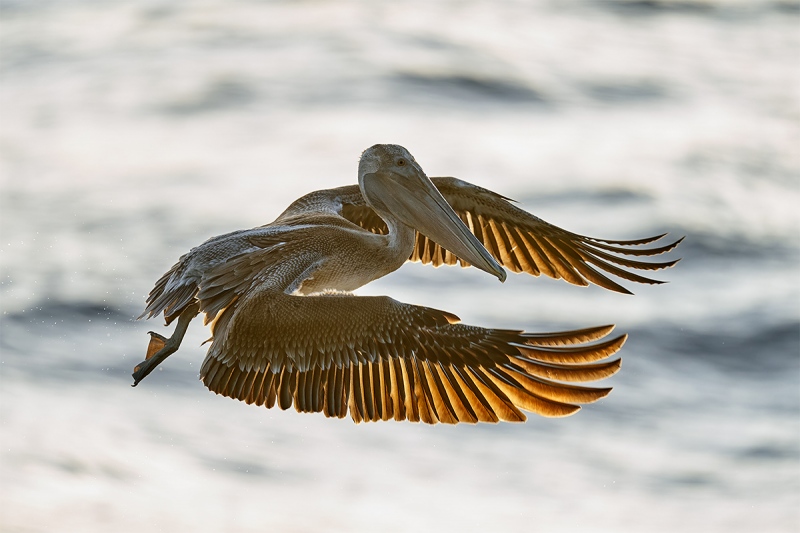
This image was also created on the morning of 6 OCT 2020 at Sebastian Inlet. I used the Induro GIT 404L/Levered-Clamp FlexShooter Pro-mounted Sony FE 600mm f/4 GM OSS lens and the blazingly fast AF King, the Sony Alpha a9 II Mirrorless Digital Camera Body. Exposure determined by Zebras with Exposure Compensation on the rear dial at +2.7 stops; once I knew I was in the ballpark I turned off Zebras so that I could see the subject: 1/2000 sec. at f/4 in Shutter Priority mode. AUTO ISO > 2000. RawDigger showed 2,010,000 overexposed pixels lit by the rosy-red OvExp warning. Center Zone Continuous AF was active at the moment of exposure and performed perfectly. Click the image to see a larger version. Backlit Brown Pelican just after a stormy sunrise |
It is Usually Better to Try Something Than it is to Give Up
To say that the situation was difficult on the Tuesday morning would be a vast understatement. There were many pelicans feeding just after dawn on the right (in other words, wrong) side of the jetty. We were shooting into the somewhat muted sun and most of the birds were flying away from us into the southeast wind. Getting a somewhat properly exposure was a nightmare as the birds flew around. They backgrounds went from water that appeared dark into a swath of brighter water lit by the sun and then back into the dark again. Working in Manual mode would have proved futile, so I tried Shutter Priority at +2 1/3 stops to try to get some light on the subjects. Once I had that figured out, I had to be on the lookout for birds that were not flying away from us. Those were few and far between. With the nice backlit primaries, this, the first image that I chose to process, was the best of the lot.
After converting the image in Capture One, it took some time and effort in Photoshop to create a halfway decent image (at least to my eye). Anita North helped with some very good suggestions on getting the color and tones right. The key was reducing the color temperature to reduce the too-orange look. I should have done that during the Raw conversion, but as I did not realize it until after the fact, I made the change in Photoshop on a Layer via Filter > Camera Raw Filter (aka Adobe Camera Raw). The last step to success was darkening the image a bit via Curves on a Layer and then using a Regular Layer Mask and erasing the backlit primaries to bring back the brightness there.
All of the above (but for the Capture One RAW conversion) plus tons more great Photoshop tips are detailed in Digital Basics II.
|
|
|
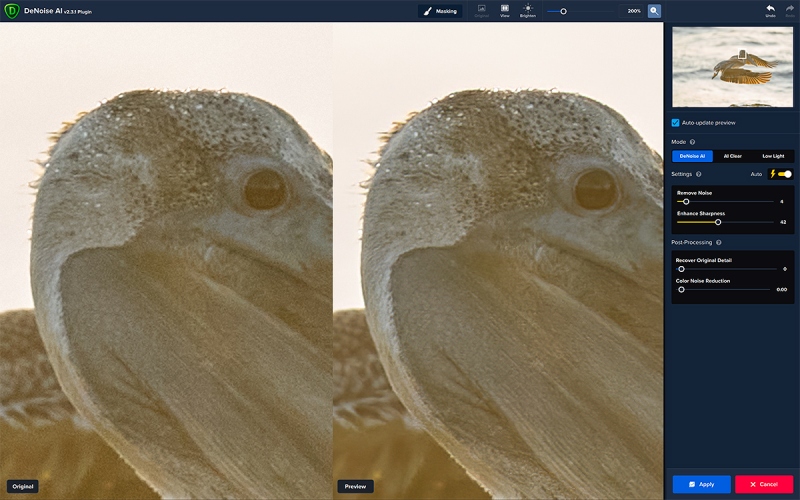
Click on the screen capture to see a larger version. DeNoise 200% view Screen Capture for today’s featured image |
DeNoise AI Tip
As is often the case, the best place to note noise reduction is in a bird’s eye or eyes. After clicking on the image to see the larger version, take a good look at the pelican’s eye to see the total elimination of noise in this properly captured image.
When DeNoise opens, these generic settings are in place:
Reduce Noise — 15
Enhance Sharpness — 15
With properly exposed images applying Reduce Noise at 15 will be total overkill — all details will be destroyed resulting in an image that will look like featureless enamel … In other words, not good. While it is fine to learn about DeNoise AI by playing with the sliders under DeNoise AI, All Clear, and Low Light, hitting Auto so that the yellow lightning bolt lights up has proven to so effective that you will likely find that hitting Auto is your time-saving go-to strategy.
|
|
The BIRDS AS ART Current Workflow e-Guide (Digital Basics II).You can order your copy from the BAA Online Store here, by sending a PayPal for $40 here, or by calling Jim or Jennifer weekdays at 863-692-0906 with your credit card in hand. Be sure to specify Digital Basics II. |
The BIRDS AS ART Current Workflow e-Guide (Digital Basics II)
The techniques mentioned above and tons more (with the exception of Capture One RAW Conversions) — along with all of my personalized Keyboard Shortcuts — are covered in detail in the BIRDS AS ART Current Workflow e-Guide (Digital Basics II), an instructional PDF that is sent via e-mail. Learn more and check out the free excerpt in the blog post here. While the new e-Guide reflects my MacBook Pro/Photo Mechanic/DPP 4/Photoshop workflow, folks using a PC and/or BreezeBrowser will also benefit greatly by studying the material on DB II. Note: folks working on a PC and/or those who do not want to miss anything Photoshop may wish to purchase the original Digital Basics along with DB II while saving $15 by clicking here to buy the DB Bundle.
Folks who learn well by following along rather than by reading can check out the complete collection of MP 4 Photoshop Tutorial Videos by clicking here. Note: all of the videos are now priced at an amazingly low $5.00 each.
You can learn how and why I converted all of my Canon digital RAW files in DPP 4 in the DPP 4 RAW Conversion Guide here. More recently, I became proficient at converting my Nikon RAW (NEF) files in Adobe Camera Raw. About two years ago I began converting my Nikon and Sony RAW files in Capture One Pro 12 and continue to do so today.
To purchase Capture One, please use this link. Then you can learn more about Capture One in the Capture One Pro 12 Simplified MP4 Video here. The next step would be to get a copy of Arash Hazeghi’s “The Nikon Photographers’ Guide to Phase One Capture One Pro e-Guide” in the blog post here.
You can learn advanced Quick Masking and advanced Layer Masking techniques in APTATS I & II. You can save $15 by purchasing the pair. Folks can learn sophisticated sharpening and (NeatImage) Noise Reduction techniques in The Professional Post Processing Guide by Arash Hazeghi and edited by yours truly. Please use this link to purchase NeatImage.
To introduce folks to our MP.4 videos and the basics involved in applying more NeatImage noise reduction to the background and less on the subject, I’d be glad to send you a free copy of the Free Noise Reduction Basics MP.4 Video. Simply click to shoot me an e-mail to get your free copy.


Good morning Guru. Hope you are doing fine.
Perhaps you offered this valuable advice before. I always follow this. When I fail to get the desired environment or opportunity to capture something; I try to shoot whatever is available. Sometimes, not always, there are few pleasant surprises.
Thank you with best regards.
Sanjeed
Have you tried the Canon EOS R5?
Nope. Have been trying to get a loaner and an RF 100-500 without success 🙁
with love, a
Hi Arti,
Do you use both AI DeNoise and AI Sharpen on an image? If so, do you use DeNoise first and then Sharpen?
Cheers,
Cliff
I always start with DeNoise AI. I only bring stuff into Sharpen AI that has significant sharpness problems. Here is something that I have learned: once you have done that, be sure to turn down the NR slider in Sharpen (usually to zero). The NR in Sharpen AI overdoes things very easily.
with love, a
Likewise, I start with DeNoise AI, do the other adjustments and when finishing for print, I’ll typically use Sharpen AI. Alternatively, I’ll use Sharpen AI when I have photos I’m trying to rescue which might have some motion blur (stabilize) or focus issues.
The Lowlight option in DeNoise AI is very remarkable for those high ISO/underexposed shots though it can be heavy on loss of detail.
Thank you sir. I will try the Lowlight setting. But I think that there will always be some loss of detail with the very high ISOs. In my conversations with Iliah Borg I tried to elicit some info there from him but he never really answered. He did, however, shock my world with his very knowledgeable comments. I should have mentioned, he is the creator/brains behind RawDigger and FastRawViewer.
with love, artie