
|
Bill Clean-up
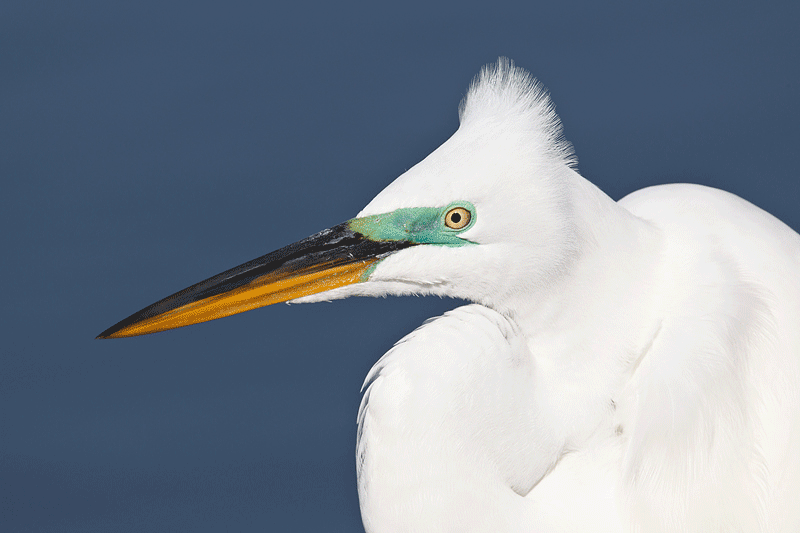
Take a moment to study the animated GIF above. The after version, the one with the immaculate bill and the denser WHITEs, is far more appealing and artistically pleasing to me than the original. Let me know what you think.
If you choose to do bill clean up work on some of your avian images these tips will likely help you. First off, you will want to work large. To zoom in on a small area hit Z for the Zoom Tool and then make sure that the box for scrubby zoom (CS-5 only) is unchecked. Then left-click/draw a box around the area that you wish to work on. (Note: if you are working at 600% or more in CS-5 the ridiculously annoying and purposeless pixel grid will appear. If you hit Control H it will disappear but usually reappears when you begin working. You can try hitting View and un-checking Extras. Sometimes that sticks and sometimes it does not….
Once I am zoomed in I choose one of three main weapons from my arsenal for the clean-up chores. I will often use the Clone Stamp Tool at 40% Hardness, sometimes reducing the Opacity to between 40 and 60%. In CS-5 I have begun using the Spot Healing Brush more and more recently with great results. Set the Hardness to 100% and make sure that Content-Aware is checked. This tool works best when a blemish is surrounded by an area of relatively consistent color and texture. Sometimes dragging the brush can produce the best results. My third and often most powerful option is to create a Quick Mask and then use the Move Tool (V) to cover larger rather ugly areas with the new layer. Resizing and/or warping the layer can make your work easier and adding a Layer Mask can let you fine tune the selection.
I used the Clone Stamp Tool, the Spot Healing Brush, and as series of small Quick Masks to clean the bill of the beautiful Great Egret featured above. All of the techniques that I used (except for adding a Layer Mask) are covered in detail in the current version of our Digital Basics PDF. But here is the best news: I finished updating Digital Basics on the flight from London to Orlando on Monday. As soon as Jennifer is feeling better and returns to work she will be sending the free update to all who have previously purchased this great Digital Workflow and Photoshop How-To Guide. Those who purchase it now will receive the March 2011 Updated Version of Digital Basics. The technique that I used to run a Linear Burn to restore detail to the WHITEs in the image above is also covered in Digital Basics. Advanced Quick Masking is detailed in Robert O’Toole’s APTATS I (on CD only) and Advanced Layer Masking techniques are described on his great APTATS II CD.
Monitor Brightness Calibration Tip
Before adjusting either the Brightness slider in the ACR conversion box or the Midtone Slider when making a Levels Adjustment in Photoshop, I make it a habit to visit the Avian Forum at Bird Photographers.Net here and scrolling down to the bottom of the page to check the calibration strip. It looks pretty much like this:
| [Not a valid template] |
|
Monitor Calbration Strip |
Next I adjust the angle of my monitor so that I can differentiate the tonalities of the last two dark boxes on the left and the last two light/white boxes on the right. To clarify, you want to be able to see a difference in the tonality of the black box and the dark grey box on the left and the white box and the very light box on the right. With the screen at just the right angle I will be able to note the differences mentioned above and will be confident that I am seeing my middle tones accurately.
You can see more SW FLA IPT images here.
Shopper’s Guide
Below is a list of the gear that I used to create the image above. Thanks a stack to all who have used the Shopper’s Guide links to purchase their gear as a thank you for all the free information that we bring you on the Blog and in the Bulletins. Before you purchase anything be sure to check out the advice in our Shopper’s Guide.
Canon 800mm f/5.L IS lens. Right now this is my all time favorite super-telephoto lens
Canon 1.4X III TC. This accessory is so important to me that I travel with three of them. This new Series III TCs are designed to work best with the new Series II super-telephoto lenses.
Canon EOS-1D Mark IV professional digital camera body. The very best professional digital camera body that I have ever used.
And from the BAA On-line Store:
Gitzo 3530 LS Tripod This one will last you a lifetime.
Mongoose M3.6 Tripod Head Right now this is the best tripod head around for use with lenses that weigh less than 9 pounds. For heavier lenses, check out the Wimberley V2 head.
Double Bubble Level You will find one in my camera’s hot shoe whenever I am not using flash.
Delkin 32gb e-Film Pro Compact Flash Card. Fast and dependable.


Justin, Printing is not my strong point. And that is an understatement….
Definitely a clean bill of health. 😉 Though I am usually prone to prefer the reality of nature with all it’s defects.
Artie – as always great photo and thank you for the PS help as well. I can’t wait for the updated Digital Basics pdf. Could you do one for printing, (hopefully with canon printers?). I think there is a real need for one taking us through the settings from start to finish (ie from photoshop settings to print settings/and/or lightroom to end) so that our prints match the pics. Please! Please! Please! Thanks again for your great work.
Thanks Petros, On my calibrated monitor here the WHITEs in the after version look clean, bright, and less blue than in the before image.
I think that you did a great job with the bill cleaning process but you have gone a little too far with the whites. They look a little brownish at my monitor as they are at the final image.
I am waiting for the updated version of your “Digital Basics” file. It is a nice collection of useful tips. I have printed the previous version and made a nice little “book”. Very handy. I have done the same thing with Robert’s APTATS CDs.
The next time that you will come at lake Kerkini, take a day or two to check the rest of the lake for many other interesting bird species. Dalmatian Pelicans are nice but I suppose that when you go to Africa you do not use all your time to photograph the Elephants 🙂
Beautiful bird and a beautiful clean up!
Artie, I love always love your PS cleanup jobs, especially on the bill on this one. As I sit here and study it, I am thinking that somewhere in between would be best for the whites; at least on my monitor. Of course, it’s what your eye saw that matters. To me, it just needs to be a bit more white if that make sense.
Hi Artie. Great tip on monitor cal. FYI, the calibration strip is still not available on the BPN VB4 brownish style screen.
The cleaned up one does look better, of course. I does remind me, however, of the greatly Photoshopped women on magazine covers who do not resemble those in the real world. Where would you draw the line, Artie?
The cleaned-up one is definitely more pleasing. Thanks for sharing.