|
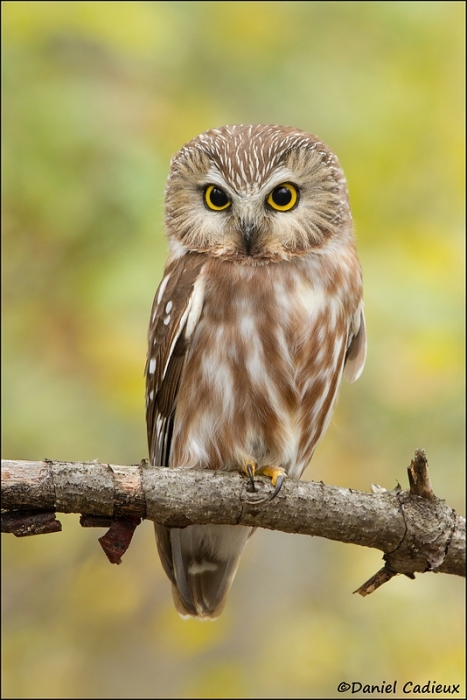
Saw Whet Owl. Image copyright 2012: Dan Cadieux. This image was created with the following gear hand held: |
How Dan Cadieux Masters the Canon EOS-7D
Dan Cadieux, a Canadian federal government employee, lives with his wife Chantal in Ottawa Canada. He is the proud father of two boys and an avid bird/nature photographer in his free time. He is a skilled, hard-working moderator in the Avian Forum at Bird Photographers.Net. As of 8:02 am on September 18, 2012 he has started 1112 threads and posted 12,310 comments. Most of the threads include one of his great images posted for critiquing. In most of the comments he is critiquing the work of others telling what he likes, what he does not like, and offering suggestions for improvement. He is an invaluable member of the BPN staff. You can learn more about Dan here.
All of the images in yesterday’s blog post, Answers in 48 Hours…, and all of the images here were created by Daniel with the Canon EOS 7D SLR digital camera and the Canon 100-400mm f/4.5-5.6L IS USM autofocus lens. As Dan does not own a tripod all of the images were created hand held.
|
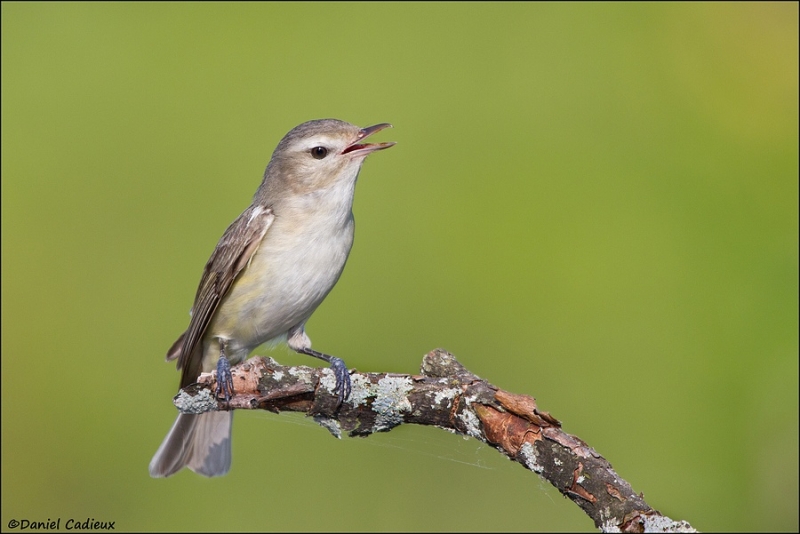
Warbling Vireo singing. Image copyright 2012: Dan Cadieux. This image was created with the following gear hand held: |
The Much-Maligned Duo
Both the Canon 100-400mm f/4.5-5.6L IS USM autofocus lens (“not sharp at 400mm, slow-to focus, poorly constructed,”) and the EOS 7D (“sub-par quality sensor, too noisy at the higher ISOs”) have been much-maligned by the so-called internet experts and others. With the images here, Dan Cadieux puts those myths to rest once and for all.
Below, in a guest blog post written especially for you at my request, Dan lets you know exactly how he captures and processes the great images that he so kindly shares with you here. Be sure to visit Dan’s website here and his BPN gallery here. Like me I am positive that you will be impressed by the artistic beauty and the technical perfection of Dan’s images. Enjoy. I am pretty sure that Dan will be glad to answer any questions that you have. To do so, please leave a comment below.
|
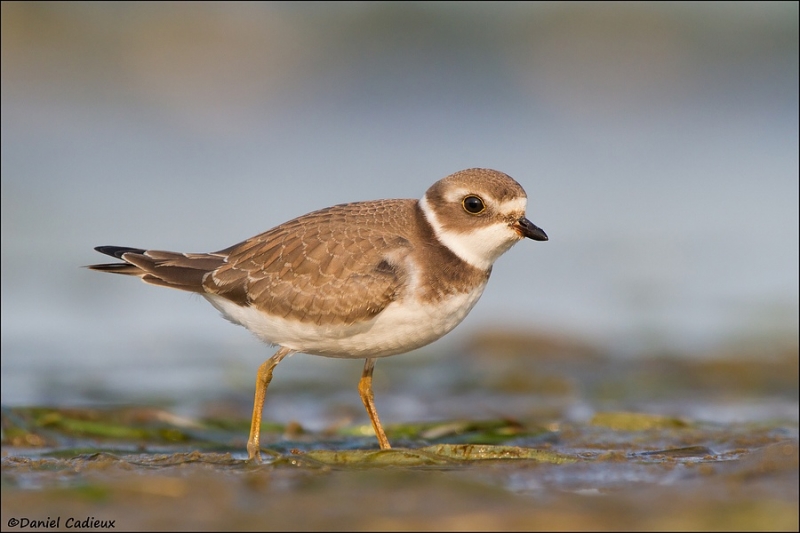
Semipalmated Plover, juvenile plumage. Image copyright 2012: Dan Cadieux. This image was created with the following gear hand held: |
Canon 7D processing 101
by Daniel Cadieux
Ever since Canon’s introduction of the EOS 7D in 2009 there has been quite the fuss over its image quality (IQ), or more precisely, noise level performance at the higher ISOs. We’ve all seen, heard, or read statements about how bad and unusable its files are with anything created at ISO 400 or higher. Is the 7D really that bad?
Many folks have contacted me about the “clean” results I’ve been able to achieve with this much-maligned camera. In this tutorial I will share my workflow and hopefully demonstrate that the answer to the above question is a resounding “No!” This tutorial is not meant to be scientific; it does not include tests, charts, graphs, comparisons, or pixel-peeping samples. There is a market and a demand for that type of information but providing it is not my intent here. It is not meant to compare the 7D to its much more expensive cousins such as the cameras in the 1D or the 5D series. It is simply a short tutorial written for hobbyists, especially those on a budget, or for those still on the fence about purchasing a 7D. It will show that the Canon EOS-7D is indeed worth a second look and that it is more than capable of creating terrific, high quality images in real-world situations.
|
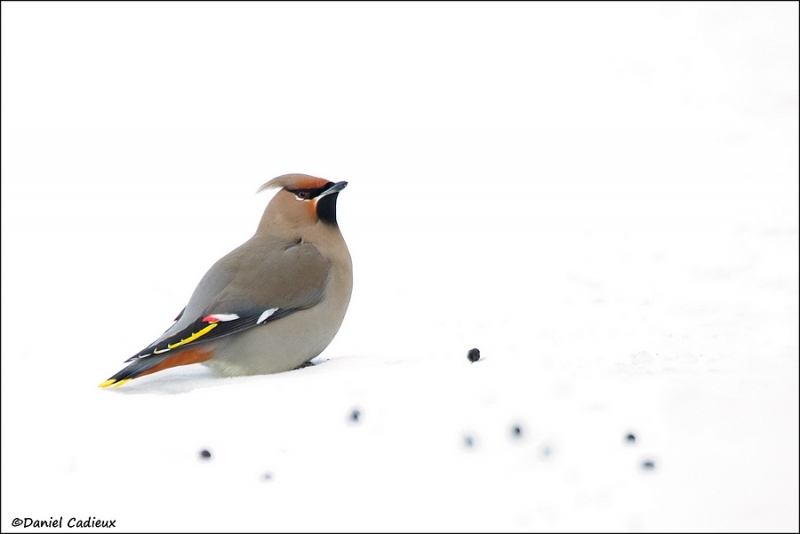
Bohemian Waxwing on snow. Image copyright 2012: Dan Cadieux. This image was created with the following gear hand held: |
I work at ISO 800 more than half the time. Many folks find that 7D image quality is unacceptable at ISO 800; here I share my workflow which shows how I create quality images with my 7D/100-400 set up.
The in-camera part of my workflow is short and sweet; it assumes that the user is proficient at exposing images properly. Here are two important points: The first is the importance of micro-adjusting each of your lenses. The 7D is capable of producing images with incredible detail, but it will not do that if your rig is front- or back-focusing with a given lens. (Note: the best way of micro-adjusting each of your lenses to your camera boy is with the Lens Align Mark II.) The second is that you must learn to “expose to the right”(ETTR); this means simply that you need to expose your images so that the histogram shows data well into the right-most box (the fifth box). If an image has bright whites in it it is fine to have a very few blinkies on the whites as blinkies are just over-exposure warnings. This will yield the best results after post-processing especially with images that have blacks or dark tones. At the very least do not underexpose your images. This is basically true for every DSLR anyhow, but the 7D can struggle a bit more with noise in deep shadows when you need to add back light in post processing. Other than those there is nothing out of the ordinary to do in-camera.
My post-processing workflow is more detailed, but it is rather simple and easy to emulate. (Warning: I never use layers and rarely use masks thus they are not mentioned; you may of course use them if they are part of your normal workflow).
|
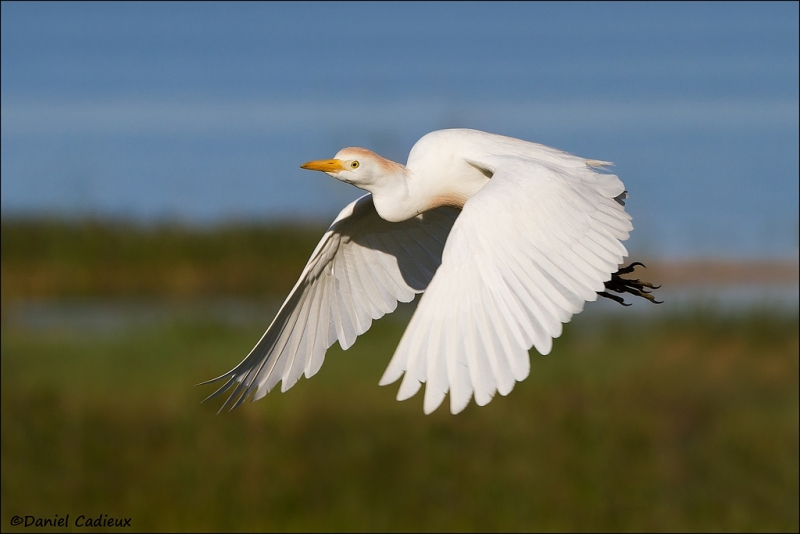
Cattle Egret in flight. Image copyright 2012: Dan Cadieux. This image was created with the following gear hand held: |
I use Lightroom 3 (LR3) for processing my RAW files; ACR is basically the same and other RAW converters work similarly. I start off with all the LR3 settings intact and from the menu options at right in the “Develop Module” I start from the top and work my way down. The first two sliders, White Balance and Tint, are most often left untouched. I work almost exclusively in Auto White Balance.
The next group of sliders is the most important. First I “correct” the exposure, which, if I have used the ETTR method correctly, means that I need to lower the value here. It can be as small as 0.10 stop, or as much as a full stop or more. The Recovery and Fill Light sliders are great if there is still a bit of clipping at either end of the histogram. Recovery can be used fairly aggressively and still look natural. Not so with Fill-Light, but it can be combined with a reduction in the Blacks (which is defaulted at +5) to produce a less problematic result. I may boost Contrast from +25, the default, to as much as +50 or so for photos made with mostly midtones or those created in very flat light. The next two sliders, Clarity and Vibrance, are usually boosted anywhere from +8 to +12. Although noise reduction (NR) is good in LR3 I do not find localized adjustments as user-friendly as in Photoshop (PS) where I do my NR.
|
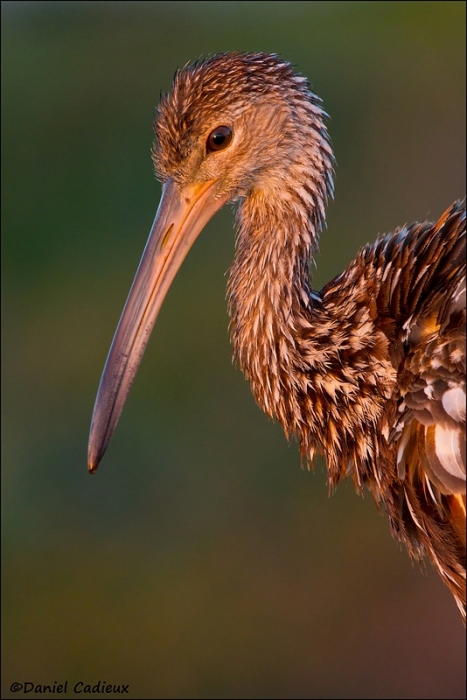
Limpkin just before sunset. Image copyright 2012: Dan Cadieux. This image was created with the following gear hand held: |
That’s basically it for LR3. Next I convert the file to a 16 bit tiff and open it in Photoshop. Note: I am currently using CS2. Even though I do a good job in LR3 in prepping the files, I feel that PS can take things up another notch. The first thing that I do is double check the exposure in Levels. Sometimes a small tweak is needed, most times not. Next I make whatever localized adjustments are needed with the Dodge and Burn tool. I use the Dodge Tool to open up areas with harsh shadows especially under a bird’s belly, chin, or undertail coverts, or to lighten too dark areas in the background or the foreground. Conversely I use the Burn Tool to tame overly light areas in the frame. I touch up the eye on 90% of my bird images by lightening the iris and/or darkening the pupil. My default settings for both of these tools are a soft brush (0% hardness) with the range set to midtones and the exposure at 8%. The same goes for the Sponge Tool which is my favorite “color enhancer” or “reducer.” I use it to enhance the iris color which may have become a bit washed-out after I’ve lightened it. I may also use it to enhance colors such as the yellow lores of a Savannah Sparrow or the green sheen on the head of a drake Mallard. These are the tools that I use the most in PS; many of the compliments that I get about my post processing skills are a result of the use of these tools.
|
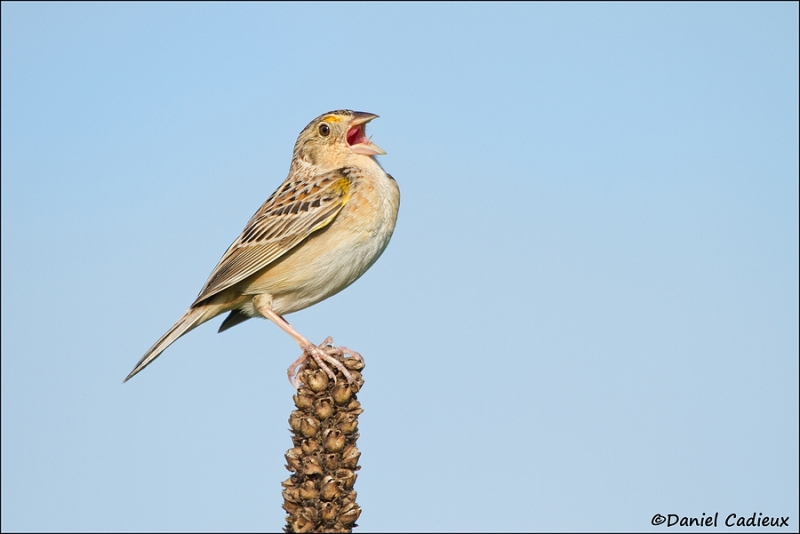
Grasshopper Sparrow singing. Image copyright 2012: Dan Cadieux. This image was created with the following gear hand held: |
I do other types of touch-ups including cloning, patching, spot healing, and cropping to format needed, but nothing unusual or groundbreaking and all stuff that is covered in detail in Artie’s Digital Basics File. I save a final version of the file, a finished version without NR or sharpening applied. This is my “master file.” I go back to it in order to prep images for web or for print. Then I open the file and apply the finishing touches (NR and sharpening via Unsharp Mask–USM) but only after after the image is sized for use. This, in my opinion, is an area of high confusion as many folks over-complicate things. Here is the simple way that I do things. With most files I apply NR to the whole image using the Noise Ninja plug-in for PS; any such software will do a nice job. Then I use the History Brush at 100% opacity and “paint” away the NR on the subject, the perch, and any other areas of high detail that are in focus or are covered by the depth-of-field. I do not use NR on any image created at ISO 400 or below unless I messed up the exposure and need to recover (lighten) it aggressively in post
|
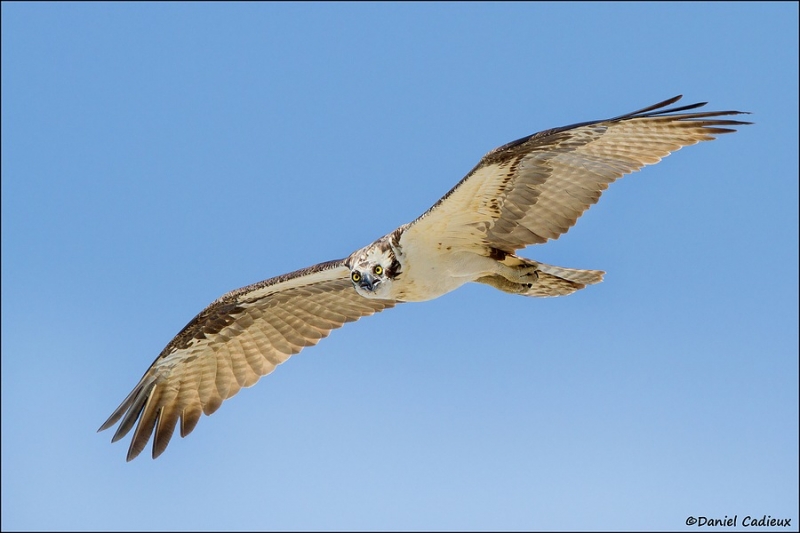
Osprey in flight. Image copyright 2012: Dan Cadieux. This image was created with the following gear hand held: |
The last step is to apply USM. For images that have had NR applied, I sharpen the whole image. Yes, the whole image. With images that have had no NR applied, I only sharpen the subject, the perch, and whatever else is in focus.
For every image file I set the Radius to 1.3 and the Threshold to 0; the Amount varies between 120 and 170. That’s it! Really! Keep in mind that the results look bad if the image is viewed at anything larger than the intended size and they will look downright awful if viewed at 100% or more. This is normal. The results, however, are awesome when the images are viewed at the intended size for display or print.
I hope that after trying my recommendations you conclude that the 7D really is a great camera that offers amazing image quality with noise characteristics that are easily handled with one round of NR applied to the images created at the higher ISOs. It is no different than any of the other crop-factor cameras out there. Opinions will surely vary, but for me, this is the perfect camera for a hobbyist on a budget and even for the pro who needs a great crop-factor camera with lots of pixels. If you have been sitting on the fence about the purchase of a 7D I recommend that you go right ahead and try one, you might be quite surprised at the results. Ignore the mixed reviews as I did. And I haven’t looked back since!
|
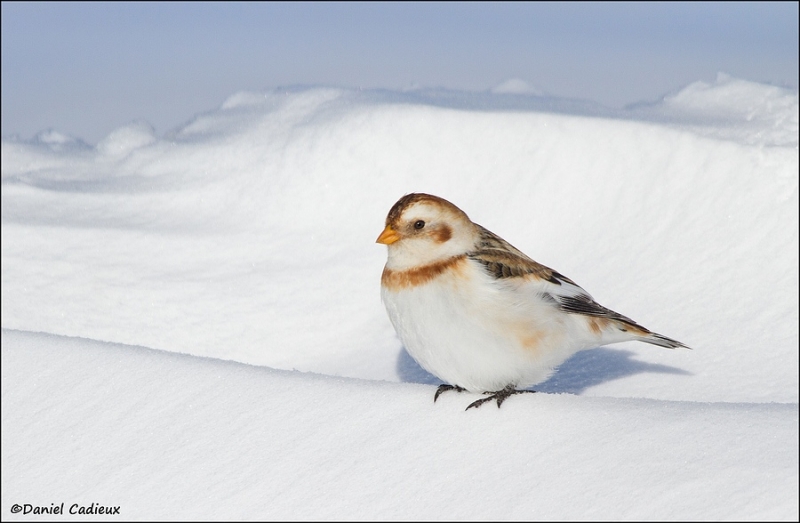
Snow Bunting female on snow. Image copyright 2012: Dan Cadieux. This image was created with the following gear hand held: |
Thanks Dan!
Thanks Dan for sharing your amazingly beautiful images and your 7D workflow with us here. Your love of birds and your high levels of skill as a bird photographer are quite evident in your images. This article and your work should serve as an inspiration for the legions of folks out there who cannot afford to purchase a Canon 1D X and a 600mm f/4L IS II lens. And as an inspiration to those who can!
Canon EOS-7D User’s Guide
The 7D UG (e-Book) is pretty much amazing. Most everything on the 7D was brand new when the camera was introduced and many folks were shaking their heads in confusion. With the 7D UG you will learn everything that you need to know about setting up and operating your camera so that you are able to consistently produce the images that you want. This all new guide, hugely popular guide will open your eyes as to the possibilities. I share all of my Menu and Custom Function settings along with the reasons for each of my choices. I describe each of the five AF Area Selection Modes in detail and let you know which ones I use for what and why! There is a ton of stuff in this guide that you will never see or hear anywhere else. You will, for example, learn how I create, save and use three different personalized Camera User Settings. Or how to set up and use Live View for a variety of nature photography applications. The entire guide is of course written in my easy to read, easy to follow, designed-for-dunces how-to style.
Which is your favorite?
Take a moment to let us know which of the seven images above is your favorite and be sure to let us know why you like it. Ties are OK. BTW, my favorite image in the orginal series was the singing Grey Catbird.
Used Canon 100-400mm lens for sale
Steve Vige
Steve Vige is offering a used Canon 100-400 in excellent condition for sale. It includes the pouch and the original Canon box: $999 buyer pays shipping.
Please contact Steve on his cell at 661-305-0307 (west coast time) or via e-mail.
NYC Weekend Nature Photography Seminar
Presented by Denise Ippolito/A Creative Adventure and Arthur Morris/BIRDS AS ART
Hilton Garden Inn, Staten Island, New York. December 8-9, 2012 from 9am-4:30pm.
Weekend: $169. SAT or SUN: $99. Lodging available for out of town guests.
Saturday: Image Capture Sunday: Image Evaluation and Processing
Hilton Garden Inn, Staten Island, New York. December 8-9, 2012 from 9am-4:30pm.
Weekend: $169. SAT or SUN: $99. Lodging available for out of town guests.
Saturday: Image Capture Sunday: Image Evaluation and Processing
Click here for complete details including the Saturday and Sunday schedules, club and group discount info, and registration incentives and for more info on the In-the-Field Seminar Follow-up Workshop.
Artie, the grizzled veteran, is widely noted as one of the premier bird photographers, tour leaders, and educators on the planet. Denise, who specializes in flowers, is the mega-creative up-and-comer, a popular lecturer, a skilled field instructor, and an amazing Photoshop wizard who will share her tips and tricks with you. Both artie and denise are full time professional nature photographers.
BIRDS AS ART Instructional Photo-Tours
Click here for complete IPT information including the current schedule and links to general IPT info, deposit and cancellation policies. and the required registration and release forms.
Shop B&H




Hello Dan, I am so happy to have stumbled onto Arties blog and your tutorial!!! I have been shooting for about 4 years but have been wanting to take my pics to a new level. You have given me hope and clear instructions on how to go about this. I have a canon 50D with the canon 100-400f/4.5-5.6L is lens. I am retiring in 4 days, then heading over to Malheur Wildlife refuge to take some shots. Thank you for giving a step by step guide to your processing. With so much info, I will be studying this for a long while. Thanks again, brenda andrew
Dan:
What is your approach to photographing birds in flight—what AF pattern, IS on or off, which type of servo, etc with the 7 D and 100-400 lens? Seems there is quite a bit of variation possible, but would appreciate knowing what works for you.
Thanks.
Hi Allan,
For birds in flight I use either IS off when lots of SS is available or mode 2 (the 100-400 is a first generation IS motor and is not recommended to leave on mode 1 for panning). AI Servo, centre point most of the time, centre point with expansion, and sometimes all focus points for plain backgrounds. Of note is that I use the back button (*) focus technique at all times.
Very informative post. Daniel, you know how much I enjoy looking at your work and thanks for being an inspiration.
And thanks to Artie who created this post, lots of great info and excellent comments above.
Art and Daniel,
Really glad to see this article. Daniel’s photography is excellent. “Almost” surprising those photos were created with that combination of gear.
I hear the 7D getting beat on far too much these days. I even began to wonder about it myself until only a couple months ago. I too own a Canon 7D and EF 100-400mm. I have always been fairly happy with the gear, but rather unhappy with my bird photography until very recently. Compared to most of the readers here, I think I am a complete novice. I’ve only been photographing birds for about 9 months, primarily with my Canon EF 100-400mm lens. I believe I still have a LOT to learn, and I greatly appreciate articles such as Daniel’s.
I struggled a lot at first to get decent quality with the 7D and 100-400. However I’ve learned that it really, really counts to “fill the frame”, or as Roger Clark puts it…get pixels on subject. My first bird photographs were frequently as little as 20-25% of the frame. Since learning to make my subjects fill more than 50% of the frame (alongside gaining the experience to get close enough for that to be possible), I’ve come to completely love my Canon 7D. It is a truly phenomenal camera, and just as capable as any other. I used to be afraid of ISO 1600 or more, however with a large enough subject I’ve found I rarely need to use any NR at all. Of course, having a longer lens helps in that endeavor.
I thought readers might enjoy seeing the results of the Canon 7D from a total novice photographer. It really is a great camera, one most definitely not deserving of the bad reputation it has. The photos below were taken with the 7D and EF 300mm f/2.8 L II lens (and possibly a TC). My skill with composition is rather lacking, but few of these photos have any NR at all, and those that do have minimal (20 or less) applied in LR:
http://500px.com/photo/14404933 (65% frame, 600mm: 300/2.8 II + EF 2x TC III)
http://500px.com/photo/13324073 (90% frame, 600mm: 300/2.8 II + EF 2x TC III)
http://500px.com/photo/14219117 (85% frame, 420mm: 300/2.8 II + Kenko 1.4x Pro 300 DGX)
http://500px.com/photo/14291951 (100% frame, 420mm: 300/2.8 II + Kenko 1.4x Pro 300 DGX)
Jon, Thanks for sharing the images. You are right, you have quite a lot to learn. I would suggest getting and studying a copy of ABP II and then hanging out on BPN as much as possible. In both cases the less you know the more you have to learn. Same with joining an IPT. artie
I would love to join an IPT. I’d love to join a bunch of them, including one of the bear tours. I don’t generally have $3000, $4000, $10000 to spend on one, though. Or rather, I’d like to put that money towards a nice EF 600mm f/4 II lens and maybe a 1D X first, before I went on an IPT. At least then, I’d be able to feel as though I could get the most out of the trip.
I just ordered your Digital Basics PDF this past weekend. I’m fairly proficient with Content-Aware Fill, but it doesn’t do what I expect it to do a lot of the time, and my skill with cloning is only so-so. I have a birthday coming up, and I’m hoping ABP II is one of the gifts I get. 😉 If not, I definitely intend to pick it up myself.
I’ve been reading BAA as much as I can over the last 7-8 months. I started right out the gate using back-button (rear-button) AI-Servo AF based on the recommendation you add in each of your photo uploads. I think it was easier to learn how to AF that way from the beginning than have to unlearn a less-proficient method of managing AF. What I really need to learn is what makes for the most pleasing compositions, as I think my skill is rather lacking there (there tends to be a lot of background noise in my shots). I’ll have to check out BPN…haven’t spent much time there, as I only discovered it recently from a link in a comment by someone here.
Artie and Daniel,
What a great article!! I have the exact same setup and had just bought Artie’s guide for the 7D. Spent last weekend at Port Aransas, TX and used rear autofocus and 19 point AF for the first time. Had a few hiccups with the AF struggling when the contrast with background and shorebirds was low. The weather was overcast for much of the day and gave me some great experience in adapting to the lighting conditions. I had never “crawled” to photograph birds before. Spent a full day in the sand and got incredibly close, even to a Common Tern (about 5′). Thanks guys for the tips.
Here are three of my favorites:
http://farm9.staticflickr.com/8461/8001857848_ce8700ec26_b.jpg – Sanderling
http://farm9.staticflickr.com/8172/8007929554_e1252022ba_b.jpg – American Oystercatcher
http://farm9.staticflickr.com/8459/8001884640_8ce0fdc766_b.jpg – Black-bellied Plover
All were handheld, Canon 7D, ISO 400, PP was in LR4. Thanks for the inspiration.
Daniel’s terrific images captured with affordable gear have always inspired me. Glenn Bartley’s inspirational images are also all captured with a 7D. As we both live in Ottawa, I always hoped I would bump into Daniel in the field, and I would ask him all the questions he has so generously answered here. I have a bad back and weak hands, and anything above a 400mm lens creates a rig I have difficulty carrying… so I use the Canon 400/5.6, the 400/4 DO, and now the new 300/2.8 L II ..often with a 1.4x (and now the 2X III on the 300/2.8 II) and rely on the 7D’s crop factor to increase my reach further. I do use a tripod. I’m also a firm believer in lens calibration. I own a 1DMk4, but prefer to use the simpler and smaller 7D. When I get the exposure right, I prefer the 7D images, and the drop from 1.6x to 1.3x cf makes a huge difference if you are shooting song birds. I sincerely hope that Canon will Keep the 7D or equivalent in their dSLR line-up.
Thank you for doing this Artie, and to you, Daniel and the other moderators on BPN who work very hard to make the site so informative and enjoyable for us all.
Great post. I’ve learned (and still learn) alot from Daniel. Seeing his work and how he achieves it led me to put more energy on my work in the field rather than “just shooting what is there”. However, because of him, I can no longer blame my gear (60D/100-400) when I shoot crappy images 😀
Favorite image is definitely the grasshopper sparrow. I find that the perch and the tongue are just awesome. Close second is the plover. Love the exposure and how the vegetation on the ground adds to the image.
Please note the misspelling of Daniel’s name in the original post! Thanks to Daniel for the superb pictures.
Thanks Big Jim for catching my typo. What is the explanation point for?
Are you still doing fine art bird photography?
Although I don’t use the 100-400mm much any more (I use the Siggy 120-300mm f/2.8 OS now, both for the f/2.8 and the 600mm with a 2x TC) my 7D is never below 400mm and is frequently well into 4 figure ISOs, and – because I know how to convert and process the files “intelligently” (ie well), I get wonderful results from it – this is with my 7D/100-400mm, handheld at 400mm and 1600 ISO, which I think is pretty good.
And the thing is, it’s easy to get this kind of result with the 7D. Like Daniel, I apply NR selectively, but my method is simply to apply a duplicate layer, apply the NR (or sharpening – same process either way) to the layer, and then use the Eraser brush to remove the NR from where it’s not needed, before flattening the layers.
I’m glad that this piece has “gone public” – it’ll save me from having to try and prove the point myself all the time.
I’m really keen to see the 7D get the credit it deserves), one more example: 100-400mm and 7D, handheld at 400mm/1600 ISO again.
The shutter speed’s pretty high on this image, but the light was still grim; and this bird (a European Goldcrest – pretty much the same thing as your Kinglets) is a two inch long bundle of hyperactivity, so a higher shutter speed is much needed.
Noisy?
Both images look very good but I am in the car on the way to dinner before tonight’s program. Not to worry, Jim is driving me. Where do you live? Which 600 F/4? artie
I live in the North East of England (an AWFUL place to be a bird ‘tog), Art.
I don’t have a 600mm f/4, I use the Sigma with 1.4x and 2x TCs as necessary. It’s a nice lens, although obviously harder to handhold at 600mm than the 100-400mm at 400 (it’s not a light lens).
When I wrote “…both for the f/2.8 and the 600mm with a 2x TC” I meant that I use the Siggy for the benefit of f2.8 when I use it without a TC; and for the benefit of 600mm when I use it with a 2x.
Keith, How can a 7D “never be below 400mm.” Did you mean below 400 ISO?
Yep, a daft typo on my part, Art – I was obviously thinking about the lens!
Nice read thanks allot. I love the 7D also. 🙂
Hi Daniel! I can’t say enough about how helpful this article is. Your images are amazing, and I do intend to continue using my two 7D’s, which are my primary wildlife cameras. I have had great luck with them and feel they are more than adequate for the job.
One question, though: I was wondering if you had had a chance to try out LR 4.1? Compared with LR 3.x, for me at least, it has taken my post processing to a new level. It’s sharpening and noise control are better, and now sharpening, noise control, moire control, and shadow and highlight adjustments are available with the adjustment brush (which means better local noise control). I think its raw conversions and adjustment controls (exposure, shadow and highlight) are light years ahead of LR 3.x.
What are your thoughts? Would you still stick with Photoshop CSx for your final sharpening and noise control? Thanks again and best regards, Dennis
Hi Dennis, thanks! I haven’t had the pleasure of trying LR4 so I cannot say, but I’ve only heard good things about it. If and when I do upgrade I’ll be looking forward to its capabalities, but in the meantime sharpening in CSx is more than adequate for my needs.
This article and ensuing thread has been one of the most instructive web presentations on bird photography I have yet seen. They deal with the issues and equipment with which I work. Let’s have more!
Would like to know Dan’s personal methods for getting close enough to birds for successful use of 400 mm lenses. Food, blinds, recorded bird calls, or slithering on one’s stomach in mud?
As it happens, here in the Pacific Northwest we have 9 months of rain and three months of amnesia. This often calls for shooting in “5 stop gloom” at ISO 3200, and I have not found 7 D very helpful then. In summer (or in Florida and California) 7 D could be super.
Not being a member of the ” 1 percent,” ( a socio- economic group to which, judging by their equipment, many serious bird photographers must belong,) my getting faster, longer lenses or better, lower noise cameras is a real struggle.
Good day Allan. Good fieldcraft is indeed important, especially at such a “short” focal lenght. A book could be written about it, but to simply answer your question (and Neil’s)…all of the above 🙂
Allan,
not a bird image, but this is the 7D and “Plastic Fantastic” handheld at 6400 ISO. f/3.2 and 1/25.
Even in properly low light/high ISO situations the 7D will do mich better than many people give it credit for.
Great Article! I can remember Jim Nieger (another huge inspiration), using the much maligned 100-400IS L & crop factor bodies like the 20D or 40D. Some images like an amazing Snail Kite in flight with snail taken with a 1.4x tc attached! Point is, from hobbyist to pro many Great photographers started with this more affordable combo that as Daniel has proven is a great set-up for bird photography. Though I look forward to future upgrades, the 7D/ 100-400 combo has taken me through the learning curve of bird photography with the results I had always hoped for.
Arthur’s 7D User’s Guide gave me a Huge Jump start, as the 7D was my first Dslr. I learned more about the camera and how to use it “in the field”, along with his books, blog & bullitins. Arthur Morris as for many others was my learning curve and for that Sir, I cannot thank you enough.
I had been looking forward to this article, as soon as I discovered Daniel’s work in the Bird Photographer’s forum I was instantly impressed. Seeing someone producing top-noth work using the same combo I have is of course very inspiring. I also learn alot from reading Daniel’s honest critique, and from his image post, as I do from many other Great photographers in the forum. The forom is a fantastic resource of knowledge. Thank you both for sharing this article & so much more.
All these photos are fantastic, my two favorites are the plover and the vireo. I’m curious, are these all full frame images or are any of them cropped?
Hi John. All my images are at least 75% full-frame, most only cropped to improve the composition, especially for action or flight as I use the centre point AF. The owl, Limpkin, and Grasshopper Sparrow are full frame images. The Vireo and Bunting about 85% FF.
Thanks Daniel and Artie for this wonderful tutorial. I’ve used a 7D as my main camera since they came on the market and love its features. Daniel’s workflow tips are extremely helpful and will no doubt improve the final product for me and my customers. Now I have to micro-adjust my lenses.
Daniel and Arnie, Thanks for your timely posting. I’ve been considering purchasing the 7D for some time and have been waiting to see if Canon was going to come up with a replacement at Photokina. I don’t think the proposed 6D would be a better option. I have owned a 100-400 lens for a few years now and it’s presently teamed up with a 40D. When I get it right the result is superb, even with a subject in flight. Your article has finally decided me and I’m now looking around for the best deal. Not only that but there’s a £80 cash back (about $120) available until the end of October. A Scot never misses a bargain!
I own 2 Canon 7Ds and use them, mostly, with a 100-400 and a 500 f4 version 1 and a 1.4 converter. All of my images taken with the 7D and the 100-400 are handheld and many with the 500 as well. In fact I bought the 500, used, from a friend of Artie’s about 8 years ago.
I bought a 7D very soon after thay came out and quietly have been selling prints enlarged up to 60″ ever since. My images are reproduced monthly in a local magazine and not a single buyer has ever complained or commented on any problems with my images.
I appreciate Daniel’s description of his workflow and plan to adopt a couple of his methods to my own work.
Daniel’s beautiful images prove that the latest and greatest, most expensive equipment is not the only way to create works of art!
Thanks, Artie and Daniel. Daniel’s images are very fine indeed. Others have commented on the IQ and workflow, which are extremely helpful; let me comment on the “much maligned 100-400 lens.” I went on a photo-safari with my cousin a couple years ago; he had a 1DsIII with the 100-400 and I had the 7D with a 400 f/5.6L. We cross-compared cameras and lenses extensively, but not scientifically, and concluded that the IQ of the two lenses was very comparable. For hand-held shots of sitting birds, the 100-400’s IS led to better shots in medium and low light than we could get with the 400 prime. The IS more than compensated for any IQ differences there might have been. For flying birds, the 400 prime had noticeably better and faster AF and so the keeper ratio was higher with that lens. The longer “reach” (more pixels on the subject) of the 7D more than compensated for any IQ advantages of the 1DsIII.
David
I’ve always enjoyed Daniel’s work. I regularly cite it as an example when someone tells me they can’t afford to get into bird photography because they think they need an 800 and a 1DX to make great images. I think the 7D + 100-400 is a fine combination, when combined with patience, practice, and good technique.
Thank you Charles!
Thanks Danny and thanks for the great effort you put in at birdphotographers net!
Richard
Congrats Daniel for your wondefull explanation, already knew your amazing work from BPN,and personal site, When Artie asked people if they knew the gear used in this setup, I did’t participate couse I knew.
I don´t have a 7D anymore but used mine in 800 ISO 80% of the time and didn’t need NR in web sizes, like you said the image must be well exposed in camera…
Normaly I applied the USM in LAB mode lightness chanell, do you think I would achive the same results convertibg to LAB mode and fter USM again to RGB?
Cheers and keep the your great work…
Thank you Humberto.
I’ve no experience with LAB mode so I can’t comment on that. I’ve always been happy with “regular” USM and never bothered looking at other options for sharpening. Best would be to test it out and decide for yourself. See you on BPN!
A very imfortmative article , I own the 7D AND THE 1D MKIV, and recently aquired a 500mm f4.0 second hand , I have found this a great combo . My last few outings have been using the 7D almost exclusively .
I’ll be reading this again , great job , and fine images.
Many thanks Dan… (and Artie)..
You make GORGEOUS photos!!!!
It is so refreshing and encouraging to hear my 2 7Ds are just fine…
As my husband just said, when I showed him this… “Well, it’s not the equipment!!!”
Seriously… I love good equipment (as Artie knows!)… but this shows what a skilled and dedicated photographer can do… AND withOUT a tripod… Kudos Dan..
I do wonder…. HOW do you work in low light with the 7D??
With ISO no greater than 800…
Do you get to sleep in (ha, not with 2 boys), and miss all those great predawn shots??
Love the workflow information…
Thank you Artie for bringing Dan to my attention…
I know, I’ve got to get onto BPN…
Many many thanks… again …. and again…
Hi Deirdre, thank you!
For low light I do just the same. For ISO 1600 (which I admittedly do not use very often) I run NR (Noise Ninja)just a bit more aggressively than the default value, say +2 to +4 over default.
BTW what the intro to the article misses is that between me and my wonderfully supportive wife we have two boys AND two girls 🙂 I actually wake up earlier on weekends, especially the longer summer days, so sleeping in is not an option for me!
Great photos, Daniel! I voted in the last post, but didn’t know you had a 7D like me. Now I’m bookmarking everything! I also have to add that my fondness is for the 2 waxwings posted. Beautiful birds and great photography. Thanks!!
About a year ago I bought a 7D and a 300mm F4 with 1.4 converter (i.e same “ball park” as Daniel?) A “mentor” from Queensland Australia took pity on me and suggested I follow a guy called “Artie”. I have done this and have initially focussed on the image capture side of things. When marvelling at the images constantly posted on this site I’ve always noted that much of the gear is often “top shelf”. So here comes Daniel using similar gear to me with a simplified pathway for me to follow in terms of post processing. For where I am at the moment this is simply tremendous. Thanks SO much for that – AND the truly inspiring images. I LOVE the snow shots – they are ones I’d have to think hard about.
However, being of similar “length” I would like a follow up article. Daniel is an exceptional birder to get SO close. I have a “camo” bag from Lens Coat in the mail. I’ve got no idea if they are any good but I do know I’ve got to get myself closer. Any tips that are not in Artie’s books?
Dan:
Amazing work. I also have a 7D and think it is a great camera. I have three questions for you, and would be greatful for an answer of reference to previous posts that you have:
1- As far as I know the microadjustment on the 7D can handle only one side of the range of Zoom lenses. How fo you microadjust for the 100 and 400 side of the lens?
2- How do you achieve ETTR on the 7D? Been hearing a lot lately on the technique and understand that the right side of the histogram holds a lot more data the the dark side. Just not sure you achieve that exposure level consistently.
3- What settings do you use for the C1, C2, and C3 positions on your 7D?
Thanks in advance for your help.
Hossam
Hossam, You ask a lot. 🙂 I will save Dan some time by chipping in on #2 and #3. ETTR and getting the right exposure using digital capture is covered in great detail in the “Exposure Simplified” section of The Art of Bird Photography II (ABP II, a 916 e-Book with more than 900 images). Dan follows the principles espoused there and simply checks his histogram for each new situation (just as I and all good photographers do). In addition, the topic has been covered here on the blog dozens if not hundreds of times at a minimum.
As far as C1, C2, and C3 settings, I am not sure how or if Dan utilizes those. My personal choices are covered in detail in the 7D User’s Guide. See additional info on the 7D UG above.
Artie:
I ask a lot because I want to learn a lot :), and I find your blog a wonderful way to learn something new every day!
For the record I have your 7D User’s guide, and I must say it is the best $28 I have ever spent. I learned so much and use your settings, I was just trying to learn if Daniel had other tricksthat I should experiment with.
On the ABP II, is there a version three coming soon?
I like folks who like to learn, especially those who are willing to study and practice. 🙂 ABP III is not even on the distant horizon. In addition to the exposure stuff, there is tons of info that will help to make you a better bird photographer: 916 pages, 900+ images, everything that I learned about bird photography, about nature photography, and about digital from 1998 through the end of 2006. Everything after that is offered for free here on the blog!
Here’s what two of my friends had to say about ABP II:
John Shaw
Arthur Morris is without a doubt one of the premier bird photographers today. His pictures have appeared in countless publications and books. His photographic style is instantly recognizable: crisp subjects against a clean background. It’s obvious to anyone who looks at his photos that he has a solid command of photographic technique as well as a thorough knowledge of avian behavior.
But there is another side of Artie that is not so obvious to a person just looking at the pictures. Artie is not only a gifted photographer, willing to spend many hours in the field to get that special photo, but he is also a good teacher willing to share the very knowledge it has taken him so many hours to accumulate. This teaching ability manifests itself when he’s shooting alongside other photographers. He can’t help himself; he is always demonstrating the newest techniques he has discovered. It also comes out in his writing, from his shorter journal entries to his book-length works such as this.
I’ve photographed alongside Art and also watched him conduct photography programs and seminars. I’ve seen him offer field instruction and tips to both beginning photographers and accomplished pros. All in all, if you want to take better bird photographs – whether you shoot film or digital – my advice in simple: pay attention to what Artie says. He knows what he’s talking about.
Jim Brandenburg
Arthur Morris’s bird photographs have a truly unequalled elegance. As artist, he shares a rare gift of quiet intimacy in his work, then as teacher, powerfully describes the steps of this most delicate ballet with his shy and elusive, feathered partners.
Thank you Hossam.
1- An acquaintance of mine did the micro-adjustment for me and mentioned the same thing. The easy answer was to micro adjust where I’ll spend the majority of my time at…400 🙂 With that I’ve been happy with sharpeness at all focal lenghts.
2- Artie replied exactly what I do. Often when I approach a subject I’ll take a test image (perhaps on a gull or on a boat in the water or other object) and adjust if needed, that way I am ready in advance.
3- I do not use those much. I have C1 setup for pan blurs (low ISO, low shutter speed, small aperture) but find myself forgetting about it and switching my settings on the fly.
Hi,
The last image that I see is a Snow Bunting. I have created many thousands of marketable images with my 7D in the last two years. I use the new 70 to 200 F 2.8 IS II with the new 1.4 extender hand holding for in-flight images at ISO 500. It is fast and very clean. Don
Hi Don, Thanks for catching my cut and paste error. It has been corrected.
Artie, thanks for having Daniel on here. I just forwarded this article to a couple of people that I know shoot with the 7D. On an unrelated note, I was hoping to make it to your talk this Thursday in Orlando at the gardens, but I have class on Friday. Maybe another day.
Great stuff Daniel! I enjoy your posts on BPN quite a bit and have to say that I’ve learned more on there in the past month that I’ve been a member than I have in a year trying to find articles.
One quick question about your sharpening (mainly because this is where I struggle the most). When you are posting online (BPN let’s say), it sounds like you take a copy of your master file, size for use, and then apply the USM that you suggested. I may be getting too detailed, but I had a couple of questions:
– When resizing for BPN, do you use the “save for web” feature or do you use “image size”. Is the PPI # important for web use (and if so, what do you set it to?)
– Once your image is resized and NR/sharpening is applied, do you take it back to Lightroom before you export it? Or do you go straight from PS to a folder on your computer that you then use to upload to BPN?
Hi Miguel, Nice to see you here. As for missing the Orlando program, bit mistake; it would be worth the drive at night; I just spoke to Milton–we get kicked out at 8:30 so you will have plenty of time to get back home for a good night’s sleep.
I trust that Dan will get back to you.
Alright, I’ll see if I can make it! The original plan was to meet up with a friend on Saturday and head over to Merritt Island National Wildlife Refuge. Also looking at other options near orlando. If you have any, let me know!
Merritt can be great and it is only about an hour from the venue for the program. But you have class on Friday :(. If you make it, be sure to say “Hi.”
Hi Miguel, thanks! Yes, BPN is a great place…and lots of fun.
For posting online I take a copy of the master file and sharpen it as detailed in the article BEFORE resizing it, then after resizing (using “Image Size”) I apply an ADDITIONAL round of sharpening. This second round of USM is less aggressive, say Amount 40 or 50 with the same radius, or a smaller radius of 0.5 or so and stronger amount (the latter is better for fine details IMO.
PPI is not important as far as I know for web posting and do not touch it. I just then save a new copy in the same folder on my PC using “Save As” and rename with a prefix of my choice to differentiate it.
Hope this helps!
Just to add a bit of variety here. 🙂 I crop my unsharpened master files to 1024 wide or 800 high. Then I apply unsharp mask at 120-140 at 0.3. The images look great and since I began doing that I have not had to endure a single “sharpening halo” comments. And when saving for the web, ppi does not matter.
Saw Whet Owl is my favorite. It’s sharp, a rarely-photographed but very photogenic bird.
Cattle Egret and Semipalmated Plover come in tied for a close second. I’d be happy to have captured any of these images.
Me too!
Messieurs Cadieux & Morris, please pardon the multiple posts and pardon my writing before trying out the method. Daniel: you are right as rain and fine as wine. Your sharpening method is a gift. I love it. It’s working beautifully. I shall use USM in this fashion from here on in. Should work beautifully for print & web alike…again, my sincere thanks…
I rescind my comment below. A radius of 1.3 makes perfect sense if you’re sharpening the large-sized file. I’ve always read that it’s best to only sharpen the image AFTER the final resizing? Different ways to skin the same cat? So to speak?
Yep. I sharpen the full resolution image in the method described, but then an additional but much less aggressive round of sharpening for a web-resized image. You are right, many ways to skin a cat when it comes to sharpening!
Daniel, most informative. Your pictures are consistently excellent, in my opinion. But I must ask: when you wrote “” For every image file I set the Radius to 1.3 and the Threshold to 0″ was there a typo there? I wonder if perhaps the radius should be 0.3 instead of 1.3? I only ask because 1.3 seems very strong to me! I eagerly await your fine-feathered response! Thanks to you and thanks to Mr Morris for sharing all of this…
Hi Jack, thank you! That is not a typo. I keep the radius at 1.3. When in USM take a look at the small preview window at 50%, this gives a good idea of the result.