

|
|
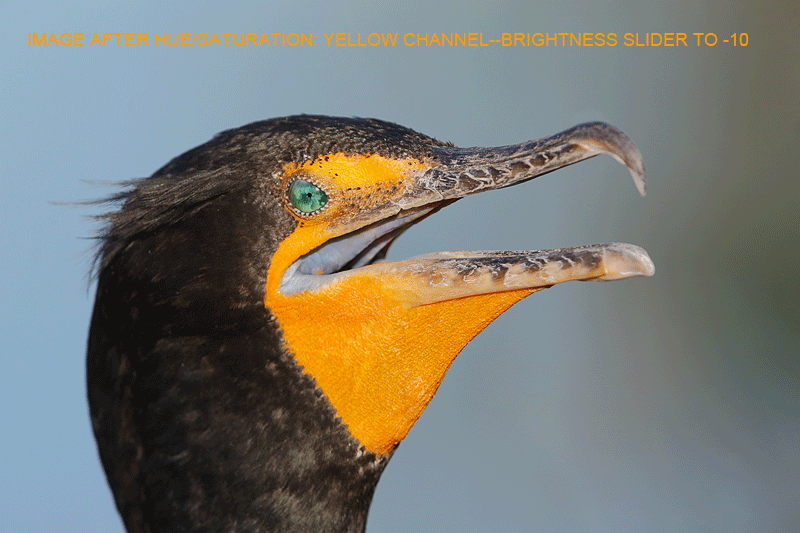
Double-crested Cormorant, gular panting. This image was created at Anhinga Trail on the sunny afternoon of Thursday, February 7th with the hand held Canon EF 300mm f/2.8L IS II lens, the Canon 2x EF Extender III (Teleconverter), and the Canon EOS-1D X digital SLR . ISO 800. Evaluative metering -1/3 stop: 1/640 sec. at f/10 in Av mode. OK boys and girls, put your thinking caps on: why ISO 800 in bright late after sun? Was it simply a mistake or did I have a good reason? If the latter, what was my thinking. Notice the beautiful rich texture and detail in the bright yellow-orange colors of the gular sac (or pouch). Central sensor AI Servo Expand/Rear Focus AF active at the moment of exposure. I had the central sensor on the side of the bird’s breast on the same plane as the eye. Click here if you missed the Rear Focus Tutorial. Click on the image to see a larger version. |
Anhinga Trail is Rocking
I picked up Denise and our friend and private client Geri Georg at the Fort Lauderdale airport on Thursday afternoon and after checking into the Hampton Inn we headed straight to Anhinga Trail in Everglades National Park where I will–with help from Denise, be conducting the Canon Digital Learning Center Destination event beginning Friday night and continuing through late Sunday. The good news is that Anhinga Trail is pretty much packed with tame birds. I will be sharing more images from the DLC shoot here as often as I can over the next few days. But I will be busy.
The bright yellow-orange bills of this species have long been problematic. What is the best way to restore detail to those bright yellow-oranges? With this image I ran a Linear Burn and followed that up with a 50% layer of NIK Color Efex Pro’s Detail Extractor. But I still was not happy. See the animated GIF below and then read on for the simple, long-overlooked, but deadly solution.
Give the animated GIF above a few moments to play. Note the before and after differences. Be sure to click on the optimized image below to see the large version of the optimized file. |
The Simple, Long-overlooked, Yet Deadly Effective Solution
I optimized this image at dinner last night, and when I looked at it again on Friday afternoon I thought, “Those yellow-oranges are still too bright with nowhere near enough detail….” Then, a brainstorm. I brought the image back into Photoshop, opened a Hue-Saturation Layer, selected the yellow channel from the drop-down menu, and rather than de-saturating the image I simply moved the Brightness slider to the left to -10. Volia. Now I have a new trick that I will use often for too-bright, seemingly over-saturated colors.
Not that I lightened the area around the eye with a Tim Grey non-destructive Dodge and Burn and cleaned up the schmutz–don’t ask, it a technical term from the Yiddish language–on the bill with the Patch Tool and a series of warped Quick Masks. All as detailed in our Digital Basics File that includes my complete digital workflow, dozens of great Photoshop tips, all of my time-saving Keyboard Shortcuts, and free updates.
MP4 Photoshop Tutorial Videos
See and hear me at work in Photoshop in these great MP4 instructional videos. Cheap! You can see them all and learn more here and learn about our latest offering here.
Southwest Florida IPT $600 Late Registration Discount!
If you would like to join us on the Southwest Florida IPT (see below) please call Jim on Monday at 863-692-0906 to register or shoot me an e-mail to save one of the two availble spots for you. Or contact me via e-mail for a pro-rated quote if you can make only part of this great IPT.
SW FLA IPT. FEB 16-21, 2013. Introductory slide program: 7pm on 2/15. 6-FULL DAYS: $2999. Co-leaders: Denise Ippolito and Robert Amoruso. Limit: 10/Openings 2 due to two late cancellations
Payment in full is due now
This is my bread and butter IPT; learn the basics and the advanced fine points from the best; escape winter’s icy grip and enjoy tons of tame birds! Subjects will include nesting Great Blue Heron and Great Egret, Mottled Duck, Brown and White Pelican at point-blank range, Snowy & Reddish Egret, Tricolored Heron, Yellow-crowned Night Heron, Osprey, wintering shorebirds and plovers, gulls and terns, & Burrowing Owl. All ridiculously tame. Roseate Spoonbill, Black-bellied Whistling Duck, American Oystercatcher, and who knows what are possible.
Click here to learn more about this IPT.
Pines West Camera Club EOL Program
I will be presenting “A Bird Photographer’s Story” for the Pines West Camera Club in Pembroke Pines, FL at 7pm on February 12, 2013. The program, sponsored by Canon Explorers of Light, is free and open to the public. Click here for additional details and scroll down for directions.
Typos
On all blog posts, feel free to e-mail or leave a comment regarding any typos, wrong words, misspellings, omissions, or grammatical errors. Just be right. 🙂
Support the BAA Blog. Support the BAA Bulletins: Shop B&H here!
We want and need to keep providing you with the latest free information, photography and Photoshop lessons, and all manner of related information. Show your appreciation by making your purchases immediately after clicking on any of our B&H or Amazon Affiliate links in this blog post. Remember, B&H ain’t just photography!


Just wanted to be sure I wasn’t missing something 😉
Artie,
In your description of your PS trick for working the yellows of the cormorants throat you mention the “Brightness” slider in the Hue/Saturation adjustment………..did you mean to say “Lightness”?
If you looked and checked up on me then yes.
I would say not a mistake. You needed ISO 800 to get the DOF to get the Cormorant’s head and bill sharp. DOF can be inches when your pretty close to the bird.
Yes, while maintaining a fast enough shutter speed to prevent motion blur on the subject.
Hi Arti,
My thoughts are that when birds are hot they tend to cool themselfs by using their ‘pouch’ to viberated for cooling down. Stopping that kind of action would need some fast shutterspeed so my guess is that you choose iso 800 to be on the save side.
Kind regards,
Yeb
You are correct sir, with a bit of extra d-o-f.
Where is the schmutz tool? I can’t find it anywhere.
The Schmutz Tool is in the “J” drop-down menu along with the Patch Tool and the Spot Healing Brush. But you can only access it if you speak Yiddish.
Alright, I’ll go against the majority and say it was a mistake. You might’ve been able to shoot at 400 and probably still use an aperture of F8 and still get everything in sharp focus. Or…it wasn’t a mistake 🙂 Doug
Hey Doug. No mistake here (though I do make such mistakes often).
Just for the record, the reason why I went for the ‘mistake’ was,
on page 98 in ABP there’s a very close shot of the one you posted
here (the one in the book was 3/4). Almost the same head angle.
You captured that one at 1/250 at 5.6. I’m guessing you pushed your
Velvia to 100.
So I thought, hmmmm, if this one was at F10 at 1/640 and comparing
it to the one in ABP, it’s possible he made a mistake.
Darn it! 🙂
Doug
I agree with some of the other comments Artie such as getting a decent DOF and shutter speed but could it also be that noise is so good with the 1D X that you are happy to use ISO 800 as a standard setting?
Even though the 1D X is great at ISO 800 I do prefer ISO 400 by a small margin.
You saw how rich the gullar pouch was in color and texture so wanted to document that and since the bird was panting the sac would be moving continuously plus you were hand holding at f10 so to get enough shutter speed at f10 you used iso 800
you probably used flash to eliminate the harsh shadows and make sure the sac was frozen
All correct but no flash.
My guess would be to allow a faster shutter speed for hand-holding and to get enough exposure for details in the black feathers and a reasonable dof since the head is angled some toward you.
Hi Dick, The right exposure is the right exposure. I was more concerned with blur from the fluttering gular sac than with blur from hand holding at 600. The 4-stop IS is that good. Yes to the d-o-f reasoning. artie
ps: see you a week from Friday on the Hooptie Deux!
Art,
You seemed to have used flash, so upping your ISO is a way to extend the reach of the flashgun. Working @ f/10 for some depth of field, you probably needed the flash to fill the whole head. The shutter speed is kinda slow but the exposure is mostly frozen by the flash anyway (and you have no background that might have been blurred).
Sorry Antonio. No flash.
I had the same thought as Antonio that you used flash, something about the quality of the light. Oh well, wrong again 🙂
Hi Arthur,
I would say it was because you were hand holding a focal length of 600mm and needed to have a shutter speed of 1/focal length to guarantee that hand shake didn’t introduce blur, this would also limit any subject movement, you are also close to the subject so wanted to be able to use more depth of field f/10 to have more of the Cormorant’s head in focus.
With four stop IS it is no longer necessary to think about 1/effective focal length of the lens. I needed the shutter speed to avoid blur due to subject movement and yes on the need for more d-o-f at close range.
Thanks Arthur, my thinking is obviously in a different place using a 100-400mm and 400 f/5.6, no four stop IS – may be one day! Have to say that Emerald Green eye is quite something, these are obviously pretty stunning birds in their own right. 🙂
Error….maybe
“I picked up Denise our private client Geri George….”should be
I picked up Denise and our private client Geri George
Thanks and corrected. artie
My thought is that you were looking to increase the depth of field and shoot at f10, and you wanted to keep a decent shutter speed as the bird might be moving his gullet and bill.
Also, I don’t think the 300f28 plus 2X converter would have Central sensor (by necessity) as it is still at f5.6. You probably just copied for the 800+1.4X text you normally use.
As expected, you nailed the answer accurately and succinctly.
Thanks for catching my cut and paste brain typo on the 300 II with the 2X III TC. It has been corrected above,