

|
|
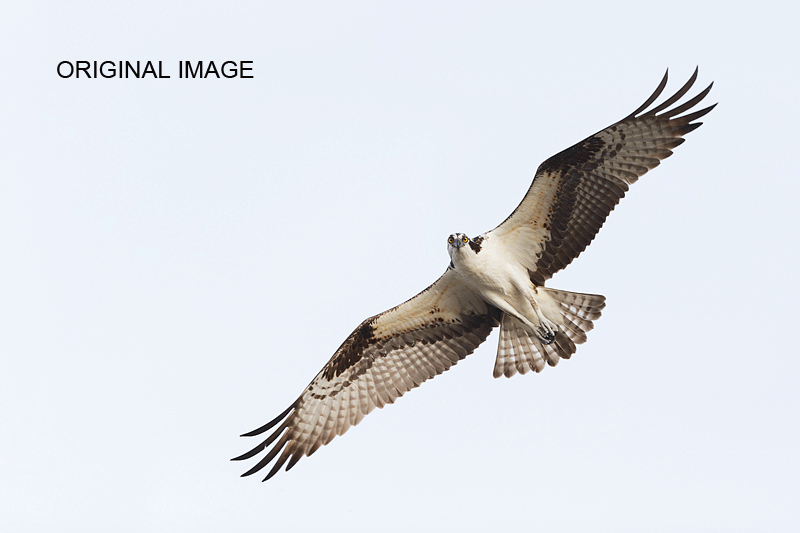
This image was created at Indian Lake Estates, FL with the hand held Canon 500mm f/4L EF IS II lens and the Canon EOS-1D X. ISO 400. Evaluative metering +1 1/3 stops off the white sky: 1/1250 sec. at f/4 in Manual mode was a slight underexposure; should have gone to +3 off the sky for more underwing detail in the orginal–see same below. Central sensor/AI Servo Surround/Rear Focus AF active at the moment of exposure. Click here if you missed the Rear Focus Tutorial. Be sure to click on the image for the larger version.
|
Ospreys By the Lake
There are at least six pairs of Osprey nesting down by the lake in my development here at Indian Lake Estates. On some windy afternoons I’ve had more than a dozen right overhead while standing in the parking lot at the base of the pier. At times, especially when it is overcast with strong south or west winds, I have succumbed…

|
|
This is the full frame original capture after conversion in DPP. To learn why I am now converting all of my images in DPP click here.
|
Hand Holding the 500II
Hand holding the 500 II alone for flight is a reasonable endeavor for me as it should be for most folks in decent shape. Remember, it is a lot easier to hand hold for flight and action than to hand hold when creating images of static subjects…. Most of my keepers from the afternoon of February 26 were perfectly framed but as often is the case the very best pose was slightly mis-framed; the tiniest portion of the fourth primary was clipped just a smidge.

|
Central Sensor Surround
Above is the BreezeBrowser Main View screen capture for the image. The illuminated red square shows that the central sensor is on the sky not on the bird’s face. But by choosing Surround as my AF Area Selection Mode all of the surrounding sensors are active. Here, the two sensor just below and right of the central sensor saved the day. In Breezebrowser you need to make sure to check Show Focus Points under View to activate this feature. To see the focus points in DPP check AF Point under View or hit Alt L.
Regular readers know that I use and depend on BreezeBrowser every day of the year. It allows me to sort my keepers and deletes the rejects faster than any other browsing program. We use it on the main computer in the home office to catalog our images file-drawer style. And the companion program, Downloader Pro allows me to download my images quickly and conveniently. It automatically adds my IPTC data and the shooting location. I have it set up to create a folder named by the Month/date/year. The Breezebrowser/Downloader Pro combo saves me many hours each week. To learn earn more or to purchase this great PC only program, click here.
To learn everything that I know about the great 1D X AF system check out our 1D X AF Guide here.
|
The Image Optmization Process
Note that even though the exposure was fairly good that the bird’s left wing was left somewhat in the dark. After moving the bird up and right in the frame, adding the tiny bit of missing wingtip (as detailed in APTATS I), and cropping to 3X2 I selected the sky with the Magic Wand Tool, ran Refine Edge, opened Hue-Saturation on the layer (Control U), and reduced the saturation while moving the Lightness Slider to the left to darken the sky. Then I merged the layer, selected the bird with the Quick Selection Tool, saved the selection, and applied a 100% layer of NIK Color Efex Pro Detail Extractor. Then I added a Regular Layer Mask and fine-tuned the Detail Extractor. I used more of the effect on the birds left wing than I did on its right wing by varying the opacity of my brush. Next I re-loaded the selection and applied a 50% layer of Tonal Contrast. I opted to apply Detail Extractor (DE) and Tonal Contrast (TC) on separate layers as I needed more control than I would have gotten applying a 50/50 DE/TC layer as I usually do. Simply put, NIK Color Efex Pro saved this image.
Then I darkened the pupils with some Eye Doctor work, painted a Quick Mask of the bird’s face, put the selection on its own layer, ran a Contrast Mask to sharpen it, and then lightened the layer by pulling up the curve (Control M). I finished off with a slight S curves (Linear Contrast) adjustment. I do that via an action using the f4 key. Pretty much all of the above is detailed in our great Digital Basics File that includes my complete digital workflow, dozens of great Photoshop Tips, and all of my time-saving Keyboard Shortcuts.
| [Not a valid template] |
NIK 15% Discount
As regular readers know, NIK Color Efex Pro has dramatically changed my digital workflow. You can save 15% on all NIK products (including Color Efex Pro, Silver Efex Pro, and Viveza) by clicking here and entering BAA in the Promo Code box at check-out. Then hit Apply to see your savings. You can download a trial copy that will work for 15 days and allow you to create full sized images.
Typos
On all blog posts, feel free to e-mail or leave a comment regarding any typos, wrong words, misspellings, omissions, or grammatical errors. Just be right. 🙂
Support the BAA Blog. Support the BAA Bulletins: Shop B&H here!
We want and need to keep providing you with the latest free information, photography and Photoshop lessons, and all manner of related information. Show your appreciation by making your purchases immediately after clicking on any of our B&H or Amazon Affiliate links in this blog post. Remember, B&H ain’t just photography!


Hi Arthur,
Nice Osprey image. Not sure if it matters? But I noticed you have a few echoes of the wing tips in the sky below the lower wing, presumably where you have cloned in the sky after cropping.
Seeing as you have now ‘hired me’, I thought I better let you know! 😉
Julian, Am not seeing any echoes even on the full-sized TIFF…. artie
Julian was kind enough to sent me a screen capture. As it turns out, there was one ghosted wing tip and one smudge as a result of sloppy Quick Masking work on my part. I have repaired the original. Julian has eagle eyes for sure!
Sorry to disagree Gary, but to my eye, the optimized image brings out so much more detail of the way the bird should look. While some contrast is lost, to me it is shadow contrast on the left wing which shouldn’t be there anyway. On my monitor the image is anything but flat. But, as you say, it is a matter of taste. Outstanding image Arthur!
Thanks Mike. I am with you! I think that the improvement from the original to the final is spectacular.
Hello Artie,
I know that it’s a matter of taste, but to my eyes the optimized image is way too flat. To me, contrast has been overly compromised for underwing detail. I would prefer a version between the two versions, i.e., showing more underwing detail than the original capture but more contrast than your optimized version. Could you show us the histograms of your original and optimized versions?