
The Streak Continues…
This blog post marks 51 days in a row with a new educational blog post, a record by far that should be extended for at least another week or two. Or not. 🙂 To show your appreciation, we ask that use our B&H and Amazon affiliate links for all of your B&H and Amazon purchases. Please check the availability of all photographic accessories in the BIRDS AS ART Online Store. We sell only what I use and depend on. We will not sell you junk. We know what you need to make creating great images easy and fun. And we are always glad to answer your gear questions via e-mail.
You can find the following items in the store: Gitzo tripods, Mongoose M3.6 and Wimberley heads, plates, low feet, and accessories, flash brackets, , Delkin e-film Pro Compact Flash Cards, LensCoat products, and our unique line-up of educational materials including ABP I & II, Digital Basics, Site and Set-up e-Guides, Canon and Nikon Camera Users and AF e-Guides, and MP-4 Photoshop video tutorials among others.
We would of course appreciate you using our B&H and Amazon affiliate links for all of your B&H and Amazon major gear, video, electronic, household, and personal purchases. For the photographic stuff mentioned above we would of course great appreciate your business.
Thanks and enjoy today’s blog post!

|
|
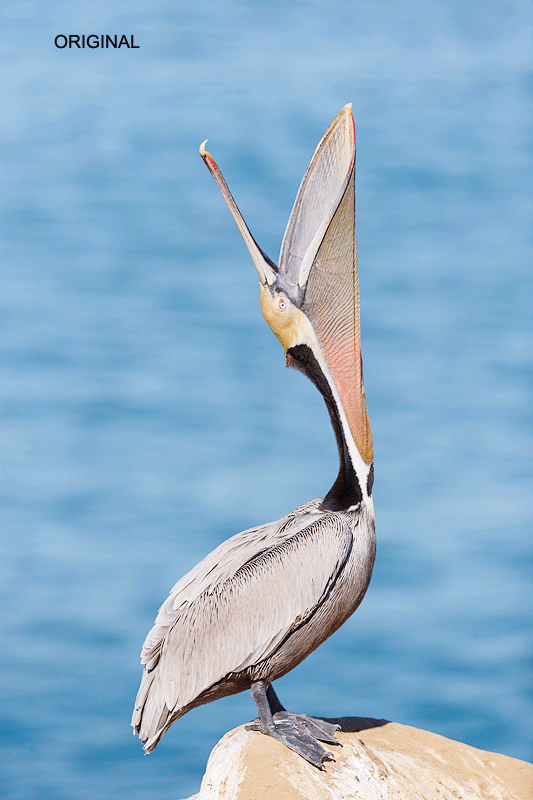
This Brown Pelican image was created with the Gitzo 3532 LS carbon fiber tripod, Mongoose M3.6 head, the Canon EF 200-400mm f/4L IS USM Lens with Internal 1.4x Extender (at 325mm) and the Canon EOS-1D X. ISO 400. Evaluative metering +2/3 stop as framed: 1/2500 sec. at f/5 in Manual mode. 61-Point/AI Servo/Surround–Rear Focus AF as framed active at the moment of exposure. There were 3 sensors active on the upper back and the bottom of the neck. Click here to see the latest version of the Rear Focus Tutorial. Click on the image to see a larger version. |
Universal Advice for Better Bird and Wildlife Photography with Zoom Lenses
Here is the best advice for better bird and wildlife photography with intermediate telephoto zoom lenses that you will ever get: zoom wider. The desire to fill the frame with our subject is ingrained in all of us. You need to learn to fight the urge to zoom in. Frame loosely to ensure not clipping part of the birds in flight or the animals in action. We all get greedy and wind up losing potentially spectacular images.
While scouting on Tuesday for the San Diego Short Notice IPT we enjoyed about 15 minutes where many of the birds remaining on the cliffs were doing head throws every few minutes. The head throws, which offer spectacular photographic opportunities, are thought to be a form of intra-flock communication. Even though I was using the 200-400 with Internal TC I kept clipping the end of the bill. Finally, I gave myself a lecture: zoom wider! With the two images here, listening to my own advice saved the day.

|
|
This Brown Pelican image was created with the Gitzo 3532 LS carbon fiber tripod, Mongoose M3.6 head, the Canon EF 200-400mm f/4L IS USM Lens with Internal 1.4x Extender (with the internal TC in place at at 420mm) and the Canon EOS-1D X. ISO 400. Evaluative metering +2/3 stop as framed: 1/2000 sec. at f/5.6 in Manual mode. 61-Point/AI Servo/Surround–Rear Focus AF as framed active at the moment of exposure. There were 3 sensors active about 1/3 of the way up the bill. Click here to see the latest version of the Rear Focus Tutorial. Click on the image to see a larger version. |
The Tighter Head Throw Image
For me, being on a tripod when trying for head throw images with the 200-400 is imperative. Holding this relatively heavy lens in place while hoping for a head throw–they do not do them often–is simply not feasible for Mr. Famous Bird Photographer. And if you hold the lens in a rest position until the action begins and plan on raising it and framing the image quickly, most folks will find doing so difficult at best.
I nearly clipped this one and needed to move the bird down in the frame while effectively extending extending canvas above and creating a tall, skinny image that I feel works well here. I used the techniques detailed in APTATS II; the whole thing took about 90 seconds. Mention this blog post and Jim will be glad to apply a $10 discount on your APTATS II purchase with phone orders only.
|
Exposing to the Right
In the animated GIF above, note how light the original image is. I exposed to the right just to the point of getting a few blinkies on the silver feathers. I used a 15% Multiply Blending Mode layer to darken the image. And not much else besides a small crop from the left and from above. The high quality pixel-rich files of today’s digital camera bodies allow sharp images to easily stand up to even healthy crops.
Your Favorite?
Please take a moment to leave a comment and let us know which of the two images here you like best. Be sure to let us know why.

|
|
Breathe deeply, bite the bullet, and live life to its fullest; we all get only one ride on the merry-go-round… Join me on this great trip. Click on the image to enjoy a larger version. |
The Southern Ocean…
There has already been a ton of interest including that from some long time wonderful Happy Camper BIRDS AS ART folks. Mulitple-IPT veteran Michael Viljoen of South Afirca has already committed to making the trip with his son. He and lovely, smiling wife Lyndsey were with me on the memorable and wonderful October 2012 Cheesemans’ South Georgia Expedition. Repeat-clients–I like to call them recidivists–are a good sign that you are doing something right.
Click here for complete details. If you are seriously interested please shoot me an e-mail for the trip link.
Support the BAA Blog. Support the BAA Bulletins: Shop B&H here!
This Bulletin took about 12 hours to prepare
We want and need to keep providing you with the latest free information, photography and Photoshop lessons, and all manner of related information. Show your appreciation by making your purchases immediately after clicking on any of our B&H or Amazon Affiliate links in this blog post. Remember, B&H ain’t just photography!


Amazon
Everyone buys something from Amazon, be it a big lens or deodorant. Support the blog by starting your search by starting your search by clicking on the logo-link below. No purchase is too small to be appreciated; they all add up. Why make it a habit? Because I make it a habit of bringing you new images and information on an almost daily basis.
Typos
In all blog posts and Bulletins, feel free to e-mail or to leave a comment regarding any typos, wrong words, misspellings, omissions, or grammatical errors. Just be right. 🙂
IPT Info
Many of our great trips are filling up. See especially info on the South Florida, Holland, and Nickerson Beach IPTs. Two great leaders on most trips ensure that you will receive individual attention, have all of your questions answered, and learn a ton including how to think like a pro, see the situation, and get the right exposure every time. In addition you will have fun, and make lots of great images. Click here for IPT details and general information.


Artie,
As usual, a great pair of pictures and detailed explanations. I prefer the first image, if I saw the second image alone would have no idea what I was looking at. The second picture is almost abstract.
Thanks Jeffrey. It is quite abstract!
What time of day were the head throws? I was at the Cave Store cliffs on Monday and they didn’t really start doing head throws until after 10 so the light wasn’t so hot by then. But the big problem then was that there were so many pelicans there (around a hundred when I counted!) that I didn’t get any head throw images without another bird in front of or behind the bird I was photographing. It’s hard to get any isolated subjects when there are so many there. It was exactly the opposite problem that I had the week before when the cliffs were mostly bare at sunrise!
Of course I didn’t get anything as good as the ones you posted. 🙂
About 10:30am or so. As long as you work right on sun angle, the light can look pleasing. We were a bit lucky as many of the birds had flown away so isolating them was a bit easier….
Thanks for your kind words. Today,Thursday January 16 was one of the best days ever at the cliffs, yet we got no head throw images…. Go figure. Later and love, artie
Hi, Artie. Both images are great but I prefer the second because there’s more of the bird and you can see what it’s doing. Just spectacular images. I was photographing cranes flying across the nearly full moon in New Mexico a couple days ago (I had planned that trip for weeks) and framed wide so I could get nice formations, and I did get some, but there was one where one of the cranes was in front of the moon with a shadow of its head on its wing, and how I wish I’d framed THAT one tighter!
Thanks. I think that you meant that there is more of the bird in the first image…. artie
Ooops, yes. I was counting the explanation of the optimized image as the second; I wasn’t paying enough attention.
ditto on Kevin’s question
Ditto on the answer given to Kevin 🙂 artie
Hello Artie the pictures are great as usual. My question is why the fifteen percent multiply blend mode instead of decreasing the exposure in Photoshop? Do you you have more control in the blend mode versus backing off the exposure. I am new to post edit . thanks kevin
Hey Kevin, Thanks :). Six of one, half a dozen of another…. artie