The Streak Continues
This post marks 130 straight days with a new educational blog post. With so many folks getting in the habit of using our B&H and Amazon links why quit now? To show your appreciation for my efforts here, we do ask that you use our the B&H and Amazon affiliate links on the right side of the blog for all of your purchases. Please check the availability of all photographic accessories in the BIRDS AS ART Online Store. We sell only what I use and depend on. We will not sell you junk. We know what you need to make creating great images easy and fun. And we are always glad to answer your gear questions via e-mail.
You can find the following items in the store: Gitzo tripods, Mongoose M3.6 and Wimberley heads, plates, low feet, and accessories, flash brackets, , Delkin e-film Pro Compact Flash Cards, LensCoat products, and our unique line-up of educational materials including ABP I & II, Digital Basics, Site and Set-up e-Guides, Canon and Nikon Camera Users and AF e-Guides, and MP-4 Photoshop video tutorials among others.
I would of course appreciate your using our B&H affiliate links for all of your major gear, video, and electronic purchases. For the photographic stuff mentioned in the paragraph above we, meaning BAA, would of course greatly appreciate your business. Here is a huge thank you to the many who have been using our links on a regular basis and visiting the BAA Online store as well.
This blog post took about 3 hours to assemble. Enjoy!
Dreaming of Africa?
No need. Check out the wonderful video from Gustafson Photo Safaris here and Todd’s amazing image galleries here. You will find details on this summer’s Tanzania Photo Safari below.
|
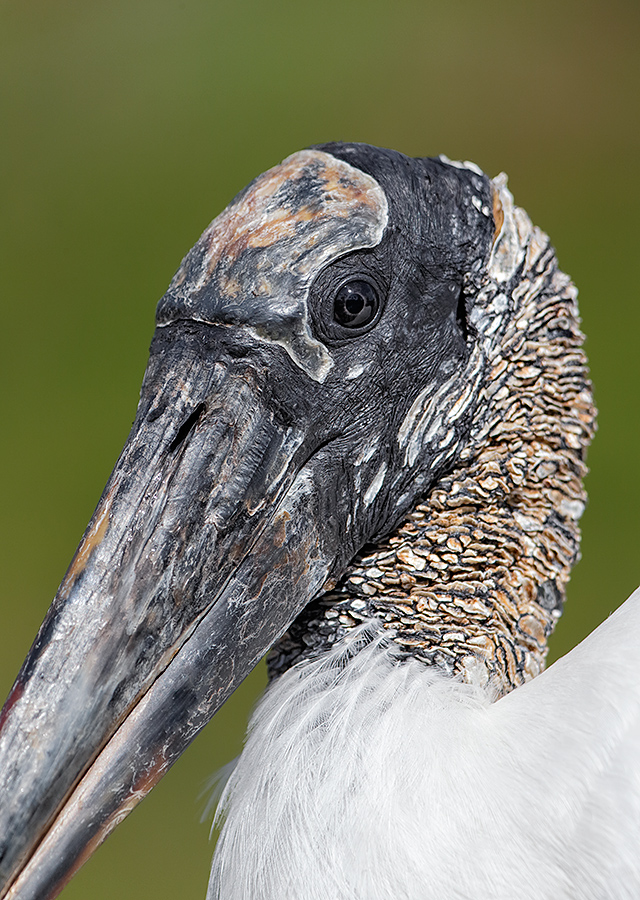
This image was created at Gatorland on Saturday April 5, 2014 at 4:38pm on a clear afternoon in direct sunlight. I hand held the Canon EF 200-400mm f/4L IS USM Lens with Internal 1.4x Extender (with the internal TC engaged at 490mm) and the Canon EOS-1D X. ISO 400. Evaluative metering +1/3 stop as framed: 1/1600 sec. at f/6.3 in Avmode. AWB. Three sensors up from the central Sensor/AI Servo-Surround/Rear Focus AF directly on the bird’s eye as originally framed was active at the moment of exposure. Practicing so that you are able to change AF sensors almost instantly is an important skill to work on. Learn everything there is to know about the 1D X and 5D III AF systems including how to manage the various AF Area Selection Modes, when to use which one, and several ways to move the AF sensor around in my 1D X AF Guide and the 5D Mark III User’s Guide. Click here to see the latest version of the Rear Focus Tutorial. Click on the image to see a larger version. . Image #1: Wood Stork Head and Face Detail.
|
Striking While the Iron is Hot
I have been asking lots of questions lately, and many folks have put their thinking caps on and left comments with their answers. There have been lots of right answers and lots of wrong answers. Some wrong answers however were perfect for another question :).
Here we will take an in-depth look at the questions from yesterday’s post. Enjoy the learning.
Note: I have responded to each comment in yesterday’s post here.
Image Questions
Questions in green
Answers in white.
#1: Why was I in Av mode for Image #1 but in Manual mode for Image #2?
Only Greg Payne got this one right; he nailed it when he wrote: “Aperture priority for #1 because it was possibly a fleeting opportunity and it had just occurred. You could dial in compensation and go to work. As the bird stayed around you could go to manual exposure based on the readings used previously.” The clue was in the story, and I quote: “Dierdre, Lynn, and I had just arrived and gotten our gear set up when some kids began tossing some gator food-pellets into the water. This in turn attracted not only a flock of small gators but some birds as well. Wood Storks rarely sit on the boardwalk railings, but this one pictured here was hungry for a pellet. I grabbed my 200-400 and went to work opting to hand hold so that I could frame accurately and react quickly.”
When presented with a new situation, as I was when creating the image above (having just arrived and grabbed my 2-4), I will most often go to Av mode. Having studied exposure for close to 3 decades now, I can usually set the exposure compensation to within 1/3 stop of perfect. Here I nailed it at +1/3. Once I knew the right exposure for the Wood Stork, 1/1600 sec. at f/6.3, I set that exposure manually. In effect, I had worked in Av mode to do my exposure check.
Here’s the best news: you too can learn to determine the right exposure compensation with just a glance, to see and understand the light, to understand what your camera’s meter is doing, and to understand the influence of the various tonalities, be they black or white, light or dark, on the metering system. How? Study the chapter on Exposure in the original, soft cover, The Art of Bird Photography (ABP), especially the section on exposure theory. And once you have mastered that, study the Exposure Simplified section in The Art of Bird Photography II (ABP II: 916 pages, 900+ images). You can save $10 by ordering the two-book bundle here.
#2: The exposure for Image #1 was perfect. Why did I need to go 1/3 stop darker for Image #2?
There were lots of misconceptions when folks attempted to answer this one. When you are working in Manual mode the shutter speed and the aperture together determine the exposure. The exposure compensation is the result not the cause. When you are working in an automatic mode like Av or Tv the EC is the cause. With image 1 the exposure was 1/1600 sec. at f/6.3. In image #2 the exposure was 1/2000 sec. at f/6.3, 1/3 stop darker.
The difference in the exposure compensations for the 2 images was the result of the differences in subject size, framing, and the amount of dark background.
So why did I go 1/3 stop darker (1/2000 sec. at f/6.3 is 1/3 stop darker than 1/1600 sec. at f/6.3) for image #2? Because the WHITEs on a Great Egret are brighter than the WHITEs on a Wood Stork. Knowing that, I made one image with the two birds in the frame, checked the histogram, saw the blinkies on the Great Egret, and spun the finger wheel dial 1/3 stop clockwise to increase the shutter speed from 1/1600 sec. to 1/2000 sec.
#3: Why should I definitely have gone to a smaller aperture, at least down to f/9, for Image #1?
Though Doug West hinted at the right answer Eve Turek and John Beasely got this one right: stopping down would have sharpened up the back of the stork’s neck.
#4: What is the one thing about Image #2 that bugs me a bit?
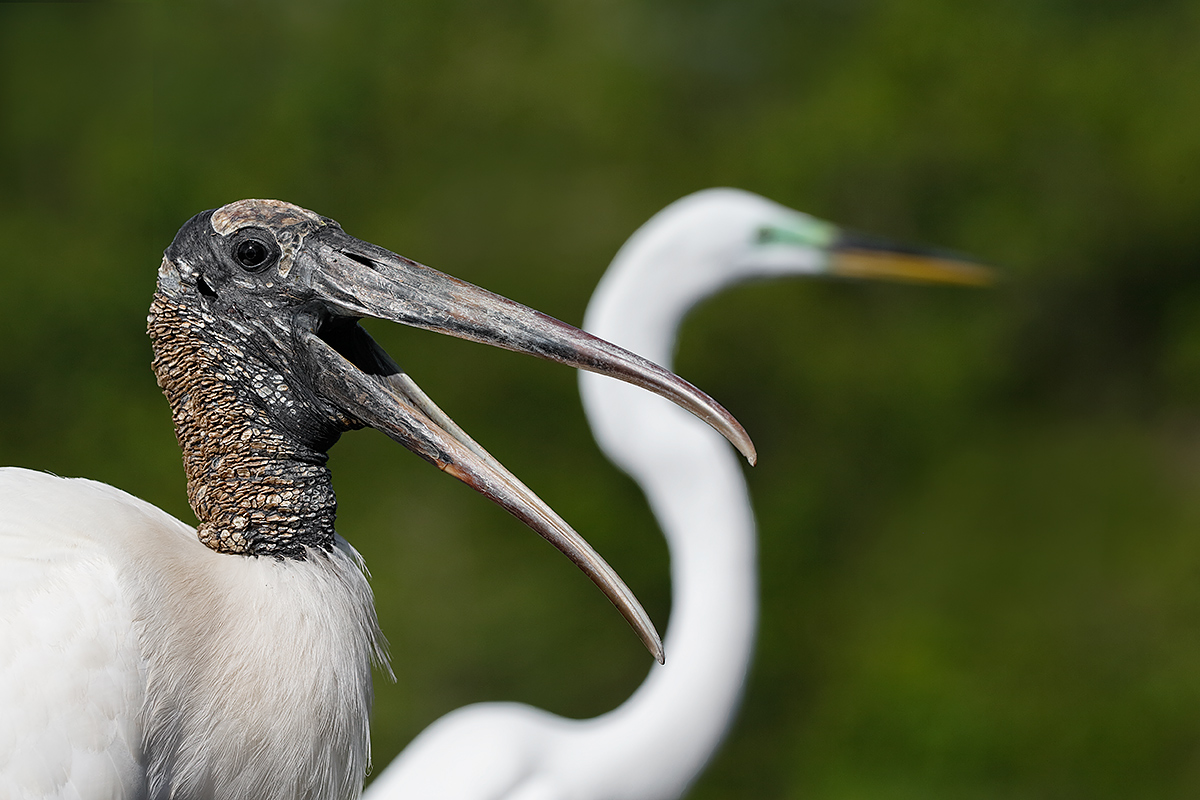
Kudos to multiple IPT veteran Doug West who knows me too well. He stated, “The head angle of the egret; it was facing slightly away.”
#5:Considering the fact that the aperture was the same, f/6.3. why does the skin on the Wood Stork’s neck look so much sharper in Image 2 than in Image 1?
Several folks got this one right but John Beasley said it best: “Oops. Question 5 – the neck is sharper because the subject was further away from your camera so your DOF is greater?” Only a wrong word kept him away from perfection. He should have used “farther” as he was referring to distance. Further refers to advancing a thought or idea.
|
This image was also created at Gatorland on Saturday April 5, 2014, this one–of the same bird, at 4:39pm, about one minute after I created the opening image in this blog post. Again, on a clear afternoon in direct sunlight. And again I hand held the Canon EF 200-400mm f/4L IS USM Lens with Internal 1.4x Extender (at 250mm) and the Canon EOS-1D X. ISO 400. Evaluative metering -1/3 stop as framed: 1/2000 sec. at f/6.3 in Manual mode. AWB. Three sensors to the left of the central Sensor/AI Servo-Surround/Rear Focus AF on the base of the stork’s lower mandible (as originally framed) was active at the moment of exposure. Again, practicing so that you are able to change AF sensors almost instantly is an important skill to work develop. You can learn everything that there is to know about the 1D X and 5D III AF systems including how to manage the various AF Area Selection Modes, when to use which one, and several ways to move the AF sensor around in my 1D X AF Guide and the 5D Mark III User’s Guide. Click here to see the latest version of the Rear Focus Tutorial. Click on the image to see a larger version. Image #2: Wood Stork/Great Egret Juxtaposition.
|
My Favorite?
I like both images equally. Had the Great Egret had its head square to the back of the camera in the second image, it would have been my favorite by far.
Confused?
If you are confused by anything that I wrote above, do let me know by leaving a comment below and I will try to help.
Comments and Answers
After I publish this at about 11:15am, I will address the many comments left at the original post here.

|
|
Now is about your last chance to join me for the 2014 Tanzania Summer Safari! |
2014 Tanzania Summer Safari, 14-day African Adventure/leave the US on August 9. Fly home on August 24: $12,999.
Leader: Arthur Morris. Three photographers/van; you get your own row of seats. Our trip is a bit more expensive than the average safari for good reason. It is the best. We have the best driver guides with a total of decades of experience. They have been trained over the years by Todd and by me to drive with photography in mind. We stay in the best lodges and camps. We hope that you will join me for my 8th 35th African photo safari.
If you are seriously interested please e-mail me; I will be glad to send you the illustrated PDF with the complete itinerary and deposit info.
What else makes this expedition unique?
•Pre-trip consultation and camera equipment advice
•Award-winning photographers as your guides
•A seamless itinerary visiting the right locations at the best time of year
•Hands-on photography instruction in the field
•Specially designed three roof-hatch photo safari vehicles
•Proprietary materials for preparation, including free copy of “A Photographer’s Guide to Photographing in East Africa.”
•Post-safari image critiques
All-inclusive (double-occupancy) except for your flights to and from Kilamajaro Airport, bar drinks, soda & water (except at the Intimate Tented Camp where everything is free for our entire stay), tips for drivers and camp staff, personal items, and trip insurance.
Support the BAA Blog. Support the BAA Bulletins: Shop B&H here!
We want and need to keep providing you with the latest free information, photography and Photoshop lessons, and all manner of related information. Show your appreciation by making your purchases immediately after clicking on any of our B&H or Amazon Affiliate links in this blog post. Remember, B&H ain’t just photography!


Amazon
Everyone buys something from Amazon, be it a big lens or deodorant. Support the blog by starting your search by clicking on the logo-link below. No purchase is too small to be appreciated; they all add up. Why make it a habit? Because I make it a habit of bringing you new images and information on an almost daily basis.
Typos
In all blog posts and Bulletins, feel free to e-mail or to leave a comment regarding any typos, wrong words, misspellings, omissions, or grammatical errors. Just be right. 🙂


My comment is not related to this post but to the National Wildlife Federation Field Guide to BIRDS of North America, my first go to book for bird identification. Today while researching a Gull I ran across the name Arthur Morris numerous times in the photo credits. Thank You Arthur for your service to the birding community and photography community!
Many thanks. I did get paid :). artie
Hi Artie,
I appreciate all your hard work in preparing these blogs – so a big thank you. But the answers here had me scratching! Image #1 was at +1/3 and image #2 was at -1/3, a difference of 2/3 although you have changed the speed by only 1/3 of a stop. Am I missing something or is this voodoo magic or what?
Best wishes, Gerald
Thanks and yes. Stay with me here and I will lead you to understanding…
#1: what was the exposure of the 1st image?
#2: what was the exposure for the 2nd image?
Thanks!
#1: 1/1600 sec @ f/6.3
#2: 1/2000 sec @ f/6.3
Which is 1/3 stop less light.
Gerald. Good. Do you understand the rest… If not, I will help. artie
It’s the next bit that I don’t get – but I’m thinking that your description “Evaluative metering -1/3 stop as framed” is just the meter reading on the changed light situation – white highlights against mid tone greens – which should be good.
You are pretty much there but are not realizing that. 🙂 This should seal the deal; here’s what I wrote above: “The exposure compensation is the result not the cause.”
Once you have set the exposure, the compensation as shown on the analog exposure scale in the viewfinder, is the result of the ISO, the exposure you have set as determined by the shutter speed and aperture, and the combination of tones in the image….
If that does not do it, try this: Set an exposure in Manual mode. Point the camera in different directions at various tonalities. The exposure that you have set remains the same. It has to: you are in manual mode. The apparent exposure compensation will be changing constantly as the indicator moves along the exposure scale…. artie
Couple of “ah ha” tips in this one Artie. Question #5 never occurred to me, but now that you mention it, it makes perfect sense. Great way to get our grey brain cells working.
Really enjoy these quizzes. Even when I don’t have time to answer. Great learning experiences. Til I can go on a IPT
Interesting question; let me try an answer. First, the eye isn’t centered horizontally, it’s a bit to the right of center. Second, if you moved the whole image to the right you’d be too tight on the bird’s neck, if you didn’t actually crop it, so it’s hard for me at least to see how the composition could be improved. Artie, I hope you don’t mind my jumping in; I know you’ll correct my errors.
Artie,
I’m still trying to learn. Why is your Wood Stork head portrait so centered? From what I have read about composition, I would have thought that you would have moved the head more to the right so that the eye would have been intersected by both horizontal and vertical rule of thirds lines.
Marv
Hi Marvin, The subject is much more complex than you make it. Here, if I put the bird’s eye in a rule of thirds spot, I would have cut off the back of its head and that would not have worked for me. With many verticals where the bird fills half to 3/4 of the frame, dead center is just fine…. See the Designing the Image chapter in ABP and the section on Advanced Composition and Image Design in ABP II. Save $10 when you buy the two book combo.