The Streak Continues: 251
This post was published just before 7:15am from my home at Indian Lake Estates, FL. Yesterday I enjoyed another great swim, an ice bath, a productive but relaxing day of work, and another good night’s sleep. This post, which took me about two hours to prepare, marks 251 consecutive days with a new enjoyable and educational blog post.
With so many folks getting in the habit of using our B&H links and our Amazon logo-links, why quit now? April, May, and June were fantastic. July was good. Lots of folks are getting the message: using my affiliate links does not cost you a penny and helps support my efforts here. To show your appreciation, I do ask that you use our B&H and Amazon affiliate links on the right side of the blog for all of your purchases. Please check the availability of all photographic accessories in the BIRDS AS ART Online Store, especially Gitzo tripods, Wimberley tripod heads, and the like. We sell only what I have used and tested, and know that you can depend on. We will not sell you junk. We know the tools that you need to make creating great images easy and fun. And we are always glad to answer your gear questions via e-mail.
You can find the following items in the store: Gitzo tripods, Mongoose M3.6 and Wimberley heads, plates, low feet, and accessories, flash brackets, , Delkin e-film Pro Compact Flash Cards, LensCoat products, and our unique line-up of educational materials including ABP I & II, Digital Basics, Site and Set-up e-Guides, Canon and Nikon Camera Users and AF e-Guides, and MP-4 Photoshop video tutorials among others.
I would of course appreciate your using our B&H affiliate links for all of your major gear, video, and electronic purchases. For the photographic stuff mentioned in the paragraph above we, meaning BAA, would of course greatly appreciate your business. Here is a huge thank you to the many who have been using our links on a regular basis and visiting the BAA Online store as well.
|
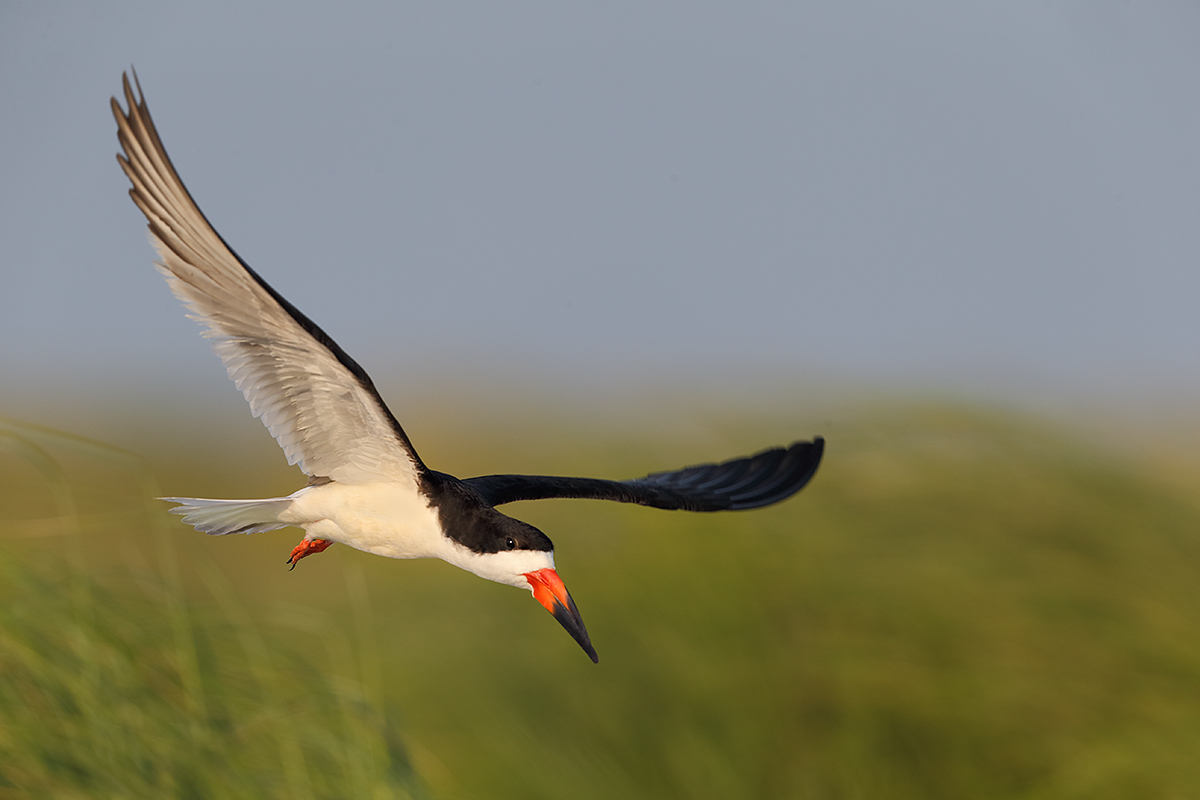
This image was created on the Nickerson Baby Beach Nesting Birds IPT. I used the Gitzo 3532 LS carbon fiber tripod, the Mongoose M3.6 head, the Canon EF 600mm f/4L IS II USM lens, the Canon 1.4x EF Extender III (Teleconverter), and the Canon EOS-1D X. ISO 400. Evaluative metering +1 stop off the light blue sky 30 degrees up from the horizon at 6:37pm on a sunny afternoon with a touch of haze: 1/1600 sec. at f/6.3 in Manual mode. AWB. Though 61-point/AI Servo Rear Focus AF selected the sensor one to the left of the central sensor and that sensor was nowhere near the bird the image was sharp on the eye; Go figure? AF was of course active at the moment of exposure. Click on the image to see a larger version. Image #1: Black Skimmer On Final Approach
|
My Favorite of the Two Skimmer Images
Of the two images presented in the “Sit or Stand? And a Basic Exposure Concept That Most Folks Simply Do Not Get…” blog post here, the image above is my favorite as it is un-cropped and but for a bit of bill clean-up and the removal of a single blade of grass on the lower right frame edge, pretty much right out of camera. As noted in the original blog post, you can only make this image while seated behind your tripod….
It is quite rewarding when you are able to capture the image that you envisioned to perfection…. Such occasions are rare in nature photography. At least for me.
|
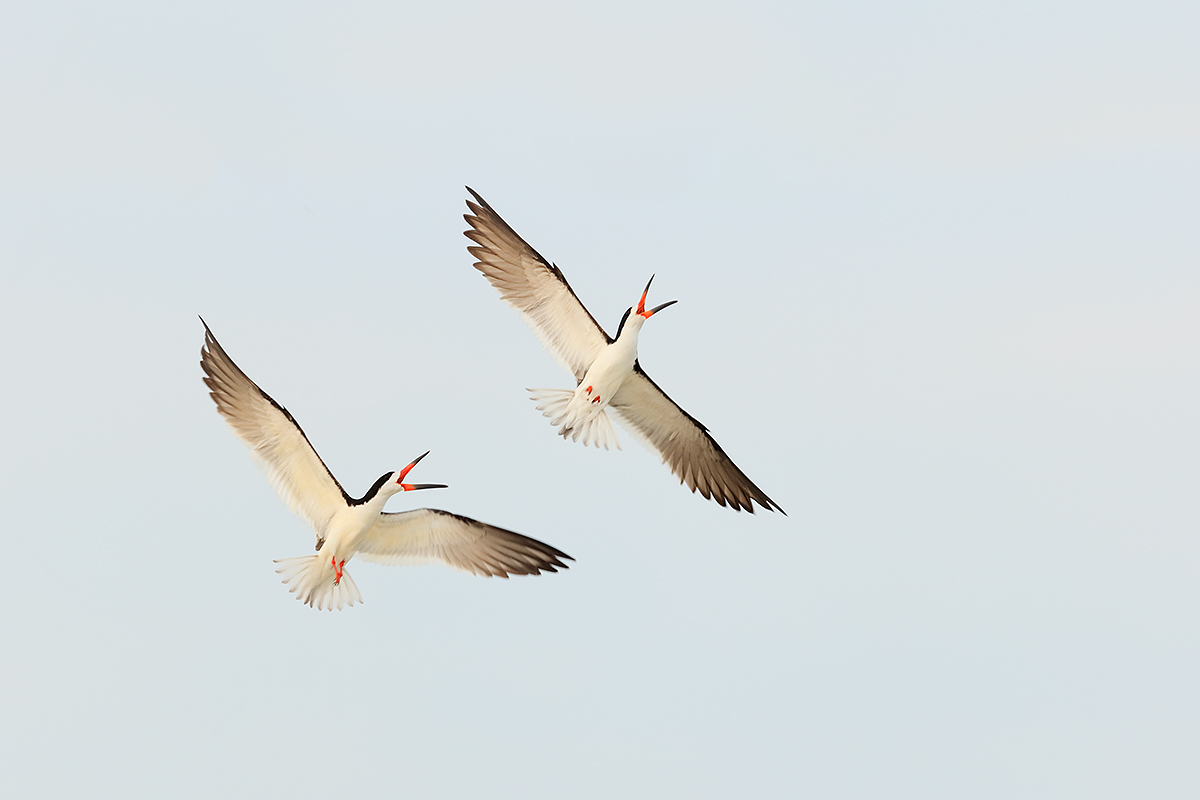
This image was created from two images made on the Nickerson Baby Beach Nesting Birds IPT at 4:41pm on a cloudy dark afternoon. See below for details. I used the Gitzo 3532 LS carbon fiber tripod, the Mongoose M3.6 head, the Canon EF 600mm f/4L IS II USM lens and the Canon EOS-1D X. ISO 1250. Evaluative metering +3 stops off the very light grey sky: 1/800 sec. at f/4 in Av mode. AWB. Central Sensor/AI Servo/Zone/AF as originally framed was active at the moment of exposure. More on Zone AF coming soon. Learn everything that I know about the great AF systems of the 1D X and 5D III (except about Zone AF) but including how to manage the various AF Area Selection Modes, when to use which one, and several ways to move the AF sensor around in the 1D X AF Guide and the 5D Mark III User’s Guide. Click on the image to see a larger version. Image #2: Black Skimmers Battling |
The Photoshop Creation
Since the opening image was pretty much right out of camera, that leaves “Black Skimmers Battling” as the Photoshop creation. Read on to earn how I created it from two separate frames that were created just an instant apart.
|
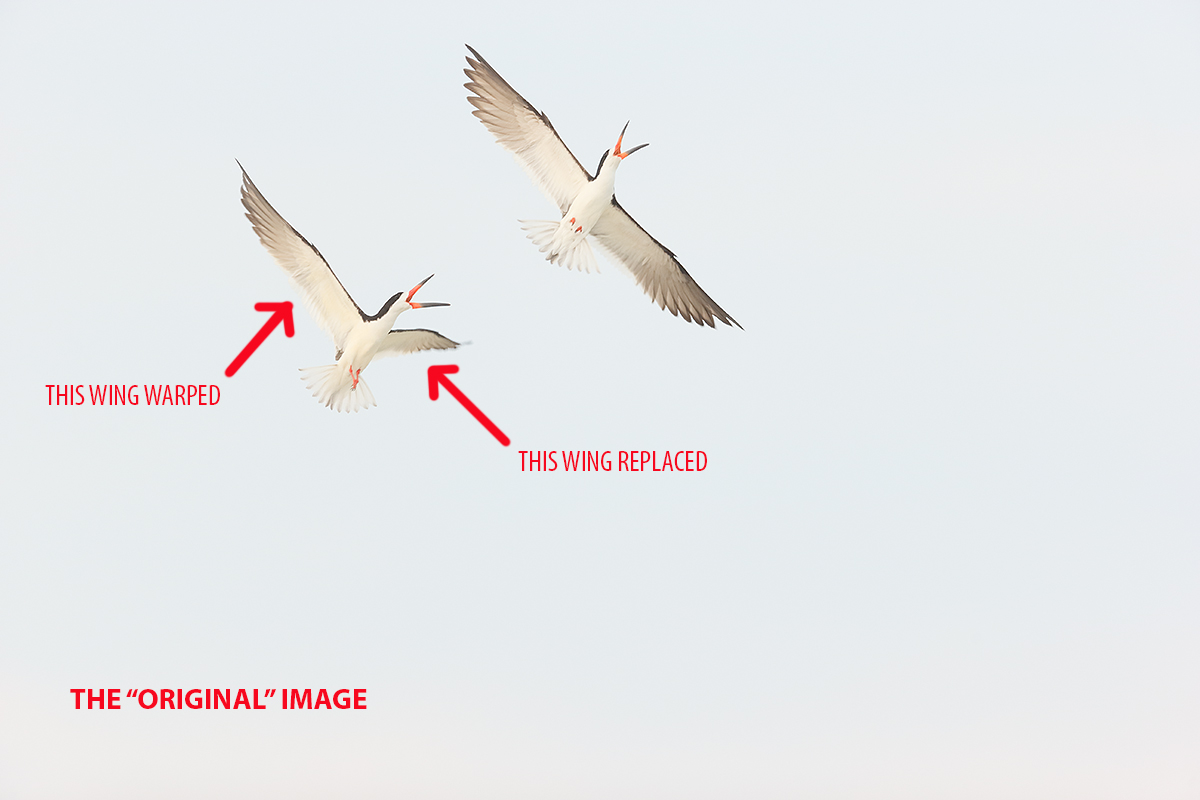
This is the base or “original” image, frame _Y7O0452.NY.CR2. |
Almost But No Cigar
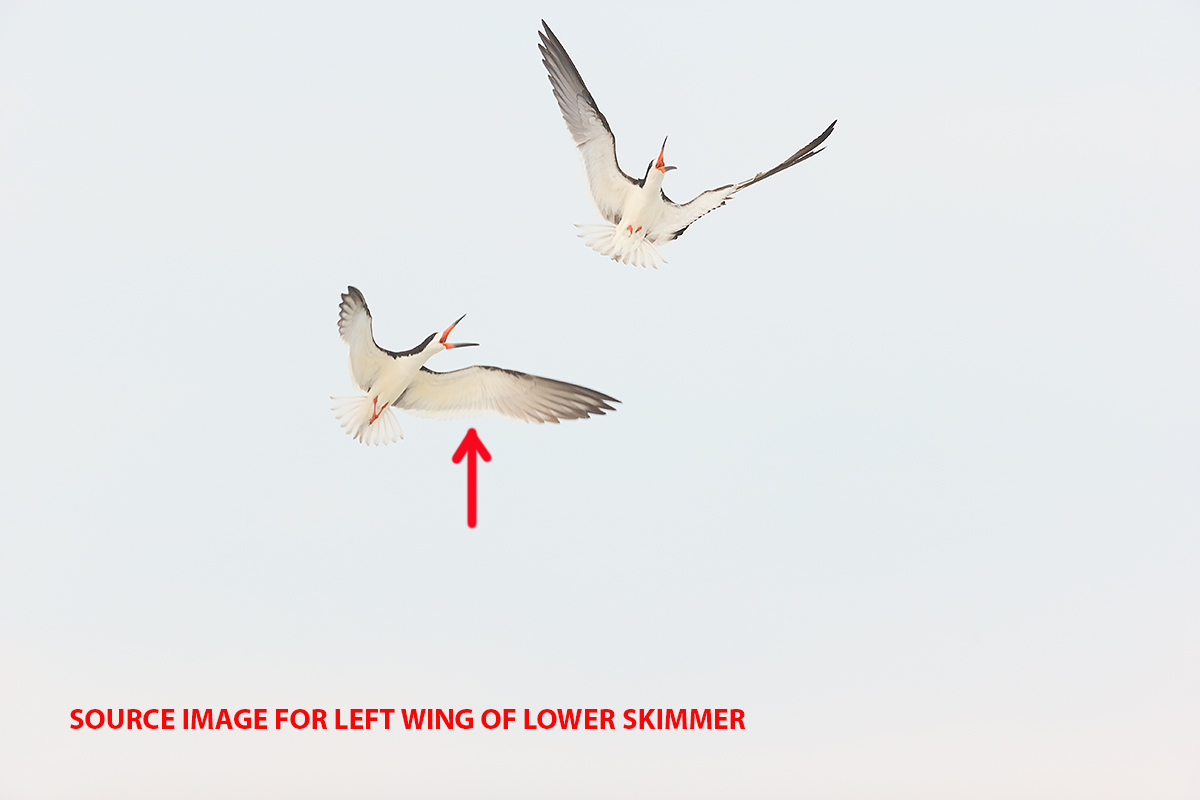
I liked a lot about the image above, especially the two open bills and the wings positions of the bird on the top right. The birds were too high in the frame but that would be an easy repair using techniques from APTATS II. In addition the far- (left) wing of the bird on the lower left was twisted in such a way as to have little impact on the image…. While reviewing the series of six images created in the same second I noticed that the far (left) wing of the bird on the lower left in the preceding frame, _Y7O0451.NY.CR2, was perfectly positioned…. See image next.
|
The preceding image, seen here, _Y7O0451.NY.CR2, served as source material for a new wing for the bird on the lower left in frame _Y7O0452.NY.CR2. |
Assembling the Composite
Once I realized that I would be using parts of two images to create my final version, I first converted _Y7O0452.NY.CR2 in DPP, saved the recipe, and then pasted it in when converting _Y7O0451.NY.CR2. That ensured that the tonality of the two skies would match perfectly. To the same end, I made sure to eliminate the vignetting during the DPP conversion by checking the box for Peripheral illumination in the Lens aberration correction section that is found under the Lens tab. (All as detailed in the DPP Raw Conversion Guide.)
I painted a Quick Mask of the new wing as detailed in both Digital Basics and APTATS I and made sure to include lots of the surrounding sky so that the original wing would be completely covered. I put the selection on its own layer and then used the Move Tool (V) to bring the new wing onto the “original” or base image. I used the Free Transform command (Ctrl T) to position the layer and then added a Regular Layer Mask to fine-tune the selection. I needed to take great care when working on the area where the new wing met the bird’s body. It is always best to work large in situations like this. (Tip from Denise Ippolito.)
When the new wing was added successfully it was obvious that the near- (right) wing of the bird on the lower left looked too thin as compared to the wing that was just added. So I painted a Quick Mask of that wing, placed it on its own layer, and hit Ctrl T for the Free Transform command. I used both the Free Transform box handles and the Warp sub-command to broaden the wing but when I was done I saw that the area near the bird’s upper body was a mess; I had created a large halo where the leading edge of the wing met the back of the neck. I discarded that layer and started over. This time when I painted the Quick Mask of the wing I made sure not to include any of the bird’s upper back. I proceeded as above; the second time was the charm.
The Image Optimization
Once the wing repairs were complete Levels and Curves adjustments gave the image some pop, my NIK 50-50 preset was applied to the birds only, and the faces of both birds were selectively sharpened with a Contrast Mask (Unsharp mask at 15/65/0). All as detailed in my Digital Basics File. (See below for details).
The DPP RAW Conversion Guide
To learn why I use Canon’s Digital Photo Professional (DPP) 3.14 to convert every image that I work on, click here. Coming soon: the DPP 4.0 RAW Conversion Guide by Arash Hazeghi with Arthur Morris. I will be starting to use DPP 4.0 this week as I get into editing the new guide.
Digital Basics
Most everything that I did to optimize today’s image above is detailed in my Digital Basics File–written in my easy-to-follow, easy-to-understand style. Are you tired of making your images look worse in Photoshop? Digital Basics File is an instructional PDF that is sent via e-mail. It includes my complete digital workflow, dozens of great Photoshop tips, details on using all of my killer clean-up tools, the use of Contrast Masks, several different ways of expanding and filling in canvas, all of my time-saving Keyboard Shortcuts, Quick Masking, Layer Masking, and NIK Color Efex Pro basics, Digital Eye Doctor, Tim Grey Dodge and Burn, how to create time-saving actions, and lots more.
APTATS I & II
Learn the details of advanced Quick Masking techniques in APTATS I. Learn Advanced Layer Masking Techniques in APTATS I. Mention this blog post and apply a $5 discount to either with phone orders only. Buy both APTATS I and APTATS II and we will be glad to apply at $15 discount with phone orders only. Please call Jim or Jennifer at 863-692-0906 weekdays to order.
Used Photography Gear for Sale
Though we have sold a boatload of great gear recently, there are still some great buys available. Click here to see the complete listings. Below is today’s featured item.
Used Canon 400 DO IS USM Lens
Price slashed $450!
Joe Messina is offering a used Canon 400 DO IS USM lens in very good ++ condition for 3750! There are some minor cosmetic scratches to the finish. The lens hood is slightly out of round and is difficult to install. The sale includes an AquaTech flexible strap-on hood, a $150 value. The sale also includes the lens trunk (with key), the original leather hood, and a hard plastic lens cap. The seller will pay insured UPS shipping within continental US. The lens will ship after the check clears.
Please contact Joe via e-mail or by phone at 415-563-6577.
If you are looking for a fast, lightweight, hand holdable telephoto lens, this is the lens for you. Learn a ton more about the 400 DO here and see lots of 400 DO images by visiting the “The Canon 400mm f/4 IS DO Lens: Fourteen Images that Prove that the Internet Experts are (As Usual) Idiots” blog post here. The lens sells new at B&H for $6499.00.
Selling Your Used Photo Gear Through BIRDS AS ART
Selling your used (or like-new) photo gear through the BAA Blog or via a BAA Online Bulletin is a great idea. We charge only a 5% commission. One of the more popular used gear for sale sites charges a minimum of 20% plus assorted fees! Yikes. The minimum item price here is $500 (or less for a $25 fee). If you are interested please e-mail with the words Items for Sale Info Request cut and pasted into the Subject line :). Stuff that is priced fairly–I offer free pricing advise, usually sells in no time flat.
Be sure to like and follow BAA on Facebook by clicking on the logo link upper right. Tanks a stack!
Support the BAA Blog. Support the BAA Bulletins: Shop B&H here!
We want and need to keep providing you with the latest free information, photography and Photoshop lessons, and all manner of related information. Show your appreciation by making your purchases immediately after clicking on any of our B&H or Amazon Affiliate links in this blog post. Remember, B&H ain’t just photography!
Amazon Canada
Many kind folks from north of the border, ay, have e-mailed stating that they would love to help us out by using one of our affiliate links but that living in Canada and doing so presents numerous problems. Now, they can help us out by using our Amazon Canada affiliate link by starting their searches by clicking here. Many thanks to those who have written.
Typos
In all blog posts and Bulletins, feel free to e-mail or to leave a comment regarding any typos, wrong words, misspellings, omissions, or grammatical errors. Just be right. 🙂


Hi, Artie. I absolutely love the first image. And the catchlight in the bird’s eye really adds to it, I think. I appreciate what you did in the second image, and your honesty and transparency about it. I’m not sure whether I prefer it to the unoptimized version; the less-than-pleasing wing positions indicate the frenzy of the chase to me. But if you hadn’t told me, I almost surely would never have known anything was altered and wouldn’t have been bothered one bit. In any case, thanks for sharing your wonderful, skillful work and methods.
You would not have known 🙂 You had the chance to know, but you passed on that 🙂
Image #1 is awesome.The light is perfect and the eye pops in this light which can be hard to capture with skimmers.Wonderful image.
Many thanks. I did just a bit of Eye Doctor work on that one 🙂
Hi Artie
Lets not forget the film days, it was such a struggle and a long learning curve to get great images, even good images, much, easier in these digital days. I started bird photography in the early eighties, and I believe you did too. Even though we started at the same time, I learned a lot from you, and your book, “The Art Of Bird Photography” The very best book “EVER” on how to photograph birds, and I read them all. Over the years shooting film I managed to get several front covers on birding magazines, some of that success goes to you, thanks Artie. Having said all this digital is so much more fun then film. I am an old guy know, but I am so happy to be alive and feeling great in the digital age of photography. Keep up the good work, and keep showing folks how to better optimize their images. Ted
Hi Ted,
You are most welcome and thanks a stack for your more than kind words; they are greatly appreciated. artie
So you take a load of snaps, cut & paste wings, eyes, beaks, etc and hey presto you have a great result; what bolex, what happened to taking a good photo in the first place?? No wonder I don’t think my photos are too great straight out of the camera!!
Pete, Thanks for your kind words and for sharing your thoughts with us here.
What is bolex?
We have been down this road many times:
#1: junk in = junk out. If my images were not sharp and for the most part properly exposed no amount of Photoshop would help them.
#2: I am taking advantage of current technology to create images that please me (and quite a few others) and might on occasion generate some income.
#3 and most importantly: I let folks know what I do and I do the same in the image captions. Like this: Black Skimmers battling white sky wing replacement _Y7O0452 Nickerson Beach, LI, NY.tif. Thus potential publishers know exactly has been done to an image.
#4: if you wish to take a more conservative approach to your image optimizations that is fine with me.
5: lots of folks wish to learn to improve their image optimization skills. In this age where it is more than difficult to sell even a single image for decent money the income generated from our various tutorials, PDFs, and MP4 videos is quite substantial. And it sure beats being a greeter at WalMart….
artie
ps: please do not forget that I did OK with film for 19 years….