
The Streak Continues: 257
This item was published just before 7:00am from my home at Indian Lake Estates, FL. This blog post, which took me 2 1/2 hours to prepare, marks 257 consecutive days with a new enjoyable and educational blog post. As always, I would appreciate your using the BIRDS AS ART B&H affiliate links for all of your major gear, video, and electronic purchases, using our Amazon logo-link for all of your household purchases, and visiting the BAA Online Store for your tripod, tripod head, LensCoat, miscellaneuos, accessories, and eGuide purchases as well.
The Art of Flower Photography
Click here if you missed yesterday’s eBook announcement.
|
|
|
This image was created with the hand held Canon EF 70-200mm f/2.8L IS II lens , the Canon 1.4x EF Extender III (Teleconverter) (at 280mm), and the Canon EOS 5D Mark III . ISO 400. Evaluative metering + 2 stops as framed (would have been more than +3 stops off the foggy, dreary sky): 1/800 sec. at f/4 in Av mode. AWB. Central sensor/AI Servo Surround/Rear Focus AF on the bird and re-compose. Click here if you missed the Rear Focus Tutorial. Be sure to click on the image to see a larger version. I almost always have this rig on my shoulder via the Black Rapid RS-7 Camera Strap when walking the beach at Nickerson in the early morning. |

Wrong For So Long…
It is a little-known fact that all pro-sumer and professional digital camera bodies create and embed a JPEG at the moment of capture even if you have your camera set to RAW only. Folks like me who use BreezeBrowser can highlight an image and then hit Shift/Control/X and follow the prompts to extract that JPEG. I have been doing that for years. When I open an extracted JPEG from the 1D X and bring it into Photoshop CS-6 and go Image > Image Size (or hit Shift/Control X the Image Size dialogue box shows the pixel dimensions as 5760 X 3840 or 63.3M. I have been telling folks for years that all quality digital camera bodies create very large JPEGs at the moment of RAW capture. How large with a 1D X? I have been telling folks confidently for years “63.3 MBs.
When I shared that “fact” with Arash Hazeghi while we were discussing the new DPP 4.0 RAW Conversion Guide he told me that I was flat out wrong. “The embedded JPEGs are actually quite small” he said. “You can see how small by going to My Computer, finding the image, right-clicking on it, and selecting Properties from the drop-down menu. When I do that with an extracted JPEG from the 1D X the File Size shows as 1.04 MB…. Even more confusing for me is that when I click on the details tab the pixel dimensions are exactly as they show in Photoshop, 5760 X 3840….
When I asked Arash why Photoshop showed the JPEGs as 5760 X 3840 pixels I did not understand it well enough to share with you here. Actually I did not understand it at all. It is quite obvious that I am confused. I am starting to realize that pixel dimensions have nothing to do with file size and that 63.3M does not mean 63.3 MB…
If you can leave a clear, lucid explanation that explains the basis of my confusion your help would be greatly appreciated.
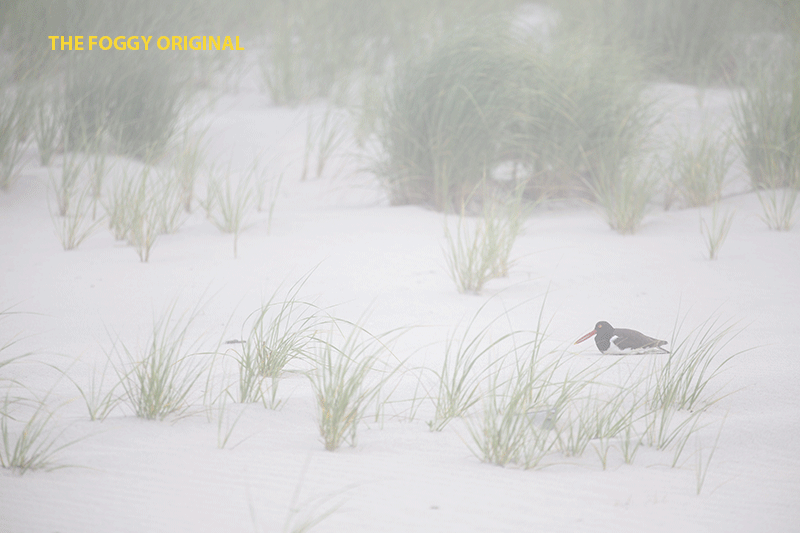
The animated GIF here compares the extracted JPEG (cropped to 800 pixels wide) with the optimized image (also cropped to 800 pixels wide). |
The Foggy Image Optimization
After converting the image in DPP 4.0 I brought it into Photoshop CS-6 and did some clean-up work with the Clone Stamp Tool, the Spot Healing Brush, and several small Quick Masks that were fine-tuned with Regular Layer Masks. One Quick Mask layer was Warped. Next was a Levels adjustment but I did not move the shadow slider all the way to the clipping point (hold down the ALT key while moving the slider) as that made the image far too contrasty. I lowered the BLUE saturation about 40 points and raised the YELLOW saturation about 40 points, the latter to juice up the grasses a bit. I finished things off with a 10% Auto Contrast layer as taught to me by Denise Ippolito.
Image Questions
1-What were the 4 major clean-up projects?
2-Why is this an atypical BIRDS AS ART image?
3-What are the strong points of the image design?
The DPP RAW Conversion Guide
To learn why I use Canon’s Digital Photo Professional (DPP) to convert every image that I work on, click here. Coming soon: the DPP 4.0 RAW Conversion Guide by Arash Hazeghi with Arthur Morris.
Digital Basics
Most everything that I did to optimize today’s image above is detailed in my Digital Basics File–written in my easy-to-follow, easy-to-understand style. Are you tired of making your images look worse in Photoshop? Digital Basics File is an instructional PDF that is sent via e-mail. It includes my complete digital workflow, dozens of great Photoshop tips, details on using all of my killer clean-up tools, the use of Contrast Masks, several different ways of expanding and filling in canvas, all of my time-saving Keyboard Shortcuts, Quick Masking, Layer Masking, and NIK Color Efex Pro basics, Digital Eye Doctor, Tim Grey Dodge and Burn, how to create time-saving actions, and lots more.
APTATS I & II
Learn the details of advanced Quick Masking techniques in APTATS I. Learn Advanced Layer Masking Techniques in APTATS I. Mention this blog post and apply a $5 discount to either with phone orders only. Buy both APTATS I and APTATS II and we will be glad to apply at $15 discount with phone orders only. Please call Jim or Jennifer at 863-692-0906 weekdays to order.
Used Photography Gear for Sale
The “Old 600” that was featured in yesterday’s blog post sold right then and there. Though have sold a boatload of great gear recently, there are still some great buys available. Click here to see the complete listings. Below s today’s featured item.
Featured Lens
Used Canon 800mm f/56L IS USM Lens
Multiple IPT veteran and good friend Mike Gotthelf, is offering a used Canon EF 800mm f/5.6L IS USM lens in excellent + condition for $8850. The lens is like new except for some very minor wear on the finish. The sale includes the leather hood, the original hard case and key, a low foot, a LensCoat, and insured shipping via UPS Ground to US addresses only. Personal checks only; your new lens will be shipped only after your check clears.
This great lens, my favorite super-telephoto for more than 3 years, sells new at B&H for $13,999.00. B&H is asking $11,399.95 for a used one here in the same condition as Mike’s. They recently dropped their price for this lens from $11,999.90…. Buy Mike’s lens and save $2456.95 right now! It will save you a ton of dough and you will have a super-sharp lens with lots of reach. And it works great with a 1.4X TC too with all pro bodies and with the 5D Mark III.
Interested folks can contact Mike via e-mail or by phone at (978)-407-0679 (eastern time).
Selling Your Used Photo Gear Through BIRDS AS ART
Selling your used (or like-new) photo gear through the BAA Blog or via a BAA Online Bulletin is a great idea. We charge only a 5% commission. One of the more popular used gear for sale sites charges a minimum of 20% plus assorted fees! Yikes. The minimum item price here is $500 (or less for a $25 fee). If you are interested please e-mail with the words Items for Sale Info Request cut and pasted into the Subject line. Stuff that is priced fairly–I offer free pricing advise, usually sells in no time flat.
|
|
|
For me, the coolest thing about learning to identify shorebirds is that once you learn the basics it is actually easier to age a shorebird, that is, to tell if it an adult or a juvenile, than it is to identify it as to species. And with a bit of experience, study, and practice, identifying the common North American migrant shorebirds is nowhere as difficult as it is reputed to be. Advice: get yourself a copy of my Shorebirds: Beautiful Beachcombers, study, and get out to local ponds, estuaries, beaches, and mudflats as much as possible for the next month. Mid-August through early September is the best time of year to see both adult and fresh juvenile shorebirds together on migration. Better yet, join me at JBWR for two great mornings of shorebird photography while honing your identification and ageing skills and learning a ton about my favorite bird family. See below for details. For the correct ageing and ID of each of the birds in the composite above, see the comments here. |

JBWR Short-Notice Shorebird Photography and ID In-the-Field Morning Workshop Sessions
Saturday August 23 and Sunday August 24: sunrise till 10am followed by brunch and image review at a local diner: $299/morning session. $549 for both days. Limit 6.
Join me at Jamaica Bay Wildlife Refuge in Queens, NY for a morning or two of shorebird photography in the mud. You will learn to age and identify the common shorebirds that we will encounter. You will learn the best times, tides, and locations to visit for the very best shorebird photography on the east coast and why only a very few days each year offer the best chances for success. I will teach you how to get close; we will either be sitting in or lying on the hard mud. These two morning sessions offer you a chance to learn from someone who has spent more time studying and photographing the shorebirds of JBWR than anyone alive. Join me and you are invited to pick my brain; as is usual, I share everything that I know. For those who are coming from out of town who would like to photograph on either Saturday or Sunday afternoon I will be glad to offer location guidance and options. Some folks may wish to join me for a JBWR/Nickerson Beach double header. See below for Nickerson Beach details.
Payment in full is due when you register and is non-refundable. Call me on weekends or Jim or Jen weekdays at 863-692-0906 with a credit card in hand to register. Please print, complete, and sign the form that is linked to here and shoot us a scanned copy via e-mail or a hard copy via snail mail to BIRDS AS ART, PO Box 7245, Indian Lake Estates, FL 33855.
|
|

Nickerson Beach Short-notice Weekday Beach-nesting Birds IPT: 2-Full Days/August 25-26, 2014: $749. Leader: Arthur Morris
Join me on Long Island, NY soon to photograph Black Skimmers with chicks and young of all sizes, adult and juvenile Common Terns, and American Oystercatchers with grown young. The skimmers will be the stars of the show. Mid- to late August is prime time for photographing young skimmers. Chances are great to witness Great Black-backed Gull predation. The will also be chances to photograph a variety of shorebird species including large flocks of southbound migrant Sanderlings. Car-pooling is recommended; if we opt to return to the beach before 5pm there is a $30/vehicle parking fee that is not included so it is best to share that expense. Parking in the morning is free.
Call me on weekends or Jim or Jen weekdays at 863-692-0906 with a credit card in hand to register and leave a non-refundable $200 deposit. We will hold your spot pending the arrival of a check for your $549 balance. Checks should be made out to “Arthur Morris” and mailed to us at BIRDS AS ART, PO Box 7245, Indian Lake Estates, FL 33855. Please print, complete, and sign the form that is linked to here and shoot us a scanned copy via email or a hard copy via snail mail to the PO Box above.
If you have any questions please feel free to contact me via e-mail or by phone this weekend at 863-692-0906.
Be sure to like and follow BAA on Facebook by clicking on the logo link upper right. Tanks a stack!
Support the BAA Blog. Support the BAA Bulletins: Shop B&H here!
We want and need to keep providing you with the latest free information, photography and Photoshop lessons, and all manner of related information. Show your appreciation by making your purchases immediately after clicking on any of our B&H or Amazon Affiliate links in this blog post. Remember, B&H ain’t just photography!
Amazon Canada
Many kind folks from north of the border, ay, have e-mailed stating that they would love to help us out by using one of our affiliate links but that living in Canada and doing so presents numerous problems. Now, they can help us out by using our Amazon Canada affiliate link by starting their searches by clicking here. Many thanks to those who have written.
Typos
In all blog posts and Bulletins, feel free to e-mail or to leave a comment regarding any typos, wrong words, misspellings, omissions, or grammatical errors. Just be right. 🙂


I can’t comment on Canon and PS because I don’t use them. But as an engineer, in the past years I used to tweak with RAW files (now I don’t, I prefer to spend all the time on the photographic side: as usual, age makes people wiser :o).
In any case, the embedded JPG is a very variable thing in function of the brand and the model. With my first Nikon cameras, the embedded JPG was very small. With the latter models, it grew larger, up to full size.
It is also possible that more than one JPG file is embedded. For instance, looking at one of the latest .NEF I’ve shot (Nikon D7000) with exiftool, I see:
Jpg From Raw : (Binary data 1005709 bytes, use -b option to extract)
Preview Image : (Binary data 100897 bytes, use -b option to extract)
The JpgFromRaw is 4928×3264, while the RAW image size is 4992×3280 – this is the usual clipping of a few pixels at the borders, typically used for noise or black-level compensation. Thus we can consider a full-size JPG. The PreviewImage is clearly smaller.
For what concerns my Sony NEX-6:
Preview Image : (Binary data 869317 bytes, use -b option to extract)
Thumbnail Image : (Binary data 10417 bytes, use -b option to extract)
The PreviewImage here turns out to be 1616×1080 pixels, while the RAW is 4912×3264, so it looks like there’s no full size JPG (in fact exiftool doesn’t call it “JpgFromRaw”), in spite of the fact that the NEX-6 can be probably considered prosumer. The ThumbnailImage here is tiny.
Hi Arthur,
Your question got me quite interested. As people have correctly pointed out the size in MB shown in Photoshop is based on the uncompressed memory size of the image not the file size on disk which will be much smaller after JPG compression (around 1MB with a large amount of compression).
But you also correctly stated that the image dimension in pixels looks like the full size, not something small like 1200×800. I had always heard exactly what Arash said that the JPG embedded in a RAW is quite small so you can’t zoom in far on the viewfinder, etc. But once you questioned it, it made me question it too. I had always just shot RAW+JPG and never bothered to look at the embedded JPG. So I downloaded the Instant JPG from RAW from Michael Tapes Design. This is not a RAW processor but just extracts the embedded JPG. Lo and behold the JPG was the full size of the RAW 4256×2832. So I thought maybe it had something to do with my RAW+JPG settings. I tried with RAW+fine, RAW+basic, RAW+normal JPG, and even just RAW. In all cases the embedded JPG was the full image dimensions of the RAW but what was interesting was that the embedded JPG was ALWAYS identical in disk space to the RAW+basic. This means that the embedded JPG is always a JPG of full dimension but with a large amount of compression. RAWs do also have a small embedded thumbnail.
I suspect that what Arash and everyone else says USED TO BE CORRECT. Cameras used to embed a small JPG, but now they don’t do that anymore – at least not on both of my bodies (Nikon D3s and D300). Now it’s a full size JPG.
Thanks for questioning the conventional wisdom Arthur. I had just believed it, but you made me question it and in this case it seems that convention is either outdated or wrong for our bodies.
Hi Robert, I believe that you (and Karl below) are correct. I am writing Chuck Westfall today to double-check. It will be nice if it turns out that I have not been nuts for all those years… artie
ps: I read your comment early this morning and accidentally spammed it. I searched for it for more than an hour before I realized that there was an easy way to find and approve it. Yikes!
63 M means 63 MB and it means 63 megabytes (63x1024x1024 bytes).
In “old times” all derivatives of bytes were written in capital letters so GB,MB,KB.
All derivatives of bits were in small letters so Gb,Mb,Kb (gigabit,megabit,kilobit).
Also “bytes” were used for file sizes and “bits” for speed – usually.
There are 8 bits to a byte.
Hi, Artie. Can’t help with the JPEG, but without looking at others’ posts: Q1. You removed the white thing in the largest clump of grass; you removed the black thing (twig?) in the sand toward the lower left; you removed the yellow material from the lowest clump of grass (what was that?), and you removed the rock in the grass below the bird and a bit to its left. Obviously also the fog, but that seems to go without saying. Q2. The great, late wildlife photographer Michio Hoshino used to urge us all to “put the animal in its environment,” and you’ve done just that. Usually, your photos are portraits of birds much closer and with your signature clean backgrounds. Q3. I like the composition because it puts the bird in its environment, and because of the white, snow-like sand and the nicely arranged clumps of grass, and because of the splashes of color.
All good stuff. When my birds are in beautiful settings I strive to work wide and include lots of habitat…. artie
ps: that does not happen often.
Hi Artie. It’s all about file compression. The Photoshop listed file size tells you the maximum file size to be used on disk with no compression. For example, a 5760 X 3840 pixel image saved with no compression (such as a non-compressed TIFF) will take up 63mb of space. A JPEG is always compressed and so will never use 63mb – it will be smaller. The degree of “smaller” depends on the compression amount. The Thumbnail used on the back of a camera LCD does not need to have a high degree of quality for such a small display so the compression is probably very high.
The confusion comes in to play in that a small JPEG file can still “represent” 5760 X 3840 pixels. What happens is that Photoshop expands the file to fill in that many pixels (based on instructions in the JPEG file), but the quality when viewed larger than an LCD will be degraded. For a non-compressed Tiff, PS opens the file as 1:1 (one pixel in the file represents one pixel in PS). For a compressed JPEG, 1 pixel in the JPEG file will represent many (repeating) pixels in PS (which is why you get “banding” with highly compressed images).
As a rough analogy, it’s like a balloon. Blow it up at sea level and you need a lot of air to get the balloon to maximum size (lots of air = many JPEG pixels = high quality). But blow it up just a little at sea level and then bring it up into the atmosphere and it will expand to the same size but will less air in it, but still a full size balloon (very little air = few JPEG pixels = low quality, but still a full size balloon or image).
Thanks Scott. I sort of understand what you wrote, but I am very confused by this:
When I open a 1200 pixel wide JPEG and go to Image/Image size is shows me 1200 pixels wide by 800 pixels tall, 2.75M. So why does it tell me that the extracted JPEG is JPEG is 5760 X 3840???? Why doesn’t PS simply tell me the actual size of the JPEG??? artie
I’m pretty sure your 1200×800 JPEG’s size on the disk is not 2.75 MB.
The reason PS does not simply tell you the actual size of the JPEG is that it depends on the compression applied when you save it. While it is open in PS, no compression is applied to avoid degrading the image every time something is changed on it.
Hi Artie, There are two sizes, kind of. The first is the internal pixel dimensions, like 5760×3840. This is governed by Exif data – i.e. it is only an internal value in the file and is used by programs like Photoshop to open the file to the correct dimensions. The pixel dimensions loosely impact the other size which is the physical size of the file on disc – but they are not directly linked to each other – they measure different things about the file (dimensions vs. size on disc). It’s like height and weight – they are loosely related, but different measurements of our body, where height is like the pixel dimensions and weight is like the size of the file on the disc.
The JPEG extracted from the original in-camera Raw simply takes the attributes (Exif data like date, time, pixel dimensions) of the Raw file. The JPEG is a representation of the raw, but with many fewer pixels. The JPEG has not been re-sized, it is simply very compressed, hence the 5760×3840 pixels dimensions does not change.
When you use Photoshop to resize an image (Image – Image Size, for example) to 1200×800 you are giving the file a new set of internal attributes (the Exif data is changed).
Artie
I’m confused by your confusion, but let me try to help.
As was said before, what photoshop is telling you is the full size of an image when loaded in memory. So basically that would be your total MP times the colour depth. In the case of a JPG we know it is 8bits for each channel thus 3 bytes per dot. If you open a 16-bits TIF you’ll see about the double size because the depth of each pixel require twice as much room than 8-bit colour depth.
Now this is only loosely related to the actual file size because before it is saved, the file will be compressed. With TIF you can opt for lossless compression but it is limited in what it can do (e.g. if all the pixels in the picture are different such as given set of R, G, B values is present only once in the image, the resulting image will be barely compressed) and JPG which takes a shortcut: if two neighbouring pixels are close enough the JPG algorithm will take one and save with the 2 pixels given the new medium value of the original ones. As we have now a duplicate it is easier to compress, and so on. How much space an image takes in photoshop memory is directly determined by the size of the image and its colour depth, the file size is related to the former because even with compression, the larger your image is, the larger the compressed image will be.
I hope I haven’t confused you even more…
Artie,
I’m surprised Arash did not have a clear explanation, it is really a very simple matter. The 63.3MB size you’re looking at has nothing at all to do with file size. It is really the image size in memory. Since JPEG files are 8 bits, or 1 byte, per channel with 3 channels (RGB), they take 3 bytes per pixel when fully expanded. Your 5760×3480 image has 22,118,400 pixels, times 3 is 66,355,200 bytes. Divided by 1024×1024 (one computer meg) is 63.281125, which rounds nicely to 63.3.
hope this helps,
Alan
Hi Alan, Arash probably said the same thing but for us computer dummies it ain’t that simple. What confuses me most is that when I open a 1200 pixel wide JPEG and go to Image/Image size is shows me 1200 pixels wide by 800 pixels tall, 2.75M. So why does it tell me that the extracted JPEG is JPEG is 5760 X 3840???? Add appropriate curse words 🙂 artie
Are you saying that original file with dimensions 1200×800 or so when you open in Breeze Browser and then extract jpg and then open that resulting jpg in Photoshop will show dimensions of 5760 x 3840 ?
That is not at all what I am saying. This is: If I create a 1200 pixel wide JPEG from an optimized TIF file, open it in Photoshop, and hit Image > Image Size it shows as 1200 X 800 pixels. If I open an extracted JPEG in Photoshop, and hit Image > Image Size it shows as 5760 x 3840 pixels.
So my confusion stems from the fact that if the extracted JPEG is really (and I am beginning to doubt it) a “small” one, Photoshop handles them differntly….
No, the embedded JPEG is not small in pixel dimension, IIRC it has been the full size ever since Canon started using the CR2 RAW file format. But it is highly compressed – so it’s a small file size and does show some compression related flaws.
Thanks Karl. I believe that you are correct. I am going to contact Chuck Westfall today to confirm.
For many of us, IIRC is “If I Remember Correctly.”
Artie:
Pixel dimensions do not relate (directly) to file size. Take a picture of a clear blue sky, and then a picture of fully detailed grass (macro with full dof).
Convert them both to full size, fully quality jpg. They’ll both be the same pixel dimensions but the file size will be drastically different. The clear blue sky will be a very small file, while the detailed grass will be a larger file.
The clear blue sky shot can be easily expressed with very little information as it is all the same colour, thus the jpg does not need to retain much descriptive info to reconstruct it, while the grass shot requires a lot of information to be retained as the pixels in the shot vary greatly with the detail changing every few pixels.
Hope that makes some sense
Thanks Jim. Not only do I fully understand that but I teach it all the time. In addition, the same is true of identical images, one under-exposed and the other properly exposed to the right. The properly exposed image will be significantly larger. But unfortunately none of the above has to do with my confusion. 🙂
Let me have a go at the RAW/JPEG confusion. “My Computer” shows you the size of the compressed JPEG file, which is just over a Meg. But, Photoshop cannot work with JPEGs – when you open a JPEG, it expands it into its own, internal format – which is a bitmap of rows and columns. Once expanded, the file does indeed take up 60+ Megs in Photoshop.
Thanks Andre. Tahe latter part of your comment is pretty much what Arash said; I simply do not understand it :)….
When I crop an extracted JPEG to 1200 pixels wide the size on the screen decreases only slightly. That make it quite clear that the file that I began with was not within miles of being 5760 pixels wide….
Aah, yes, I see what you are getting at.
If you want to use your screen as a reference for comparison, you HAVE TO use a 100% crop in your view, so the pixels of the image are represented properly on the screen.
That will give you a proper comparison. In that case, your 5760 wide image will appear much wider than your 1200 one.
Well, that is something that I understand and can confirm. But I have no idea why PS would “expand it into its own, internal format,” it being the extracted JPEG but does not do the same thing to a 1200 wide JPEG….
Hi,
your confusion is between the file size of a JPEG – which as used by the camera is highly compressed using a lossy form of compression – and the internal size of the image when it has been loaded by Photoshop which allocates 3 bytes for every pixel.
Both images have 5760 X 3840 pixels but the compression in a JPEG does reduce the storage requirements considerably by describing a block of 8×8 pixels with a set of factors of a wavelet function – the fewer factors are used to describe such a block (and in consequence the smaller the JPEG file size) the more likely it is that you can discern those 8×8 blocks when viewing the image later, with an uniform area less likely to have visible artifacts than the plumage of a bird.
Some rather easy to follow steps to reveal what the JPEG compression does to your image can be found at http://www.photoshopessentials.com/essentials/jpeg-compression/
Thanks KG, but Is am still very confused. I understand that a JPEG is a smaller, compressed version of larger TIF file. Let’s try to keep it simple and tackle one issue at a time.
When Photoshop says “5760 X 3840 pixels, 63.3 M. Does 63.3M mean 63.3 MB? Or does it mean something else…. artie
I do not know for sure if the following is the answer but it could be: there is a difference between Megabit and Megabyte. The former is Mb in short, while the abbreviation of Megabyte is MB. The difference is a factor 8. So one MB is 8 times larger than a Mb.
Again, don’t know if Photoshop expresses file size in Megabit or an entirely different standard, but this could account for the difference in size when looking at Megabytes.
Don’t know 🙂
File size is always shown in bytes.As per Adobe’s help explanation:
“…Document Sizes Information on the amount of data in the image. The number on the left represents the printing size of the image—approximately the size of the saved, flattened file in Adobe Photoshop format. The number on the right indicates the file’s approximate size, including layers and channels…”
That’s from information box at the bottom of document window.
Yes, when Photoshop says 63.3M it simply means the amount of RAM used to store the pixels of your current photo – which happens to be 5760 X 3840 X 3 (1 Byte per color channel, so 3 in total for RGB). That’s 66355200 Bytes or 64800 kilobytes or 63.28125 megabytes – which Photoshop rounds to a nice number of 63.3 megabytes for display purposes. (I should have really used the new binary prefixes as set by the ISO standards committee but I am an old-timer in this business and for me a kilobyte still contains 1024 bytes and a megabyte still contains 1024 kilobytes)…
When you load a RAW file via Adobe bridge then you should see about the double size being reported from Photoshop – because for those Photoshop uses 2 Bytes per color channel and pixel.
Still confused :). Here is my response to everyone: when I open a 1200 pixel wide JPEG and go to Image/Image size is shows me 1200 pixels wide by 800 pixels tall, 2.75M. I know that the embedded JPEG is roughly that size or a bit bigger. So why is PS showing me that the embedded JPEG is 5760 X 3840????
It makes no sense. I will cut and paste this in various responses above :). artie
ps: thanks for trying.
It is a bit complicated to answer in several places at once. ^^
It does exactly the same thing to your embedded JPEG and your 1200×800 file. For the embedded one, please refer to Karl’s explanations above. For the other file, we have 1200 (width) * 800 (height) * 3 (number of bytes used to encode the colors, this is the same as 24 bits which you may be more familiar with) / 1024 (bytes to kilobytes) / 1024 (kilobytes to megabytes) = 2.75 Megabytes.
The actual size on the disk will be different because of compression, of course, but once loaded into Photoshop both images work just the same.
I think your confusion comes from the JPEG compression setting. Take your extracted JPEG from the Canon RAW file and your 1200×800 JPEG you created from an edited image in Photoshop. When creating the JPEG both processes used different compression qualities. That’s what I already tried to explain in my first reply to your problem.
When JPEG is compressed a block of 8×8 pixels is taken and is instead expressed as a set of factors that describe these 64 pixels without storing their individual value.
Much like when you take an image and you start describing it verbally. For the same photo you can simply say, “Bird in front of a blue sky”. Or you can start describing it in more detail, “Juvenile GBH flying from the left to the right with muddy feet and beak. The background is a mostly blue sky with some strato cumulus clouds in the distance over a lake.” Both these descriptions have different amounts of information but describe the same photo. And that’s the same for a JPEG. You can strongly compress a photo by leaving out as much information as possible (low quality setting) or you can stay as closely as possible to the original as you need to (high quality setting) – these settings result in widely different file sizes.
The other factor contributing to the size of a JPEG is the amount of small detail. To not completely obliterate that the compression scheme adapts to the contents of the current block. A block which lies completely in the blue sky can be described simply as “blue”, a block that contains part of your bird will be described as “diagonal white feathers” to stay with my above sample in a low quality setting (note that both blocks require different amounts of information to describe them even at the same low quality setting). In the high quality setting the description of the first block may still be a simple “blue”, whereas the other block now becomes “ten white feathers oriented diagonally at 40° angle with some mud spots on the third, 5th and 7th feather”.
To sum things up: The camera uses the full sized photo but compresses the image quite strongly (low quality setting – the typical choice for Canon is to use the smallest selectable JPEG L setting for the embedded JPEG in a RAW file). Your 1200×800 photo you edited has been sharpened, contains loads of small detail and the default quality setting for the JPEG files in Photoshop is on the high quality side of things, thus results in a comparatively large file.
Gonna have a go at your questions for once:
1-What were the 4 major clean-up projects?
-Removing the fog
-Removing the grass in front
-Removing the distracting dark little branch on the sand and the two blurry distracting light parts in the grass both in front and in the back
2-Why is this an atypical BIRDS AS ART image?
You almost never take pictures showing the environment like this; your signature way of making pictures is to have a creamy beautifully colored background with a large, detailed and sharp as a razor subject in front of it.
3-What are the strong points of the image design?
You placed the bird a bit to the right in the frame, looking into the picture. Also you can see three horizontal “layers” with the grass in front, the sand and the grass in the back. They split the picture into three parts which gives it a nice balance.
Could be that I am totally wrong on any of these points, but I thought I’d give it a go :).
Good stuff. Nice to have you here! artie
Beautiful ! No time to answer the questions today but I like this habitat image very much