
The Streak Continues: 330
Yesterday I took it pretty easy and fell off the wagon in the afternoon with more than a few M&Ms Peanuts borrowed from Jim…. I made lots of IPT motel reservations and purchased my San Diego and Galapagos flights as well. I did make time for my morning meditation, an easy 3/4 mile swim followed by ten minutes of forced laughter, and an ice bath. This blog post, the 330th in a row, took me about 2 1/2 hours to prepare. It was published just before 7:30am from my home at Indian Lake Estates, FL.
Please help us out…
To show your appreciation for my efforts here, we ask that you use our the B&H and Amazon affiliate links on the right side of the blog for all of your purchases. B&H Is recommended for you major photography gear purchases, Amazon for your household, entertainment, and general purpose stuff. Please check the availability of all photographic accessories in the BIRDS AS ART Online Store, especially Gitzo tripods, Wimberley tripod heads, and the like. We sell only what I have used, have tested, and can depend on. We will not sell you junk. We know what you need to make creating great images easy and fun. And we are always glad to answer your gear questions via e-mail.


If what you learned here on my blog about the Canon EOS-7D Mark II has inspired you to purchase this great new camera body, please consider using the logo link above to support our efforts here in bringing you the latest, greatest educational materials on daily basis.
|
|
|
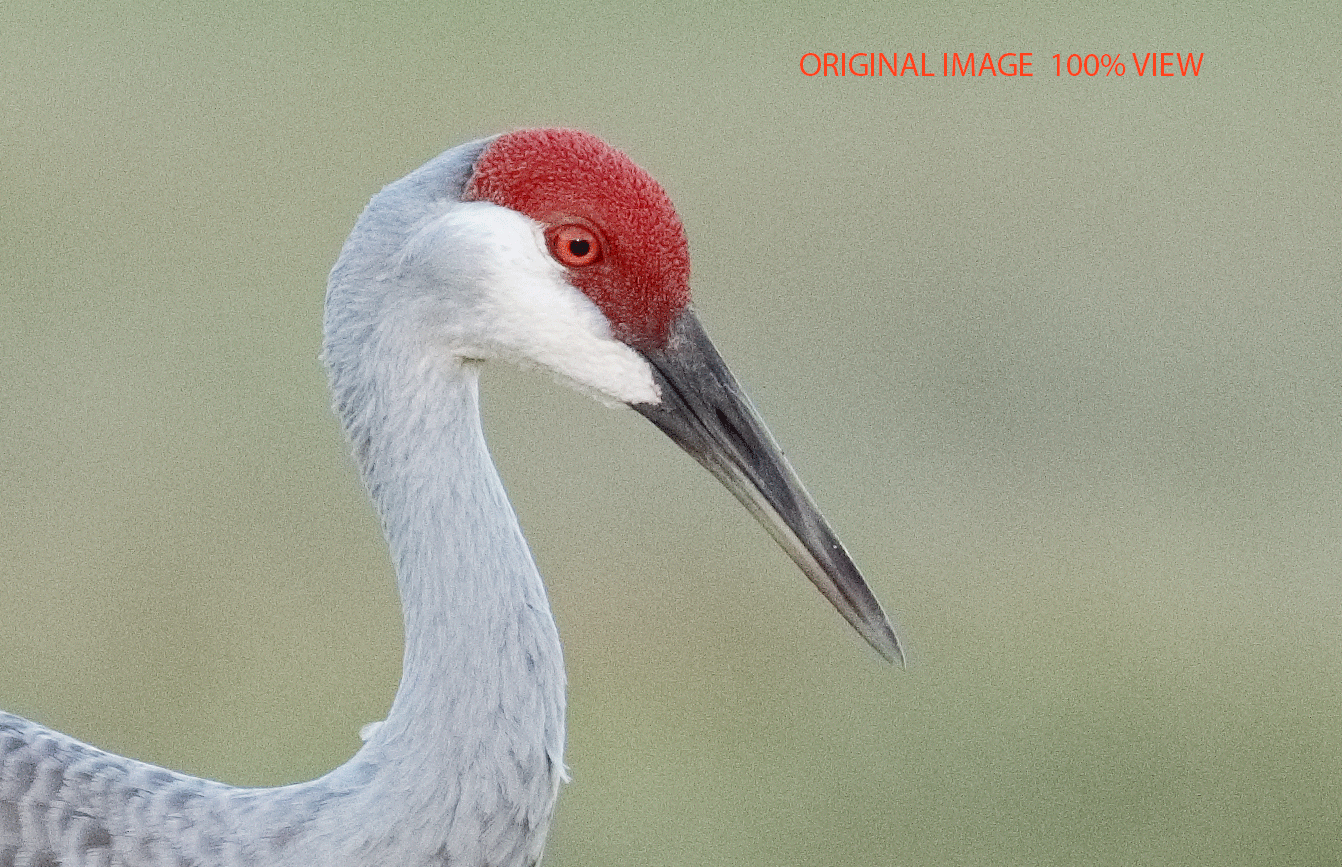
This image was created at 7:47am on the cloudy morning of October 24, 2014 at Indian Lake Estates where the cranes are plentiful and tame. Working from my Sequoia, I used the BLUBB-supported Canon EF 600mm f/4L IS II USM lens and a beta version of the Canon EOS 7D Mark II . ISO 3200. Evaluative metering +1 stop as framed: 1/1250 sec. at f/4 in Av mode. AWB. Central Zone/AI Servo/Rear Focus AF activated two sensors in the upper left corner of the array that fell on the bird’s shoulder and was active at the moment of exposure. See the DPP Screen Capture below. Click here to see the latest version of the Rear Focus Tutorial. Click on the image to see a larger version. Sandhill Crane striding |

Two Hours Down the Drain
I spent an hour yesterday morning photographing a large pine cone with the super-versatile Canon EF 70-200mm f/2.8L IS II USM lens with the three different camera bodies: the 7D II, the 1D X, and the 5D III. The tripod was locked down tight, I focused carefully, and tried to ensure that nothing changed as I switched camera bodies. All this was done in an effort to create three virtually identical images and then to compare image quality and noise at ISO 1600. As I have noted before, that ain’t easy. Then I spent another hour last night converting the images in DPP v3.14.41.0 and trying to follow these simple directions: “Crop the images from the full frame bodies to the same subject size as in the crop (7D II) body. And then compare them.” Trying to execute the crops so that the subjects lined up pixel for pixel was impossible. And again it seemed that there were differences in the accuracy of focus. (Using Live View to focus on a pine cone did not make sense to me.) Not to mention that when you crop the two full frame images to the same approximate subject size the JPEGs are of different sizes…. Any advice there is welcome as long as I can understand it :). I do have three pretty nice Stop Sign in the Water images that I may take one last crack at. I tried and failed with an earlier series of those….
After many serious but failed attempts in Photoshop to get things right with the pine cone images, I simply deleted them all and went off in search of a nice 7D ISO 3200 Sandhill Crane image for today’s blog post.
The Simplest Thing for Me to Do…
At this point it seems that my original approach to things is best: make lots of images in lots of different situations with the beta version EOS-7D Mark II and evaluate those images. In that vein I must say that today’s featured image looks pretty darned good for ISO 3200. And it was exposed well to the right.
Your Call?
How does today’s optimized image look to you?
|
|
This is the DPP v3.14.41.0 screen capture for today’s featured image. |

The DPP v3.14.41.0 Screen Capture
The main point of this screen capture is to show the AF points (illuminated in red) that were selected by the Zone AF Area Selection Mode and active at the moment of exposure. I am using and liking Zone AF more and more as it seems to be greatly improved as compared to previous generation camera bodies. Zone AF, like 65-point Automatic Selection and Large Zone AF, features AF sensors that are selected by the system and dance across the viewfinder as they change from moment to moment. These three AF Area Selection Modes are the only three that utilize the new iTR Face Detection technology. See here for more on that.
With this pose and subject-to-imaging sensor orientation the side of the bird’s upper breast is on the same plane as the bird’s eye. In this case I much prefer focusing just forward of the bend of the wing than trying to focus on the bird’s eye or face as in the latter case maintaining focus is a lot more of an iffy proposition.
Note that after exposing well to the right to produce a high quality image file that I darkened the image 2/3 stop by moving the Brightness slider to the left to -0.67. Note also that I used a Quick Mask to cover the distracting element in front of and slightly below the bird’s raised foot. See more on the image optimization below.
This is the before and after animiated GIF of the 100% view. |
The 100% View
The noise at ISO 3200 in this light toned, exposed to the right image file is noticeable but as we have seen before, 7D II noise is smoother and finer grained as compared to the noise in previous camera bodies. Note how much better the eye and face look after the image optimization.
The Image Optimizations
Today’s image was converted in DPP v3.14.41.0. First I painted a Quick Mask of the pupil and darkened it by pulling down the curve. Next I selected and worked on the red crown. With that on its own layer I worked on the color with Hue-Saturation, Selective Color, and Curves adjustments. Then I ran a Contrast Mask to selectively sharpen the crown only. That followed by a bit of bill and neck clean up. Next I selected the WHITEs with Select > Color Range and to bring some detail back into them I ran a layer of NIK Detail Extractor and a small Linear Burn. These changes were fine-tuned with a Regular Layer Mask. Lastly I applied a healthy dose of Filter > Blur > Surface Blur to the whole image and working large and carefully painted the effect away on the bird by adding a Regular Layer Mask.
Note by viewing the animated GIF what a great job Surface Blur did in eliminating BKGR noise.
The DPP RAW Conversion Guide
To learn why I use Canon’s Digital Photo Professional (DPP) to convert every image that I work on, click here. The current guide will teach you how to best convert all of your Canon images in all 3 point something versions of Canon Digital Photo Professional including the current v.3.14.41.0.
Coming on Monday: The DPP 4.0 Guide by Arash Hazeghi and Arthur Morris. The more that I use DPP 4.0 for my 1D X and 5D III RAW conversions–I remember those–the more I learn about it. And the more I learn about it the more I am impressed with it. Note: at present, DPP 4.0 will work only with 1D X, 5D III, and 6D images. I am hoping that at some point Canon will release a new version of DPP 4 that will support 7D II images.
Digital Basics
Everything that I did to optimize today’s images is covered in detail in my Digital Basics File–written in my easy-to-follow, easy-to-understand style. Are you tired of making your images look worse in Photoshop? Digital Basics File is an instructional PDF that is sent via e-mail. It includes my complete digital workflow, dozens of great Photoshop tips (including the recommended Surface Blur settings as taught to me by Denise Ippolito), details on using all of my image clean-up tools, the use of Contrast Masks, several different ways of expanding and filling in canvas, all of my time-saving Keyboard Shortcuts, Quick Masking, Layer Masking, and NIK Color Efex Pro basics, Contrast Masks, Digital Eye Doctor, using Gaussian Blurs, Tim Grey Dodge and Burn, a variety of ways to make selections, how to create time-saving actions, and tons more.
APTATS I & II
Learn the details of advanced Quick Masking techniques in APTATS I. Learn Advanced Layer Masking Techniques in APTATS II. Mention this blog post and apply a $5 discount to either with phone orders only. Buy both APTATS I and APTATS II and we will be glad to apply at $15 discount with phone orders only. Please call Jim or Jennifer at 863-692-0906 weekdays to order.
|
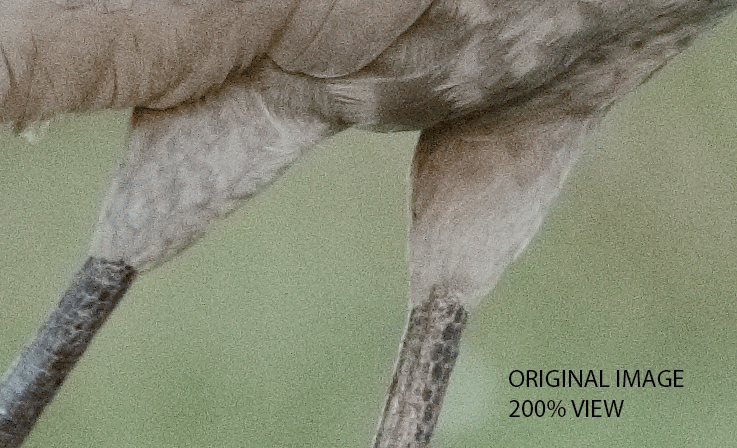
The 200% View
In the 200% view we note as expected some noise on the subject. In addition we see again how effective Surface Blur is in eliminating BKGR noise. I used the Clone Stamp Tool to eliminate the white blob by the bird’s left leg.
Yesterday I Wrote:
Amazing 7D Mark II Confession/Screw-up?
At some point about three days ago when studying the complex 7D II menu items, I noted that Small Raw plus JPEG was set on My Menu 2. I was somewhat aghast :). I was sure that the first thing that I had done when I got the camera in my hands was to set RAW only. But I had my doubts…. As I worked backwards with the images from October 21 and 20 I saw that they were captured as Small Raw plus JPEG. As I continued, I was glad to see that all of the images prior to October 20 were full sized RAWs. I am somewhat chagrined that I did not catch this inadvertent error after the first day….
Exposing to the Right (ETTR) Eliminates 7D II Noise at ISO 1000
Note that at 200% there is virtually no evident noise with this ISO 1000 image. How could this be true if we had previously seen some noise with ISO 800 images? The answer is that the exposure for this image was pushed well to the right with some blinkies on the water. The best way to minimize noise at any ISO is to expose well to the right with a good amount of data in the rightmost histogram box. With subjects darker than the backgrounds a few blinkies on the BKGR never hurt as they are easily recovered in DPP.
In Part I Was Wrong…
I spoke with the brilliant Arash Hazeghi by phone last night putting the finishing touches on our marketing campaign for the soon-to-be-released DPP Guide that we co-wrote. I asked him about Small RAW captures and noise. He said, and I quote: “When you create small RAWs, the camera takes four pixels and blends them into one. This reduces noise while also smoothing out fine detail.”
I considered the possibility of that yesterday and had even typed a sentence or two on the subject, but wound up deleting them and then asking Arash. Why Arash? Aside from being a digital photography expert, a skilled bird photographer specializing in hand held flight photography with big lenses, and a moderator in the Avian Forum at BirdPhotographers.Net, he is a Ph.D. and a senior electron device engineer. He received his MS.c. degree and Ph.D. degrees in Electrical Engineering in 2006 and 2011, respectively from Stanford University, Stanford, California. His pioneering research on carbon nanotubes and quantum capacitance have been cited many times. He is currently focused on the development of cutting edge memory technology.
|
|
|
Do consider joining me for a once in a lifetime trip to the Galapagos archipelago in July, 2015. |

GALAPAGOS Photo Cruise of a Lifetime IPT/The Complete Galapagos Photographic Experience. July 14-28, 2015 on the boat. 13 FULL and two half-days of photography: $12,499. Limit 14 including the leader:/Openings: 4.
My two-week Galapagos Photo-Cruises are without equal. The world’s best guide, a killer itinerary, a great boat (the Samba), and the best leader with eight Galapagos cruises under his belt. Pre-trip and pre-landing location-specific gear advice. In-the-field photo instruction and guidance. Jeez, I almost forgot: fine dining at sea!
The great spots that we will visit include Tower Island (including Prince Phillips Steps and Darwin Bay), Hood Island (including Punta Suarez, the world’s only nesting site of Waved Albatross, and Gardner Bay)—each of the preceding are world class wildlife photography designations that rank right up there with Antarctica, Africa, and Midway. We will also visit Fernandina, Puerto Ayora for the tortoises, Puerto Egas—James Bay, North Seymour and Isla Lobos for nesting Blue-footed Booby (most years), South Plaza, Floreana, and Urbina Bay, all spectacular in their own right. We visit every great spot on a single trip. Plus tons more. And there will he lots of opportunities to snorkel on sunny mid-days for those like me who wish to partake.
We will be the first boat on each island in the morning and the last boat to leave each island every afternoon. If we are blessed with overcast weather, we will often spend 5-6 hours at the best sites. And as noted above, mid-day snorkeling is an option on most sunny days depending on location. Note: some of the walks are a bit strenuous. Great images are possible on all landings with a hand held 70-200mm lens and a 1.4X teleconverter. I bring a longer lens ashore on most landings as that fits my style. I generally work with either the Canon 300mm f/2.8L IS or the Canon 200-400mm f/4 L IS with Internal Extender.
Do know that there is a NatureScapes Galapagos trip: one week for $8495. Thus, my trip represents a tremendous value; why go all that way and miss half of the great photographic locations?
The Logistics
Fly to Guayacil, Ecuador on July 12, 2015. Travel insurance/rest day: July 13 (We may or may not offer a photo outing on the 13th). Fly to the archipelago on July 14 and board the Samba. Get off the boat on July 28. Fly to Guayacil that afternoon. Fly home on the early morning of July 29 unless you are staying on or going elsewhere (or catching a red-eye flight on the evening of the 28th).
$12,499 includes just about everything: all transfers, guide and park fees, all food on the boat, transfers and ground transportation, your flights to the archipelago, and three nights (double occupancy) in a top notch hotel in Guayacil. If you are good to go, a non-refundable deposit of $5,000 per person is due immediately. The second payment of $4,000 is not due until 11/1/14. The final payment of $3449 per person will be due on 2/1/15. A $200 discount will be applied to each of the balances for couples or friends who register at the same time.
Purchasing travel insurance within 2 weeks of our cashing your deposit check is strongly recommended. On my past two cruises a total of 5 folks were forced to cancel less than one week prior to the trip. My family and I use Travel Insurance Services and strongly recommend that you do the same.
Not included: your round trip airfare from your home to and from Guayacil, beverages on the boat, phone calls, your meals in Guayacil, personal items, and a $600/person cash tip for the crew and the guide—this works out to roughly $40/day to be shared by the 7 folks who will be waiting on us hand and foot every day for two weeks. The service is so wonderful that many folks choose to tip extra.
Please e-mail for the complete itinerary and for additional info and images. Please cut and paste “Galapagos 2015 Info Please) into the Subject line.
Be sure to like and follow BAA on Facebook by clicking on the logo link upper right. Tanks a stack!
Support the BAA Blog. Support the BAA Bulletins: Shop B&H here!
We want and need to keep providing you with the latest free information, photography and Photoshop lessons, and all manner of related information. Show your appreciation by making your purchases immediately after clicking on any of our B&H or Amazon Affiliate links in this blog post. Remember, B&H ain’t just photography!
Amazon.com
Those who prefer to support BAA by shopping with Amazon may use this link:
Amazon Canada
Many kind folks from north of the border, eh, have e-mailed stating that they would love to help us out by using one of our affiliate links but that living in Canada and doing so presents numerous problems. Now, they can help us out by using our Amazon Canada affiliate link by starting their searches by clicking here. Many thanks to those who have written.
Typos
In all blog posts and Bulletins, feel free to e-mail or to leave a comment regarding any typos or errors. Just be right :).


It has been mentioned several times that the grain in high ISO images are finer grained and smoother. (I agree with that.) I am interested if you think this noise/grain is easier to remove with Photoshop? Can you get the same results with less surface blur? Is there any advantage to that?
Just a thought that I haven’t seen any comments on.
Thanks!
Detail on using Surface Blur are in Digital Basics along with tons of other great stuff and my complete Digital Workflow. artie
Hey Arthur,
Because I like to take photos besides birds, last year I sold my 60D and got a 5dmarkIII and sometimes I feel reach limited and I don’t have any of the big whites. Do you think it’s a good idea to sell the 5dmarkIII and get a 6d (other photos) + 7DII(for birds)?
Thanks and great job
Hi Miguel, For folks who need more reach the 7D II is a Godsend. I will be keeping my 5D III for scenics, flowers, UrbEx, and the like and using it occasionally for birds and wildlife. I do not know anything about the 6D or the 60D so I cannot advise you there :).
YAW and thanks for your kind words.
artie
Hi, Artie and Miguel. I hope you don’t mind a comment on this from me. I have a 6D, and it makes gorgeous images. It’s not a great action camera in my experience–from what I read and see, the 5D3 totally smokes it for action–but it’s good enough to get sandhill cranes in flight. But it’s a wonderful landscape and flower and macro camera, and it loves sunsets. Only you, Miguel, can make the decision, but maybe this comment will help.
David
hello
thanks for your reply.
Off course I have your guide 1Dx but reading your blog I saw that now you use more different point
Thanks
Gio
Yes, there are some great new options and considerations with the 7D II. It will be a while till I get the guide done.
artie
ps: there are lots of hints and clues and info in the image captions for those who study them carefully…..
Hello Artie
for the focus I always use only the central sensor.
I saw, however, that often the new 7 d mark II (and also with the 1Dx?) Are used at all times.
Can I get notice about for the best approach?
thanks
Giovanni,
For now you can study the image captions carefully. At some point my plan is to write and offer a complete 7D Mark II User’s Guide….
Right now we offer both a 5D III User’s Guide and a 1D X AF Guide that covers the AF Area Selection Mode basics. But there is some new and different stuff that will need to be addressed in the new guide.
You can see the 5D IIi and the 1D X guides by scrolling down here.
The full bird image is awesome.
Bill Richardson, 1DX is 1DX. It’s evident in Artie’s images. No way a $ 1,800 body can compete against a $ 6,800 body. So, if one can afford and carry it; 1DX is the way to go without any second thought. IQ, Frame-rate u name it . . .
Quazi, With all due respect I disagree. But only 100%. I expect you to be the first to correctly identify which camera was used to create each of the three “stop sign in the water” images that will run in Monday’s blog post. artie
Quazi: Are you saying that you can look at one of Artie’s images and reliably tell whether it was made with a 1DX or a 7D2?
David
Yes with unedited crops.
The 3 unedited crops will be published at about 9:00am eastern time today. If you get all three right I will tip my hat to you. artie
In fact anyone can.
Quazi: Even if you’re right–and you might be–that one can see the difference between unedited 200% crops, why would anyone care? I don’t think any of us views or displays images cropped anywhere remotely that severely, and in my opinion, at 200%, no digital camera produces pleasing images.
FF
That’s totally bogus. If that were true, then all of us might as well throw away anything that is priced under a 1D X. While I burn my 1D Mark IV, I might as well trash all of the images I made with my 20D because surely, those aren’t worthy either. Silly me, I always thought the photographer had something to do with creating an image, not the price of a camera.
Doug
Let’s not forget that it was John Shaw who said that a sharp 4mb digital file blows away film for medium sized prints… artie
In case the poll goes in favor of 7D II; I’ll eagerly be looking for 1DX bodies being auctioned by photogs at throw away prices !
Of course but noise is only one factor. I am embarking on an expedition where weight will be critical. I am thinking the 7D2 on a 300f2.8II will work better for me than a 1DX on a 600mII.
Artie, could you give us an impression in the battery life please?
Thank you
I’d say that battery life is similar to the 5D III. As expected, I ran it down part way only when doing lots of Live View work and a video or two. artie
Hi Artie,
I would like to second Cynthia’s request for some testing with the 400 f/5.6, the 300 f/4, and the 100-400 for use on birds in flight, particularly as alternatives to the 300 f/2.8 that is outside my budget. Also, do you have any information on when the BG-E16 will be available? Finally, I also appreciate your efforts working with the 7D2 and making that available to us.
The lenses that you mention are all quality lenses. That’s why they have an “L” on them :). The 7D II will do just great on any of them. No clue on the vertical grip. YAW. Whatever you do please use my affilite link for your 7D II purchase 🙂 artie
“I was a bit disappointed in the noise at 3200 ISO”
That’s entirely because DPP is an abysmal high ISO converter, Bill.
You get less noise north of 6400 ISO from (for example) Canon 70D files, out of Capture One Pro: and the 70D isn’t as good at high ISO as the 7D Mk II, which fact I’ve proven to my own satisfaction from converting my own 70D files, and those from Imaging Resource (IR), in direct comparison to IR’s 7D Mark II sample Raws.
These all having been converted either in Photo Ninja, or Raw Therapee, both of which can convert 7D Mk II files – and a damn’ sight better than DPP can.
Interesting to hear that. I don’t use DPP and have no experience with it. As I have said here before, I really like PSCC noise reduction and Nik dfine noise reduction for automated NR. But Artie refuses to use PSCC and all its great new capabilities! ;-0
Bill, I have PSCC on my new MAC :). I will likely try Dfine for NR first if DPP 4 does not come to support the 7D II, artie
You broke down!! Have you used it yet? Lots of new, great stuff. The NR really is outstanding. Use ACR as a filter on a new layer and you can still do your masking.
Keith, Agree that DPP 3.whatever have lousy NR. That’s why Arash wrote and sold a separate NR guide. If DPP 4 comes to support 7D II files that will change.
Not sure what you are talking about when you mention that both Noise Ninja and Raw Therapee “can convert 7D II images.” Please explain….
Hi Artie
Really appreciate your experiments with the new 7DII. Just wondering how well it does with more “ordinary” lenses….those that some 7D buyers might be likely to have. Specifically, the 400 f/5.6 or the new 300 L IS, or the 100-400- all f/4, which might make a big difference in the way the camera can be used, and image quality at high ISO. It would be interesting to compare to a 1D MK IV, which a lot of us are still using too.
Appreciate all the time and effort you’re putting into this. Wish they made DPP for MAC…. 🙁
What do you mean by the new 300 L IS???
The 400 f/5.6 and the 100-400 will do just fine with the 7D II. The limiting factor will be the skill of the operator. DPP works just fine on a MAC> You just download the MAC version….
As I said elsewhere it would be great if there were 172 hours in each day so that I could test all of the various lenses with the 7D II and compare the 7D II images with images from every camera ever made but the last time I checked, alas, just 24 hours in each day….
🙂
Hi Artie
The 300 isn’t really new-just newer than the old one….but some people really like it. OOPS! I meant the 70-300! Yeah, I understand about the time. Maybe someone else will do these other tests. I’m sure the new 7D II will get compared to just about everything , given how eager people are to finally have a new crop camera with real potential.
Again, all of the lenses that you mention are quality lenses. There is no need to test a 7D II with an of them :). artie
1. If you like regular Peanut M&M’s, you really should try the Dark Chocolate Peanut M&M’s! After all, dark chocolate IS better for your heart 🙂
2. I’m intrigued by the lower (apparent) noise in small RAWs. And you didn’t mention (unless I missed it) that there were any quality issues with the images you shot in Small RAW. So I’m wondering if small RAW might be useful in higher ISO shooting in minimizing noise, especially in the 7DII; I’d be interested in your thoughts on this.
Loren
Don’t forget I am a diabetic :). When I want to be bad I only eat what I can find in Jim’s room.
I should have mentioned that the feather detail looked just fine even though it was not supposed to :). It is recommended that folks use full sized RAW capture all the time. artie
Yeah…me too 🙂 So when I cheat it has to really be worth my while!
I’ve always used full sized RAW…never even tried or thought about small RAW until the bell rang in my head about the noise issue. I won’t bother trying it on my current 7D, but I’ll definitely do some testing on it when the new one shows up.
Hi, Artie. That’s a wonderful image and very impressive for ISO 3200, even before you optimized it. On comparing images from the 3 cameras, I think it’s very difficult. What I’d be inclined to do is to set up the tripod so that you can take the photograph with the zoom lens on the 7D2 near the short end of the lens, and then set up the “full frame” bodies on the same tripod in the same place and zoom in with the lens so the image is the same size in the frame. Of course, there will be some difference in the optics when you do that, but I think with a stellar lens like the 70-200 f/2.8L IS II, that’s less of a problem than doing what you did (changing the number of pixels in the image). I know there are some pixel peepers who might not be happy because this isn’t a precise comparison, but most of us are interested in approximate comparisons, not absolutely precise ones. And with so many variables, I’m not sure you can make a precise comparison, anyway.
Why does using live view to focus on the pine cone not make sense to you? For something like that, it makes sense to me because it’s so accurate, and you’re testing noise and DR and other aspects of image quality rather than focus accuracy.
In any case, many many thanks for all you’ve done so far. It’s been enough information for me!
I have a new plan that I will try for the stop sign in the water images…. A simplified plan. We shall see. When you use Live Mode AF in Live View there is a big focusing box. How do you know where it is focusing???
YAW.
On my 7D, I half-press the shutter to activate focus. When focus is achieved, the box turns green and I hear a beep.
Sorry, you asked WHERE, not when. As I understand it, it focuses on what’s in the box. As you know, when using the regular focus, the area focused on is bigger than the little focus box that appears in the viewfinder. I think the live-view box is a more accurate representation of the focusing area. You can enlarge the view by pressing the focus/enlarge button on the 7D, I assume it works the same on the others. By the way, when in live view on the 7D, you can move the focus box around with the joystick. Again, I assume but don’t know if that works on the 7D2, 5D3, and 1DX.
In case you haven’t noticed there are lots of ridges on a large pine cone…. Many of those will be covered by the large box. As I keep asking, where will it focus?
Well, I’d guess on the ridge(s) closest to the camera. Isn’t that a problem with normal focus as well? Maybe you could shoot at f/11…But if you can’t figure it out, it seems unlikely that I’ll be able to. 🙂
All I can say is that I’ve been very pleased with focus results using live view.
I don’t think you were wrong. I think shooting to the histogram’s right and shooting small RAW both helped with the noise. There is just something about the 7D2 images I find appealing. I will be interested in how images converted from RAW look. I was a bit disappointed in the noise at 3200 ISO but it cleaned up nicely. Still trying to decide whether to keep my 1D4 as my second body, buy another 1Dx or get the 7D2.
I thought that the total lack of noise might be related to the Small RAW business…. I love the 7D II images. There is quite an impressive gallery of my 7D II stuff here.
You might be being unfair posting 200% images. Anything over 100% is pretty challenging to any camera. I have learned to judge sharpness/noise at 50% for a better understanding what the final print will look like. In any event, it is all interesting so thanks for posting.
Well, I just tested my new 1DX at 3200 ISO at 200% and I was wrong. THAT camera is unchallenged. I also tried upsizing the images 200% and was still pretty noise free. (I recall Chuck Westfall saying the clean 1DX images upsized impressively but I hardly believed it) Now I am leaning toward getting a 2d 1DX rather than a 7D2. Decisions, decisions.