
What’s Up?
I enjoyed a relaxing 1/2 mile swim and and an ice bath today. BTW, go Wisconsin! I felt like a travel agent arranging my flights to Santiago, Chile and Stanley in the Falklands (where I will board the Ortelius for my next Cheesemans’ South Georgia Expedition) and to Tokyo for the sold out Japan in Winter IPT. Lots lots more healthy eating. And I enjoyed another great night’s sleep on Friday with just one pit stop. This blog post took about 2 1/2 hours to prepare and was published from my home at ILE, FL very early on Sunday morning. Today marks 81 straight days with a new educational blog post.
Canon 600 mm f/4L IS II Lens
David Ramirez is offering a used Canon EF 600mm f/4 L IS II in excellent plus condition for $10,499.00. The sale includes the Lenscoat cover in Max-4, the rear lens cap, the front lens cover, the lens trunk, the lens strap, the original box, the lens manual, and both the original lens foot and the 4th Generation Design replacement low foot CRX-5 (a $122 value). Insured shipping via UPS Ground is also included. Your item will not ship until your check clears unless other arrangements are made.
Please contact David by e-mail or by phone at 541-892-3726 (Pacific Time).
As the lens sells new for $11,999 you can save a cool $1500 by grabbing this one now.
I currently own and use the 600 II as my go-to super-telephoto lens when I need reach. It teams well with any camera body and offers amazing reach with the new 7D II (960mm at f/4!). I use it often with my 1DX with both TCs especially the 2X III. as I recommend and use the Mongoose M3.6 I use the CR-X5 Low Foot as the plate. Some young strong folks hand hold the 600 II for long flight and general bird photography shooting sessions. I can hand hold it only for short periods unless I am seated. It is a killer lens when using your car as a blind with the lens supported by a BLUBB.
South Georgia October 2015
Do consider joining me in South Georgia next October for the trip of a lifetime. Click here for complete details.
St. Augustine Alligator Farm Short-Notice Spoonbill and Wading Bird Chicks IPT: May 1-4, 2015. TWO FULL and TWO 1/2 DAYS: $1099. Limit 8/Openings 6.
Two folks have signed up for this IPT that was announced only yesterday. Scroll down here for complete details.
Please Remember to use our Affiliate Links 🙂
To show your appreciation for my continuing efforts here, we ask, as always, that you use our the B&H and Amazon affiliate links on the right side of the blog for all of your purchases. B&H is recommended for you major photography gear purchases, Amazon for your household, entertainment, and general purpose stuff. Please remember: no phone orders: web orders only!
Please check the availability of all photographic accessories in the BIRDS AS ART Online Store, especially the Mongoose M3.6 tripod heads, Gitzo tripods, Wimberley heads and plates, LensCoats and accessories, and the like. We sell only what I have used, have tested, and can depend on. We will not sell you junk. We know what you need to make creating great images easy and fun. And we are always glad to answer your gear questions via e-mail.
I would of course appreciate your using our B&H affiliate links for all of your major gear, video, and electronic purchases. For the photographic stuff mentioned in the paragraph above we, meaning BAA, would of course greatly appreciate your business. Here is a huge thank you to the many who have been using our links on a regular basis and visiting the BAA Online store as well.
|
|
|
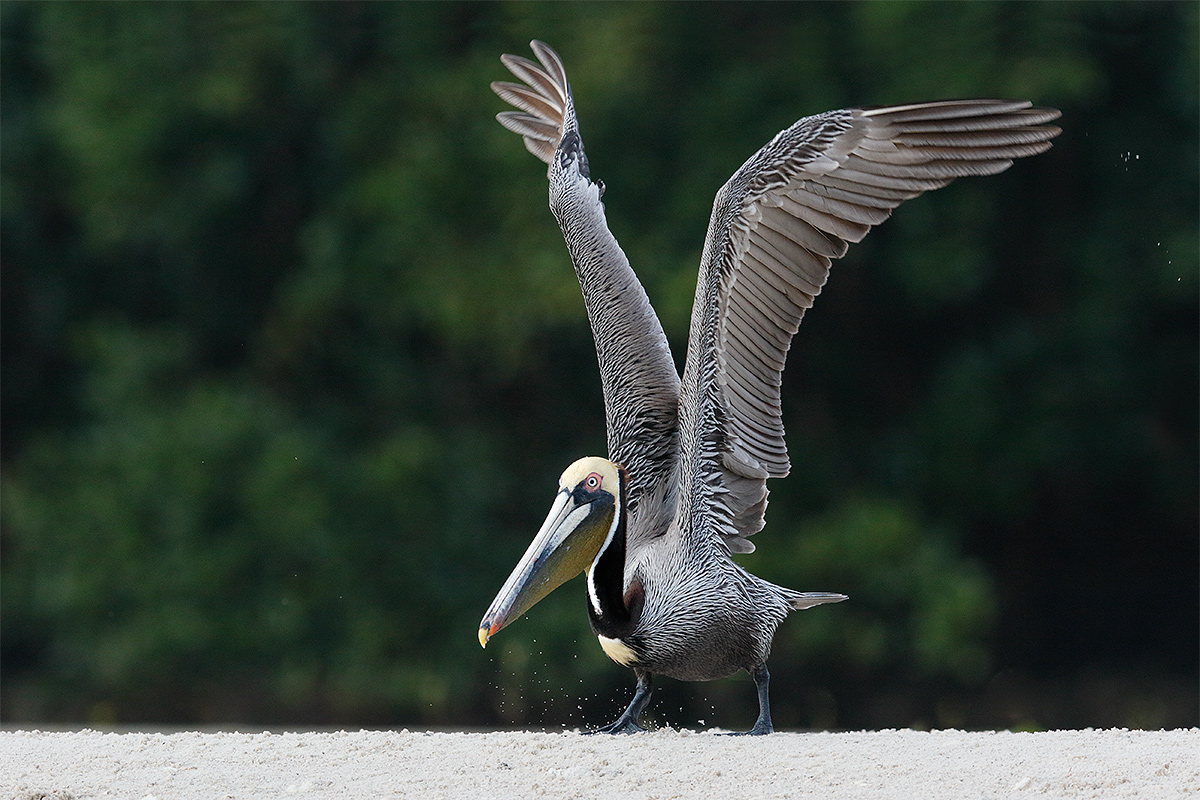
This image was created at 8:19am on the cloudy morning of March 22, 2015 at Alafia Banks with the Canon EF 600mm f/4L IS II USM lens and the Canon EOS 7D Mark II. ISO 640: 1/1250 sec. at f/5.6. AWB. AI Servo Zone/Shutter Button AF as framed was active at the moment of exposure; see the DPP 4 screen capture below for the active points. Click on the image to see the spectacular larger version. |
Manual Mode a Must!
Those who persist in working in Av mode in all situations for a variety of reasons (and all the rest of you as well) are invited to estimate the correct amount of positive or negative Exposure Compensation (EC) that should have been shown on the analogue scale at the moment of exposure to result in a perfect exposure.
To simplify the question, what would the right EC have been if you had been working in Av mode?
Either way, the answer will be the same. We can make it a multiple choice question to encourage more folks to participate:
a: +2 stops
b: +1 stop
c: +1/3 stop
d: -1/3 stop
e: -2 stops
f: -2 2/3 stops
Be sure to let us know why you chose your answer.
Exposure Fine Points
#1: if you are photographing a species of a given tonality in flight (working correctly in Manual mode as you should be for most flight situations) and the bird lands, it is generally best to open up 1/3 stop (usually by slowing down the shutter speed one click). Why? Though theoretically the light falling on the subject is roughly the same whether the bird is in flight or on the ground my experience is that “it is lighter up there.” That is, the land absorbs a bit of the light. Does this really make sense to me? No. Does it work? Yes.
#2 is a principle that we teach whenever we are photographing a variety of birds in flight in the same light: to get the right exposure for subjects of varying tonalities you need to adjust your shutter speed for light and dark birds. Again, it is almost always best to do that by adjusting the shutter speed. At the defaults, with Canon gear, that means turning the Index Finger Dial clockwise for a faster shutter speed and counter-clockwise for a slower shutter speed.
Here is how that works at Alafia Banks:
a: Figure the correct exposure in a given lighting condition via experience and a histogram check. Make sure that you have no blinkies on the subject and that you have data well into the fifth (highlight) histogram box on the right. On a clear sunny morning at ISO 400 this usually work out to 1/3200 sec. at f/6.3.
b: If a Great Egret comes along, go one click clockwise with the Index Finger Wheel to 1/4000 sec. at f/6.3. Why? Great Egrets are well whiter than the brightest WHITEs on a spoonbill. Remember this principle: Whites and light tones need less light to be properly exposed than middle tones.
c-If a Great Blue Heron or a Brown Pelican flies by go one click lighter (slower shutter speed) than you are for a spoonbill. Why? The WHITEs on these two species are not as bright as the WHITEs on a spoonbill. This would put you at 1/2500 sec. at f/6.3.
d-If a dark morph Reddish Egret (darn close to a middle tone) comes into range go only another click lighter? Why? You need to guard against getting blinkies on the pink of the bill which can be very bright in full breeding plumage… You will wind up at 1/2000 sec. at f/6.3.
e: If a Double-crested Cormorant flies by open up only four clicks from the spoonbill settings. Though it is a black bird, you still need to guard against toasting the bright orange bill. You will correctly be at 1/1250 sec.
f: If a Fish Crow (basically all BLACK) is the subject, open six clicks from the spoonbill settings to 1/800 sec. (if I have done the math correctly.
We do the exact same thing at Bosque with the geese and cranes, we vary the shutter speed to come up with a good exposure for birds of varying tonalities while working in Manual mode when the light is constant.
|
|
The DPP 4 Screen Capture |

Zone AF
As careful readers have been noticing, I have been working more with Zone AF in recent months. While I almost never rely on Zone AF for flight, I have been trying it for action shots and also with somewhat static stuff. I chose it for today’s pelican image in an effort to move the bird back in the frame. The relatively wide coverage of center AF zone allows for that with large birds. When the pelican raised its wings to take off and kicked up some sand in the process I simply fired off several frames. As you can see by the screen capture above, Zone AF did an excellent job of picking AF points that resulted in a sharp-on-the-eye image.
All in all AF Zone has performed quite well in a variety of situations. For flight however, I will be sticking with center AF point/Expand AF… And of course, my new old friend, Shutter Button AF.
Before and After Image Questions
What are the two main differences between the original image (as seen in the screen cap) and the optimized version that opens this post? Eagle-eyed readers will be able to come up with at least three differences.
The DPP 4 Screen Capture
Though you cannot see the Brightness slider, I moved it to +.67 as the original was about 2/3 stop underexposed. I moved the Highlight slider to -1 (as I often do) to assure lots of detail in the brightest highlights, in this case, the light yellow atop the pelican’s head. I moved the Shadow slider to -1 to darken the background; this is something that I do only rarely.
Digital Basics
Everything that I did to optimize today’s image is covered in detail in my Digital Basics File–written in my easy-to-follow, easy-to-understand style. Are you tired of making your images look worse in Photoshop? Digital Basics File is an instructional PDF that is sent via e-mail. It includes my complete digital workflow, dozens of great Photoshop tips, details on using all of my image clean-up tools, the use of Contrast Masks, several different ways of expanding and filling in canvas, all of my time-saving Keyboard Shortcuts, Quick Masking, Layer Masking, and NIK Color Efex Pro basics, Contrast Masks, Digital Eye Doctor techniques, using Gaussian Blurs, Tim Grey Dodge and Burn, a variety of ways to make selections, how to create time-saving actions, the Surface Blur (background noise reduction) settings, and tons more.
APTATS I & II
Learn the details of advanced Quick Masking techniques in APTATS I. Learn Advanced Layer Masking Techniques in APTATS II. Mention this blog post and apply a $5 discount to either with phone orders only. Buy both APTATS I and APTATS II and we will be glad to apply at $15 discount either with phone orders or here in the BAA Online Store. For phone orders, call Jim or Jennifer at 863-692-0906 weekdays.
|
|
|
You can order your copy of “The Photographers’ Guide to Canon Digital Photo Professional 4.0” (aka the DPP 4 Raw Conversion eGuide) by Arash Hazeghi and Arthur Morris by clicking here. |

The DPP 4 eGuide (PDF)
The Ideal Companion to the 7D Mark II User’s Guide
Learn how and why I and many other discerning photographers choose and use only DPP 4 to convert their Canon RAW files in the DPP 4 RAW Conversion Guide by Arash Hazeghi and yours truly. The latest version supports all of the newer Canon camera bodies and several older models including the EOS-7D and the EOS-1D Mark IV. A free update that will cover most of the newly added cameras will be sent in a week or two. See upcoming blog posts for exact details.
|
|
|
Clockwise from upper left to center: Snowy Egrets/breeding plumage pair, American Alligator with egret feather on head, Cattle Egret in breeding plumage (with fill flash), large Snowy Egret chicks, displaying gator, Wood Stork in flight carrying nesting material (fill flash), begging Snowy Egret chick, another Cattle Egret in breeding plumage (with fill flash), and Great Egret chick. |

St. Augustine Alligator Farm Short-Notice Spoonbill and Wading Bird Chicks IPT: May 1-4, 2015. TWO FULL and TWO 1/2 DAYS: $1099. Limit 8/Openings 6.
St. Augustine in early May is a bird photographer’s paradise. With any luck we should have chicks of all sizes in the nests ranging from newly hatched Snowy Egrets and Tricolored Herons to nearly fledged Great Egrets. More than a few pairs of Roseate Spoonbills have nested at the Alligator Farm for the past several years. Photographing the spoonbill chicks in the nest is a huge challenge…. With any luck we will encounter a few Snowy and Cattle Egrets in stunning breeding plumage. We should have lots of flight photography ops especially late in the day. We will enjoy early entry. Folks who will need a photographer’s pass ($89.95 includes full season early entry and late stay and submission fees for up to 5 photos in their annual contest; this works out to cheaper than four separate entry tickets). We will have those ready for pick-up on the first afternoon. All will need to bring a $5 bill for the staff tip for each of our 3 extra-late stays.
|
|
|
Clockwise from upper left: flash-as-main light Great Egret chick begging, breeding plumage Cattle Egret w/fill flash, Little Blue Heron, Great Egret chick in nest begging, Cattle Egrets copulating, Wood Stork with nesting material, another Wood Stork with nesting material, and breeding plumage Snowy Egret displaying. |

What You Will Learn
On this IPT you will the learn the basics and fine points of digital exposure and how to get the right exposure every time after making a single test exposure. You will learn to understand and predict bird behavior and to see and understand the light. You will learn to design pleasing images by mastering your camera’s AF system and how and why to work in Manual mode (even if you’re scared of it). Most importantly, you will learn to spot the good situations, to choose the best perspective. Rookeries are crowded, cluttered, white-washed places. Most folks who visit have no clue as to the difference of an image with tons of distractions and one with a clean line of sight and the best possible distant background. Join me and I will teach you to see like a pro.
I will be bringing my flash to the Alligator Farm (gasp!) I have not used flash for at least a year. I will be teaching you how to use flash as fill and how to use flash as main light. In addition, I will be reviewing the flash flight techniques that I developed at St. Augustine more than a few years ago.
|
|
|
Clockwise from upper left: gator back, Great Egret returning to mate (with fill flash), Roseate Spoonbill with bill open, Roseate Spoonbill chick begging, Roseate Spoonbill 11am silhouette, large Great Egret chicks in nest, and bill of Roseate Spoonbill. |

Whats the Rest of the Deal?
At lunch (included) we will review my images; folks learn a ton watching me edit–why keep this one and delete that one. If you opt to bring your laptop, we can take a look at five of your best images from the morning session. We will process a few of my images in Photoshop after converting them in DPP. That followed by Instructor Nap Time.
A $499 non-refundable deposit is required to hold your spot. Your balance of $600, payable only by check, is due immediately. Please include a separate check for $89.95 so that we can purchase your pass in advance. Please click here to read our cancellation policy before committing. Then please print, read, and sign the necessary paperwork linked to here and get it to us. You can register by calling Jim or Jen at the office at 863-692-0906 and arranging for your deposit of $499. Balances are payable only by check. I hope to see you there.
Be sure to like and follow BAA on Facebook by clicking on the logo link upper right. Tanks a stack!
Support the BAA Blog. Support the BAA Bulletins: Shop B&H here!
We want and need to keep providing you with the latest free information, photography and Photoshop lessons, and all manner of related information. Show your appreciation by making your purchases immediately after clicking on any of our B&H or Amazon Affiliate links in this blog post. Remember, B&H ain’t just photography!
Amazon.com
Those who prefer to support BAA by shopping with Amazon may use this link:
Amazon Canada
Many kind folks from north of the border, eh, have e-mailed stating that they would love to help us out by using one of our affiliate links but that living in Canada and doing so presents numerous problems. Now, they can help us out by using our Amazon Canada affiliate link by starting their searches by clicking here. Many thanks to those who have written.
Typos
In all blog posts and Bulletins, feel free to e-mail or to leave a comment regarding any typos or errors. Just be right :).


Hi Artie,
My answer is “e”, -2 stops, because of the dark background (which dominates a large percentage of the image) would cause the whites to be overexposed.
Thanks again for all of the fun and learning!
Best,
Wayne
Well done. Be sure to see tomorrow’s blog post. a
Hello again. After reading a few more of your blogs I think the crux of my confusion might be the sun. I am looking for a hard and fast rule for what to do about exposing whites correctly and I now think the correct exposure depends on the sun. In your Exposure Simplified Simplified post you state that “When the sun it out at full strength, the meters on our cameras are pretty smart.” But “When the sun is at less than full strength, as in the near white-out here, the meters on our cameras are pretty dumb and need lots of help from us.” You added +2 1/3 stops for that snowy scene. Could I safely add light to white if the sun is less than 1/2 strength always? Conversely would you then subtract light from dark animals (black bear) if the sun was less than 1/2 strength? Thank you for taking the time to read this, it does not need to be posted, and I won’t hold it against you if you ignore me.
Confused in Michigan,
Peg
Artie,
Looking at the pelican image I think that you cropped a little from the right side and bottom, removed a few distracting light areas in the background near the sand as well as along the the right margin and then finished up by bluring the background a little with probably a surface blur. Your “exposure fine points” was very informative.
Thanks
Ivan
Yes, I’m thinking the brown on the pelican is darker than 18% gray so it would need a little more light. On the exposure fine points you said that the whites of the brown pelican aren’t bright whites, so my guess is that +1/3 stop should do it without over exposing the whites.
Hey Peg, You have forgotten about the huge dark, almost black background and how that will affect the meter…. And you have forgotten about the WHITEs and the light yellow gold on the forehead….
On another note, I try to understand your posts but am a beginner and need to know if one must always assume that evaluative metering is not to be trusted.
I trust Evaluative metering but only 100% of the time.
Do you always use that premise? Whites are particularly confusing.
Not sure which premise you are referring to…. As I have said here and elsewhere 1000 times, getting the right exposure with digital is easy. Just get some data in the rightmost box of the histogram…. If you have ten seconds with a subject in the same light you should be able to learn to do that quickly and correctly. Good advice: keep on studying the blog and asking questions. Best advice, get yourself a copy of the CD book, The Art of Bird Photography II (ABP II: 916 pages, 900+ photographs each with our legendary educational captions). Then study the section on “Exposure Simplified” and the section on histograms….
I have read articles that say to get good whites in snow pictures add 1 1/3 to 2 stops of light.
You are confused as to your starting point…. That is perfect advice if you are spot metering WHITEs. That would be pretty much impossible in the pelican image… That is one of the many reasons that I feel that folks should not use spot metering…. Again see same in ABP II and also in the original classic “The Art of Bird Photography” (ABP in softcover). You can save $10 by getting the two book bundle here.
Your post today says for a white egret to reduce light because whites and light tones need less light to be properly exposed then middle tones. I could use a simple rule about whites and exposure, perhaps another day?
If you get your hands on ABP and ABP II and study the stuff on exposure and histograms and continue to visit the blog and ask questions it will all seem simple. I have taught 1000s of folks to get the right exposure every time in ten seconds or less…. artie
Hi Artie, Here goes, deep breath and….. -2 stops – The auto metering would have taken the average and tried to lighten the whole scene, therefore I think that – 2 stops would have bought it back???
Cheers, Graham
Because of your explanation of exposure fine points, part C, my thoughts would be to add 1/3 of a stop of light.
Hi Peg, I am slightly confused. Are you saying that this is your answer?
c: +1/3 stop
artie
Before and After Image Questions
Don’t know if these count, but you cropped off some from the bottom and it looks like you added just a little canvas to the top and cropped off the right hand side.
Doug
More on the right hand crap…when you did that, you moved the flying sand also?
Doug
Dang…I obviously meant crop…sorry, just woke up.
Doug
Hey Doug, I’ll take no crap from you 🙂
Good on all the changes but did not mess around with any flying sand, at least as far as I can remember. Only one more important change that would be much easier to see with an animated GIF….. later and love, artie
ps: I see that I did get rid of one speck of sand behind and slightly above the bird’s tail.
pps: did you ever bite on the used old 600?
I sent the money into Gerald two days ago. So hopefully in 1-2 weeks you’ll be getting a confirmation it was sold.
I’ll also be sending my money in for my sale to my 300 soon. I had to ship that thing to California, which took Fedex almost two weeks to deliver it due to the package going back n forth from the buyer not being home, delivery exceptions…a real nightmare. So I had to wait until she was happy before I could send the money to Gerald. Gerald was real nice in holding the 600 for me cause he could’ve sold it weeks ago.
I also bought that Induro tripod. I know I said I was going to wait, but B&H took $100 off and couldn’t pass that up. I went to B & H via your site, so hopefully that sale popped up.
Hey Doug,
Many thanks on all counts. Your efforts are greatly appreciated. later and love, artie
Excellent article, thanks. I have three of your books and the little laminated card carry into the field exposure guide from the film days but I still forget & get confused, probably due to not enough opportunities to take pictures in the last few years.
Is the laminated exposure guide still worthwhile? Have you considered an update for digital?
Hi Gary, YAW. The principles covered and illustrated in and on the laminated card remain the same with digital. Find me a company who can produce the laminated cards and I just might be enticed to do a digital version. artie