What’s Up?
On Tuesday I micro-adjusted my 500 II with my new 5D IV, alone, and with my 1.4X III i and 1.4X III ii TCs and with my 2X III i and 2X III ii TCs and did lots of work on the LensAlign/FocusTune Micro-adjusting Guide. I keep learning more with every session.
I shared an early draft with Bill Hill who wrote via e-mail:
Artie, Just a note as a progress report and thanks again. I got my 500 f4 back from Canon, a very good experience, and focus-tuned it with my 2x III converter. AWESOME. It came out to -3; I have never gotten such sharp images at 1000mm. Thanks to MT, AM and Canon! The info in your guide is essential to anyone who wants to use learn to use Focus Tune. Bill
I am not sure if the guide will be ready for publication before I leave for the Galapagos on Sunday but it will surely be published not later than early September.
New: Wanted to Buy Service
I am gonna give this a try. If you would like to post a wanted to buy item I will be glad to post it on the blog provided that you agree to pay me a 2 1/2 per cent finder’s fee if I am successful, 2 1/2% of the what you wind up paying for the item. To list an item, please click only here to shoot me an e-mail.
If you wish to sell a wanted to by item, please click here to shoot me an e-mail. Once I get your e-mail I will shoot you the Items for Sale Info e-mail. If you agree to all the usual terms we will work together to determine a fair price and then I will put you in touch with the prospective buyer. If a sale is not completed within two weeks, you agree that I will list the item for sale in a blog post and on the Used Gear page. In addition, you agree not to sell the item to the person who originally wanted to buy the item. As always, the seller will pay me 5% of the original asking price. Note: the cost of insured Ground Shipping via major courier is always paid by the seller.
The Streak
Today marks eleven days in a row with a new educational blog post. This blog post took more than four hours to create.
Revamped
I finally updated the IPT page to properly reflect the recently completed trips. If you doubt that I am really slowing down do click here to see the meager IPT schedule. Right now there are only two US-based IPTs on the schedule. Best news is that I turned up the missing registrant for the Fort DeSoto IPT so that will run. Do consider joining us if you would like to learn from the best.


Gear Questions and Advice
Too many folks attending BAA IPTs and dozens of folks whom I see in the field, and on BPN, are–out of ignorance–using the wrong gear especially when it comes to tripods and more especially, tripod heads… Please know that I am always glad to answer your gear questions via e-mail.
Please Don’t Forget …
As always–and folks have been doing a really great job for a long time now–please remember to use the BAA B&H links for your major and minor gear purchases. For best results, use one of our many product-specific links; after clicking on one of those you can continue shopping with all subsequent purchases invisibly tracked to BAA. Your doing so is always greatly appreciated. Please remember: web orders only. And please remember also that if you are shopping for items that we carry in the BAA Online Store (as noted in red at the close of this post below) we would of course appreciate your business.
|
|
|
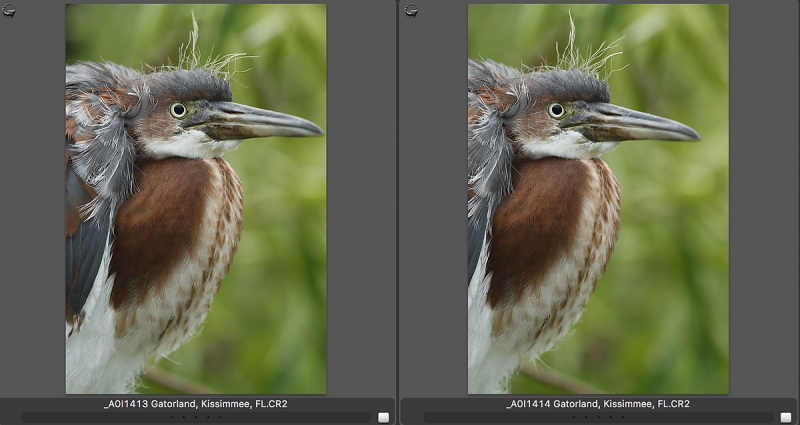
These two images were created last June at Gatorland with the Induro GIT 304L/Mongoose M3.6-mounted Canon EF 500mm f/4L IS II USM lens, the Canon Extender EF 1.4X III, and the Canon EOS-1D X Mark II. ISO 800. Evaluative metering +2/3 stop as framed: 1/60 sec. at f/11 in Manual mode. Daylight WB. LensAlign/FocusTune micro-adjustment: -1. FourAF point up and one to the left of the Center AF Point/AI Servo/Expand/Shutter button AF was active at the moment of exposure. Tricolored Heron fledgling |
Too-big-in-the-Frame Lesson
At times, you have a nice situation or pose but with the focal length you’re working with, it is difficult to fit the bird in the frame with sufficient space around it. The best solution is to make the first image, lock focus — I have all of my bodies set up with the AF-On button set to Focus lock — and then re-compose.
I made the image on the left (_A0I1413) and knew that the bill tip was too close to the edge. I should have hit the AF-On button to lock focus and then re-composed to the right. But I did not think quite that fast enough. I simply shifted the lens a bit to the right and focused on the base of the bill rather than the bird’s eye to make the image on the right (_A0I1414). Though I had only a bit more room in front of the bird, it was just enough to give the bird a bit more room in the frame. Keep reading to learn how I optimized the image (and how I softened up the background).
Aperture Choice
I have no explanation as to why I was at f/11. Perhaps I was photographing to fledged tricolors perched next to each other … For the two image above, even f/8 would have been more than I needed. Notice how the background detail has been brought up by too small an aperture, f/11.
An Image Design Question
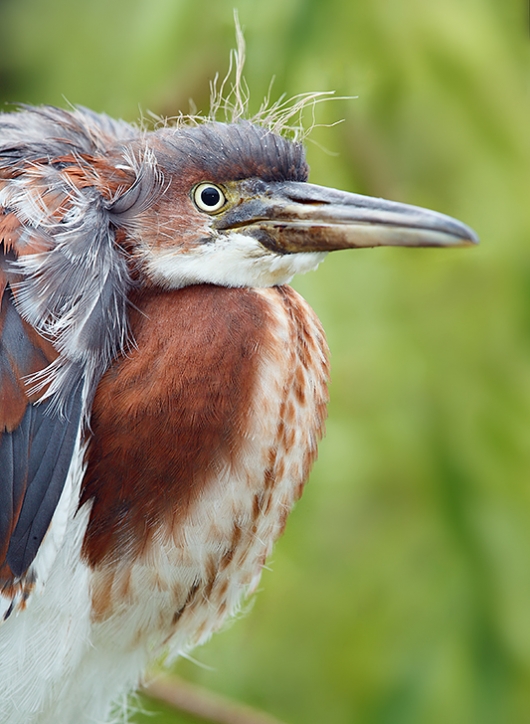
Why didn’t I simply optimize the image on the right, (_A0I1414)? Because I loved the tract of loose, gray feathers behind the bird’s head in the first image (_A0I1413) and wanted to include that tract in the final image.
|
|
Tricolored Heron fledgling/the optimized image |
The RAW Conversions
After converting the first image in DPP 4, I copied the recipe, pasted it into the second image, and converted that one too. Then I brought both images into Photoshop. Working in the un-framed view, I expanded canvas right by pulling out the love handle on the right frame-edge and then double-clicking on the image to complete the now somewhat boxy crop. Next, I needed a section of the second image to fill in the added canvas.
The Rectangular Marquee Tool
I have been using the Rectangular Marquee Tool more and more recently when I need a selection, especially a selection with a straight edge. After expanding the canvas right on the first image, I selected a chunk of the edge of the frame on the right in the second image using the Rectangular Marquee Tool, making sure to include just a bit of he bill tip. Then I hit Control J to put the selection on its own layer and used the Move Tool (V) to drag it roughly in place in the 1st image. I reduced the opacity of that layer to 50% to make it easy to line up the bill tips in the two images. When I did that, I learned that the the bird had moved between the time I created the first image and the time I created the second image (only seconds later). Since I would not need the bill tip I simply lined up the background elements until they matched. After that, it was a simple matter of refining that layer after adding a Regular Layer mask. After doing that there were still a few small areas that needed to be filled in or cleaned up. I used the Clone Stamp Tool, the Patch Tool, and the Spot Healing Brush for those tasks.
Softening the Background
Here is a trick that I use often. Though the basics are contained in the Current Workflow e-Guide (Digital Basics II), I did not include specific instructions there. So please consider this a free to all DB II Update. Thus, there is no need to e-mail Jim for the update; it is right here:
To soften the background, I used a relatively large brush to paint a Quick Mask of most of the background, making sure to stay clear of the subject. On my 15″ Macbook Pro with retina display, I painted the Quick Mask to within about 3/8 inch of the bird. Then I hit Q to get the marching ants and then hit Control J to put the selection on its own layer. Next I applied a 65 pixel Gaussian blur (Filter > Blur > Gaussian blur) and then while keeping my eye on the background reduced the opacity just a bit to taste. Last, to make sure that the blur did not effect the bird, I added a regular layer mask and, working large, checked the edges of the bird, erasing (B, D, X) just a bit where needed.
The Rest of the Image Optimization
I color balanced the image using the RGB Curves method. The resulting colors were quite rich, vibrant, and lifelike but just a bit muddy so I reduced the opacity of that layer and then effectively reduced the Contrast by using another brand-new technique: I went to Selective Color and decreased the BLACKs in both the BLACK and the NEUTRALs about 5 points each. Voila. That was about it.
In the Current Workflow e-Guide (Digital Basics II) I give you lots of great Tools to work with and lots of specific tutorials. Creative folks, however, can put those tools to new uses and adapt those tutorials in new and different ways and thus accomplish great things.
The basics of all of the tools and techniques mentioned above are detailed in Current Workflow e-Guide. I will continue to share new ways of using and applying them here with the occasional free “update.”
|
|
|
The BIRDS AS ART Current Workflow e-Guide (Digital Basics II) will teach you an efficient Mac/Photo Mechanic/Photoshop workflow that will make it easy for you to make your images better in Photoshop (rather than worse). That true whether you convert your images in DPP 4 or ACR. See the blog post here to learn lots more and to read a free excerpt. You can order your copy from the BAA Online Store here, by sending a Paypal for $40 here, or by calling Jim or Jennifer weekdays at 863-692-0906 with your credit card in hand. |
If In Doubt
If in doubt about using the BAA B&H affiliate link correctly, you can always start your search by clicking here. Please note that the tracking is invisible. Please, however, remember to shoot me your receipt via e-mail.


Please Remember to use my Affiliate Links and to Visit the New BAA Online Store 🙂
To show your appreciation for my continuing efforts here, we ask, as always, that you get in the habit of using my B&H affiliate links on the right side of the blog for all of your photo and electronics purchases. Please check the availability of all photographic accessories in the New BIRDS AS ART Online Store, especially the Mongoose M3.6 tripod head, Wimberley lens plates, Delkin flash cards and accessories, and LensCoat stuff.
As always, we sell only what I have used, have tested, and can depend on. We will not sell you junk. We know what you need to make creating great images easy and fun. And please remember that I am always glad to answer your gear questions via e-mail.
I would of course appreciate your using our B&H affiliate links for all of your major gear, video, and electronic purchases. For the photographic stuff mentioned in the paragraph above, and for everything else in the new store, we, meaning BAA, would of course greatly appreciate your business. Here is a huge thank you to the many who have been using our links on a regular basis and those who will be visiting the New BIRDS AS ART Online Store as well.
Amazon.com
Those who prefer to support BAA by shopping with Amazon may use the logo link above.
Amazon Canada
Many kind folks from north of the border, eh, have e-mailed stating that they would love to help us out by using one of our affiliate links but that living in Canada and doing so presents numerous problems. Now, they can help us out by using our Amazon Canada affiliate link by starting their searches by clicking here.
Be sure to like and follow BAA on Facebook by clicking on the logo link upper right. Tanks a stack.
Typos
In all blog posts and Bulletins, feel free to e-mail or to leave a comment regarding any typos or errors. Just be right :).


Hi, Artie, Just thought I would let you know, I am using you for my week 31 inspiration on 52 Frames. Here is our assignment:
Modern day cameras are quite amazing if you take a moment to think about it. We can shoot in extremely low-light scenarios, capture an airplane in the sky or zoom in on the details of an ant. But, as we all know, the camera is just a tool. At the end of the day it is the photographer’s unique creativity and insight that, creates a photograph. So for this week’s challenge we are focusing on photographers!
You are all going to choose a famous photographer and emulate her or his style. Study your chosen photographer’s work intensely and carefully. Maybe even try out new techniques and expand your creative comfort zone.
Look critically and try to understand what makes your chosen photographer’s work so distinct. Hone in on a few unique traits of their art and see if you can incorporate some of their style in your own work. Because, as you know, it is not about the camera – it is about the photographer.
Tips and Tuts for this week:
A good rule of thumb (but not ironclad) for who is a “famous” photographer is whether they have a Wikipedia page. You can refer to this comprehensive list of photographers in Wikipedia.
Here are some lessons we can learn from two masters of photography.
A small summary of some of history’s most iconic photographers.
And because there are not enough women on the previous list, here is an amazing group of female photographers you should definitely have a look at.
Study a couple of photos from your photographic mentor and take note of the following: What is their photographic ‘genre’? (Portraits, landscapes..etc.). What is their source of light? What is the message the photographer wanted to convey. How did they compose their photo?
Don’t get overwhelmed. Choose a photo from your photographer’s work that speaks to you the most. Then go about emulating this style. This can, but doesn’t have to be, very similar to the original. You can make it your own.
We encourage you to share a link about your famous photographer’s work you in your text description, as well what you have learned from this week’s challenge.
Thanks Mel! I am flattered that you chose me especially since I have no Wikipedia page 🙂 Good luck with your assignment. Are you gonna do a bird or a barn? (Melissa was on the 2017 Palouse IPT.)
with much love, artie