Stuff
It was a beautiful, still, clear morning on Thursday but there were no birds on the perches. And few elsewhere. Using my hand held 400 DO II/1.4X III/1DX II I had some good flight chances with both Black and Turkey Vultures while working out of the car, and then again when I took my now daily walk on the long pier. I learned yesterday that this pier is the longest fresh water pier in the state of Florida. I did swim a slow mile midday, 88 lengths.
I have lots more work to do on my AZ trip and on upcoming Florida IPTs and the new Master Class offerings. Thanks to the many who wrote with Phoenix help and suggestions.
Click on the logo-link above for great holiday savings!
$300 off on the Canon 100-400 II!
$300 off on the Canon 100-400 II!
The Streak
Today makes one hundred fifty-three days in a row with a new educational blog post! This blog post took about 90 minutes to prepare including the time spent optimizing the image. With all of my upcoming free time (or not …), the plan right now is to break the current record streak of 480 … Good health and good internet connections and my continuing insanity willing.
Click here for Amazing 5D Mark IV Bundles and Deals
Booking.Com
Booking.Com came through for me twice again recently with both the DeSoto Fall IPT and next July’s UK Puffins, Gannets, and Bempton Pre-trip room reservations. And all the rates were great. If you’d like to give Booking.Com a shot, click here and you will earn a $25 reward. Thanks to the many who have already tried and used this great service.
Gear Questions and Advice
Too many folks attending BAA IPTs and dozens of folks whom I see in the field, and on BPN, are–out of ignorance–using the wrong gear especially when it comes to tripods and more especially, tripod heads… Please know that I am always glad to answer your gear questions via e-mail. Those questions might deal with systems, camera bodies, accessories, and/or lens choices and decisions.
Canon EF 100mm f2.8 USM macro Lens
Price Drop!
Galapagos IPT veteran Paul Reinstein is offering a Canon EF 100mm f2.8 USM macro lens in near-mint condition for the bargain price of $225. Why such a ridiculously low price? The lens has a speck of dirt near the center of the lens. Paul tested the lens at f/22 with both near and far focus and the speck was never visible in the image of a clean light background. The sale includes the lens hood, the front and rear lens caps, the original product box, and insured shipping via the US Postal Service to US addresses only. Your item will not ship until your check clears unless other arrangements are made. Photos are available upon request.
Please contact Paul via e-mail or by phone at 1-310-946-903 (Pacific time).
Both Denise Ippolito and I loved this lens for flowers and more. She used it hand held almost all the time; I on a tripod about 75% of the time. Different strokes. It is a lightweight, super-sharp lens. At the minimum focusing distance of 12 inches it offers true macro at 1:1 magnification. Note: the tripod ring is not included with this lens even when you buy a new one; you can go with the Canon Tripod Mount Ring D for IS 100mm f/2.8L Macro lens or the far less expensive Vello Tripod Collar D (Black) for Canon EF 100mm f/2.8L IS USM Macro lens. artie
|
|
|
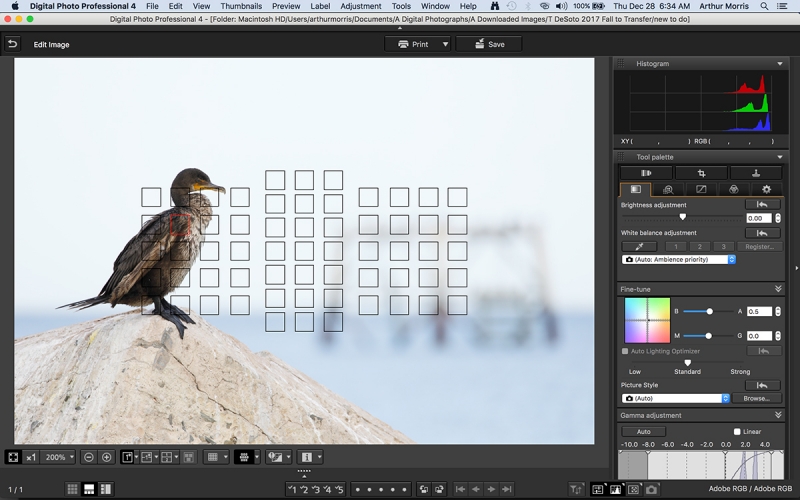
This image was created at Fort DeSoto on the morning of October 28, 2017 with the hand held Canon EF 100-400mm f/4.5-5.6L IS II USM lens, the Canon Extender EF 1.4X III (at 520m), and my favorite flight photography camera body, the Canon EOS 5D Mark IV. ISO 800. Evaluative metering +3 stops off the light gray sky: 1/500 sec. at f/9 in Manual mode. AWB at 9:34am on a cloudy day. LensAlign/FocusTune micro-adjustment: extrapolated to -1. One row up and four AF points to the left of the center AF point/AI Servo/Expand/Shutter Button AF was active at the moment of exposure as framed. As seen by the illuminated red AF point above, the selected AF point was on the bird’s shoulder. The DPP 4 Screen CaptureClick on the image to see a larger version if you’d like to read the fine print. |
BLACKs Too Dark …
Note that with nearly all the data in the right-most (highlight) box of the histogram that the very dark tones on the cormorant are way too dark. I did not want to overdo the Shadow slider so I moved it only to +1 for the RAW conversion in DPP 4 and dealt with the too dark tones in Photoshop as detailed below.
|
|
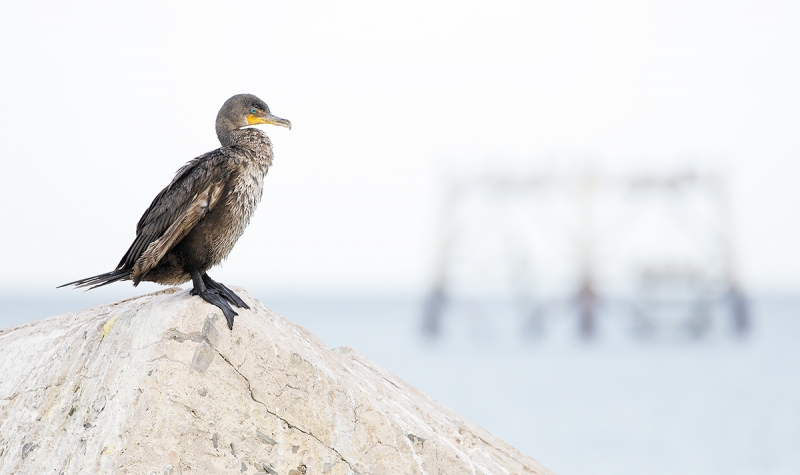
Double-crested Cormorant and Derelict Navigation TowerClick on the image to enjoy a larger version. |
The Juxtapositional Concept
The Navigation Tower in the background of today’s featured image was wrecked in Hurricane Irma. Hundreds of pelicans, cormorants, and gull can usually be seen roosting on what is left of it. I have photographed it often in different types of light but have never published any of them here. I had zero interest in photographing this cormorant but as I walked by it the derelict tower crept into the frame of my vision so I went to work. Choosing your side-to-side (and to a lesser degree, in this case, the up and down) perspective in situations where you are trying to create a pleasing juxtaposition of two objects is of course paramount to the success of the image. I just love that the tower is completely out of focus. Realize that with the 1.4X III TC in place that wide open is f/8; I was not going for more depth of field at f/9 in an effort to get the tower sharp. In fact, had it even been possible to render the two sharp I would not have liked the image at all.
Dealing with the BLACKs
I began working with the too dark dark tones on the whole bird. I selected the bird using the Quick Selection Tool (W), feathered the selection .7 pixels, put it on its own layer (Command + J), and applied my NIK 40/40 Detail Extractor/Tonal Contrast recipe. That was perfect but the bird was squinting and its face was still too dark. First I did some Eye Doctor work: I opened the eye a bit with a small, transformed Quick Mask and the Warp command; then I used Tim Grey dodge and burn to darken the pupil and lighten the iris; next I touched things up with the Clone Stamp Tool; and finally I selected the iris with the Quick Selection Tool (W) and increased the Saturation on that layer only (Command + U). The eye was looking much better.
Next I selected the bird’s face, bill, and neck, again with the Quick Selection Tool (W). I put that on its own layer and pulled up the Curve (Command + M). The problem was that there was a visible line where the lightening met the darker body. To eliminate that I added a Regular Layer Mask and painted the line away (B + D + X) with a fairly large 50% brush. Last was a bit of a pano crop.
Your Thoughts?
Do you like the image? Why or why not? How might you have improved it either in the field or at the computer. What if anything did you learn from this blog post?
|
|
|
The BIRDS AS ART Current Workflow e-Guide (Digital Basics II) will teach you an efficient Mac or PC/Photo Mechanic/Photoshop workflow that will make it easy for you to make your images better in Photoshop (rather than worse). That true whether you convert your images in DPP 4 or ACR. See the blog post here to learn lots more and to read a free excerpt. You can order your copy from the BAA Online Store here, by sending a Paypal for $40 here, or by calling Jim or Jennifer weekdays at 863-692-0906 with your credit card in hand. |
The BIRDS AS ART Current Workflow e-Guide (Digital Basics II)
Your guessed it, everything mentioned above (and tons more) is covered in detail in the BIRDS AS ART Current Workflow e-Guide (Digital Basics II), an instructional PDF that is sent via e-mail. Learn more and check out the free excerpt in the blog post here. The new e-Guide reflects my Macbook Pro/Photo Mechanic/DPP 4/Photoshop workflow. Do note that you will find the RGB Curves Adjustment Color Balancing tutorial only in the new e-guide. Note: folks working on a PC and/or those who do not want to miss anything Photoshop may wish to purchase the original Digital Basics along with DB II while saving $15 by clicking here to buy the DB Bundle.
The two most recent and many of the older MP4 Photoshop Tutorial videos releases go hand and hand with the information in DB II):
Folks who learn well by following along rather than by reading can check out the complete collection of MP 4 Photoshop Tutorial Videos by clicking here.
You can learn how and why I and other discerning Canon shooters convert nearly all of their Canon digital RAW files in DPP 4 using Canon Digital Photo Professional in the DPP 4 RAW conversion Guide here. And you can learn advanced Quick Masking and advanced Layer Masking techniques in APTATS I & II. You can save $15 by purchasing the pair. Folks can learn sophisticated sharpening and (NeatImage) Noise Reduction techniques in the The Professional Post Processing Guide by Arash Hazeghi and yours truly.
Support the Blog
Please help support my (stupendous) efforts here on the blog by remembering to click on the logo link above each time that you shop Amazon. That would be greatly appreciated. with love, artie
If In Doubt …
If in doubt about using the BAA B&H affiliate link correctly, you can always start your search by clicking here. Please note that the tracking is invisible. Web orders only. Please, however, remember to shoot me your receipt via e-mail.


Please Remember to use my Affiliate Links and to Visit the New BAA Online Store 🙂
To show your appreciation for my continuing efforts here, we ask, as always, that you get in the habit of using my B&H affiliate links on the right side of the blog for all of your photo and electronics purchases. Please check the availability of all photographic accessories in the New BIRDS AS ART Online Store, especially the Mongoose M3.6 tripod head, Wimberley lens plates, Delkin flash cards and accessories, and LensCoat stuff.
As always, we sell only what I have used, have tested, and can depend on. We will not sell you junk. We know what you need to make creating great images easy and fun. And please remember that I am always glad to answer your gear questions via e-mail.
I would of course appreciate your using our B&H affiliate links for all of your major gear, video, and electronic purchases. For the photographic stuff mentioned in the paragraph above, and for everything else in the new store, we, meaning BAA, would of course greatly appreciate your business. Here is a huge thank you to the many who have been using our links on a regular basis and those who will be visiting the New BIRDS AS ART Online Store as well.
Be sure to like and follow BAA on Facebook by clicking on the logo link upper right. Tanks a stack.
Typos
In all blog posts and Bulletins, feel free to e-mail or to leave a comment regarding any typos or errors. Just be right :).


Hey Arthur, I do not like the tower in the background. Learned exposing to the right with a dark bird, the bird will still be too dark.
I like the composition and OOF got my interest, but foreground and bird look much too light on my screen. Don’t usually see this with your images.
I find the out of focus tower unpleasant. At first I thought it was an out of focus drone. It’s obviously man made but it isn’t clear what it is. I would clone it out. The rest of the image is great!
Not sure how much I like the oof tower, seems to distract the eye from the bird. I would make a tight crop to remove the tower. If I did not want to crop the image I would place a not too dark vignette on the image with the center, lighter portion on the bird, so the eye stays on the bird.
I learned to keep doing more creatively with a photo than I usually would—like cropping it into a pano, leaving an oof object in it if it works compositionally. THANKS