What’s Up?
Saturday morning was totally cloudy and bleak. I went down to the lake, set up the R5/RF 100-500 rig for in-camera HDRs, and hoped to get at least one bird flying toward me. And that is exactly what I got: one bird flying toward me. (All the rest were flying away.) I was quite happy with the quite-funky result and will be sharing that image with you here on Tuesday.
I was glad to learn this morning that Chuck Carlson sold four of his five listed Canon items within hours and that he has an interested buyer for his 5D Mark iv. Folks who listen to my pricing advice usually sell their stuff quickly. (This just in: he sold the 5D iv on Sunday morning.)
I got a tremendous amount of work down on both the BAA Canon R5/R6 AF e-Guide and on the BAA Canon EOS R5 Camera User’s e-Guide and plan on doing more of the same today before watching the Super Bowl. Though I have great respect for Tom Brady, I simply cannot fathom a Tampa Bay victory. I’ve got the Chiefs over the Bucs 45 to 28. Patrick Mahomes simply has too many weapons. Or not!
With the continuing grey skies, there was not sunset last night. At 3:30am today it was pouring rain. The thunder was booming. And the lightning was flashing. The forecast for today — Sunday 7 February 2021, is for more of the same. I will likely head down to the lake for a bit at some point when it’s nor pouring just to see what’s up. As it has been warming up nicely for past two days, I am planning on a swim (hopefully between lightning bolts).
Have a great day and — if you partake — enjoy the game. This post took about two hours to prepare and makes forty-nine days in a row with a new one.
If you would like to read some solid COID-19 information, please click on the link to shoot me an e-mail to request the link. Doing so might change or save your life.
Please Remember
With income from IPTs now at zero, please, if you enjoy and learn from the blog, remember to use one of my two affiliate programs when purchasing new gear. Doing so just might make it possible for me to avoid having to try to get a job as a Walmart greeter and will not cost you a single penny more. And if you use Bedfords and remember to enter the BIRDSASART code at checkout, you will save 3% on every order and enjoy free second-day air shipping. In these crazy times — I am out at least forty to sixty thousand dollars so far due to COVID 19 (with lots more to come) — remembering to use my B&H link or to shop at Bedfords will help me out a ton and be greatly appreciated. Overseas folks who cannot order from the US because of import fees, duties, and taxes can always help out by clicking here if they see fit.
|
|
The RawDigger e-Guide |
The RawDigger e-Guide with Two Videos
by Arthur Morris with Patrick Sparkman
The RawDigger e-Guide was created only for serious photographers who wish to get the absolute most out of their raw files.
Patrick and I began work on the guide in July 2020! At first we struggled. We asked questions. We learned about Max-G values. We puzzled as to why the Max G values for different cameras were different. IPT veteran Bart Deamer asked lots of questions that we could not answer. We got help from RawDigger creator Iliah Borg. We learned. In December, Patrick came up with an Adapted Histogram that allows us to evaluate the exposures and raw file brightness for all images created with all digital camera bodies from the last two decades. What we learned each time prompted three head-to-toe re-writes of the guide.
The point of the guide is to teach you to truly expose to the mega-Expose-to-the-Right so that you will minimize noise, maximize image quality, best utilize your camera’s dynamic range, and attain the highest possible level of shadow detail in your RAW files in every situation. In addition, your properly exposed RAW files will contain more tonal information and feature the smoothest possible transitions between tones. And your optimized images will feature rich, accurate color.
We teach you why the GREEN channel is almost always the first to over-expose. We save you money by advising you which version of RawDigger you need. We teach you how to interpret the Max G values for your Canon, Nikon, and SONY camera bodies. It is very likely that the Shock-your-World section will shock you. And lastly — thanks to the technical and practical brilliance of Patrick Sparkman — we teach you a simple way to quickly and easily evaluate your exposures and raw file brightness using an Adapted RawDigger histogram.
The flower video takes you through a session where artie edits a folder of images in Capture One while checking the exposures and Max-G values in RawDigger. The Adapted Histogram video examines a series of recent images with the pink histograms and covers lots of fine points including and especially how to deal with specular highlights. The directions for setting up the Adapted Histogram are in the text.
If we priced this guide based on how much effort we put into it, it would sell it for $999.00. But as this guide will be purchased only by a limited number of serious photographers, we have priced it at $51.00. You can order yours here in the BAA Online Store.
Canon R5/R6 AF e-Guide Info
So far, 103 folks have sent PayPals for their copy of the Canon R5/R6 AF e-Guide. And 33 who used my affiliate links to purchase their R5 have e-mailed for and received their free copy of the guide. If you e-mailed your Bedford receipt or sent a PayPal and did not receive your guide, please LMK immediately via e-mail.
Feedback has been overwhelmingly positive so far. Three folks wrote stating that they had a better way of setting up AF on their R5s. When I wrote back explaining why they were in error, two of them back-tracked. One stubborn guy is still doing it his way — less efficiently. Be sure to scroll down to read about my plans for a Canon R5/R6 User’s e-Guide. Understand that the info in the BAA Canon R5/R6 Autofocus e-Guide is so important that I opted to publish the AF guide immediately as the R5/R6 User’s Guide will take at least another month to finish.
|
|
BAA Canon R5/R6 Autofocus e-Guide |
BAA Canon R5/R6 Autofocus e-Guide
Twenty-one pages. 3,452 words. 28-DPP4 screen captures showing the R5’s vaunted AF system in action. Note: the AF system of the R5 is identical to the AF system of the R6.
You will learn:
1- The two most useful AF Methods for general bird photography and for birds in flight.
2- How to set up your R5/R6 AF Menus.
3- What boxes to check (and un-check) under Limit AF Methods.
4- How to change the AF Method quickly, easily, and efficiently. Note: the default way of doing this is clunky, cumbersome, and inefficient at best. One person replied that this tip alone was worth the price of admission.
5- The only setting that should be used for Initial Servo AF pt for Face Detection + Tracking.
I you are currently using multiple back buttons either for general bird photography or for birds in flight, what you learn in this guide will change your life. For the better.
Here are the first three paragraphs of this e-Guide:
From the moment I learned about the new Canon mirrorless bodies, I read about using two or three back-buttons to focus using different AF methods. The word on the street said that the way to go for birds in flight was to use one button to acquire focus with Zone AF or with Large Zone: Horizontal AF and then switch to another button to activate Face Detection + Tracking AF and then use the shutter button to make an image. My immediate thought was, “This is insanity! There has got to be a better way.” In short, there is a far superior way to set up AF on your R5 or R6.
Remember that I got away from any form of back-button or rear focusing many years ago after finally realizing that it is always easier to do one thing (press the shutter button), than it is to do two things (press a back button and then press the shutter button).
The default method of switching AF Methods with the R5/R6 bodies is cumbersome at best. It involves first pressing the grid button (my name) on the upper right back of the camera and then pressing the hard-to-access M-Fn button to toggle through the AF Methods. This method is so bad that it will not be mentioned again in this guide.
The guide is free to all who have ordered an R5 or an R6 using my B&H affiliate link or from Steve Elkins/Bedfords using the BIRDSASART coupon code at checkout. Please send your receipt to me via e-mail. It will take me a few days to a week to verify the B&H purchases. Bedfords folks should expect their free e-Guides fairly quickly.
To purchase your copy of the e-Guide, please click here or send a PayPal for $25.00 to birdsasart@verizon.net and be sure to include the words R5/R6 AF Guide in your PayPal e-mail.
Everyone who gets the guide will receive a free update no later than the first week in February.
Canon EOS R5 Camera User’s e-Guide
As regular readers know, I am working on a complete Canon R5 Camera User’s e-Guide. This will require a lot of research, a lot of time, and a lot of effort. I am hoping to have it complete by late February. As always, folks who use the BAA affiliate links to purchase their Canon gear will receive a substantial discount.
Understand that the info in the BAA Canon R5/R6 Autofocus e-Guide is so important that I opted to publish the AF guide right off the bat to help folks get started with their new camera bodies. I may soon offer a pre-publication version of the User’s e-Guide … With a small discount, of course.
New and Better Bedfords Discount Policy!
You can now save 3% on all of your Bedfords photo gear purchases by entering the BIRDSASART coupon code at checkout. Your discount will be applied to your pre-tax total. In addition, by using the code you will get 2nd day air shipping via Fed Ex.
Grab a Nikon AF-S Teleconverter TC-14E III and save $14.99. Purchase a Canon EOS R5 and your discount will be $116.97. Purchase a Sony FE 600mm f/4 GM OSS lens and save a remarkable $389.94! Your Bedford’s purchase no longer needs to be greater than $1,000.00 for you to receive a discount. The more you spend, the more you save.
Money Saving Reminder
Many have learned that if you need a hot photo item that is out of stock at B&H and would enjoy free overnight shipping, your best bet is to click here, place an order with Bedfords, and enter the coupon code BIRDSASART at checkout. If an item is out of stock, contact Steve Elkins via e-mail or on his cell phone at (479) 381-2592 (Central time). Be sure to mention the BIRDSASART coupon code and use it for your online order to save 3% and enjoy free 2nd-day air shipping. Steve has been great at getting folks the hot items that are out of stock at B&H and everywhere else. The wait lists at the big stores can be a year or longer for the hard to get items. Steve will surely get you your gear long before that. For the past year, he has been helping BAA Blog folks get their hands on items like the SONY a9 ii, the SONY 200-600 G OSS lens, the Canon EOS R5, the Canon RF 100-500mm lens, and the Nikon 500mm PF. Steve is personable, helpful, and eager to please.


Gear Questions and Advice
Too many folks attending BAA IPTs (remember those?) and dozens of photographers whom I see in the field and on BPN, are–out of ignorance–using the wrong gear especially when it comes to tripods and more especially, tripod heads… Please know that I am always glad to answer your gear questions via e-mail. Those questions might deal with systems, camera bodies, accessories, and/or lens choices and decisions.
Great Topaz News!
Folks who use the BAA Topaz link to purchase Sharpen AI, DeNoise AI, or the Utility Bundle (or any other Topaz plugins) will receive a 15% discount by entering the ARTHUR15 code at checkout. If the stuff is on sale (as it usually is), you save 15% off of the sale price! To get the discount you must use my link and you must enter the discount code. Be sure to start with this link.
|
|
|
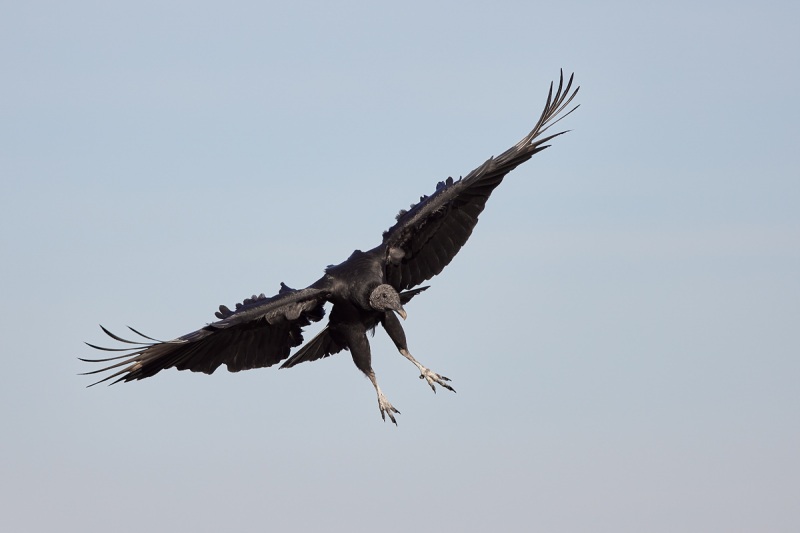
This image was created on 5 February 2021 down by the lake at ILE. Working away from my vehicle, I used the handheld Canon RF 100-500mm f/4.5-7.1L IS USM lens (at 500mm) and the highly touted 45MP Canon EOS R5 Mirrorless Digital camera body. ISO 1250. Exposure determined via test image/histogram evaluation: 1/2500 sec. at f/7.1 (wide open) in Manual (M) mode. RawDigger showed to be a slight over-exposure. (In retrospect, an EC of +2 would have been perfect.) AWB at 8:24am on a mostly sunny morning. The R5 AI Servo AF Method used to create this image performed perfectly and will be detailed in both the BAA Canon R5/R6 AF e-Guide (the last update is in progress) and in the BAA Canon EOS R5 Camera User’s e-Guide (in progress). I wrote those sections yesterday afternoon. Image #1: Black Vulture landing |
Wind and Sun Together
In the recent Wind-Against-Sun Flight blog post here, we saw what happens when the wind is blowing straight at the sun. With today’s featured image, we see what happens when both the wind and the sun are behind you.
As you may remember, I created more than 600 flight images in less than an hour on this great morning. As virtually every image was sharp on the eye, the images with the best wing positions became the keepers. I kept 74 on the first edit.
Do remember that if you are trying to create silhouettes, wind-against-sun conditions are best so that the birds are flying at you with the sun/color behind them.
R5 AF Method for Flight Photography Breakthrough
Recently I (finally) had two very good flight photography opportunities with the R5/RF 100-500 rig. And I learned a ton. I have finally found an AF Method for flight that I have confidence in. What I have learned will be detailed in both the BAA Canon R5/R6 AF e-Guide (the last update is in progress) and in the BAA Canon EOS R5 Camera User’s e-Guide (in progress). I am sure that I will finish the AF e-Guide update this week and likely have the full guide finished within two weeks. The work on both is painstaking.
|
|
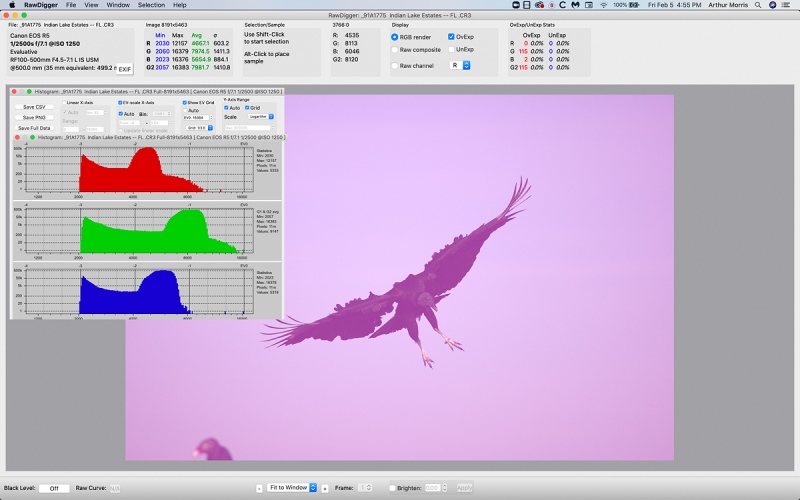
Image #1A: The RawDigger Adapted (pink) Histogram for the Black Vulture landing image |
The RawDigger Adapted (pink) Histogram
I have finally figured out how to consistently make very good to excellent to perfect exposures with the Canon R5. Unfortunately, without Zebras for stills, this involves making and evaluating a test exposure for each situation. The details on what I have come up with will be detailed in the in the BAA Canon EOS R5 Camera User’s e-Guide (in progress). In fact, I wrote that section last night.
In the RawDigger e-Guide, Patrick and I teach you how to set up and evaluate the Adapted (pink) Histogram. The adapted histogram was completely Patrick’s creation, and works with raw files from pretty much any digital camera now in use. It greatly simplifies all things RawDigger. In the guide you will learn why the exposure for this raw file (actually the raw file brightness), is 100% dead-solid perfect. You will also learn why we distinguish exposure from raw file brightness …
|
|
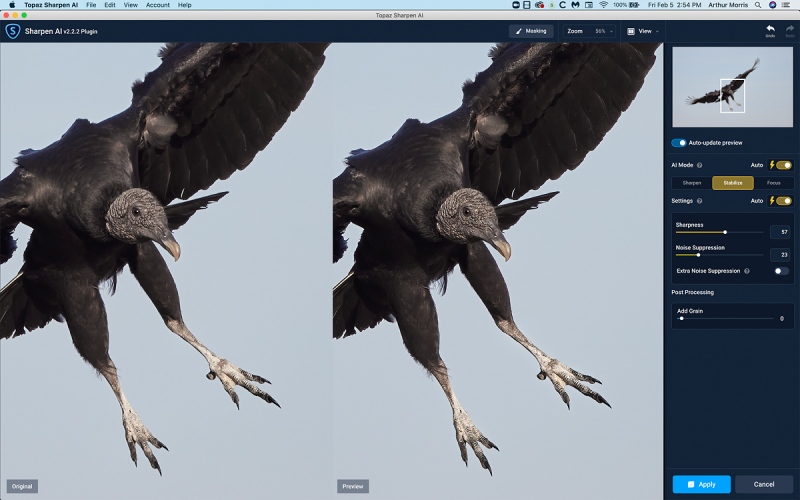
Image #1B: The Topaz Sharpen AI scene capture for the Black Vulture landingimage |
Topaz Sharpen AI Tip
When applying Sharpen AI (or DeNoise for that matter), I advise doing so on a separate layer. If some of the changes look funky, you can add a Regular Layer Mask and paint away what you don’t like. If you wish to keep some of the effect, painting with a reduced opacity brush works well. If something looks totally overdone, you can simply reduce the opacity of the layer (to taste).
As you can see by clicking on the screen capture above to enlarge it, Sharpen AI on Stabilize looked perfect on the plug-in screen when viewed at 100%. When I got back in Photoshop, I click-drew a box around the vulture’s head to enlarge it and toggled the eyeball for the AI Sharpen layer on and off. It was easy to see that AI Sharpen had over-done it. I reduced the opacity of that layer to 50% and was quite happy with the result. At times, we are smarter than the AI (artificial intelligence).
Typos
In all blog posts and Bulletins, feel free to e-mail or to leave a comment regarding any typos or errors.




I purchased Topaz using your link and applied your 15% discount code, but did not get a discount. Please advise on how to follow up with Topaz. Topaz does not have a phone number or show any way to communicate with them. Please advise on what I should do to get the discount.
Thank you.
I’ve been in touch via e-mail and as you know, I am doing my best to help.
with love, a
Can you use in camera HDR on a BIF? I thought it takes 3 separate photos and then combines them.
Yes. Why not? The results are quite funky. See two examples here. I will be posting a much better one on Tuesday.Tip: it is always a good plan to think out of the box …
with love, a
ps: do you own an R5?
Interesting. Like the strong outline. Yes, have an R5. Awesome camera. I was a little disappointed with the 100-500RF and returned it. Sticking with my first generation Tamron 150-600 until Canon comes out with a Sony like 200-600. I am intrigued by your front button focus. I have been using dual back button.
Me too on the black outlines. You will likely love the next one.
Strange. I absolutely love the RF 100-500, especially for its light weight and how sharp it is.
What were you disappointed in?
I will be doing some flight photography from a pontoon boat at the end of this week and am planning on leaving the SONY 200-600 at home.
With all due respect, dual back-button is 100% insane. I think that you could learn a few things from the R5 AF e-Guide … That User’s Guide will include tips on setting up for in-camera HDRs (and getting the right exposure for the JPEG — that is a tricky proposition).
with love, a
I wonder if I had an off copy of the lens.
Those are very rare.
No sharper than my Tamron at 500mm. Much lighter and quicker focus than the Tamron, but not staying on the birds any better than the Tamron.
That has more to do with the camera than with the lens. There is a chance that you were not using the best AF Method for flight …
My miss rate was higher than the Tamron, maybe from the lower shutter speed I was using to keep the iso from maxing out.
Yes, the 100-500 is slow at f/7.1 but with DeNoise I am no longer scared of high ISOs. At all. And the RawDigger guide teaches us when it is OK to cheat a bit on ISO. But you can never cheat on shutter speed …
Also was wishing for the 600 while using it. For that price, I was expecting more. Btw, have the RF 24-70 f2.8 and that lens is crazy sharp.
Good to know. Are you getting a 600 GM?
Looking forward to the guide. Agree that the dual back button is a little crazy. Very curious what you are using.
It is easy to use and fast and efficient. The info has been available for to months in the R5/R6 AF e-guide.
with love, a
Mike
Typo, under wind and sun together you wrote “wing and sun together.” Great shot today.
Thanks and fixed. with love, a
Early on I found that Sharpen AI frequently over-sharpened my images. So, I’ve taken to backing off a bit from their prescribed suggestions.
That is correct, sir!
with love, a (aka Ed McMahon)
I generally don’t use sharpen AI unless the image is intended for printing and then the output is usually perfect. For the web, Denoise AI is sufficient in most cases or at most I’ll add some sharpen at less than 50% of the default depending on the image.
Hi Adam,
I agree for the most part (even though we rarely have anything printed). But I have had some good saves with almost-sharp flight and action images with Sharpen AI …
with love, a
Another very useful 2 layer approach for using Sharpen AI is adding a black mask for the sharpened layer and painting white into areas that need sharpening with a low flow brush. This approach gives great control IMO.
Thanks, Steve. What do you mean by a low flow brush?
with love, a