What’s Up?
My flight from Islip to Orlando was blessedly uneventful. The luggage was off the plane amazingly quickly and right hand man Jim Litzenberg picked me up a minute after I had grabbed my single checked bag off the carousel. As mentioned previously, the East Pond at JBWR was flooded and un-photographable. Nickerson, on the other hand, was mega-productive with large numbers of young Common Terns and Black Skimmers. There were lots of chicks and lots of attacks and predation. That despite pretty poor weather conditions for the past few days.
What Don’t You Know About Bird Photography?
Whoever you are (including me), the answer is a lot. If you enjoy photographing birds along the coast or at the beach, you can learn a ton from me about bird photography in those two very popular settings. Today’s blog post deals with the fine points of getting low. There is a lot to learn and a lot to study. And there are lots of questions to challenge you. That said, the stuff below is only a fraction of what you don’t know. Join me at DeSoto or in San Diego to add to your list and become a much better photographer. Writing and refining the text for this post took about three hours with much of the work done on the plane.
Today is Saturday 19 August 2023. Wherever you are and whatever you are doing, I hope that you too have a great day. I have lots to do before I head to Ecuador for the 2023 Galapagos Phot-Cruise of a Lifetime. If you are interested in joining me in the Galapagos in August 2024, please get in touch via e-mail. Remember that you only live once.
Please remember to use the B&H and Amazon links that are found on most blog pages and to use the BIRDSASART discount code at checkout when purchasing your new gear from Bedfords to get 3% back on your credit card and enjoy free second-day air FedEx. Please, also, consider joining a BAA IPT. You will be amazed at how much you will learn!
You can find some great photo accessories (and necessities, like surf booties!) on Amazon by clicking on the Stuff tab on the orange/yellow menu bar above. On a related note, it would be extremely helpful if blog-folks who, like me, spend too much money on Amazon, would get in the habit of clicking on the Amazon logo link on the right side of each blog post when they shop online. As you might expect, doing so will not cost you a single penny, but would be appreciated tremendously by yours truly. And doing so works seamlessly with your Amazon Prime account.
If an item — a Delkin flash card, or a tripod head — for example, that is available from B&H and/or Bedfords, is also available in the BAA Online Store, it would be great, and greatly appreciated, if you would opt to purchase from us. We will match any price. Please remember also to use my B&H affiliate links or to earn 3% cash back at Bedfords by using the BIRDSASART discount code at checkout for your major gear purchases. Doing either often earns you free guides and/or discounts. And always earns my great appreciation
|
|
B&H Bild 2023 Expo – 2 Days Of Inspiration, Learning, and Creativity: SEPT 6 & 7, 2023 |
Registration is Free!
In New York City at The Javits Center
Easily Accessible to anyone in The Tri-State Area
A Celebration of 50 Years of Creativity Through Photo, Video and Audio
Click here to learn more or to register.
More than 100 World Class Speakers
Portfolio Reviews
Photo Walks
Photo & Video Experiences
Tri-State Accessibility
Audio Experience
Contests and Prizes
Learn New Skills
Show Specials on Gear
Network with the Premier Photographers, and Videographers
|
|
|
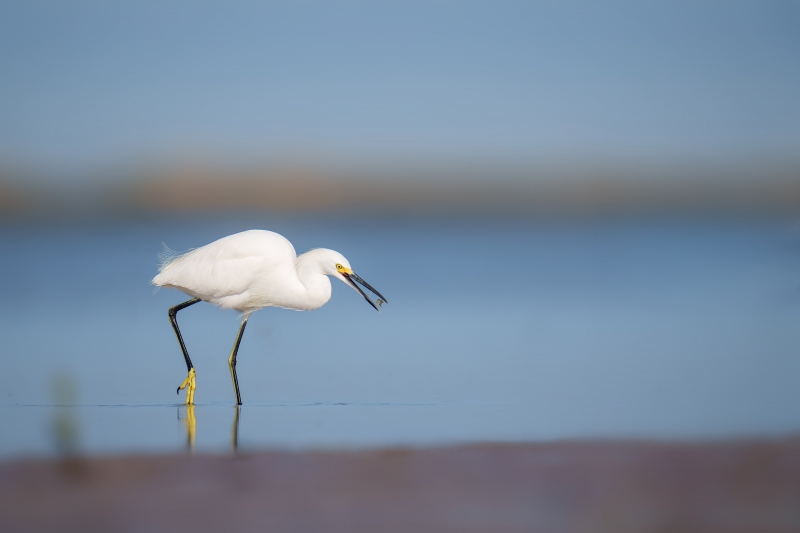
This image was created on 1 November 2022 on a Fort DeSoto IPT. Seated on damp sand and working off the rear monitor with the lens hood on the ground, I used the handheld Sony FE 400mm f/2.8 GM OSS lens with the Sony FE 1.4x Teleconverter (at 560mm) and The One, the Sony Alpha 1 Mirrorless Digital Camera). The exposure was determined via Zebra technology with ISO on the Thumb Dial. ISO 400. 1/6400 sec. at f/4 (wide open) in Manual mode. When evaluated in RawDigger, the raw file exposure was determined to be dead-solid perfect. AWB at 9:19:05am on a sunny morning. Tracking: Zone/AF-C with Bird Face/Eye detection enabled performed to perfection. Be sure to click on the image to enjoy a high-res version. Image #1: Snowy Egret with tiny Fiddler Crab |
How Low Can You Go?
By placing the lens hood of your telephoto lens on the ground, you cannot get any lower without digging a hole. Working off the rear monitor, place your left hand under the the camera body and then try to find and frame the subject (while keeping the camera square to the world). Toward that end, it is a good idea to activate the in-camera level. To some degree, you will need to trust some sort full-screen AF pattern — Sony’s Tracking Zone usually works like magic. Having your reading glasses on (if you need them), may enable you to see the AF point as it acquires and tracks the subject.
High Level Perspective Question I
Would having gotten one or two inches higher or lower have improved this image? Why or why not (for each)?
|
|
|
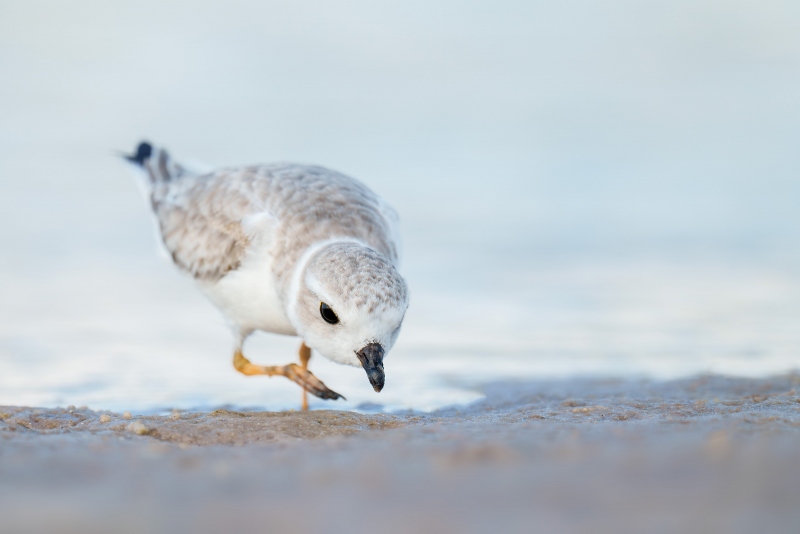
This image was created on 2 November 2022 on a Fort DeSoto IPT. Seated on dry sand behind my flattened tripod and working off the rear monitor, I used Robus RC-5558-3 Vantage Series 3 Carbon Fiber Tripod topped by the Levered-Clamp FlexShooter Pro-mounted Tracking: Zone AF/C Bird Face-Eye detection enabled was active at the moment of exposure and performed perfectly. Be sure to click on the image to enjoy the larger version. Image #2: Piping Plover worn juvenile foraging |
High Level Perspective Question II
Would having gotten one or two inches higher or lower have improved this image? Why (or why not for each)?
The Various Shades of Low
It has never been easier to make small adjustments when working low. Here, in order from the lowest to the highest, are the available options:
1- Lens Hood on the Ground: You can only get lower by digging a hole or my removing the lens hood and placing the front of the lens on the ground. The latter technique will only gain you a fraction of an inch and is not recommended. You can lie flat and put your eye to the viewfinder or sit and work off the rear monitor.
2A- Lens Foot on the Ground: You rotate the lens foot to the bottom of the lens and place the foot on the ground. Be sure to rotate the lens to the click-stop and tighten the lens collar. Again, you can lie flat and put your eye to the viewfinder or s1t and work off the rear monitor.
2B: Panning Ground Pod: Using a Panning Ground Pod gets you as low as the two previous techniques. It is, however, as you might expect, easier to pan and follow a moving subject like a foraging shorebird. Again, you can lie flat and put your eye to the viewfinder or s1t and work off the rear monitor. Getting on your belly and working with your eye to the viewfinder makes it easier frame and follow the subject while getting dirty and placing lots of strain on your neck and lower back along with wear and tear on your elbows and more. I got down and dirty a lot when I was younger but have a problem remembering the last time I did.
2C: The Heel-pod Technique: Using this technique will get you approximately as the three previous techniques or perhaps an inch or so higher. While seated with your legs in front of you and flat on the ground, place the lens hood between your heels and then then try to find and frame the subject (again while keeping the camera square to the world). By adjusting the position of your feet you can make fine adjustments to the height of your lens.
3: The Toe-pod Technique. Resting the lens hood atop your big toes toes will get you several inches higher than the previously mentioned techniques. You need to be quite flexible to use the toe-pod technique. For most folks it is a bit less stable than any of the previous techniques.
4- The Ankle-pod Technique: Here, while seated, you bend your left knee so that it rests on the ground and place the lens barrel on your ankle. This get you 3-4 inches off the ground but is far less stable than the previous techniques. If you need an additional inch or two, this technique may be perfect in a given situation.
5- The Flattened Tripod Technique: Assuming that you have a decent tripod, you can splay the legs out completely to flatten the tripod. On average, this will place the center of the lens about 10-12 inches above the ground depending on the specific tripod and the specific head you are using. Here, the Levered-Clamp FlexShooter Pro is a huge advantage. When you will be sitting in the same spot for an extended period of time, you can take a moment to level the head and be sure to the world no matter where you point your lens. This method is used most often when working off the tilted rear screen. Really flexible folks with no back or next problems may shoot while lying flat.
6-The Lowered Tripod Technique: Shorten the tripod completely but leave the bottom legs out about three inches, then spread the legs to the stops and sit behind the tripod. Your rig will be 18-22 inches off the ground and you will be working with your eye to the viewfinder. The big advantage to doing that is that it is much, much easier to frame the shot, to watch the AF tracking, and to follow the action by panning when needed.
It is possible to to get a bit lower by adjusting the angle of the legs (by splaying them out a bit) after you have pulled the leg locks away from the stops; the trick is to shove the legs into the sand or the dirt while keeping the tripod platform relatively parallel to the ground. This is best learned on an IPT. The longer the focal length, the lower your angle of declination will be. Again, the the Levered-Clamp FlexShooter Pro is a huge advantage. once you get good at lowering the tripod as detailed above it is possible to get to the exact height that you need for a given shot.
7- The Knee-pod Technique: Sit on the ground with your left knee bent. Position the bottom of our left forearm atop the platform created by the top of your knee and the upper surface of your lower left thigh. Work through the viewfinder. This will put you anywhere from about 20 to 28 inches above the ground depending on your height and your posture.
8: Handholding while Seated: Sit erect on the ground and raise the camera to your eye. This will put you at about 24 to 32 inches above the ground, again depending on your height and your posture.
Remember that getting low to some degree will usually yield intimate images, but that lower is not always better. Quasi-horizon lines often cause compositional problems by intersecting with the subject.
|
|
|
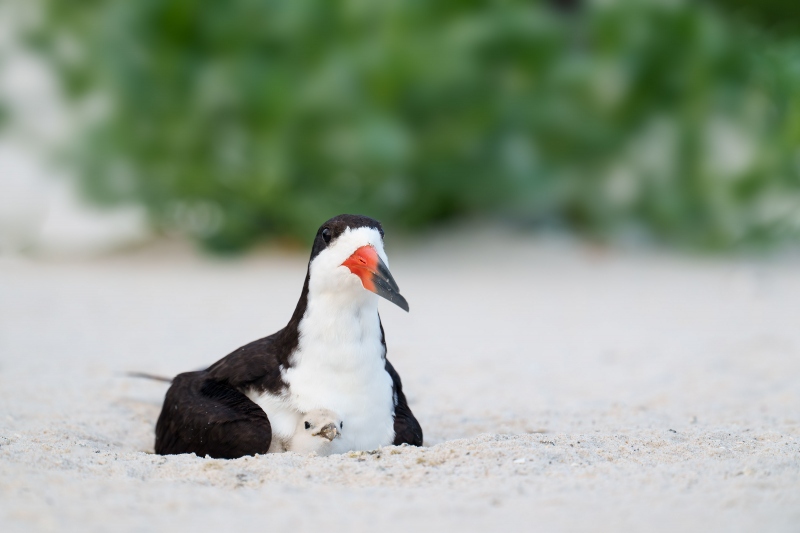
This image was created on 15 August 2023 at Nickerson Beach Park, Lido Beach, Long Island, NY. Seated on dry sand behind my lowered tripod with the legs splayed out and working off the rear monitor, I used Robus RC-5558-3 Vantage Series 3 Carbon Fiber Tripod topped by the Levered-Clamp FlexShooter Pro-mounted Tracking: Zone AF/C Bird Face-Eye detection enabled was active at the moment of exposure and performed perfectly. Be sure to click on the image to enjoy the larger version. Image #3: Black Skimmer brooding chick |
The Quasi-Horizon Line
Does the quasi-horizon line (where the beach meets the base of the bush bother you? Why or why not? How could I have avoided the merge of that line with the adult’s head?
Your Call?
Which of today’s three featured images is your favorite? Why did you make your choice.
|
|
|
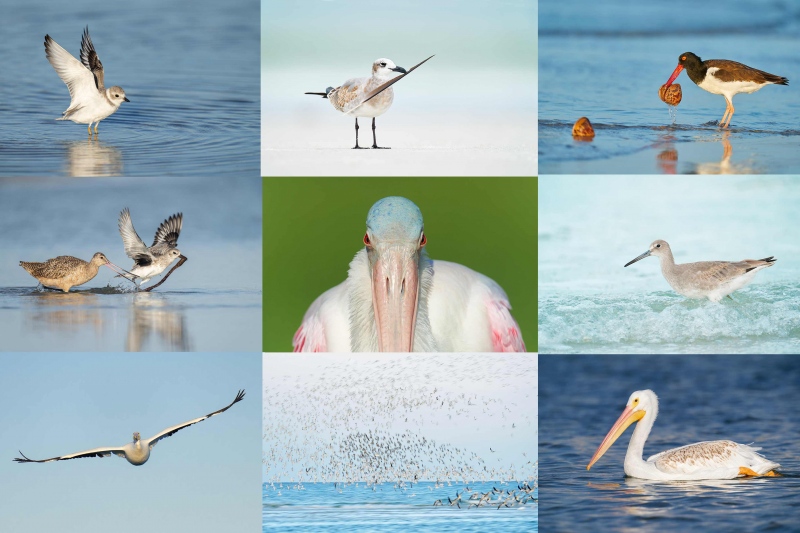
All images from SEPT/OCT/NOV at Fort DeSoto. Click on the image to enjoy a larger, sharper high-resolution version. Clockwise from upper left to center: Piping Plover flapping after bath, juvenile Laughing Gull with feather, American Oystercatcher with sea urchins, Willet foraging in surf, American White Pelican juvenile swimming, skimmer/tern/shorebird blast-off blur, American White Pelican in flight, Black-bellied Plover stealing lugworm from Marbled Godwit, Roseate Spoonbill staring. |
The Fall 2023 Fort DeSoto Instructional Photo-Tours
Fall 2023 Fort DeSoto Instructional Photo-Tour #1
3 1/2 Days: Tuesday 26 September through the morning session on Friday 29 September 2023. $1899.00 includes three working lunches. Limit six photographers.
Fall 2023 Fort DeSoto Instructional Photo-Tour #2
3 1/2 Days: Tuesday 17 October through the morning session on Friday 20 October 2023. $1899.00 includes three working lunches. Limit six photographers.
Fall 2023 Fort DeSoto Instructional Photo-Tour #3
3 1/2 Days: Tuesday 14 November through the morning session on Friday 17 November 2023. $1899.00 includes three working lunches. Limit six photographers/Openings five.
Fall Bird Photography at Fort DeSoto
Fort DeSoto, located just south of St. Petersburg, FL, is a mecca for migrant shorebirds, terns, and gulls in fall. There they join hundreds of egrets, herons, and night-herons that winter on the T-shaped peninsula. With any luck at all, we should get to photograph one of Florida’s most desirable shorebird species: Marbled Godwit. Black-bellied Plover and Willet are easy, American Oystercatcher is pretty much guaranteed. Great Egret, Snowy Egret, Great Blue Heron, Tricolored Heron, and White Ibis are easy as well and we will almost surely come up with a tame Yellow-crowned Night-Heron or two. And there should be some quality Brown Pelican flight photography. In addition, Royal, Sandwich, Forster’s, and Caspian Terns will likely provide us with some good flight opportunities as well. Though not guaranteed, Roseate Spoonbill and Wood Stork might well be expected. And we will be on the lookout for a migrant passerine fallout in the event of a thunderstorm or two.
On this IPT, all will learn the basics and fine points of digital exposure. Nikon and Canon folks will learn to get the right exposure every time after making a single test exposure, and SONY folks will learn to use Zebras so that they can be sure of making excellent exposures before pressing the shutter button. Everyone will learn how to approach free and wild birds without disturbing them, to understand and predict bird behavior, to identify many species of shorebirds, to spot the good situations, to choose the best perspective, to see and understand the light, and to design pleasing images by mastering your camera’s AF system. Most importantly, you will surely learn to evaluate wind and sky conditions and understand how they affect bird photography. And you will learn how and why to work in Manual mode (even if you’re scared of it). The best news is that you will be able to take everything you learn home with you so that you will be a better photographer wherever and whenever you photograph.
|
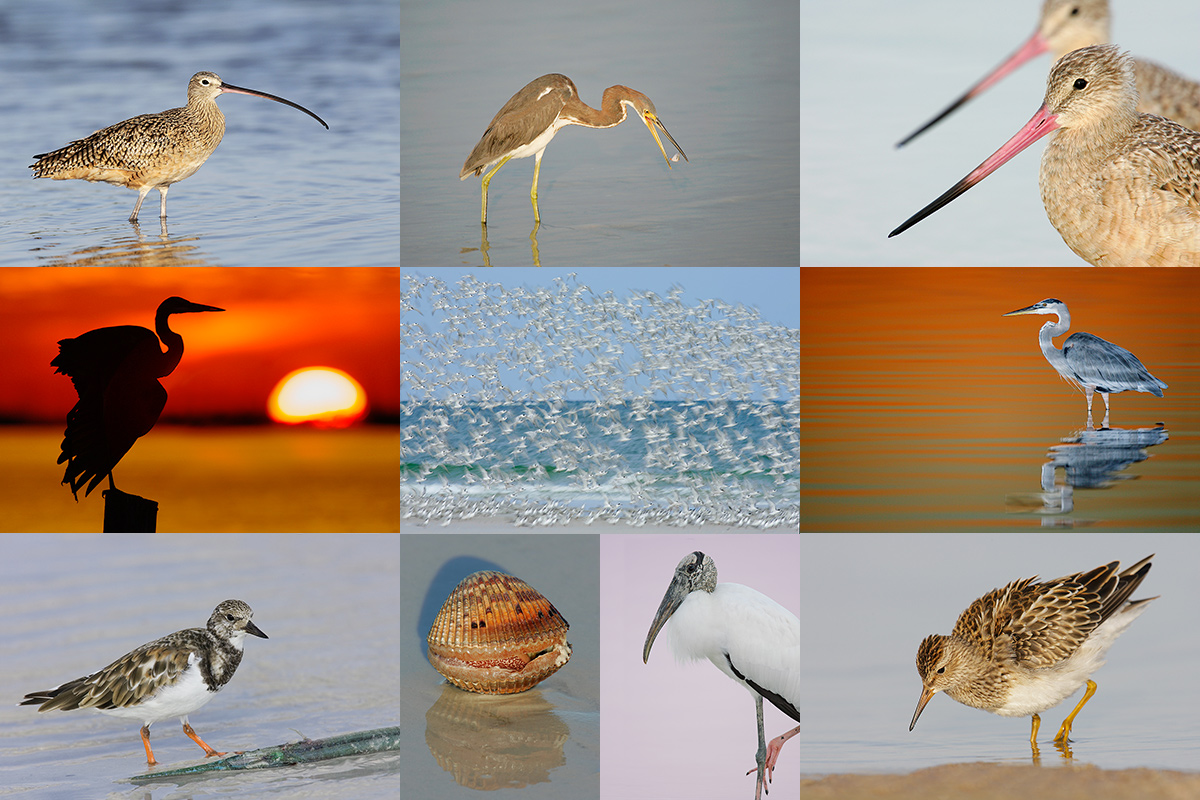
Clockwise from upper left to center: Long-billed Curlew, juvenile Tricolored Heron, Marbled Godwits, Great Blue Heron, juvenile Pectoral Sandpiper, Wood Stork, smiling Sea Scallop, Ruddy Turnstone scavenging needlefish, Great Blue Heron sunset silhouette at my secret spot, and southbound migrant tern flock blur. |
The Details
There will be a Photoshop/image review session during or after lunch (included) each full day. That will be followed by Instructor Nap Time.
These IPTs will run with only a single registrant (though that is not guaranteed). The best airport is Tampa (TPA). Once you register, you will receive an e-mail with Gulfport AirBnB/VRBO information. If you register soon and would like to share an AirBnB with me, shoot me an e-mail. Other possibilities including taking a cab to and from the airport to our AirBnB and riding with me for $50/day. This saves you both gas and the cost of a rental car.
A $600 deposit is due when you sign up and is payable by credit card. Balances must be paid by check one month before the trip. Your deposit is non-refundable unless the IPT sells out with six folks, so please check your plans carefully before committing. You can register by calling Jim during weekday business hours at 863-692-0906 with a credit card in hand, or by sending a check as follows: make the check out to: BIRDS AS ART and send it via US mail here: BIRDS AS ART, PO BOX 7245, Indian Lake Estates, FL 33855. You will receive a confirmation e-mail with detailed instructions, clothing, and gear advice. Please shoot me an e-mail if you plan to register or if you have any questions on lodging.
Up Early, Stay Out Late!
Obviously, folks attending an IPT will be out in the field early and stay late to take advantage of the sweetest light and sunrise and sunset colors (when possible). The good news is that the days are relatively short in early fall. I really love it when I am leaving the beach on a sunny morning after a great session just as a carful or two of well-rested photographers are arriving. On cloudy days, we may — at the leader’s discretion, stay out in the morning for a long session and skip the afternoon session. To ensure early starts, breakfasts will be your responsibility. And so that we can get some sleep, dinners will sometimes be on your own as well.
Typos
With all blog posts, feel free to e-mail or to leave a comment regarding any typos or errors.




I would select image #2 as my favorite though all 3 are very pleasing. It feels like the Sanderling is inches away from me! The horizon line does not bother me, perhaps a slightly higher perspective would be a tad better. I really appreciated the various methods of getting low. I just hit the big 60 so getting into a prone position can sometimes be challenging!
Image #1 Fantastic in all respects!
Does the quasi-horizon line (where the beach meets the base of the bush bother you? Why or why not? How could I have avoided the merge of that line with the adult’s head? Doesn’t bother me because the bird is sharp while the bush is OOF making the bird come forward from the bush.
#2 is my favorite. There’s motion with the foot up, a story–it’s foraging, it’s on a level with the camera, beautiful lighting from the sand under its chin. If you were higher, the under the head wouldn’t show and would be in more shadow. Also the right toe might be touching the OOF foreground water. If you were lower even more of the left leg wouldn’t show. So it looks perfect to me as composed.
Image #1 and #2 and #3 are interesting and well made. Image #3 Black Skimmer female or male are cute with the small chick!
Number 3!! I like the eye level “surprise”
#1 for me is m’y preferred one.
#3 is second . Not bothered by the Line.
Nice Shots!