
In the Last Blog Post
In the last blog post, Image #5 was the top choice (though very few folks commented). Dan Cadieux figured out two of the three images that had some significant Photoshop work done on them (though he did not see any evidence). I liked all of the images with #5 also my favorite, that followed by Image #4. I loved the neatly edged feathers of the juvie Ospreys. Only one person– thanks for trying, Elinor, took a shot at this rather softball question:
After checking the EXIF for Image #3, how do we know for sure that the bird in Image #2 was actually taking fight?
Answer: The EXIF shows that the two images were created in the same second at 7:05:38am.
What’s Up?
Early on Tuesday morning was gorgeous at ILE. The water in South of Pier Bay was like a mirror. A young Great Egret, an adult Snowy Egret, and a very handsome pied (admixed white and indigo blue feathering) juvenile Little Blue Heron that has been eluding me for weeks foraged in the still water bathed in butter light and accompanied by their perfect reflections. Five more Great Egrets and a Limpkin were perched on the pier railing. I put the 600 with the 2X on the BLUBB, stayed well back so as not to flush any of the birds, and pulled in close to the pier with the car angled at about 30°to get on sun angle for the juvie Little Blue. Then, every bird flew away as a pier-walking neighbor waved a friendly hello and said, “Good morning.” I wanted to reply, “It was till you came along” but I stifled the thought and drove away to looking for something to photograph.
After hearing that Clemens (Van der Werf) had had a great afternoon at DeSoto last week, I grabbed an AirBnB in St. Pete for two nights on a whim and Jim and I drove over on on Tuesday afternoon. I found the oystercatcher chicks easily but both chicks had been banded that morning 🙁 I walked north all the way to the inlet and saw pretty much nothing. Almost back to the car I came across a Least Tern fishing. It hovered right in front of me right down sun angle for five minutes as I created more than a thousand images. I really liked one and will share it with you here soon.
There were very few birds at DeSoto on Wednesday morning. The wind was supposed to be southeast (OK) but had already switched to southwest by sunrise (bad). I met Matt Milnes visiting from Georgia and we spent most of the morning together. Matt had kindly helped me with some ILE turtle nest questions a few years back. Out of desperation, we headed to my morning backup location where we found nothing as well. On our way back to the parking lot we came upon three White Ibises feeding in the shallow surf. One was quite bright red so we worked it for about twenty minutes. Realizing after that that I had I lost my prescription reading glasses somewhere near the Gulf, I headed back to North Beach to look for them. Matt kindly joined me to help, but we came up empty.
I made a rookie mistake on Wednesday afternoon. Having struck out the previous afternoon, I decided not to take my fanny pack with extra cards and batteries. So, of course, with a gorgeous breeding plumage Dunlin and a handsome Semipalmated Plover right in front of me, and a Reddish Egret dancing in the distance right down sun angle — all is sweet late afternoon light of course, the dreaded ‘card full” message popped up on the back of my a-1 ii. I filled the 160GB card. My Delkin Black 960GB CF Express A card accidentally wound up in the a-1 body that is sitting on my desk 🙁
|
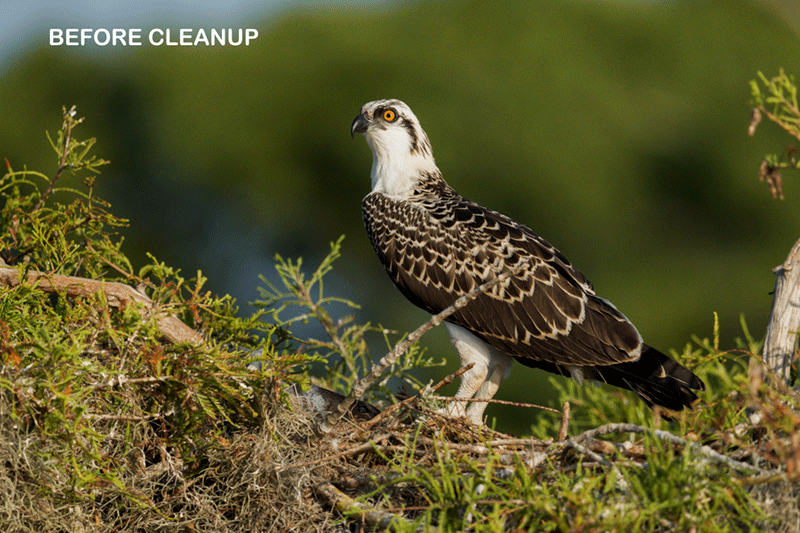
Overlapping Sticks
The twigs and sticks that overlapped the handsome young Osprey really bugged me. Removing them with the Clone Stamp Tool is tedious work and the results are iffy at best. The relatively new Remove Tool is the way to go. The clean-up took some time and effort but the results are superb. Most of the time, the Remove Tool does a great job blending the surrounding areas. I was not happy with one spot that had turned the feather to mush so I painted a small Quick Mask of a feather tip and moved it into place to complete the repair.
If anyone can shed some Lightroom light on the Remove Tool please leave a comment. My understanding is that at best, it is difficult to access it (in LR).
|
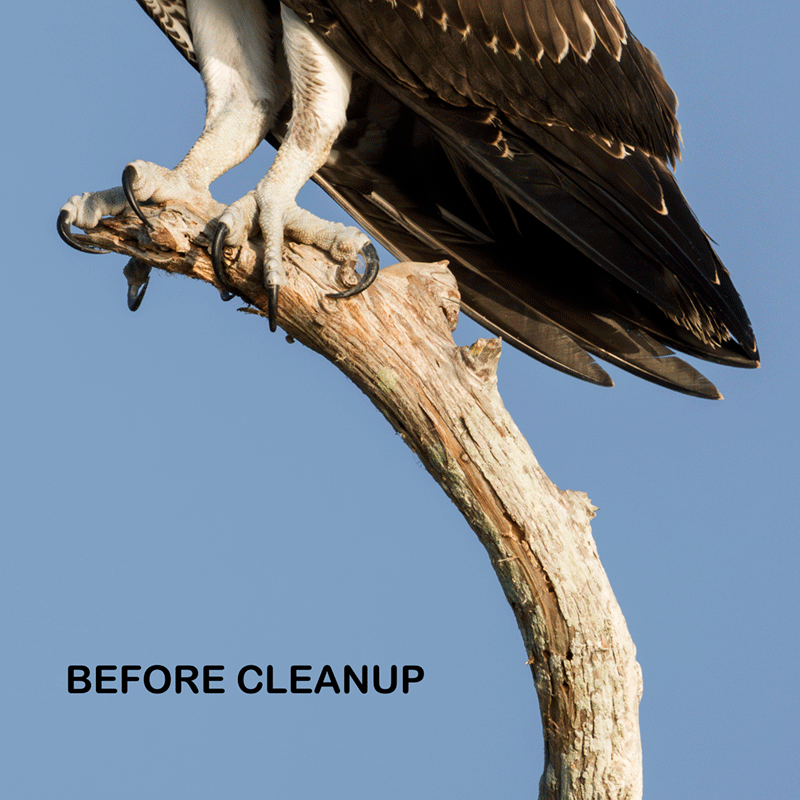
Bump on the Perch
I did not care for the two chunks of wood that merged with the primaries of the Osprey’s far wing. I used the Divide and Conquer technique to separate the chunks into smaller, easier to eliminate sections. The free floating chunks were then removed using the Patch Tool. Those that abutted the wing feathers were easily removed via the Remove Tool as it is superb whenever edges are involved.
|
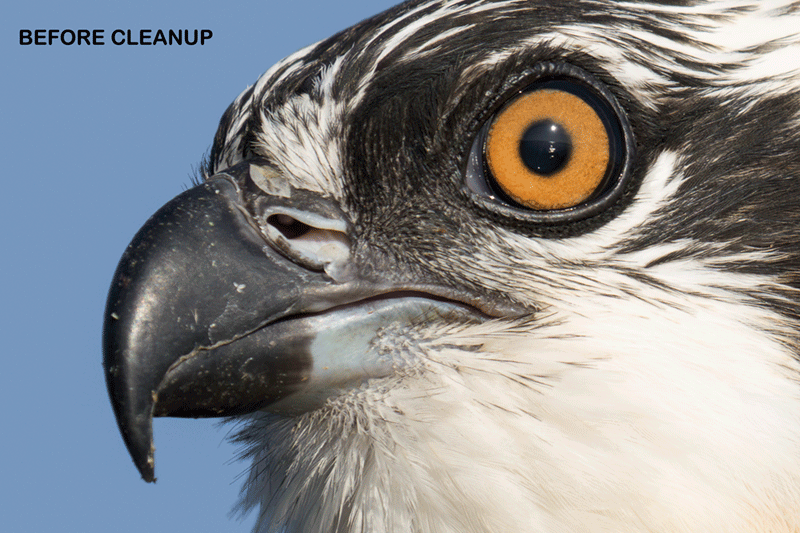
Bill Cleanup
You guessed it. The Remove Tool makes bill cleanup child’s play. All you need to do is work large. Here’s a high level tip for dealing with strips of specular highlights on a bird’s bill:
1- Complete your bill cleanup work without touching the strip of specular highlights.
2- Add a new layer.
3- Use one swipe of the Remove Tool and paint over the strip of specular highlights.
4- Now, reduce the Opacity of the top layer to taste, usually between 40 and 60%. You will still see the strip but it will be reduced in intensity.

|
The BIRDS AS ART Current Workflow e-Guide (Digital Basics II).You can order your copy from the BAA Online Store here, by sending a PayPal for $40 here, or by calling Jim or Jennifer weekdays at 863-692-0906 with your credit card in hand. Be sure to specify Digital Basics II. |
The BIRDS AS ART Current Workflow e-Guide (Digital Basics II)
The techniques mentioned above and tons more great Photoshop tips and techniques — along with my complete digital workflow, Digital Eye Doctor Techniques, and all my personalized Keyboard Shortcuts — are covered in detail in the BIRDS AS ART Current Workflow e-Guide (Digital Basics II), an instructional PDF that is sent via e-mail. Note: folks working on a PC and/or those who do not want to miss anything Photoshop may wish to purchase the original Digital Basics along with DB II while saving $15 by clicking here to buy the DB Bundle.
Please note: the Divide and Conquer technique was inadvertently omitted from DB II. It is detailed in a free excerpt in the blog post here.
Folks who learn well by following along rather than by reading can check out the complete collection of MP 4 Photoshop Tutorial Videos by clicking here. Note: most of the videos are now priced at an amazingly low $5.00 each.
You can learn how and why I converted all of my Canon digital RAW files in DPP 4 in the DPP 4 RAW Conversion Guide here. More recently, I became proficient at converting my Nikon RAW (NEF) files in Adobe Camera Raw. About three years ago I began converting my Nikon and Sony RAW files in Capture One and did that for two years. You can learn more about Capture One in the Capture One Pro 12 Simplified MP4 Video here. Today, I convert my Sony raw files in Photoshop with Adobe Camera Raw.
You can learn advanced Quick Masking and advanced Layer Masking techniques in APTATS I & II. You can save $15 by purchasing the pair.

|
The Digital Basics III Video Series |
The Digital Basics III Video Series
I realized more than a year ago that my digital workflow had changed significantly and was toying with the idea of writing a Digital Basics III. More recently, I learned and begun working with two great new Photoshop Tools, the Remove Tool and the Luminance Targeted Adjustment Tool. The former is like a smarter Spot Healing Brush Tool on steroids and the latter is a step up from the fabulous Color Mixer Tool. During that same time frame, I came up with a new and improved 2-step noise reduction technique. I still use Divide and Conquer, Quick Masks, Layer Masks, an expanded array of personalized keyboard shortcuts, and tons of other stuff from both versions of Digital Basics.
As soon as I realized that I did not want to take on another large writing project, I realized that by creating a series of videos I could much more easily share all the details of my current digital workflow and much more easily incorporate additional new tips, techniques, and tools as I went. And so, The Digital Basics III Video Series was born.
You can save recipe all five videos in Volume I by clicking here. The videos will be most valuable for folks using the latest version of Photoshop (2024) or Lightroom along with Topaz DeNoise AI and Topaz Sharpen AI.
Preserving the Natural History Moment
Note that in each of the three images, the natural history moment depicted by the original raw files has been preserved. Each looks just a bit better and makes me a bit happier. Please remember that JIJO applies — junk in equals junk out.
Typos
With all blog posts, feel free to e-mail or to leave a comment regarding any typos or errors.


Two out of three ain’t bad at all when it comes to figuring out the processing work you did! The third one (bump on the perch), I would never have guessed.
🙂
a
in the first line about the Osprey- “Overlapping Sticks” – youy type: ” Osprey early bugged me”:
Do you Mean “really” instead of early?
Yes and thanks, Eugen. I will fix it now.
with love, artie