
Your Call
Which of today’s three featured images is the strongest? Why did you make your choice?
In the Last Blog Post
Thanks for all the comments at the last offering. I loved all three of the photos equally for the reasons noted in the post. And all three were mentioned by at least one person. If you forced me to pick just one, I would go with the Green Heron that looked as much like a painting as it did a photograph. It was the consensus choice.
What’s Up?
I woke at 4am on Monday morning. We left at 5:10am and Jim kindly drove me to the airport for my 8:55am flight to Islip. After yet another blessedly uneventful (though quite bumpy at times) flight, we landed just a few minutes late. I visited my younger daughter Alissa for lunch, picked up a friend in the city, and then headed for dinner and the AirBnB in Seaford, Long Island. It was a long and very exhausting day.
While on the plane, after many months of work by both authors, I added three final images to The Complete and Quintessential Guide to Photographing Bird in Flight by Arash Hazeghi and yours truly, Arthur Morris/BIRDS AS ART. The title says it all. The work consists of 20,605 words in 523 paragraphs. There are 183 quite excellent images each with an informative educational caption. Though most of the photos were made with Sony mirrorless gear, there are representative examples of image created with both Canon and Nikon dSLR equipment. I am sending the MS Word file to BAA-friend David Pugsley who kindly agreed to review and proofread the final manuscript. More here when he is done.
Today is Tuesday 10 June 2025. It is dreary here on Long Island so I am taking a rare morning off to unpack, organize and do some shopping. The weather — sunny with a SW breeze, is looking decent for an afternoon visit to Nickerson Beach. I hope that you too choose to have a wonderful and productive day. Do remember that happiness is a choice — Byron Katie, The Work.Com.
If you are interested in a fun morning, afternoon, or day (or two) of In-the-Field Instruction at Nickerson between now and the morning of 16 June, please get in touch via e-mail or try me on my cell at 863-221-2372. Please leave a message and shoot me a text if I do not pick up. Weatherwise, Friday morning is looking best, Saturday is supposed to be a washout, and all the other afternoons are looking pretty good.
If an item — a Delkin flash card or a Levered-clamp FlexShooter Pro — for example, that is available from B&H and/or Bedfords, is also available in the BAA Online Store, it would be great, and greatly appreciated, if you would opt to purchase from us. We will match any price. Please remember also to use my B&H affiliate links or to earn 3% cash back at Bedfords by using the BIRDSASART discount code at checkout for your major gear purchases. Doing either often earns you free guides and/or discounts. And always earns my great appreciation.
Gear Questions and Advice
Too many folks attending BAA IPTs and dozens of photographers whom I see in the field and on BPN, are — out of ignorance — using the wrong gear, especially when it comes to tripods and more especially, tripod heads. And the same is true in spades when ordering new camera bodies or lenses. My advice will often save you some serious money and may help you avoid making a seriously bad choice. Please know that I am always glad to answer your gear questions via e-mail. If you are desperate, you can try me on my cell at 863-221-2372. Please leave a message and shoot me a text if I do not pick up.
Don’t Just Shoot: Learn
To learn of the late-registration discounts and AirBnB availability for the Jacksonville Royal Terns with chicks and more extended IPT late June/early July, or If you are interested in changing your life and becoming a better photographer by joining me on an Extended IPT at Sebastian Inlet for Ospreys and more (SEPT 25 to NOV 24, 2025) or in San Diego for Pacific-race Brown Pelicans and more (JAN 6 to FEB 2, 2026), please e-mail for dates, rates, terms, and additional information. Or shoot me a text to 863-221-2372. Both offerings include options for shared AirBnB lodging and ground transportation during your stay.

BILD EXPO Presented by B&H
Why Attend? BIRDS AS ART Appearances, Speakers, Gear, Deals, and More!
Bild Expo is back! Join us at The Javits Center in New York City for an unforgettable event featuring 100+ expert speakers, 250+ exhibitors, hands-on experiences, and the world’s greatest creative community. B&H’s incredible show specials will be the icing on the cake! Whether you’re a seasoned pro, an enthusiast, or a beginner, at Bild you will get inspired, learn, meet like-minded people, and celebrate being part of this amazing world of creativity.
I am pleased to announce that I will be doing portfolio reviews and four round table sessions at BILD this June. Here are the round table topics:
1- Systems, Lenses, and Camera Bodies for Bird Photography
2- Creating Sharp Bird Photographs
3- Bird Photography Hotspots
4- Creating Bird Photographs that depict Flight, Action, and Behavior
Click here or on the logo link above for more information.
Click here to register.
I hope to see you there.

|
|
This image was created on 5 June down by the lake near my home at Indian Lake Estates, FL. Standing as tall as possible at full height, I used the Robus RC-5570 Vantage Series 3 Carbon Fiber Tripod/Levered-Clamp FlexShooter Pro-mounted Sony FE 600mm f/4 GM OSS lens with the Sony FE 2x Teleconverter and The Latest Greatest Sony Flagship Body, the a1 II Mirrorless Camera. ISO 1600. The exposure was determined by Zebras with ISO on the rear wheel: 1/640 second at f/8 (wide open) in Manual mode. RawDigger showed that the exposure was perfect. AWB at 8:32:26am on a cloudy morning. Wide/AF-C with Bird-Eye/Face Detection performed perfectly. Click on the image to enjoy the high-res version. Image #1: Osprey in fresh juvenal plumage on pier railing |
Juvenile Ospreys
With their extraordinarily long, sharp talons, orange irises — they are yellow on the adults, and crisply edged black covert and back feathers, young Ospreys just out of the nest are very handsome, among the most attractive juvenile raptors on the planet. From the seven nests down by the lake, I am only aware of two fledglings hanging around the pier this season. And one of them very much likes the pier.
It Was a Cloudy Morning
It was a cloudy morning and there was not much around. I had made a few so-so images of a Black-bellied Whistling Duck and a pied juvenile Little Blue Heron. There was, however, a handsome juvenile Osprey sitting on the pier railing. So, I parked, grabbed my 1200mm rig and the tripod, and walked slowly down the pier hoping for a tight head portrait; some juvenile Ospreys allow for a close approach. This one did not :-(.
For the full body portrait, I pulled the tripod legs in a bit to get as tall as possible to place the faint impression of the distant part of the pier above the bird’s head. With the great Sony OSSs (Optical Stabilization Systems), one in the lens and one in the camera body (AKA IBIS), working at 1/640 sec. at 1200mm was child’s play. I do not hesitate to go as slow as 1/60 second when working at 1200mm on the tripod.
|
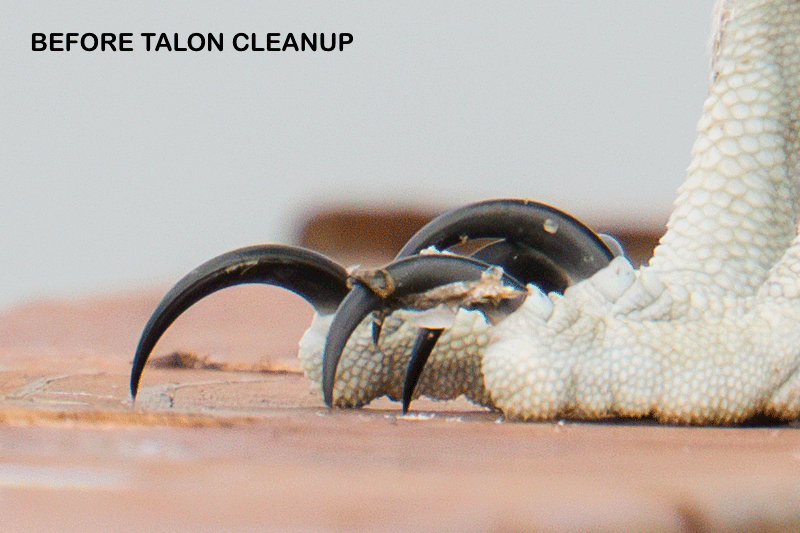
Talon and Railing Cleanup
A close look at the young bird’s talons in Photoshop revealed that it had recently enjoyed a meal of fish. In short, the bird’s feet were a mess. In addition, I was not thrilled by the bent board behind the bird’s feet. So, I went to work with the Remove Tool, the Clone Stamp Tool, and a small Quick Mask or two each refined by a Regular Layer Mask.

|
The BIRDS AS ART Current Workflow e-Guide (Digital Basics II).You can order your copy from the BAA Online Store here, by sending a PayPal for $40 here, or by calling Jim or Jennifer weekdays at 863-692-0906 with your credit card in hand. Be sure to specify Digital Basics II. |
The BIRDS AS ART Current Workflow e-Guide (Digital Basics II)
The techniques mentioned above and tons more great Photoshop tips and techniques — along with my complete digital workflow, Digital Eye Doctor Techniques, and all my personalized Keyboard Shortcuts — are covered in detail in the BIRDS AS ART Current Workflow e-Guide (Digital Basics II), an instructional PDF that is sent via e-mail. Note: folks working on a PC and/or those who do not want to miss anything Photoshop may wish to purchase the original Digital Basics along with DB II while saving $15 by clicking here to buy the DB Bundle.
Please note: the Divide and Conquer technique was inadvertently omitted from DB II. It is detailed in a free excerpt in the blog post here.
Folks who learn well by following along rather than by reading can check out the complete collection of MP 4 Photoshop Tutorial Videos by clicking here. Note: most of the videos are now priced at an amazingly low $5.00 each.
You can learn how and why I converted all of my Canon digital RAW files in DPP 4 in the DPP 4 RAW Conversion Guide here. More recently, I became proficient at converting my Nikon RAW (NEF) files in Adobe Camera Raw. About three years ago I began converting my Nikon and Sony RAW files in Capture One and did that for two years. You can learn more about Capture One in the Capture One Pro 12 Simplified MP4 Video here. The next step would be to get a copy of Arash Hazeghi’s “The Nikon Photographers’ Guide to Phase One Capture One Pro e-Guide” in the blog post here. Today, I routinely convert my Sony raw files in Photoshop with the latest version of Adobe Camera Raw.
You can learn advanced Quick Masking and advanced Layer Masking techniques in APTATS I & II. You can save $15 by purchasing the pair.

|
The Digital Basics III Video Series |
The Digital Basics III Video Series
I realized well more than a year ago that my digital workflow had changed significantly and was toying with the idea of writing a Digital Basics III. More recently, I learned and begun working with two great new Photoshop Tools, the Remove Tool and the Luminance Targeted Adjustment Tool. The former is like a smarter Spot Healing Brush Tool on steroids and the latter is a step up from the fabulous Color Mixer Tool. During that same time frame, I came up with a new and improved 2-step noise reduction technique. I still use Divide and Conquer, Quick Masks, Layer Masks, an expanded array of personalized keyboard shortcuts, and tons of other stuff from both versions of Digital Basics.
As soon as I realized that I did not want to take on another large writing project, I realized that by creating a series of videos I could much more easily share all the details of my current digital workflow and much more easily incorporate additional new tips, techniques, and tools as I went. And so, The Digital Basics III Video Series was born.
You can purchase the Digital Basics III Video Series by clicking here. The videos will be most valuable for folks using the latest version of Photoshop (2024) or Lightroom along with Topaz DeNoise AI and Topaz Sharpen AI.

|
|
This image was created on 5 June down by the lake near my home at Indian Lake Estates, FL. Standing at full height, I used the Robus RC-5570 Vantage Series 3 Carbon Fiber Tripod/Levered-Clamp FlexShooter Pro-mounted Sony FE 600mm f/4 GM OSS lens with the Sony FE 2x Teleconverter and The Latest Greatest Sony Flagship Body, the a1 II Mirrorless Camera. ISO 8000! The exposure was determined by Zebras with ISO on the rear wheel: 1/2500 second at f/8 (wide open) in Manual mode. RawDigger showed that the exposure was perfect. AWB at 8:33:11am on a cloudy morning. Wide/AF-C with Bird-Eye/Face Detection performed perfectly. Click on the image to enjoy the high-res version. Image #2: Osprey in fresh juvenal plumage landing on lamppost |
Think Fast, Act Fast
When the young raptor took flight, I knew that 1/640 sec. would not cut it so I spun the shutter speed dial five or six times to increase the shutter and did likewise to the Thumb Dial to raise the ISO, both without counting. I figured faster would be much better and that I would be in the right neighborhood exposure-wise.
I was a bit disappointed when the bird landed as I am not a big fan of lampposts as perches for birds, handsome or otherwise. The lamppost got me thinking …
Note that I knew that the bird would be landing away from me as the breeze was from the southwest.

|
|
From Image #2, above; branch courtesy of Generative Fill Image #2A: Osprey in fresh juvenal plumage landing on not a lamppost anymore |
What If …
I thought, what if the lamppost were a branch? And in the moment, I decided to take my first step down the slippery slope of (AI) Generative Fill. I circled the lamppost with the Patch Tool (my keyboard shortcut “P”), went to Edit > Generative Fill, typed “branch” in the Prompt dialogue box, and hit Generate. Three results popped up but all had too many twigs. So, I tried “single curved branch” and three more popped up. I was not thrilled by any of them but I selected the best of the lot, trimmed the end, and then selected the branch and desaturated it.
I am curious as to your thoughts about using (AI) Generative Fill in the manner shown here.

|
|
This image was created on 5 June down by the lake near my home at Indian Lake Estates, FL. Standing at full height, I used the Robus RC-5570 Vantage Series 3 Carbon Fiber Tripod/Levered-Clamp FlexShooter Pro-mounted Sony FE 600mm f/4 GM OSS lens with the Sony FE 2x Teleconverter and The Latest Greatest Sony Flagship Body, the a1 II Mirrorless Camera. ISO 8000! The exposure was determined by Zebras with ISO on the rear wheel: 1/2500 second at f/8 (wide open) in Manual mode. RawDigger showed that the exposure was perfect. AWB at 8:34:31am on a cloudy morning. Wide/AF-C with Bird-Eye/Face Detection performed perfectly. Click on the image to enjoy the high-res version. Image #3: Osprey in fresh juvenal plumage in flight |
Remarkable
It is truly amazing that today, photographers can create a fairly decent flight image working at 1200mm with an ISO of 8000. The improvement in the technological advances made with the high end mirrorless gear is indeed remarkable. Who would’a thunk it?
Typos
With all blog posts, feel free to e-mail or to leave a comment regarding any typos or errors.


Hey Arthur, do you still have Amazon affiliate link? I don’t see it here.
I’ve used Generative Fill more than I thought I would when it first came out, and now still use it often to remove things. It really is quite remarkable in what it can remove and rebuild whatever was behind it (think of a nest branch over a subject for example, or a distraction in front of a “complicated” background), many times in a single pass. I know it’s not for everyone’s personal processing ethics, but I love it and is a great tool when needed.
I generally use the remove tool to get rid of unwanted elements, and generative fill or generative crop mostly to expand canvas (usually sky or water) or produce missing wingtips. Works well for those purposes (some of the wingtips can look strange, but then so do some real wingtips, and usually one of the three AI generated choices is decent, at least as a starting point). I’m typically asking only for “background,” and that can result in complex rippled water or marsh that beautifully matches what’s already there. But the one or two times I’ve asked for something specific, say “rippled water,” the results have been poor, not matching the image at all.
Though the plumage in Image 1 is beautiful, as is the view of those huge talons, and Image 3 is amazing at 1200mm, my favorite is the unmodified surrealistic Image 2, especially if cropped square or vertical and with the lamp cleaned up as nicely as the talons in Image 1. The limp AI branch doesn’t work for me, though a better one, or one pulled from another image, might.
Agree that is one limp branch 🙂 I am thinking of bringing in a real branch.
ps Content-Aware Crop does extremely well especially when you work incrementally.
with love, artie
Re: AI Generative Fill and my favorite
Please don’t be offended but I am not a fan of doing anything that removes or adds anything from the original image. Image #2 is my favorite because 1. I really like Osprey. 2. Whenever we make it to Florida (usually Sanibel-Captiva) I take 100s of Osprey photos. You saw one of my favorites on my Flickr page, Osprey on electrical pole with morning catch. 3. I like photos of birds in flight, especially with wings spread.
No offense taken. My general approach is to remove stuff that I do not like as long as it does not change the natural history of the moment.
I have taken a few Osprey photos over the years.
a
Re: Talon cleanup
Would that amount of post processing be acceptable for most photo contest?
Depends on the contest. Most it would not.
a
Art: I use generative fill frequently to get rid of things, but never have used it to replace something. Great idea! My favorite image today, is #1. Yes, juvenile osprey are beautiful!
So long as it’s disclosed, I don’t have a problem with digital image manipulation such as in this example when put forth for artistic or instructional purposes. Documenting images used for journalistic purposes should be more tightly controlled.
Really nice osprey!
Though I never used the 1200mm lens, I did carry the 13-14 pound monsters for too many years -(
a
That Canon lens came in two parts: a front objective section, and a rear focusing unit that mounted to the camera. The focusing unit worked with four different front sections: a 400mm f/5.6, a 600mm f/5.6, an 800mm f/8, and the 1200mm f/11. Nikon had a very similar setup for its super-telephoto lenses at the time, although their 400mm lens was f/4.5.
>> It is truly amazing that today, photographers can create a fairly decent flight image working at 1200mm with an ISO of 8000. The improvement in the technological advances made with the high end mirrorless gear is indeed remarkable. <<
It truly is. The Sony 600mm f/4 plus the 2X teleconverter together weigh 3247 grams, or just over 7 pounds. The combo is about 19.4 inches long. The Canon 1200mm FL lens of the 1970s weighed 6200 grams, or almost 13.7 pounds and was 33.6 inches, or nearly a yard long. Talk about unwieldy! Also keep in mind that the Canon lens was f/11 and the Sony combo is a full stop faster, has advanced coatings and image stabilization, and it's no wonder that today's equipment can produce better photographs, more consistently, than the dinosaurs of yesteryear!