December 11th, 2013
|
|
|
This tulip image was created at the Willem-Alexander Pavilion at Keukenhof, Lisse, Holland with the tripod-mounted Canon EF 600mm f/4L IS II USM lens and the Canon EOS 5D Mark III Digital camera body. ISO 400. Evaluative metering +2/3 stop: 1/5 sec. at f/16 in Manual mode.
Again, manual focus on the distal end of the pistil. Click on the image to enjoy a larger size.
Image #4: Tulip Multiple Exposure: “Beauty of Spryng”
|
How I Use Live View
I have found myself using Live View more recently than in previous years, especially for my flower photography.
Here is how and why I use Live View:
For flower or macro work, I often use Live View along with the 2-second timer to ensure sharp images in wind-free situations. Live View raises the mirror with the simple push of a button.
Again, mostly with flowers I have used Live View to ensure getting the right exposure by viewing the RGB histogram that you can bring up in Live View.
I use Live View when creating images with stacked teleconverters using Live Mode AF which focuses off contrast on the sensor. The funny thing is that once I have achieved focus I turn Live View off, look through the viewfinder, and push the shutter button to make the image.
I rarely use Live View at 10X magnification to focus manually with stacked teleconverters when there is not enough contrast for Live Mode AF to work.
And of course I use Live View to create the few videos that I make.
That’s about it. Note: I do not use Live View to check composition or image design. For that I make an image and then check the LCD on the back of the camera.
I never once thought that using Live View might in any way be potentially harmful to the sensor. Is there a danger? Keep reading.
|
|
|
This image was created in-camera at Keukehof Gardens in Lisse Holland on the first Tulip IPT with the tripod-mounted Canon EF 300mm f/2.8L IS II USM lens and the Canon EOS 5D Mark III.
ISO 100. Evaluative metering +1 stop at f/22 in Tv mode. What do you think was the shutter speed?
Central sensor Surround/AI Servo Rear Focus on the first row of pink tulips. Click here if you missed the Rear Focus Tutorial. Click on the image to see a larger version.
|
How’d He Do Dat?
First off, do you like it? Do you hate it? Why? Be forewarned: I love it in part because of the outline effect on the pink tulips. Do let us know how you think this image was created in-camera? What technique or techniques were used? Please be as specific as you can. What was the shutter speed? Here is a clue: the original was rendered as a JPEG. Sometimes you can come up with something new and creative just by screwing around and having some fun.
|
|
|
This image was created at the Willem-Alexander Pavilion at Keukenhof, Lisse, Holland with the tripod-mounted Canon Telephoto EF 180mm f/3.5L Macro USM Autofocus lens and the and the Canon EOS-5D Mark III. ISO 800. Evaluative metering +2/3 stop: 1/25 sec. at f/8 in Av mode.
Central sensor AI Servo/Rear Focus on the closest large tulip petal on the left and re-compose. Click here if you missed the Rear Focus Tutorial. Click on the image to see a larger version.
Live View (for Mirror Lock) and 2-second timer were used to create a sharp image of this Tulipa “Washington Orange” at a very slow shutter speed.
|
Live View Caution/A Guest Blog Post by Tim Grey
From the December 11, 2013 edition of the “Ask Tim Grey eNewsletter.”
Today’s Question: In a recent podcast episode Tim and Renee spoke highly of shooting with live view, especially for close focus shallow DOF [depth of field] circumstances. I have tried it for this purpose too and it works well. The Canon 6D manual, however, cautions against continuous live view use for a long period as it can cause internal temperature rise that would cause image quality to deteriorate, and I have read elsewhere it could possibly even cause camera damage. So my question is, how long is a “long period”?
Tim’s Answer: This is a great question, which of course doesn’t have a clear and specific answer.
To begin with, there is no question that using the Live View feature of your digital SLR will cause some problems. On any camera, such continuous use of the image sensor will lead to a rather significant (and relatively quick) increase in heat, which leads to greater noise in any images you capture. Of course, the same is true for capturing a large number of images in a relatively short period of time, especially under hot conditions. By contrast, if you use the Live View (and thus the image sensor) sparingly, and the temperature is relatively cold, there will be less heat buildup and thus less noise in the images.
For cameras (such as digital SLRs) that feature a shutter mechanism, the Live View option can also be harmful to the shutter, leading to earlier-than-expected failure of the shutter. That is because the shutter must remain open the entire time you are using Live View, which among other things can stretch the springs used in the shutter assembly.
Of course, you could also argue that simply taking a picture damages your shutter, since a shutter has a limited life expectancy measured in a number of actuations. That, of course, would generally relate to the number of images captured, and most shutter mechanisms in today’s digital SLR cameras have a life expectancy measured in the hundreds of thousands of actuations, perhaps up to a maximum of around one million actuations.
In any event, I do recommend being somewhat judicious in the use of Live View. I certainly couldn’t cite a number in terms of how long you can use Live View before too much heat builds up or until you’ve actually done harm to the shutter mechanism. But the point is that while I love using Live View, I do try to minimize the use.
In other words, if I feel it will improve a given photo, I will absolutely use Live View. But I will also try to limit the amount of time I’m using Live View by working somewhat quickly, and also by being conscious of these issues and not turning on Live View until I’m ready to use it, and turning it off as soon as I’m done using it.
I wouldn’t go to extreme measures here, as in most cases the harm done will be relatively modest. But it is something worth keeping in mind, and it is worth developing good habits when it comes to the use of Live View.
My Question
Does anyone know if the same potential risks occur while doing video? Heck, at least it was cold at Bosque 🙂
Follow-up from Time Grey via E-mail
Yes, the same issues relate to the capture of video clips. I am addressing that question in an “Ask Tim Grey eNewsletter” next week, as a reader posed the same basic question earlier today.
Pixology Magazine
Get in-depth articles every month that will help you optimize every aspect of your photography, with my digital magazine, Pixology. Subscribe today by clicking here.
It seems that I get a copy of Tim’s eNewsletter in my personal Inbox most every day. The amazing thing is that I read almost every one of them and always learn something new. You can subscribe to the Ask Tim Grey eNewsletter by clicking here.

|
|
If you would like to learn to be a better, more creative tulip photographer consider joining us on the 2014 Tulip IPT.
|
Holland 2014 7 1/2-Day/8-Night: A Creative Adventure/BIRDS AS ART/Tulips & A Touch of Holland IPT. April 17-April 24, 2014: $4995 Limit: 12/Openings: 5
Act soon: this trip is now a go and is filling quickly.
Join Denise Ippolito, Flower Queen and the author of “Bloomin’ Ideas,” and Arthur Morris, Canon Explorer of Light Emeritus and one of the planet’s premier photographic educators for a great trip to Holland in mid-April 2014. Day 1 of the IPT will be April 17, 2014. We will have a short afternoon get-together and then our first photographic session at the justly-famed Keukenhof. Most days we will return to the hotel for lunch, image sharing and a break. On Day 8, April 24, we will enjoy both morning and afternoon photography sessions.
The primary subjects will be tulips and orchids at Keukenhof and the spectacularly amazing tulip, hyacinth, and daffodil bulb fields around Lisse. In addition we will spend one full day in Amsterdam. There will be optional visits the Van Gogh Museum in the morning and the Anne Frank House in the afternoon; there will be plenty of time for street photography as well. And some great food. On another day we will have a wonderful early dinner at Kinderdijk and then head out with our gear to photograph the windmills and possibly some birds for those who bring their longs lenses. We will spend an afternoon in the lovely Dutch town of Edam where we will do some street photography and enjoy a superb dinner. All lodging, ground transportation, entry fees, and meals (from dinner on Day 1 through dinner on Day 8) are included.
For those who will be bringing a big lens we will likely have an optional bird photography afternoon or two. If we get lucky, the big attraction should be gorgeous Purple Herons in flight at a breeding marsh. We would be photographing them from the roadside. And we might be able to find a few Great-crested Grebes at a location near Keukenhof.
You will learn to create tight abstracts, how to best use depth-of-field (or the lack thereof) to improve your flower photography, how to get the right exposure and make sharp images every time, how to see the shot, and how to choose the best perspective for a given situation. And you will of course learn to create a variety of pleasingly blurred flower images. If you bring a long lens, you will learn to use it effectively for flower photography. Denise’s two favorite flower lenses are the Canon 100mm macro and the Canon 24-105mm zoom. Mine are the Canon 180mm macro lens and the Canon 600mm f/4L IS II, both always on a tripod and both often used with extension tubes and/or the 1.4X teleconverters. Denise hand holds a great deal of the time. For flower field blurs denise uses the same lenses mentioned above. My favorite is the 70-200 often with a 1.4X TC but I use both the 24-105 and the 600 II as well. Both of us use and love the Canon EOS-5D Mark III for all of our flower photography. The in-camera HDR and Multiple Exposure features are a blast.
One of the great advantages of our trip is that we will be staying in a single, strategically located hotel that is quite excellent. Do note that all ground transfers to and from Schipol will be via hotel shuttle bus.
What’s included: Eight hotel nights. All ground transportation except for airport transfers as noted above. In-the-field instruction and small group image review and Photoshop sessions. All meals from dinner on Day 1 through dinner on Day 8. The hotel we are staying in often offers both lunch and dinner buffets. The food is excellent. Whenever you order off the menu be it at the hotel or at one of the several fine-dining spots that we will be enjoying at various locations, only the cost of your main course is included. On these occasions the cost of soups, appetizers, salads, sodas and other beverages, alcoholic drinks and wine, bottled water, and desserts are not included. This is done in part in hopes that folks will be less inclined to enjoy an eight course dinner so that we can get to bed early. As with all A Creative Adventure/BIRDS AS ART Instructional Photo-Tours both the photo sessions and the days are long. Nothing that we do however will be demanding. Being able to sit down on the ground with your gear is, however, a huge plus. Anyone in halfway decent shape should be fine.
Snacks, personal items, phone calls, etc. are not included.
Beware of seemingly longer, slightly less expensive tours that include travel days and days sitting in the hotel doing nothing as part of the tour. In addition, other similar trips have you changing hotels needlessly. The cost of this years trip is a bit higher than last years to reflect our increased experience and the extra hotel night that is included. One final note on other similar trips: the instructors on this trip actually instruct. On other similar trips the instructors, though usually imminently qualified, serve for the most part as van drivers….
Happy Campers only please. A non-refundable deposit of $1,000 per person is required to hold your spot. The second payment of $2,000 due by October 30, 2013. The balance is due on January 15, 2014. Payments in full are of course welcome at any time. All payments including the deposit must be made by check made out to “Arthur Morris.” As life has a way of throwing an occasional curve ball our way, you are urged to purchase travel insurance within 15 days of our cashing your check. I use and recommend Travel Insurance Services. All payments are non-refundable unless the trip fills to capacity. In that case, all payments but your deposit will be refunded.
All checks should be made out to “Arthur Morris” and sent to: Arthur Morris, PO Box 7245, Indian Lake Estates, FL 33855. Please fill out the paperwork here and include a signed copy with your deposit check.
For couples or friends signing up at the same time for the tulip trip, a $200/person discount will be applied to the final payment.
Click here for complete details and lots of wonderful images with our legendary educational captions. Click here and see item one for lots more tulip images.
December 10th, 2013

|
|
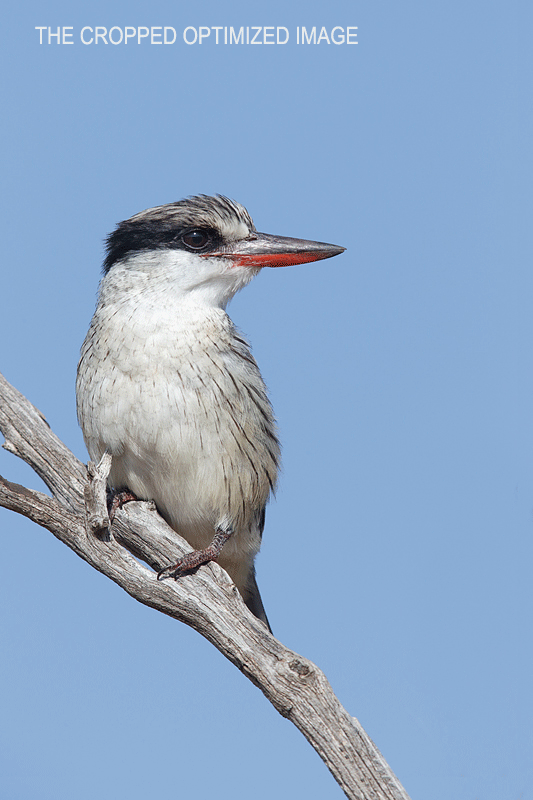
This image was created on the Tanzania Summer Safari with the Canon EF 24-105mm f/4L IS USM lens (hand held at 65mm) and the Canon EOS-1D X. ISO 400. Evaluative metering +1/3 stop: 1/320 sec. at f/16 in Av mode.
Central sensor AI Servo Surround Rear Focus AF on the bird and re-compose. Click here if you missed the latest version of the Rear Focus Tutorial. Click on the image to see a larger version.
|
The 24-105
As regular readers know, I never leave home without my Canon EF 24-105mm f/4L IS USM lens. It comes in handy for a great variety of images; see “A Fitting Ending/Short Zoom Lens Tips” here to learn more about this useful B-roll lens. Whenever I head afield without my 24-105 it is usually not long before I am wishing that I had brought it along….
The bird in the tree is a Striped Kingfisher.

|
|
This image was also created from the top of our safari van on the Tanzania Summer Safari last August with the Canon EF 200-400mm f/4L IS USM Lens with Internal 1.4x Extender (with the internal TC in place at 345mm) and the Canon EOS-1D X. ISO 400. Evaluative metering +1/3 stop as framed in Av Mode: 1/320 sec. at f/16.
Central sensor/AI Servo/Surround–Rear Focus AF on the bird and re-compose. Click here to see the latest version of the Rear Focus Tutorial. Click on the image to see a larger version.
|
Going Wide with the 200-400 with Internal TC
To create the second story telling image in this series I went with the 200-400 at 345mm. Many folks would ask, “Why did you need the teleconverter in place?” I didn’t. It was in place to give me additional reach if needed; as I zoomed to frame the image I simply pressed the shutter button once I was pleased with the composition.
Note that when creating vertical images of small-in-the-frame subjects that placing the subject near one of the corners is almost always the best way to go. Learn more about Advanced Composition and Image Design in The Art of Bird Photography II (ABP II: 916 pages, 900+ images on CD only).
The Power of Twelve Hundred Millimeters
To create the relatively large-in-the-frame vertical image above I went with the 600II/2X III combo. Though many state openly that it is not possible to create critically sharp images with a 2X teleconverter I do just that consistently. For quite a while I worked at f/8 or f/9 with this combination (f/8 is wide open) but more recently I have begun stopping down to f/10, f/11, or f/13 when possible. To learn to make sharp images at long effective focal lengths see “Advanced Sharpness Techniques in The Art of Bird Photography II (ABP II: 916 pages, 900+ images on CD only). For those who as I have done gone completely to full frame bodies learning to work successfully with a 2X TC is huge advantage for both bird and wildlife photography.
Also relevant and of interest to many would be “Big Lens Choices for Canon and Nikon–As I See Them….” here.
The Image Optimization
After converting the RAW file in Canon’s Digital Photo Professional (click here to learn how and why I use DPP) I dust-spotted the image, eliminated several extraneous branches with a series of Quick Masks as detailed in APTATS I and regular layer masks, moved the bird up and a bit back in the frame using techniques from APTATS II, lightened the mask using Tim Grey Dodge and Burn techniques, and ran a 50% layer of my NIK 50/50 preset on the bird and the perch only. All the rest as described in detail in our in Digital Basics File, an instructional PDF that is sent via e-mail. It includes my complete digital workflow, dozens of great Photoshop tips, several different ways to expand canvas, all of my time-saving Keyboard Shortcuts, Quick Masking, Layer Masking, and NIK Color Efex Pro basics, image clean-up techniques, Digital Eye Doctor, and tons more.
I do realize that but for too much room at the top that the wider framing in the original post has merit.
Image Questions
#1- Which of these images do you think that I created first? Why?
#2: Why only +1/3 stop for all three of these images?
#3: Which is your favorite image? Why?
2014 Tanzania Summer Safari
If you are interested in joining us in Tanzania next summer please shoot me an e-mail and I will be glad to forward you the PDF with dates, itinerary, and price. With Jean-Luc Vaillant already signed up, this trip is a go.
Coming Soon
Stay tuned for next year’s Bosque IPT dates with the promised reduced rates and info on the Bosque Site Guide Current Conditions Update. The latter, which should be available be the end of this week, will be sent at no charge to all who have purchased the invaluable Bosque Site Guide. It will also be available as a separate purchase.
Also in the pipeline is a brand new MP-4 Photoshop Tutorial Video on creating high quality animated GIF files and using the Text Tool to type on images. It will sell for $4 and will be the first of many new MP-4 videos. See here for the current library.
December 9th, 2013
Jumping for Joy
Beautiful early morning light. The bird is pretty much right down sun angle and the exposure is spot-on. The subject is gorgeous. The wing position is perfect. There is a great look at the silver primary coverts contrasting with the black primaries and secondaries. The perfect image design that features the goose perfectly positioned against a distant, pleasingly de-focused mountain background. When I saw this image on the camera’s rear LCD screen I jumped for joy, though not very high out of concern for my healing left knee.
(Note: click here for the best diagram of dorsal wing surface feather tracts that I have seen.)
Yet the subject is not in sharp focus; the image is a total failure. I did not delete only because I knew that it would be perfect to make the point that in nature photography you need to do everything right. Often within a second or two at most…. That is the great challenge of bird and wildlife photography that drives me to succeed.
|

|
|
This is a 100% crop of the goose’s head.
|
Near Perfection Equals Total Failure
As you can see plainly above, the bird’s eye and face are not sharp. The image is a total failure. As you will see immediately below, this failure was caused by operator error.
|

|
|
This is the BreezeBrowser Main View screen capture.
|
BreezeBrowser Main View Screen Capture
Above is the BreezeBrowser Main View screen capture for today’s image. Note that the illuminated red square shows that the center focusing sensor was active at the moment of exposure. But it was not on the subject…. In an ideal world one of the Surround AF points would have caught the top of the bird’s far wing. But the main problem was that I had never properly acquired focus and was not matching the speed of the bird in flight with my panning speed. Had I done my job properly the 1D X would have nailed accurate focus as it does so often and well.
Note: in Breezebrowser you need to check “Show Focus Points” under View to activate this feature. To see the focus points in DPP check “AF Point” under View or hit Alt L. Hit Alt M to see Highlight Alert. To learn how and why I use DPP (Canon Digital Photo Professional) to convert my RAW files, see the info on our DPP RAW Conversion Guide here.
Note the perfect histogram and the smattering of flashing highlights on the goose’s neck. The highlight alert in Breezebrowser is a bit more sensitive than the highlight alert on all Canon camera bodies so the few flashing highlights on the subject here let me know that I have made a perfect exposure with the brightest WHITE RGB values at about 238. Just as I like them.
Regular readers know that I use and depend on BreezeBrowser every day of the year. It allows me to sort my keepers and delete the rejects faster than any other Windows browsing program. We use it on the main computer in the home office to catalog our images file-drawer style. And the companion program, Downloader Pro allows me to download my images quickly and conveniently. It automatically adds my IPTC data and the shooting location. I have it set up to create a folder named by the Month/date/year. The Breezebrowser/Downloader Pro combo saves me many hours each week. To learn more or to purchase this great PC only program, click here. As far as the BreezeBrowser/Downloader Pro Combo goes, if you are using a Windows platform and are not using these two great programs you are at best, wasting your valuable time. My understanding is that Photo Mechanic is best for Mac-users who do not opt to run Parallels or VM Ware fusion on their Macs so that they can enjoy the many advantages of BreezeBrowser. See BreezeBrowswer on a Mac for details.
1D X AF Guide and 5D III User’s Guide
To learn everything that I know about the great 1D X AF system check out our 1D X AF Guide here. 5D Mark III users should check out our 5D III User’s Guide here.
Image Exposure Question
Why is the correct exposure here–ISO 800, 1/1250 sec. at f/6.3–1 1/3 stops lighter than my recommended bright white ISO 400 exposure of 1/2000 sec. at f/8? (Note: the sun was out….)
Great buy: Used Canon 800mm f/5/6L IS Lens for Sale
Friend and multiple IPT-veteran Monte Brown is offering his lightly used Canon 800mm f/5.6L IS lens in excellent condition for sale for $9,500. Purchase includes the lens case and hood, the 4th Generation Design Low Foot, the original foot, a LensCoat, the original invoice and the original Canon shipping carton. The lens was purchased new from B&H in April 2009 and was recently underwent a pre-sale clean and check by Canon. The buyer pays insured shipping via UPS Ground to US addresses only. The lens will be shipped only after your check clears.
The Canon EF 800mm f/5.6L IS USM Autofocus lens sells new for $13,223.00 so you will save a bundle on a great lens. No need to ever use a 2X…
If interested you can contact Monte by phone at 1-765-744-1421 or via e-mail.
Last Year’s Grand Prize winning image by Lou Coetzer
Time is Running Out!
BIRDS AS ART 2nd International Bird Photography Competition
The December 31, 2013 closing deadline is fast approaching.
Learn more and enter the BIRDS AS ART 2nd International Bird Photography Competition here. Twenty-five great prizes including the $1000 Grand Prize and intense competition. Bring your best.
Support the BAA Blog. Support the BAA Bulletins: Shop B&H here!
We want and need to keep providing you with the latest free information, photography and Photoshop lessons, and all manner of related information. Show your appreciation by making your purchases immediately after clicking on any of our B&H or Amazon Affiliate links in this blog post. Remember, B&H ain’t just photography!


Amazon
Everyone buys something from Amazon, be it a big lens or deodorant. Support the blog by starting your search by clicking on the logo-link below. No purchase is too small to be appreciated; they all add up. Why make it a habit? Because I make it a habit of bringing you new images and information on an almost daily basis.
Typos
In all blog posts and Bulletins feel free to e-mail or leave a comment regarding any typos, wrong words, misspellings, omissions, or grammatical errors. Just be right. 🙂
IPT Info
Many of our great trips are filling up. You will learn more about how to make great images on a BAA IPT than anywhere else on the planet. Click here for the schedule and additional info.
December 8th, 2013 This Blog Post and College Football…
I started working on this blog post at 4:00am. After I take my 59 degree Fahrenheit ice baths before dinner each night I usually get to bed early so I get up earlier than most folks. I will post this at about 9:30am. Yesterday afternoon I was thrilled with Auburn’s amazing victory over Missouri in the SEC championship game. Auburn needed a victory by underdog Michigan State over Ohio State in last night’s Big Ten championship game to get to the national championship game. I taped that game on TiVo and watched it this morning while working on this blog post. I was rooting for Michigan State as I had fallen in love with Auburn’s amazing running attack the day before. Congrats to Michigan State for its gritty, come-from-behind victory and to Auburn for its upcoming trip to the national championship game against the surely to be favored Florida State Seminoles. I will be rooting for Auburn.
All in all I probably spent about four hours on this blog post. Each post is presented for your enjoyment, to teach you a few new things about nature photography, and hopefully, to inspire you. Everyone buys something from Amazon. Please get in the habit of doing all of your Amazon shopping (holiday and otherwise) by starting with our Amazon affiliate link immediately below or with one of our B&H affiliate links in and at the end of this blog post. Your purchases will not cost you a penny more and using our links is a great way to thank me for my work here and for my work on the BIRDS AS ART Bulletins. 🙂
Thanks for considering this request. No purchase is too small to be appreciated!
Multi-Subject Flight Photography Tips
Photographing Parallel-Flying Pairs
When photographing two birds flying parallel to the plane of your position, that is, from side to side, the best strategy is to place the active AF sensor on the trailing feet of the front bird. As you can see, that plan worked perfectly here and resulted in a balanced composition with the birds nicely back in the frame. If I had had the central sensor on the front bird I would have cut off a good part of the trailing bird.
As always for flight photography, once you have acquired focus with the bird or birds in the zone, that is, either flying parallel to your position or angling at least slightly towards you with a good light angle and decent subject size in the frame, it is always best to fire off several frames in rapid fire succession. The 1D X especially gives you a better chance to come up with a pair or perfect wing positions as I did here. This is the best of a 3-frame sequence; I kept all of them but this one is sheer perfection.
|

|
|
This is the BreezeBrowser Main View screen capture.
|
BreezeBrowser Main View Screen Capture
Above is the BreezeBrowser Main View screen capture for the opening image. Note that the illuminated red square shows that the center focusing sensor was active at the moment of exposure. In Breezebrowser you need to check “Show Focus Points” under View to activate this feature. To see the focus points in DPP check “AF Point” under View or hit Alt L. Hit Alt M to see Highlight Alert. To learn how and why I use DPP (Canon Digital Photo Professional) to convert my RAW files, see the info on our DPP RAW Conversion Guide here.
Regular readers know that I use and depend on BreezeBrowser every day of the year. It allows me to sort my keepers and deletes the rejects faster than any other Windows browsing program. We use it on the main computer in the home office to catalog our images file-drawer style. And the companion program, Downloader Pro allows me to download my images quickly and conveniently. It automatically adds my IPTC data and the shooting location. I have it set up to create a folder named by the Month/date/year. The Breezebrowser/Downloader Pro combo saves me many hours each week. To learn earn more or to purchase this great PC only program, click here. As far as the BreezeBrowser/Downloader Pro Combo goes, if you are using a Windows platform and are not using these two great programs you are at best, wasting your valuable time. My understanding is that Photo Mechanic is best for Mac-users.
1D X AF Guide
To learn everything that I know about the great 1D X AF system check out our 1D X AF Guide here.
Beating the Dead Horse
If I’ve said it once, I’ve said it a thousand times: “As always for flight photography, once you have acquired focus with the bird or birds in the zone, that is, either flying parallel to your position or angling at least slightly towards you with a good light angle and decent subject size in the frame, it is always best to push the shutter button, hold it down, and fire off several frames in succession.”
Note that that does not mean that you acquire focus while the bird is a mile away, mash down on the shutter button,, and keep making images until the bird is well past your position flying away from you. Proper technique is to make 3 or 4 images when the bird is in the zone as described above. I swear that I have seen folks make 100 images as a bird flies by, no doubt in an effort to impress someone….
With the image above, I created a three frame sequence and got lucky in capturing a neat juxtaposition of the two geese, in part due to the fast frame-rate of the 1D X. Pushing the shutter button when the birds are tiny in the frame, well off light angle, or flying away from you is simply a waste of time and pixels. On the other hand, if the birds are in the zone, push the button whether or not you like the way the birds are arranged in the frame. You cannot react fast enough when you see a pleasing image in the viewfinder. Sometimes you can anticipate a good image, but usually that is not possible.
For the last time, when the birds are in the zone, push the button and create 3- or 4-frame sequences.
A Primer on Exposing Correctly for Bright Whites in Full Sun and a Note On Sunny F/22 White Exposures
First off, as you might have suspected the original capture here (see below) was created as part of a rapid fire burst–this one a 4-frame sequence. I will say no more. 🙂
Most film folks are familiar with the Sunny f/16 guideline–1 over the film speed will give a good exposure for a middle-toned subject at f/16. That from John Shaw’s classic The Nature Photographer’s Complete Guide to Professional Field Techniques . (I lost my signed copy years ago when moving to Florida….) Most folks, however, never turned the page after reading about Sunny f/16. If I recall correctly, what follows is Sunny f/22 for Whites. This premise states simply that if you know the correct exposure for a middle-toned subject (f/16) then you need to shoot one stop darker for white subjects (f/22). This simple principle is not understood by most nature photographers, heck, by most photographers. The point is hammered home in the Exposure chapter in the original The Art of Bird Photography. Few folks now that ABP was inspired by John’s Amphoto book. . (I lost my signed copy years ago when moving to Florida….) Most folks, however, never turned the page after reading about Sunny f/16. If I recall correctly, what follows is Sunny f/22 for Whites. This premise states simply that if you know the correct exposure for a middle-toned subject (f/16) then you need to shoot one stop darker for white subjects (f/22). This simple principle is not understood by most nature photographers, heck, by most photographers. The point is hammered home in the Exposure chapter in the original The Art of Bird Photography. Few folks now that ABP was inspired by John’s Amphoto book.
Important Note
After totally screwing up the math when I first posted this, I decided to re-write it correctly. That re-write begins below.
OK, so now let’s do the math and see how it applies to digital. At ISO 400 1/film speed is 1/400 sec. John states that the correct exposure for bright whites in full sun with film is 1/400 at f/22. That extrapolates to 1/800 sec. at f/16 and then again to 1/1600 sec. at f/11. For the Snow Goose trio image I was actually 1 stop lighter than the Sunny f/22 for Whites guideline–1/1600 at f/8 is one stop lighter than 1/1600 sec. at f/11 as suggested by Sunny f/22 for bright whites.
Why? Obviously digital is better able to hold the detail in the highlights than film at a given exposure level.
Here’s the rub, I thought that I had been at 1/1600 at f/9 but I must have inadvertently hit the thumb wheel. Why do I like 1/1600 sec. at f/9 (1/2000 sec. at f/8) for bright whites in full sun? I like to bring my Whites into Photoshop without any RGB values above 235 or so. For the Snow Goose trio image above I needed to do some extra work to restore detail in the brightest WHITEs: I applied an 18% layer of Linear Burn to the WHITEs that I had selected using Select/Color range and followed that with NIK Detail Extractor at about 25% painted in using a Hide-All Layer Mask.
The bottom line is that my baseline exposure for bright whites in full sun with digital at ISO 400 is 1/2000 sec. at f/8 or 1/1600 sec. at f/9. If, in extremely bright sun I run into a few blinkies on the the subject I will go 1/3 stop darker to 1/2500 sec. at f/8 or 1/2000 sec. at f/9 (for flight photography). These bright whites in sun value hold pretty well across all camera bodies and systems though you may have to tweak things 1/3 stop either way after you check the histogram and most importantly, for blinkies.
Kudos to those who e-mailed and left comments noting my math error. What’s my excuse? It’s been a long, long time that I have thought in terms of Sunny 16 in any form. With digital the rule is to get some data in the rightmost box of the histogram and let ’em fly.
The fact is that very few folks know or understand that WHITEs need one full stop less light then middle-tones to be exposed correctly. And BLACKs need 2/3 to a stop more light than middle-tones to be properly exposed. Note that in nearly all cases we need to expose for the highlights and avoid significant blinkies on the subject.
How do I know that most folks do not understand these concepts? I ask the question all the time at seminars, in-the-field workshops, on IPTs, on BPN, and whenever I see someone using an incident meter. The failure rate is 99.9%…..
I am sorry for my careless error. I hope that I got it right this time. 🙂
The Art of Bird Photography II
You can learn a ton about getting the right exposure with digital every time whether the sun is out or it is cloudy in the “Exposure Simplified” of ABP II (916 pages, 900+ images on CD only). If you have no clue as to what I am talking about with regards to exposure or if you would like a complete bird photography education here then you will surely want to order the 2-book combo.
Digital Basics
All of the above is of course described in detail in our in Digital Basics File, an instructional PDF that is sent via e-mail. It includes my complete digital workflow, dozens of great Photoshop tips, several different ways to expand canvas, all of my time-saving Keyboard Shortcuts, Quick Masking, Layer Masking, and NIK Color Efex Pro basics, image clean-up techniques, Digital Eye Doctor, and tons more.
|

|
|
This is the original Snow Goose Trio capture.
|
As above, the original capture shown here was the best of a 4-frame sequence. It featured three very nice wings-up positions. The problem was that the third bird in the formation was too low. I used a series of Quick Masks as learned in APTATS I and techniques that I learned while editing APATATS II for readability to seamlessly move the bird up in the frame.
Your Favorite?
Take a moment and leave a comment letting us know which of the images above is your favorite. And be sure to let us know why you made your choice.
Last Year’s Grand Prize winning image by Lou Coetzer

|
|
|
BIRDS AS ART 2nd International Bird Photography Competition
Time is Running Out! The December 31, 2013 closing deadline is fast approaching.
Learn more and enter the BIRDS AS ART 2nd International Bird Photography Competition here. Twenty-five great prizes including the $1000 Grand Prize and intense competition. Bring your best.
Support the BAA Blog. Support the BAA Bulletins: Shop B&H here!
We want and need to keep providing you with the latest free information, photography and Photoshop lessons, and all manner of related information. Show your appreciation by making your purchases immediately after clicking on any of our B&H or Amazon Affiliate links in this blog post. Remember, B&H ain’t just photography!
Amazon
Everyone buys something from Amazon, be it a big lens or deodorant. Support the blog by starting your search by clicking on the logo-link below. No purchase is too small to be appreciated; they all add up. Why make it a habit? Because I make it a habit of bringing you new images and information on an almost daily basis.
Typos
In all blog posts and Bulletins feel free to e-mail or leave a comment regarding any typos, wrong words, misspellings, omissions, or grammatical errors. Just be right. 🙂
IPT Info
Many of our great trips are filling up. You will learn more about how to make great images on a BAA IPT than anywhere else on the planet. Click here for the schedule and additional info.
December 7th, 2013

|
|
Bird Photography Hotspot: Anhinga Trail, Everglades National Park.
|
Anhinga Trail, Everglades National Park
Simply put, Anhinga Trail is one of the top bird photography hotspots in the U.S. How good is it? In the original The Art of Bird Photography it was one of only ten listed North American hotspots.
Here, adapted from what I wrote, is a free and updated excerpt from ABP:
Anhinga Trail
Everglades National Park
There are several good bird photography spots in Everglades National Park. None however ranks with Anhinga Trail which consistently offers superb opportunities for visiting bird photographers. The livin’ is easy. The birds are close and they are tame. You can walk the entire trail in under 10 minutes. The straight, paved, main portion of the trail runs roughly east/west and abuts the famed Taylor Slough which lies just a few yards north of the trail. This layout allows photographers to utilize direct frontal lighting from dawn til dusk. When water levels are low as they usually are in mid-winter, there are large numbers of fish in the slough that attract hordes of hungry birds and more than a few American Alligators.
Photography is generally good from early winter to early spring. January, February, and March can be spectacular. Great Blue Herons and the gators spend most of each day hunting by standing perfectly still. Common Moorhens and Purple Gallinules for atop spatterdock or in the short grasses that border the slough. White Ibis, Snowy and Great Egrets, and Tricolored Heron forage along the water’s edge while Double-crested Cormorants dive for fish or sit placidly on the low wooden railings posing for photographers. Green Herons defending their breeding territories chase each other around like kids in a schoolyard. And American Bitterns are sometimes found posing like statues in the sawgrass.
Osprey and Belted Kingfisher hover above the two large pools and Turkey and Black Vultures often fill the skies along with Red-shouldered Hawks and very rarely, the rare Short-tailed Hawk. In March and April Swallow-tailed Kites may be found swooping down low over the trees in the parking lot to grab bit of hanging moss with which they line their nests. If you are lucky enough to have a south or east wind in the morning you might enjoy some great flight photography as both species of vultures land atop the visitor center, the light green metal roof reflecting light on their dark underwings.
Perhaps by now you are wondering, “Why the Anhinga Trail moniker?” Rest assured, the trail is aptly named: Anhingas pose on the low railings for cell phone toting tourists. They spear bluegills, small bass, and an unfortunate variety of introduced tropical fish. They raise their young in stick nests that in some years are located right next to the boardwalk.
Observers accustomed to to seeing this species in their drab non-breeding plumage will be dazzled by the soft parts color of Anhingas at the height of breeding plumage; both the males and females feature bright, Kelly green eye rings surrounded by turquoise facial skin. Courtship and nest building generally take place in in mid-winter and by February most females are either incubating their eggs or tending chicks. If you visit in March you will generally see nests full of the creamy yellow young of various sizes.
The birds at Anhinga Trail are so tame that you can create head portraits of many of the species mentioned above with a 70-200 lens and a teleconverter. Be sure to visit if you have the chance.
Anhinga Trail/Everglades National Park Mini-IPT: Feb 1-2, (SAT/SUN), 2014. (Limit 14/Openings 12): $799. Introductory slide program: 7pm: FRI Jan 31. (Limit 14/Openings: 12):
Join Denise Ippolito and Arthur Morris for four great photography sessions at one of the top bird photography hotspots in North America. Morning sessions: 6:15am to 10:30am. Afternoon sessions: 3:00pm till 5:45pm. Lunch included. Informal image review and Photoshop sessions after lunch.
What you will learn:
Autofocus basics and correct camera and gear set-up.
How to get the right exposure with digital every time.
How and why to expose to the right.
How to create pre-dawn silhouettes.
How to design pleasing images.
How to find the best perspective.
How to make strong images in cluttered situations.
How to photography birds in flight.
In-the-Field creative techniques.
Optional morning add-on session:
Jan 31 (Friday) Anhinga Trail/Everglades National Park Add-on/Morning Only (Limit 14/Openings 12): $249
Includes lunch, and informal image review and Photoshop session.
Do consider joining us for the all or part of the South Florida Composite IPT:
2014 South Florida Composite IPT: 6 1/2 days of photography spread over 9 days of learning, hanging out, and travel: $2644. (Limit 14/Openings: 12
Click here for complete details or to register. Please e-mail with any questions or leave a comment below.
Last Year’s Grand Prize winning image by Lou Coetzer
Time is Running Out!
BIRDS AS ART 2nd International Bird Photography Competition
The December 31, 2013 closing deadline is fast approaching.
Learn more and enter the BIRDS AS ART 2nd International Bird Photography Competition here. Twenty-five great prizes including the $1000 Grand Prize and intense competition. Bring your best.
Support the BAA Blog. Support the BAA Bulletins: Shop B&H here!
We want and need to keep providing you with the latest free information, photography and Photoshop lessons, and all manner of related information. Show your appreciation by making your purchases immediately after clicking on any of our B&H or Amazon Affiliate links in this blog post. Remember, B&H ain’t just photography!
Amazon
Everyone buys something from Amazon, be it a big lens or deodorant. Support the blog by starting your search by clicking on the logo-link below. No purchase is too small to be appreciated; they all add up. Why make it a habit? Because I make it a habit of bringing you new images and information on an almost daily basis.
Typos
In all blog posts and Bulletins feel free to e-mail or leave a comment regarding any typos, wrong words, misspellings, omissions, or grammatical errors. Just be right. 🙂
IPT Info
Many of our great trips are filling up. You will learn more about how to make great images on a BAA IPT than anywhere else on the planet. Click here for the schedule and additional info.
December 6th, 2013 This Blog Post…
Like yesterday’s blog post, this post took a bit more than four hours to prepare. Each blog post is presented for your enjoyment, to teach you a few new things about nature photography, and hopefully, to inspire you. Please consider doing all of your Amazon holiday shopping by starting with our Amazon affiliate link immediately below or with one of our B&H affiliate links in and at the end of this blog post. Your purchases will not cost you a penny more and using our links is a great way to thank me for my work here and for my work on the BIRDS AS ART Bulletins. :).
Thanks for considering this request. No purchase is too small to be appreciated!
The Calm Before the Storm
The image above was made on November 24, 2013, our great snow day at Bosque only a few minutes before I created the video below. The calm before the storm indeed.
You Gotta See This: First Ever Published BAA Video
Our day in the snow at Bosque was so spectacular (see here and here) and we had so, so many blast-offs, that I set up the Canon EF 70-200mm f/2.8L IS II USM lens and the Canon EOS 5D Mark III on the Gitzo 3532 LS carbon fiber tripod with the Mongoose M3.6 head and shot lots of video.
ISO 100. Evaluative metering +1 2/3 stops: 1/30 sec. at f/13 in Manual Mode. I used central sensor Surround rear focus AF on the near edge of the flock and re-compose before going to Live View. Click here to see the latest version of the Rear Focus Tutorial.
The Video
The original 15-second video is a relatively huge 166mb file. It looks truly spectacular at 1920 x 1080. My original plan was to post the video on the blog so that all could enjoy it. With help from Peter Kes of course. Peter immediately informed me that the file was way, way, way too large and that it would jam up our server. He agreed to try it anyway in a draft. After 15 minutes of attempted downloading I told Peter that we needed a better solution. 🙂 In short order he down-sized the video to 2.7mb/729 pixels wide “while retaining some quality.”
You can view the video above by pressing the Play arrow. Unless you have a really fast connection, your first attempt to play the video will be accompanied by skipping and fits and starts. After it finishes playing give it a minute or so and then press Play again. Things should go smoothly then. Note: if you give the video a minute or two to load you should enjoy seamless viewing the first time you play it. The quality, however, is only fair but it is the best that we could do given the size and server constraints. I am pretty sure that everyone will get the idea. If you have never experienced a blast-off at Bosque and/or have never experienced snow at the refuge you will surely be impressed.
Great News
Those who wish to enjoy the beyond-spectacular full-screen 166mb original video capture (at 1920 x 1080 pixels) and those who would like to see the fantastic quality of a well-made EOS-5D Mark III video may purchase the full-sized original Movie file for only $5.00. A link to download the file will be sent to you via HightailIt.com. After you save the file to your computer and double-click on it you will be able to view the video full screen in your default viewer whether you use Windows of MAC.
You can purchase your copy at the BAA Online Store by clicking here or by calling Jim at 863-692-0906 with your credit card in hand.
Catching Up
Torrential Miracle
In the November 12 Torrential Miracle post my favorite image by far was the one of the chick above made with the 600 II, the 2X III, and the 1D X. Why? The cuteness, the duckling’s expression, and the incredible sharpness.
I also asked, “In the second image, the one of the hen with the two chicks, why should I have added 2/3 stop more light than for the image of the drake?” Joel Haas was correct in part when he said, “Because the overall tonality of the background was much lighter than the background in the image of the
drake, and you wanted to properly expose the birds.” David Policansky added more important information when he commented “I’d have added more light to the hen and chicks because with the drake you had that brilliant white on its head that you didn’t want to blow out. The hen and chicks don’t have that.” I’d like to add that the background was darker and the WHITEs brighter in the image of the drake because the sun was much stronger than in the image of the hen with the two chicks. As I say and write often, “When the sun is at or near full strength, the meter does a pretty good job. When it is cloudy of overcast the meter is dumb. You need to add a lot more light with scenes that average to well lighter than a middle tone.”
Folks who have no clue as to how to get the right exposure are directed to the Exposure Simplified section of ABP II and the chapter on Exposure Theory in ABP. Best advice: save $10 by purchasing the two book combo here and start studying. Getting the right exposure with digital should be the easiest thing in the world; all that you need to do is make sure that you have data in the right-most histogram box without any blinkies on the subject or important parts of the background….
Creating Black-Lit Magic
In the Creating Black-Lit Magic post I was surprised to learn that most folks preferred the white rim light to the red rim-light. I will take that into account when I process more images from that series. And I may redo some of the images that were posted there.
Beyond Spectacular Part I
In the Beyond Spectacular Part I post my very favorite image from the snow day was Image #5 above. Why? The surreal look and the sublime mountain background. Wish this one luck in the next BBC Wildlife Photographer of the Year Competition…
A Name for this Image…
If you have a creative name for this image I would appreciate your leaving a comment.
Image Questions
I also asked the following questions:
1-Why was I using the Hoya 77mm Neutral Density (ND) 0.9 (3-stop) Pro 1 Digital Multi-Coated Glass Filter for images #1 and #5?
I use the 3-stop ND filters so that I can work at wider apertures. You spend a lot less time cleaning dust spots at f/8 than you do at f/22. In addition, in bright conditions, the 3-stop ND filters allow me to get to the very slow shutter speeds that I sometimes like to employ, shutter speeds in the range of from 1/4 to 1/15 sec. In bright sun you cannot achieve those speeds even at ISO 50.
2-Why was f/16 a poor choice in Image #3?
There was no need to stop down so much if at all. Why? Depth-of-filed with short lenses is great, especially with relatively distant subjects. A much wider aperture, perhaps one like f/8 or even f/5.6, would have yielded a faster shutter speed. The distant subjects and the 1/400 sec. shutter speed allowed me to get lucky.
Last Year’s Grand Prize winning image by Lou Coetzer
Time is Running Out!
BIRDS AS ART 2nd International Bird Photography Competition
The December 31, 2013 closing deadline is fast approaching.
Learn more and enter the BIRDS AS ART 2nd International Bird Photography Competition here. Twenty-five great prizes including the $1000 Grand Prize and intense competition. Bring your best.
Support the BAA Blog. Support the BAA Bulletins: Shop B&H here!
We want and need to keep providing you with the latest free information, photography and Photoshop lessons, and all manner of related information. Show your appreciation by making your purchases immediately after clicking on any of our B&H or Amazon Affiliate links in this blog post. Remember, B&H ain’t just photography!
Amazon
Everyone buys something from Amazon, be it a big lens or deodorant. Support the blog by starting your search by clicking on the logo-link below. No purchase is too small to be appreciated; they all add up. Why make it a habit? Because I make it a habit of bringing you new images and information on an almost daily basis.
Typos
In all blog posts and Bulletins feel free to e-mail or leave a comment regarding any typos, wrong words, misspellings, omissions, or grammatical errors. Just be right. 🙂
IPT Info
Many of our great trips are filling up. You will learn more about how to make great images on a BAA IPT than anywhere else on the planet. Click here for the schedule and additional info.
December 5th, 2013 This Blog Post…
This blog post took only four hours to prepare. Each blog post is presented for your enjoyment, to teach you a few new things about nature photography, and hopefully, to inspire you. Please consider doing all of your Amazon holiday shopping by starting with our Amazon affiliate link immediately below or with one of our B&H affiliate links at the end of this blog post. Your purchases will not cost you a penny more and using our links is a great way to thank me for my work here and my work on the BIRDS AS ART Bulletins. :).
Thanks for considering this request. No purchase is too small to be appreciated!
Big Time Bosque Screw-Up
A funny thing happened on the way to a massive fly-out… There was brilliant color in the eastern sky at 6:14am on December 2, 2013. But the huge flocks that would soon be headed north to the Farm Fields were not in the air yet. As usual, Denise Ippolito and I had advised to do a few exposure checks. For the pre-dawn fly-outs we advise that most folks work in Tv mode with Auto ISO, choose a slow shutter speed in the range of from as low as 1/4 second when it is still way-dark to about 1/30 second, and add about 2/3 stop of light depending on the intensity of the color and how much of the image is very dark, aka the mountains or distant strips of land. Plus 2/3 works well when there is just a small layer of the distant ridge bordering the bottom of the frame. With nice color this will somewhat burn the RED channel. This however is a necessity, if you underexpose so that you do not clip the RED channel you the image will be much too dark (and muddy) overall.
I decided to make some pan blurs of the color as I was doing my exposure check. As I framed each image I thought, Why does the sky look so dark in the viewfinder?” When I called out my exposure data, “ISO 10,000 +1 stop in Tv mode gives me 1/3 sec. at f/6.3,” Denise said, That’s gotta be wrong. Are you sure that it is not ISO 1,000. I said, “Nope. There are 4 zeros not 3. She said again, “That’s wrong.” Still nothing clicked.
And then I remembered. The morning before while we were doing blurs, I had removed the clear drop-in filter and inserted a 3-stop Neutral Density Filter into the lens’s filter drawer… That explained why the sky looked so dark through the viewfinder and why my ISOs were three stops higher than everyone else’s….. Then I remember that when I had stored the lens the previous day that I had realized that I had the ND filter in place in the 200-400. I said to myself, “I’ll take it out later. I will surely realize that everything is looking too dark.’
Unfortunately, that had not been the case. The lesson: when using ND filters or polarizers to attain slow shutter speeds along with wider apertures be sure to remove them when the blur session is over. 🙂
Compounding The Disaster
With the color in the eastern sky getting more vivid every minute I hesitated going back to the car and switching out the ND filter. But I was loving the 200-400 in the pre-dawn so I finally decided to do so. While I was looking for my filter wallet and switching the two filters I missed a huge fly-out blast off that went right through the brightest colored section of the sky. Big time bummer.
When I finally returned to the scene of the crime I did manage to salvage things a bit by catching a small group of geese heading back to the Flight Deck and going through the bright colors at 6:34am and 7 seconds.
Recovering In Part
With still some nice color remaining I somewhat made amends with the 70-200 (above at 7:34:52 am) and with the 24-105 (below, 4 seconds later at 7:34:56 am.). Missing a huge blast-off through the best color was not what I had planned but as a lover of what is (see The Work of Byron Katie–Who would you be without your story?–here) I opted to see the experience as just another lesson learned. That was a far better choice than beating myself up. And heck, the story made for an interesting blog post….
|

|
|
This image was created with the hand held Canon EF 24-105mm f/4L IS USM lens (at 47mm) and the Canon EOS-1D X. ISO 200. Evaluative metering +1 stop as framed: 1/30 sec. at f/7.1 in Tv mode.
Central sensor/AI Servo Rear Focus/Suround AF as framed active at the moment of exposure. Click here if you missed the latest version of the Rear Focus Tutorial. Be sure to click on the image to enjoy a larger version.
|
The Bosque Site Guide
I’ve said it before and I will say it again, if you head to Bosque without a copy of my Bosque Site Guide on your laptop you are just plain foolish…. Let my 20 years of experience ensure that you will be in the right place for all weather, wind, and sky conditions. It’s that simple.
I will be working on a 2013 Bosque Current Conditions Update early next week. It will be sent at no charge to all who have previously purchased the Bosque Site Guide and also be offered at a discount as a stand-alone purchase. Best advice? Purchase your copy of the Bosque Site Guide today and receive the 2013 Current Conditions Update free next week.
Your Biggest Screw-Up?
Take a moment to leave a comment and let us know of your biggest nature photography screw-up. Comments on the images are always welcome.
Last Year’s Grand Prize winning image by Lou Coetzer
BIRDS AS ART 2nd International Bird Photography Competition
The December 31, 2013 closing deadline is fast approaching.
Learn more and enter the BIRDS AS ART 2nd International Bird Photography Competition here. Twenty-five great prizes including the $1000 Grand Prize and intense competition. Bring your best.
Support the BAA Blog. Support the BAA Bulletins: Shop B&H here!
We want and need to keep providing you with the latest free information, photography and Photoshop lessons, and all manner of related information. Show your appreciation by making your purchases immediately after clicking on any of our B&H or Amazon Affiliate links in this blog post. Remember, B&H ain’t just photography!
Amazon
Everyone buys something from Amazon, be it a big lens or deodorant. Support the blog by starting your search by clicking on the logo-link below. No purchase is too small to be appreciated; they all add up. Why make it a habit? Because I make it a habit of bringing you new images and information on an almost daily basis.
Typos
In all blog posts and Bulletins feel free to e-mail or leave a comment regarding any typos, wrong words, misspellings, omissions, or grammatical errors. Just be right. 🙂
IPT Info
Many of our great trips are filling up. You will learn more about how to make great images on a BAA IPT than anywhere else on the planet. Click here for the schedule and additional info.
December 4th, 2013 This Blog Post…
This blog post took more than 8 hours to prepare. Each blog post is presented for your enjoyment, to teach you a few new things about nature photography, and hopefully, to inspire you. Please consider doing all of your holiday shopping by starting with our Amazon affiliate link immediately below or with one of our B&H affiliate links at the end of this blog post. Your purchases will not cost you a penny more and using our links is a great way to thank me for my work here and my work on the BIRDS AS ART Bulletins. :).
Thanks for considering this request. No purchase is too small to be appreciated!
Beyond Spectacular Part II
If you missed Beyond Spectacular Part I, click here. What can I say? 2028 images created. 480 first edit keepers. Denise Ippolito and I stayed at the refuge from 6am till 5:30 pm. With this actually being my twentieth straight year here at the Thanksgiving season, November 24, 2013 was my best day ever at Bosque.
600II/1.4X III/1D X for Flight
The 600mm f/4L IS II lens, the 1.4X III telecovnerter, and the EOS 1D X are an incredible combo for tripod-mounted flight photography. Others stronger and younger than I use the same combo effectively for hand held flight photography. In either case, the snow reflected light up onto the undersides of the geese and cranes giving the birds a pleasing snow glow. Note that it is important to add lots of light in these conditions to produce a proper exposure with data into the right-most histogram box.
Mountains, Mountains, Mountains
The background mountains are an important compositional element in each of the first two images presented here. In the image directly above they are the subject. The dusting of snow makes the image that much more attractive. My understanding is that Chupadera Peak is the largest peak in the range to the west of the refuge but that the other peaks are not formally part of a Chupadera range. Therefore the low mountains seen in the image above are not really the Chupaderas though pretty much everyone refers to them in that way.
Snow at Bosque
The combination of snow, geese, cranes, and a cornfield is a powerful one for most folks, and irresistible one for me. Here I went to a small aperture with lots of depth-of-field. In my 20 years of visiting Bosque I have enjoyed a decent snowfall only twice. Snow has been even rarer for me than fire in the mist conditions; I have encountered that 3 or 4 times over my two decades of refuge visits. Be sure to enjoy it when you can!
Fish-Eye
At times you will find yourself at Bosque with hundreds if not thousands of geese directly overhead. Though south winds increase your odds, the situation may occur on any wind. Pointing a fish eye lens straight up is the way to go when it happens. For this image I could not point the lens directly up so I made sure to level the image in the viewfinder as best as I could by using the bottom line of the 4X6 viewfinder grid….
Using All the Clubs in your Bag
To create the images in today’s blog post, all made on the very same day, I used the 600mm f/4L IS II, the 200-400 with Internal TC, the 70-200 f/2.8L IS II, and the old 15mm fish eye lens. In the first snow day post, Beyond Spectacular Part I, I featured an image created with the 24-105mm zoom lens.
So on a given day over the course of 11 1/2 hours I used every lens that I had at my disposal. How do you decide which lens to use? You see the snow. You see the birds either on the ground or in the air. You take note of the light and of what the birds are doing. You try to figure out what will happen next. You decide what you want to show in your image and then choose the tool that will best enable you to fulfill your photographic vision. Then you push the button at just the right time. With experience, your choices will become second nature.
Your Favorite?
Which of the six images is your favorite? Before you choose, be sure to click on each image to view and appreciate a larger version. Please let us know why.
Last Year’s Grand Prize winning image by Lou Coetzer
BIRDS AS ART 2nd International Bird Photography Competition
The December 21, 2013 closing deadline is fast approaching.
Learn more and enter the BIRDS AS ART 2nd International Bird Photography Competition here. Twenty-five great prizes including the $1000 Grand Prize and intense competition. Bring your best.
Support the BAA Blog. Support the BAA Bulletins: Shop B&H here!
We want and need to keep providing you with the latest free information, photography and Photoshop lessons, and all manner of related information. Show your appreciation by making your purchases immediately after clicking on any of our B&H or Amazon Affiliate links in this blog post. Remember, B&H ain’t just photography!
Amazon
Everyone buys something from Amazon, be it a big lens or deodorant. Support the blog by starting your search by clicking on the logo-link below. No purchase is too small to be appreciated; they all add up. Why make it a habit? Because I make it a habit of bringing you new images and information on an almost daily basis.
Typos
In all blog posts and Bulletins feel free to e-mail or leave a comment regarding any typos, wrong words, misspellings, omissions, or grammatical errors. Just be right. 🙂
IPT Info
Many of our great trips are filling up. You will learn more about how to make great images on a BAA IPT than anywhere else on the planet. Click here for the schedule and additional info.
December 3rd, 2013
|

|
|
This image was created yesterday evening at Bosque del Apache NWR in San Antonio, New Mexico with the hand held Canon EF 24-105mm f/4L IS USM lens (at 24mm) and the Canon EOS 5D Mark III Digital camera body ISO 640. Evaluative metering +1 stop as framed: 1/80 sec. at f/5.6 in Tv mode.
Central sensor/AI Servo Rear Focus/Suround AF on the nearest crane and re-compose. Click here if you missed the latest version of the Rear Focus Tutorial. Be sure to click on the image to enjoy a larger version.
|
A Fitting Ending
I saw it coming while we were still on the North Farm Loop Road, streaks of thin white clouds radiating in the western sky. “We might get some monster color about 20 minutes after sunset. We did. It was a fitting way to end two great weeks of photography at Bosque for Denise Ippolio and me. We thoroughly enjoyed ever moment that we spent with the two groups.
|

|
|
This image was also created yesterday evening at Bosque del Apache NWR in San Antonio, New Mexico with the hand held Canon EF 24-105mm f/4L IS USM lens (this time at 88mm) and the Canon EOS 5D Mark III Digital camera body ISO 1000. Evaluative metering at zero as framed: 1/60 sec. at f/6.3 in Tv mode.
Central sensor/AI Servo Rear Focus/Suround AF on the nearest crane and re-compose. Click here if you missed the latest version of the Rear Focus Tutorial. Be sure to click on the image to enjoy a larger version.
|
Short Zoom Lens Tips
The obvious focal length choice was 24mm to include the vast expanse of clouds and sky. After checking the exposure and creating several versions of the opening image here, I decided to zoom in and create an image that featured lots more color. In a variety of situations, we taught the groups to use Tv mode when appropriate. For the sunrise fly-ins and blast-offs it is much easier for most folks (including and especially me), to pick an appropriate shutter speed, dial in the correct EC (exposure compensation), and work in Auto ISO (or set ISO Safety Shift as I do) than it is to to work in Manual mode where you will often need to be change two or three of the exposure parameters every few minutes or so as the EV (light) levels increase.
I use this technique when I wish to ensure a minimum shutter speed for hand holding. Here, with the 24-105’s great IS system, I knew that creating sharp images hand held at 1/60 or 1/80 sec. would be child’s play. I could have gone a lot slower without a problem.
Learn more about using the 24-105mm and other short end zoom lenses in “Scenic, Wildlife, and B-Roll Versatility” here. If you plan on adding the 24-105 to your lens line-up, please use one of the B&H affiliate links here or start your B&H or Amazon searches using the generic link in the right hand column. Doing so would be greatly appreciated. As always, feel free to e-mail me with your gear questions.
Image Questions
After getting a perfect exposure for the opening image at +1 stop why did I use the metering exposure for the tighter image? Note: I added one full stop of light to the opening image but did not add any light to the second image. The question at hand is why not?
If you have no idea, you can learn the basics of exposure by studying the “Exposure Simplified” section in “The Art of Bird Photography II (ABP II: 916 pages 900+ images on CD only) and the chapter on Exposure in the original “The Art of Bird Photography” (soft cover). Best deal: order both when you buy the two book combo.
|

|
|
This image was created yesterday evening at Bosque del Apache NWR in San Antonio, New Mexico with the hand held Canon EF 24-105mm f/4L IS USM lens (at 28mm) and the Canon EOS 5D Mark III Digital camera body ISO 1600. Evaluative metering +1/3 stop as framed: 1/60 sec. at f/4.5 in Tv mode.
Central sensor/AI Servo Rear Focus/Suround AF on the nearest crane and re-compose. Click here if you missed the latest version of the Rear Focus Tutorial. Be sure to click on the image to enjoy a larger version.
|
Astounded
When we arrived at our chosen crane pool there was another workshop group at work. I was astounded when I saw that everyone was using telephoto lenses despite that fact that going wide was the obvious choice; light levels were much too low for folks to be using long glass. Not a single on of the participants was using a short lens. As soon as we had exited our vehicles, I had shouted to the group, “The shorter the better; 24-105, even 16-35. Deboarh, your 24-70 is fine. The 70-200 is too long.” Everyone listened and we all made many great images.
Above you see part of the group at work. Denise Ippolito is checking the composition on the rear LCD screen of her 5D Mark III. Again, it was a fitting way to end a great two weeks.
Your Favorite?
Which of the three images above do you like best? Please let us know why you made your choice.
Last Year’s Grand Prize winning image by Lou Coetzer
BIRDS AS ART 2nd International Bird Photography Competition
The December 21, 2013 closing deadline is fast approaching.
Learn more and enter the BIRDS AS ART 2nd International Bird Photography Competition here. Twenty-five great prizes including the $1000 Grand Prize and intense competition. Bring your best.
Support the BAA Blog. Support the BAA Bulletins: Shop B&H here!
We want and need to keep providing you with the latest free information, photography and Photoshop lessons, and all manner of related information. Show your appreciation by making your purchases immediately after clicking on any of our B&H or Amazon Affiliate links in this blog post. Remember, B&H ain’t just photography!
Amazon
Everyone buys something from Amazon, be it a big lens or deodorant. Support the blog by starting your search by clicking on the logo-link below. No purchase is too small to be appreciated; they all add up. Why make it a habit? Because I make it a habit of bringing you new images and information on an almost daily basis.
Typos
In all blog posts and Bulletins feel free to e-mail or leave a comment regarding any typos, wrong words, misspellings, omissions, or grammatical errors. Just be right. 🙂
IPT Info
Many of our great trips are filling up. You will learn more about how to make great images on a BAA IPT than anywhere else on the planet. Click here for the schedule and additional info.
December 2nd, 2013
The State of Bosque Photographic Workshops
At Bosque, being in the exact right place at the right time is imperative to photographic success. There was once a guy from Florida, I think, who was considering joining my Bosque IPT. In the end, he decided to go it alone. When he saw a brand new fire in the mist image that I posted, he e-mailed and said, “You are so lucky; that is exactly the situation that I dreamed of.” I chuckled. That morning I was well aware of the fire-in-the mist possibilities. I brought the group to the exact right spot at the exact right time. Penny wise and pound foolish. With my 19 years of experience I know where to be when. And nobody else can come close to matching my skills in that area….
Today, however, there are so many folks doing low-priced tours at Bosque (and at other locations) as to be baffling. Heck, it seems that anyone who owns a digital camera qualifies to lead bird photography workshops. And as one would expect, these tours are priced exceedingly low. While it is of course true that you get what you pay for, I am no fool. In order to compete with the new boys and girls, next year’s Bosque trip or trips will be competitively priced. The schedule and rates will be published soon.
Blasting Highlights
Photographing into the blinding reflections of the sun is a delicate task. You need to know what you are doing with exposure. When we first arrived at the crane pools the sun on the water was so bright that no amount of minus compensation would eliminate very substantial blinkies. I talked the group through the ISO, shutter speed, and aperture settings. Pretty soon more birds began arriving and everyone was able to put a bird or two in the brightest swath of color and make some good images. Do check the exposure settings for the image above carefully. Learn to photograph while looking into the blasting highlights in the “Creating 11 a.m. Silhouettes” section in The Art of Bird Photography II (ABP II: 916 pages, 900+ images.)
Go For the Gusto: Push the Button Now/Ask Questions Later
At +2/3 stop EC (exposure compensation) I had been set up to create silhouetted images of the incoming cranes against the colorful sky when I noticed an area of open water. I tracked two birds as they dropped below the horizon and waited for them to hit the clear water. As they were landing in very bright highlights it is obvious that I needed less plus compensation, probably about 0 would have been perfect. But I remembered another important lesson from The Art of Bird Photography II: when unexpected action occurs, push the shutter button. Why? If you take the time to adjust your settings you will miss the action.
At +2/3 as framed the right water was indeed showing as overexposed when I hit Alt M in Canon’s Digital Photo Professional (DPP) but moving the brightness slider two clicks to the left and doing the same with the Highlight Slider I was easily able to recover the highlights. To learn how and why I convert my images in DPP click here.
Pick a Good Spot
I told the group that sitting was an advantage as it would give you an extra moment or two with the birds above the distant ridge. So I found a comfortable mound of dirt, lowered the tripod legs, parked myself on it, and began making images. All but the very first image here were made from the exact same spot. For the image above, I simply spotted two birds that were isolated from the many.
Study the Flight Patterns
On most evenings the cranes coming into roost take one of several flight paths time after time. Some are great for photography; others not so good. Last night the birds coming from high left made ideal subjects. But once in a while a bird coming from our right would turn hard left while still above the ridge. As this one did much to my delight.
Rapid Fire
I am often amazed when we are doing flight photography and I encounter a student with the drive speed set to Single Frame. For all of my bird photography I have the drive speed set to Continuous High. Once I have the bird or birds nicely in the frame I hold the shutter button down for 3 or 4 frames until the moment is gone, that is, until either the bird drops below the ridge or the arrangement of the compositional elements becomes a mess. The image above was my favorite of an excellent three-frame sequence.
The Grand Finale
First a few educational notes. All of the images here were created at at color temperature of K (Kelvin) 8000. Note that for the last two images I resisted going to ISO 1600 knowing that with the birds hanging in the sky that I would get away with relatively slow shutter speeds, 1/640 and 1/400 sec. This frame, the last one presented here today, was my favorite of about a 6-frame sequence. To make the yellow sky more red I went into the RED channel in Hue Saturation and played with the Hue slider, something I almost never do. But here it worked perfectly.
It is hard to believe that it is possible to create so many Family Jewels type images in less than a half hour. Did I mention that everyone in the group was sitting right next to me having a blast? Anything is possible when you know where to be when, or have a leader who does :).
Your Favorite?
Which of the images above do you like best? Please use the time designation to specify a given image, and be sure to let us know why.
Last Year’s Grand Prize winning image by Lou Coetzer
BIRDS AS ART 2nd International Bird Photography Competition
The December 21, 2013 closing deadline is fast approaching.
Learn more and enter the BIRDS AS ART 2nd International Bird Photography Competition here. Twenty-five great prizes including the $1000 Grand Prize and intense competition. Bring your best.
Support the BAA Blog. Support the BAA Bulletins: Shop B&H here!
We want and need to keep providing you with the latest free information, photography and Photoshop lessons, and all manner of related information. Show your appreciation by making your purchases immediately after clicking on any of our B&H or Amazon Affiliate links in this blog post. Remember, B&H ain’t just photography!
Amazon
Everyone buys something from Amazon, be it a big lens or deodorant. Support the blog by starting your search by clicking on the logo-link below. No purchase is too small to be appreciated; they all add up. Why make it a habit? Because I make it a habit of bringing you new images and information on an almost daily basis.
Typos
In all blog posts and Bulletins feel free to e-mail or leave a comment regarding any typos, wrong words, misspellings, omissions, or grammatical errors. Just be right. 🙂
IPT Info
Many of our great trips are filling up. You will learn more about how to make great images on a BAA IPT than anywhere else on the planet. Click here for the schedule and additional info.
December 1st, 2013
Who is Dave Klein?
Dave Klein is a dentist and dental educator who lives in Bloomington, Minnesota, a suburb of Minneapolis near where my buddy Jim Neiger (author of the great eGuide, Flight Plan) grew up. In recent years Dave has begun to feel that he is a photographer trapped inside a dentist’s body.
All of the images here are courtesy of and copyright 2013: David W. Klein.
Dave’ e-mail to Denise’s Bosque Group
Hi Everyone and Happy Thanksgiving!
I certainly enjoyed meeting all of you as we shared the joys and struggles of Bosque together. I have been there three times before but never experienced a snow event like the one we enjoyed, nor the mega-blastoffs we witnessed, nor those challenging north winds. I hope that everyone got home safely and didn’t forget anything important like a tripod in New Mexico 🙂 Note: Cheryl Slechta, a moderator on the Out-of-the-Box forum at BirdPhotographer’s.Net, left her tripod on the tour loop road; it was kindly returned to the Visitor’s Center where she was happily re-united with it. Cheryl, Lynn and I had a nice, albeit cold time at the crane pools on the Monday afternoon after the workshop ended and created some nice color blurs at sunset along with images of silhouetted cranes in flight as they arrived at their evening roost. Note: Lynn is Lynn Fulton (aka McFulton), Denise’s good friend and client from Ontario, Canada.
For me personally it was thrill to be with Artie and Denise as I have tremendous respect for the their skill, knowledge, techniques, and mastery. I always feel a bit chagrined to look at my work and theirs but it keeps me motivated to learn and improve. I hope to be able to photograph with them again one day soon and hope that all of you may, too. Enjoy the holidays, Safe travels wherever you go next and please keep in touch. Attached are my five to share – the small bird is a Say’s Phoebe that Lynn and I worked Monday afternoon as we were leaving the refuge for the crane pools. It very cooperative and posed in really sweet light. Thanks for pointing it out to me, Lynn.
Best, Dave
Dave’s Comment
On the November 26, 2013 blog post, “Beyond Spectacular Part I,” Dave kindly wrote:
All of these are wonderful and I feel very fortunate to have been there to witness these spectacular and rare moments at Bosque. I can’t imagine the BBC overlooking image #5 – it is amazing and my favorite of all of them; it has a dream-like quality to it. Thanks so much for your company and instruction this past week and for your frequent reminders about exposure values as light and conditions changed constantly. You and Denise worked hard to get us in the best positions for the best opportunities that presented themselves. I wish you, Denise and your IPT group a very Happy Thanksgiving tomorrow and huge success throughout your time at Bosque. I hope our paths will cross again – you and Denise were very generous with your time and knowledge and that made this trip all the more memorable for me.
Dave’s Response
After I replied to Dave’s original e-mail he answered as follows:
Thank you for your kind comments on the images. I re-sized them and attached them below. Please let me know if there are any issues with the images. I would be honored if you used them in a blog post. I hope things continue to go well at Bosque for you and Denise and the post-Turkey Day IPT. The blast-off image was made with the Nikon 10.5mm f/2.8 DX fisheye lens pointed directly at the flock taking off. In post I used the lens distortion correction slider in NX2 to stretch the image and to flatten the perspective. That’s about the only way I thought I could get the entire flock in one image. Despite the unfavorable winds and the weather challenges we faced we had some amazing opportunities that I’ve never enjoyed during prior visits to Bosque. Your knowledge of where to be when at Bosque is remarkable.
Dave’s Final e-Mail
In Dave’s final e-mail he wrote in part:
What I liked most about the workshop was the blending of styles that the two of you represent: technical, compositional and creative. Your vast experience with Bosque told us when to be patient with a situation and let the photographic opportunity present itself and when to quickly move on to another location when the circumstances weren’t in our favor. Thanks so much Artie for your dedication to your workshop participants and your readership. I feel privileged to say I am part of both.
Mr. Dave
Who Cares about Dave Klein?
Denise surely does. I surely do. And everyone who met him on the IPT does. His wife and family for sure. And I am betting that all of his patients and students do too.
As for me, I love happy campers. And I love skilled photographers who join our workshops to learn more, to learn to become more creative, and to improve their already considerable skills.
Your Favorite
Which of Dave’s images do you like best? Be sure to let us know why.
8 SPECTACULAR PHOTOGRAPHY DEALS

4 GREAT COMPUTER DEALS


AMAZING I-PAD & TABLET DEALS


14 KILLER PORTABLE HOME ENTERTAINMENT DEALS


Last Year’s Grand Prize winning image by Lou Coetzer
BIRDS AS ART 2nd International Bird Photography Competition
The December 21, 2013 closing deadline is fast approaching.
Learn more and enter the BIRDS AS ART 2nd International Bird Photography Competition here. Twenty-five great prizes including the $1000 Grand Prize and intense competition. Bring your best.
Support the BAA Blog. Support the BAA Bulletins: Shop B&H here!
We want and need to keep providing you with the latest free information, photography and Photoshop lessons, and all manner of related information. Show your appreciation by making your purchases immediately after clicking on any of our B&H or Amazon Affiliate links in this blog post. Remember, B&H ain’t just photography!
Amazon
Everyone buys something from Amazon, be it a big lens or deodorant. Support the blog by starting your search by clicking on the logo-link below. No purchase is too small to be appreciated; they all add up. Why make it a habit? Because I make it a habit of bringing you new images and information on an almost daily basis.
Typos
In all blog posts and Bulletins feel free to e-mail or leave a comment regarding any typos, wrong words, misspellings, omissions, or grammatical errors. Just be right. 🙂
IPT Info
Many of our great trips are filling up. You will learn more about how to make great images on a BAA IPT than anywhere else on the planet. Click here for the schedule and additional info.
November 30th, 2013
The Before
On the way down Highway 1, I said to Richard, “If we are lucky, we might find a big group of geese in the corner of the main impoundment just past the pay booth. We did. It was sunny and warm with a mild south by slightly east wind. Hand held at 1/13 sec. the image above had been intended only as an exposure check….
I did most of my work that afternoon with the 600 II and the 2X III TC trying to pick off single birds in blue water. Isolating various individuals was quite a trick. I moved often…. If you missed the previous blog post, see the results at “Your Goose is Cooked” here.
Jiggle Blurs
With the same gear in hand and the same shutter speed, I zoomed in to the long end of the focal length range and jiggled the camera as I pressed the shutter button. Denise Ippolito describes it as shivering. I thought the resulting image was rather pleasing. I liked the degree of blurring and the way that there was room for the whole tree on the left top of the frame.
Big Glass Bird-scape
Scoping out the huge group with my big lens I saw a large concentration of Ross’s Geese about 200 yards away. And photographed it. As you can see above; not the stub-nosed look of the smaller Ross’s.
The Roar
It seemed that all 15,000 birds took flight at once with a truly deafening roar, reminiscent of an approaching freight train. They were angle slightly away from us into that slight southeast breeze. For the first few images I went wide to capture the reflections in the water.
Zoominig In
For the image above I zoomed in on the flock that was still heading southeast.
Heading North
For the last image presented today, I went wide again as the flock began to turn to the north. After two minutes Richard and I were left standing in awed silence.
Your Favorite
Which of the images above do you like best? Be sure to let us know why.
8 SPECTACULAR PHOTOGRAPHY DEALS
4 GREAT COMPUTER DEALS
AMAZING I-PAD & TABLET DEALS
14 KILLER PORTABLE HOME ENTERTAINMENT DEALS
Last Year’s Grand Prize winning image by Lou Coetzer
BIRDS AS ART 2nd International Bird Photography Competition
The December 21, 2013 closing deadline is fast approaching.
Learn more and enter the BIRDS AS ART 2nd International Bird Photography Competition here. Twenty-five great prizes including the $1000 Grand Prize and intense competition. Bring your best.
Support the BAA Blog. Support the BAA Bulletins: Shop B&H here!
We want and need to keep providing you with the latest free information, photography and Photoshop lessons, and all manner of related information. Show your appreciation by making your purchases immediately after clicking on any of our B&H or Amazon Affiliate links in this blog post. Remember, B&H ain’t just photography!
Amazon
Everyone buys something from Amazon, be it a big lens or deodorant. Support the blog by starting your search by clicking on the logo-link below. No purchase is too small to be appreciated; they all add up. Why make it a habit? Because I make it a habit of bringing you new images and information on an almost daily basis.
Typos
In all blog posts and Bulletins feel free to e-mail or leave a comment regarding any typos, wrong words, misspellings, omissions, or grammatical errors. Just be right. 🙂
IPT Info
Many of our great trips are filling up. You will learn more about how to make great images on a BAA IPT than anywhere else on the planet. Click here for the schedule and additional info.
November 29th, 2013
Your Goose is Cooked…
If you do not know how to identify and age the geese at Bosque
There are several goose species at Bosque del Apache National Wildlife Refuge in San Antonio, New Mexico. Snow Geese. often numbering in the tens of thousands, predominate. There are two morphs or forms of Snow Goose at Bosque, the white morph, by far the most abundant in New Mexico, and the blue morph, much less common here. Note: in some wintering locations the flocks may be 50-50, half white snows and half blues. At Bosque blue morph snows make up less then 2% of the Snow Goose populations in a given year. The next most abundant goose is Ross’s Goose, smaller than snows and much more agile fliers. Ross’s numbers vary from year to year. This year is a very good year with probably more then 5% of the white geese being Ross’s. For me, this makes Ross’s a more difficult and rewarding subject than the more common and far more numerous white morph Snow Goose. But you cannot photograph what you cannot see. 🙂 There is a blue morph Ross’s but it is exceedingly rare; I have never seen one anywhere. Many folks have no clue as to how to separate adult white Snow Goose from adult Ross’s Goose. See item next.
As a bird photographer, learning to ID and age the species you encounter is a big plus. There were many folks trying to pick off single birds from the huge flock floating on still blue water yesterday afternoon–a rather rare occurrence at Bosque BTW; most had no idea that they had many of the rarer Ross’s right in front of them.
Ross’s Goose vs Snow Goose ID Tips
The key to separating these two species is the size and shape of the bill. Snow Goose has a much larger bill with, as you can see in the images above, a large grinning patch, the long black shape that separates the upper and lower mandible. Ross’s Goose has much shorter, stubbier bill. To me they look stub-nosed. Bill coloration is usually all pink for snow, pink with greenish or grayish warts or tubercles at the base. The Snow Goose in the image above has a bit of an atypical yellow tinge to it. The differences in coloration of the bills can be seen only with good optics or in close-up images like those here. With practice it is easy to learn to pick out the Ross’s Geese in flight by both there stub-nosed look and their faster, more acrobatic flight. It is not uncommon to see the turn upside down in flight.
Juvenile Snow Goose
Young of the year Snow Goose is a gray version of the adult with a darker bill (not seen in the image above. Most of the grayish geese that you see in flight, on the ground, or in the water are snows. Juvenile Ross’s are quite similar but for their smaller size and stub-nosed bills.
Exposure Question
Why did I go with a 1/3 stop slower shutter speed to come up with a perfect exposure for the juvenile white Snow Goose in the image above.
Adult Blue Goose
Adult Blue Geese are extraordinarily handsome. And that is exacerbated at Bosque where they are uncommon at best. “Incoming Blue Goose” is an oft-heard call at the cornfields. Though the blues with their dark bodies and white heads are largely similar to each other it is hard to find two that are identical.
Exposure Question
Why did I go with a 1/3 stop slower shutter speed to come up with a perfect exposure for the adult Blue Goose in the image above.
Juvenile Blue Goose
Young of the year Blue Geese are dark, a sort of indigo blue. Interestingly enough, Snow Goose genetics are pretty neat. The gene for blue is a recessive trait. Though the odds are long against it, two white snows might have 3 blue young, or any combination of white and blue young. Similarly, two blue snows might have only white young.
Exposure Question
Why did I go with 1 1/3 stops more light to come up with a perfect exposure for this juvenile white Blue Goose? If the exposure questions baffle you or even if you cannot answer them instantly and correctly, you need to get yourself copies of both ABP and ABP II and study the sections on exposure.
Other Species
Canada Goose is the only other regularly occurring goose species at the refuge. Several hundred are usually present each season. A decade ago they were commonly seen feeding near the Flight Deck but now the best chance to view them is as fly-overs. In my 19 years of visiting Bosque in late fall I have seen only two White-fronted Geese though this species is quite abundant in other parts of its wintering range.
Your Favorite?
Take a moment to let us know which of the images above you like best. And why. Which do you think is my favorite? Why do you think?
8 SPECTACULAR PHOTOGRAPHY DEALS
4 GREAT COMPUTER DEALS
AMAZING I-PAD & TABLET DEALS
14 KILLER PORTABLE HOME ENTERTAINMENT DEALS
Last Year’s Grand Prize winning image by Lou Coetzer
BIRDS AS ART 2nd International Bird Photography Competition
The December 21, 2013 closing deadline is fast approaching.
Learn more and enter the BIRDS AS ART 2nd International Bird Photography Competition here. Twenty-five great prizes including the $1000 Grand Prize and intense competition. Bring your best.
Support the BAA Blog. Support the BAA Bulletins: Shop B&H here!
We want and need to keep providing you with the latest free information, photography and Photoshop lessons, and all manner of related information. Show your appreciation by making your purchases immediately after clicking on any of our B&H or Amazon Affiliate links in this blog post. Remember, B&H ain’t just photography!
Amazon
Everyone buys something from Amazon, be it a big lens or deodorant. Support the blog by starting your search by clicking on the logo-link below. No purchase is too small to be appreciated; they all add up. Why make it a habit? Because I make it a habit of bringing you new images and information on an almost daily basis.
Typos
In all blog posts and Bulletins feel free to e-mail or leave a comment regarding any typos, wrong words, misspellings, omissions, or grammatical errors. Just be right. 🙂
IPT Info
Many of our great trips are filling up. You will learn more about how to make great images on a BAA IPT than anywhere else on the planet. Click here for the schedule and additional info.
November 28th, 2013

|
|
This Wild Turkey tom bird-scape image was created near my home at Indian Lake Estates way back when, on February 16, 2008 with the Canon 500mm f/4L IS lens (now replaced by the much lighter Canon EF 500mm f/4L IS II USM lens), the 1.4X II TC (now replaced by the Canon 1.4x EF Extender III (Teleconverter), and the EOS-1D Mark III (now replaced by the Canon EOS-1D X. ISO 400. Evaluative metering +1/3 stop: 1/800 sec. at f/6.3. I added a bit of light in the early morning light at risk of burning the highlights in order to obtain maximum detail in the dark feathers. The few blinkies were easily recoverable. Audio was used.
Be sure to click on the image to enjoy a larger version.
|
Happy Bird Day
I, my right-hand man Jim Litzenberg, and BAA Executive Director and my daughter, Jennifer Morris, would like to wish each and every one of you and your friends and families a wonderful Thanksgiving filled with food, friends, football, and hopefully, a few hours to get out and photograph birds. (It seems that there is a Snowy Owl invasion in the northeast, especially on Long Island and coastal New Jersey.)
I am celebrating my 19th straight Thanksgiving at Bosque del Apache NWR in San Antonio, NM. I am thankful for so much including and especially the fact that the new management team is so willing to improve the refuge for both the general public and for photographers.

|
|
This tight head and neck portrait of a Wild Turkey tom was created near my home at Indian Lake Estates way back when, on February 16, 2008 with the Canon 500mm f/4L IS lens (now replaced by the much lighter Canon EF 500mm f/4L IS II USM lens), the 2X II YC (now replaced by the Canon 2x EF Extender III (Teleconverter), and the EOS-1D Mark III (now replaced by the Canon EOS-1D X. ISO 400. Evaluative metering +1/3 stop: 1/400 sec. at f/11. It had gotten just a bit brighter. Again, the very few blinkies were easily recoverable. Audio was used.
Be sure to click on the image to enjoy a larger version.
|
Image Questions
Which of the two images above is the stronger image? Which do you like best? Be sure to let us know why. What are the strong points and weak points of each image? Is there anything that you love? Anything that bugs you?
8 SPECTACULAR PHOTOGRAPHY DEALS
4 GREAT COMPUTER DEALS
AMAZING I-PAD & TABLET DEALS
14 KILLER PORTABLE HOME ENTERTAINMENT DEALS
Last Year’s Grand Prize winning image by Lou Coetzer
BIRDS AS ART 2nd International Bird Photography Competition
The December 21, 2013 closing deadline is fast approaching.
Learn more and enter the BIRDS AS ART 2nd International Bird Photography Competition here. Twenty-five great prizes including the $1000 Grand Prize and intense competition. Bring your best.
Support the BAA Blog. Support the BAA Bulletins: Shop B&H here!
We want and need to keep providing you with the latest free information, photography and Photoshop lessons, and all manner of related information. Show your appreciation by making your purchases immediately after clicking on any of our B&H or Amazon Affiliate links in this blog post. Remember, B&H ain’t just photography!
Amazon
Everyone buys something from Amazon, be it a big lens or deodorant. Support the blog by starting your search by clicking on the logo-link below. No purchase is too small to be appreciated; they all add up. Why make it a habit? Because I make it a habit of bringing you new images and information on an almost daily basis.
Typos
In all blog posts and Bulletins feel free to e-mail or leave a comment regarding any typos, wrong words, misspellings, omissions, or grammatical errors. Just be right. 🙂
IPT Info
Many of our great trips are filling up. You will learn more about how to make great images on a BAA IPT than anywhere else on the planet. Click here for the schedule and additional info.
November 27th, 2013
Wings Up/Wings Down
My two favorite wing positions, illustrated nicely here, are wings up (above) and wings down (below). Take a moment to leave a comment and let us know if you have a general preference for either wings up or wings down. And whatever your preference, let us know which of the two images here you like best. What are the strong points and weak points of each image? Is there anything that you love? Anything that bugs you?
|

|
|
This Sandhill Crane image was the third frame in a sequence of about six. It was created in the same second as the image above, also with with the Gitzo 3532 LS carbon fiber tripod, the Mongoose M3.6 head, the Canon EF 600mm f/4L IS II USM lens, the Canon 1.4x EF Extender III (Teleconverter), and the Canon EOS-1D X. ISO 800. Evaluative metering +1 stop off the white frosted grasses: 1/1600 sec. at f/5.6 in Manual mode.
One sensor to the left of the central sensor/AI Servo/Surround Rear Focus AF just caught the top of the bird’s neck just behind the head–active at the moment of exposure. Click here to see the latest version of the Rear Focus Tutorial. Click on the image to see a larger version. This is the full frame original capture.
Wings Down
|
Crane Pool News
Activity at both crane pools has been picking up the last day or two. Both Harry’s Crane Pool and Ed Cranepool have been seeing a lot more activity both mornings and afternoons but still crane numbers at these traditional locations are below average.
For details on how to photograph at both of these great locations see the Bosque Site Guide. If you can’t make an IPT getting the site guide is the best way to share my 19 years of experience. Learn to photograph Bosque like a pro on your very first day there.
Bosque Short Version IPT
Not Too Late to Join Us
For information on the version of the 2013 Bosque IPTs please scroll down here. Please shoot me an e-mail if you would like to join us. Please call Jim at 863-692-0906 or e-mail for late registration discount info or to enter.
BIRDS AS ART 2nd International Bird Photography Competition
Learn more and enter the BIRDS AS ART 2nd International Bird Photography Competition here. Twenty-five great prizes including the $1000 Grand Prize and intense competition. Bring your best.
Support the BAA Blog. Support the BAA Bulletins: Shop B&H here!
We want and need to keep providing you with the latest free information, photography and Photoshop lessons, and all manner of related information. Show your appreciation by making your purchases immediately after clicking on any of our B&H or Amazon Affiliate links in this blog post. Remember, B&H ain’t just photography!
Amazon
Everyone buys something from Amazon, be it a big lens or deodorant. Support the blog by starting your search by starting your search by clicking on the logo-link below. No purchase is too small to be appreciated; they all add up. Why make it a habit? Because I make it a habit of bringing you new images and information on an almost daily basis.
Typos
In all blog posts and Bulletins feel free to e-mail or leave a comment regarding any typos, wrong words, misspellings, omissions, or grammatical errors. Just be right. 🙂
IPT Info
Many of our great trips are filling up. You will learn more about how to make great images on a BAA IPT than anywhere else on the planet. Click here for the schedule and additional info.
November 26th, 2013
Beyond Spectacular Part I
What can I say? 2028 images created. 480 first edit keepers. Denise and I stayed at the refuge from 6am till 5:30 pm. With this being my 19th straight year here at the Thanksgiving season, yesterday was my best day ever at Bosque.
Snow and Cranes
The combination of fresh white snow and soft grey cranes is a most wonderful color combo. It is hard to make a bad image in these conditions. Here a sandhill picks at a corn cob. Yesterday was only my second decent snow in 21 visits to Bosque.
|

|
|
This image was also created yesterday at Bosque del Apache NWR in San Antonio, New Mexico, this one with the Canon EF 24-105mm f/4L IS USM lens and the Canon EOS 5D Mark III Digital camera body ISO 400. Evaluative metering +1 stop as framed: 1/400 sec. at f/16 in Av mode. Please do not ask why I was at f/16.
Central sensor/AI Servo Rear Focus/Suround AF active at the moment of exposure. Click here if you missed the latest version of the Rear Focus Tutorial. Be sure to click on the image to enjoy a larger version.
Image #3
|
Wide Angles
With the birds blasting off every ten minutes, the huge flocks were often directly overhead. I tried at first with the fish eye lens without any great success, but inspired by Denise Ippolito who kindly moved the car so that I could grab my 24-105. I did so with great success.
|

|
|
This Ross’s Goose image was also created at Bosque del Apache NWR on the very early morning of November 22, 2013, this one with the hand held
Canon EF 200-400mm f/4L IS USM Lens with Internal 1.4x Extender (with the internal TC in place at 513mm) and the Canon EOS-1D X. ISO 500. Evaluative metering +1 2/3 stops as framed in Av Mode:1/5000 sec. at f/5.6.
Central sensor/AI Servo/Surround–Rear Focus AF as framed active at the moment of exposure. Click here to see the latest version of the Rear Focus Tutorial. Click on the image to see a larger version.
Image #4
|
The “T” Shot
Whenever there is a blast-off there is a good chance that you will have some geese flying over the road. Lenses in the 300-400mm class with and without teleconverters are ideal for creating images of the birds in flight directly overhead. On sunny days it is possible to create some photos with dramatic backlight coming through the wings of the geese. Here, on a cloudy day with snow on the ground, the light reflected off the snow gave this Ross’s Goose a heavenly glow.
Watch Your Blast-off Backgrounds
Hand holding intermediate telephoto zoom lenses makes it easy to frame your blast-off images while striving for a clean lower edge and a clean upper edge. Be sure to watch background elements such as trees or as here, mountains, and to place them in a pleasing location in the image.
Image Questions?
Why was I using the Hoya 77mm Neutral Density (ND) 0.9 (3-stop) Pro 1 Digital Multi-Coated Glass Filter for images #1 and #5?
Why was f/16 a poor choice in Image #3?
Which of the five images is your favorite? Please let us know why.
Bosque Short Version IPT
Not Too Late to Join Us
For information on the version of the 2013 Bosque IPTs please scroll down here. Please shoot me an e-mail if you would like to join us. Please call Jim at 863-692-0906 or e-mail for late registration discount info or to enter.
BIRDS AS ART 2nd International Bird Photography Competition
Learn more and enter the BIRDS AS ART 2nd International Bird Photography Competition here. Twenty-five great prizes including the $1000 Grand Prize and intense competition. Bring your best.
Support the BAA Blog. Support the BAA Bulletins: Shop B&H here!
We want and need to keep providing you with the latest free information, photography and Photoshop lessons, and all manner of related information. Show your appreciation by making your purchases immediately after clicking on any of our B&H or Amazon Affiliate links in this blog post. Remember, B&H ain’t just photography!
Amazon
Everyone buys something from Amazon, be it a big lens or deodorant. Support the blog by starting your search by starting your search by clicking on the logo-link below. No purchase is too small to be appreciated; they all add up. Why make it a habit? Because I make it a habit of bringing you new images and information on an almost daily basis.
Typos
In all blog posts and Bulletins feel free to e-mail or leave a comment regarding any typos, wrong words, misspellings, omissions, or grammatical errors. Just be right. 🙂
IPT Info
Many of our great trips are filling up. You will learn more about how to make great images on a BAA IPT than anywhere else on the planet. Click here for the schedule and additional info.
November 24th, 2013
Attempted Murder or a Great Bosque Happening?
In the image above, it looks as if Assistant Refuge Manager Aaron Mize just might be attempting to end the life of his boss, new Refuge Manager Kevin Kobble.
Not to worry….
Actually, Aaron and Kevin were removing some mostly old-sunflower brush to improve sightlines to a channel that has been filled with many thousands of Mallards with a sprinkling of pintails, coots, and a very few wigeons. And the ducks have conveniently been blasting off every 30 minutes or so.
While co-leading Denise Ippolito’s A Creative Adventure Bosque Workshop we have been enjoying some very good photography while battling constant strong north winds with gusts exceeding 40mph.
Here is how it all came about
After a nice fly-out of Snow Geese just past the Two Tree Window we headed up to the crane pools. At Ed Crane-pool we found a good sized flock of white geese, mostly snows with quite a few Ross’s. They left in the always-disappointing dribs and drabs. When all were gone I was approached by Bosque’s Assistant Refuge Manager, Aaron Mize. He asked how I thought conditions at the refuge were this season.
For details on the locations mentioned above and tons more on learning to photograph at Bosque, please see the info on my Bosque Site Guide here. For some creative inspiration, see Denise’s “Impressions of Bosque here.
As expected, I answered candidly:
Overall things are very good to excellent. There are zillions of geese blasting off regularly and flying around in huge groups. Strangely, crane numbers seem low and the numbers of cranes at the two crane pools each morning is astoundingly low. Despite the lengthy federal closure the staff and volunteers did a great job of getting the refuge ready for the birds, for the general public, for the Festival of the Cranes, and for the thousands of serious photographers who will be visiting the refuge this winter.
There are, however, a few things that could be improved and one or two things that shocked me. I mentioned one or two locations where ten minutes work clearing a bit of brush could drastically improve both photographic and viewing conditions. As for the shocked I mentioned an area of the refuge where many new of the familiar blue and white flying goose “Area Closed/Do Not Enter” signs had been placed well back from the water’s edge thus making photography from previous hot spots either difficult or impossible. The signs drive people to compete for spots on the Flight Deck where over-crowding has been an ever-increasing problem. In addition, most photographers, desperate to get a lens on the 20,000 geese flying over the distant plateau, will disregard the signs in the pre-dawn blackness thus giving the general public the impression that nature photographers are criminals. As the purpose of the signs is to keep folks from walking out among the cranes,it would be great if new signs could be moved back to the water’s edge.
Aaron agreed. We were then joined by Refuge Manager Kevin Kobble. We spoke about the upcoming re-building of the Flight Deck and potential plans for the North Railroad Pool. Aaron asked me if I would be willing to put in my two cents on the plans for the new Flight Deck and of course, I told him that I would be thrilled.
Then Aaron asked if we would be willing to do a short video on current conditions at Bosque. Same answer. Aaron was taping us on his cell phone but an incoming call ruined the first take. Harold Klein agreed to shoot the video with his tripod-mounted Nikor 70-200. Lastly we agreed to meet on Monday–yikes, that’s tomorrow, to do a ride-around and point out some things that could be done to make a fabulous place even better for photography.
We said our good-byes, made a pit-stop for the group, and were shocked to find Aaron and Kevin ahead of us clearing the brush at the new duck spot…. After the clean-up, Aaron interviewed participant Harold Klein for the Bosque Facebook page. Harold was amazing. I asked to see his SAG membership card. You can see the video on the here.
I sent them the following e-mail that night:
Dear Aaron and Kevin,
Hope that all is well, that we get six inches of snow tonight, and that the refuge is open tomorrow Smile emoticon.
Thanks a stack for your openness and help this morning. Paraphrasing a very dear friend, “It has been tough to deal with ten years of uninspired, uncaring management. I am thrilled to the core that so many of us will be able to work together with both of you and to return the refuge to its former place of prominence as one of if not the (with the demise of Ding Darling) crown jewel(s) of the national wildlife refuge system….
What happened this morning–you two men taking 15 minutes out of your busy day to help a bunch of photographers–is a prime example of what is possible. As you saw, a few small changes can turn a situation from a so-so opportunity to a spectacular opportunity. I cannot tell you how many letters I have written over the past decade that were basically ignored…. In short, I am thrilled for the future.
Kudos on flopping the entrance and exit of the temporary tour loop; it is another small change that will make life easier and better for the thousand of folks with long lenses who visit the refuge annually, and for the countless visitors who come simply to enjoy the geese and the cranes.
We will come looking for either Aaron or hopefully both of you between 10:30 and 11:00am on this coming Monday for a ride-around. Please rsvp on that. And think about lunch on us at the Buckhorn Grill.
later and love, artie & denise
|

|
|
Mallard blast-off. Canon 100-400 hand held with the EOS-1D Mark IV. Image courtesy of and copyright 2103: Denise Ippolito/A Creative Adventure
|
By the Way….
The weather forecast was wrong. We had only 4 inches of snow. Sunday was by far my best ever day at Bosque. It was so good that we never went back for lunch. It seemed that all 77,000 geese on the refuge were in front of us in the cornfield blasting off every ten minutes. The blast-offs were so spectacular that I think that there is a good chance that at lease one of the 2028 images that I made today turns out to be BBC-worthy image…. Stay tuned for lots of great images from our day in the snow.
Bosque IPTs/Late Registration Discounts Increased
It’s Getting Late!
Register now; apply a $1000 discount to the 7-DAY IPT!
For information on both the 7-Day and the recently announced short version of the 2013 Bosque IPTs please scroll down here. If you would like to join us for the first 3 or 4 days of this IPT please shoot me an e-mail. Please call Jim at 863-692-0906 or e-mail for late registration discount info.
BIRDS AS ART 2nd International Bird Photography Competition
Learn more and enter the BIRDS AS ART 2nd International Bird Photography Competition here. Twenty-five great prizes including the $1000 Grand Prize and intense competition. Bring your best.
Support the BAA Blog. Support the BAA Bulletins: Shop B&H here!
We want and need to keep providing you with the latest free information, photography and Photoshop lessons, and all manner of related information. Show your appreciation by making your purchases immediately after clicking on any of our B&H or Amazon Affiliate links in this blog post. Remember, B&H ain’t just photography!
Amazon
Everyone buys something from Amazon, be it a big lens or deodorant. Support the blog by starting your search by starting your search by clicking on the logo-link below. No purchase is too small to be appreciated; they all add up. Why make it a habit? Because I make it a habit of bringing you new images and information on an almost daily basis.
Typos
In all blog posts and Bulletins feel free to e-mail or leave a comment regarding any typos, wrong words, misspellings, omissions, or grammatical errors. Just be right. 🙂
IPT Info
Many of our great trips are filling up. You will learn more about how to make great images on a BAA IPT than anywhere else on the planet. Click here for the schedule and additional info.
November 23rd, 2013
Having a Blast at Bosque with the Canon 200-400 with Internal Extender
I am co-leading Denise Ippolito’s A Creative Adventure Bosque workshop. She has a great group 10 folks. Despite less than ideal conditions yesterday we got off to a great start. We taught the group to create pleasing blurs in the pre-dawn darkness using Tv mode and either Auto ISO or ISO safety shift and then dialing in some plus compensation. Note that in the image above with lots of land and trees and not a whole lot of sky I was at only +1/3 stop but in the image below with lots of sky I was at +1 1/3 stops. Had I been working against totally grey skies without the light bright strip I would have been at +2 or more. Everyone in the group caught on quickly and during our image review session all were able to share some great images with Denise and me.
Zoom Lenses for Blast-Offs
Intermediate zoom telephoto lenses have always been great for blast-offs. These include but are not limited to the much-maligned Canon EF 100-400mm f/4.5-5.6L IS USM lens, the Canon 70-200mm IS lenses (along with comparable lens from Nikor), and the Nikon AF-S NIKKOR 80-400mm f/4.5-5.6G ED VR Lens. Yesterday morning as I was–by force of habit–mounting my Canon EF 600mm f/4L IS II for the morning fly-in, I thought, why not the 200-400? So that is the way I went. Things worked out perfectly. I began without the TC in place but as the birds were way in the back of the main impoundment I simply moved the lever downward to engage the internal 1.4X. This gave me a focal length range of from 280-560mm. It took a bit of practice to get used to zooming in and out with the heavy gloves on but in short order I had things down pat.
Using Tv Mode Techniques to Set a Fast Shutter Speed
Above you saw us using Tv mode with Auto ISO or ISO Safety Shift to have precise control over the blur speed in pre-dawn conditions. With the low light/heavy cloud conditions I showed folks how to use the same set-up to ensure a minimum fast shutter speed by setting 1/1000 sec. as the shutter speed and dialing in +2 stops to photograph the geese and cranes in the dreary light. Things were difficult with the 30-40 mph north winds but at least we had the clouds going for us….
Your Favorite Image?
Please take a moment to leave a comment and let us know which of the three images is your favorite. And let us know why. It is 5:51am on the 23; we will be a the refuge with the group in 5 minutes. The forecast is for 4-6 inches of snow tonight. We are praying that the forecast is an accurate one….
Bosque IPTs/Late Registration Discounts Increased
It’s Getting Late!
Register now; apply a $1000 discount to the 7-DAY IPT!
For information on both the 7-Day and the recently announced short version of the 2013 Bosque IPTs please scroll down here. If you would like to join us for the first 3 or 4 days of this IPT please shoot me an e-mail. Please call Jim at 863-692-0906 or e-mail for late registration discount info.
BIRDS AS ART 2nd International Bird Photography Competition
Learn more and enter the BIRDS AS ART 2nd International Bird Photography Competition here. Twenty-five great prizes including the $1000 Grand Prize and intense competition. Bring your best.
Support the BAA Blog. Support the BAA Bulletins: Shop B&H here!
We want and need to keep providing you with the latest free information, photography and Photoshop lessons, and all manner of related information. Show your appreciation by making your purchases immediately after clicking on any of our B&H or Amazon Affiliate links in this blog post. Remember, B&H ain’t just photography!
Amazon
Everyone buys something from Amazon, be it a big lens or deodorant. Support the blog by starting your search by starting your search by clicking on the logo-link below. No purchase is too small to be appreciated; they all add up. Why make it a habit? Because I make it a habit of bringing you new images and information on an almost daily basis.
Typos
In all blog posts and Bulletins feel free to e-mail or leave a comment regarding any typos, wrong words, misspellings, omissions, or grammatical errors. Just be right. 🙂
IPT Info
Many of our great trips are filling up. You will learn more about how to make great images on a BAA IPT than anywhere else on the planet. Click here for the schedule and additional info.
Kitty Kono from her Bear Boat Book
I couldn’t finish this little book without a special thank you again to Art Morris and Denise Ippolito. When I first became serious about taking wildlife photographs, my Philadelphia based teacher Owen Biddle suggested I read and memorize Art’s seminal book “The Art of Bird Photography.” That was six years ago. I got the book, read every word, and have followed his blog ever since. I fell in love with what this man can do with a camera. Through Art’s blog, I met the equally talented Denise Ippolito. I invited her to come and speak to my local camera club. Since that time I have had the utmost pleasure of spending days on end with these two consummate professionals. They have given me a glimpse of what it is truly like to live your passion. It shows in every one of their magnificent images. Thank you Art and Denise. I’m looking forward to the next adventure.
November 22nd, 2013 Air Travel With Big Lenses: Dealing With Puddle Jumpers
Traveling with barely legal roll-aboards with twenty to thirty thousand dollars of camera gear can be difficult, and for some, a quite scary deal, especially when one or more legs of your flight is on a puddle jumper, a small jet with tiny overheads nowhere large enough to take your rolling bag.
Most folks (but not me) are aghast at the thought of gate-checking the roll aboard or backpack that holds their lenses including their largest super-telephoto, several other lenses, two or more camera bodies, tele-converters, extension tubes, and a set of filters.
Important Note
As an Amazon Associate I earn a small percentage from qualifying purchases when you purchase from Amazon using the links below.
Carhartt Men’s Knit Cuffed Beanie
Most folks know that I have been protecting my gear with Carhartt Watch Caps for decades. They are far less costly than the LensCoat stuff, offer far more protection in terms of absorbing shock during travel by air or by car, and better protection against moisture as well. I double the hats for my camera bodies. You can buy thinner, cheaper watch caps, but they simply do not do the job. Best of all, the beanies come in 17 colors; well-organized folks can color-code their gear by using one color for TCs, a different one for camera bodies, etc., etc., etc.
When rain threatens, I make sure to have an extra cap in my fanny pack. If it starts to drizzle or rain, I simply place the beanie over my camera body. They are thick and in addition, they repel the raindrops. I have never had a problem with a lens in the rain. Camera bodies, you ask? Well yes. But never when protected by a Carhartt beanie 🙂
What to do?
The first step is to start with a great bag. I own and use both the ThinkTank Airport Security TM V2.0 and the slightly smaller Airport International TM V2.0 rolling bag. Both are fabulous roll-aboard carry-ons: they are roomy and sturdy and will protect your gear if you are forced to check your camera gear on small aircraft. You can learn more here by following the links.
The next step is to pack your gear properly. At present I use a combination of my wool watch caps and a sewed up hockey sock or two that will protect your gear far better than the LensCoat stuff. Check out the wool hat solution here.
You land at a major airport only to learn that to get to Podunk your next leg will be on a puddle jumper. The first thing that I do is to ask, How full is this flight? If there are more than a few empty seats, your chances of getting your gear on board are increased. If, at any time the gate agent states that you need to put a plane side or gate check tag on your rolling bag, accept it graciously and affix it to your bag. The last thing that you want to do is alienate someone who might be in a position to help.
Most times there will be baggage ground crew folks to grab your tagged bag. The airlines plan is that they grab your bag, stow it in the luggage hold, and when the plane lands, you reclaim your rolling bag. That is usually exactly what happens when you gate check your bag. But when flying puddle jumpers in Alaska, such as when going to Kodiak for a Bear Boat IPT, beware of ERA; they will consistently tell you that you can grab your gate-checked item plane-side when you land but the fact is that they throw the gate-checked bags onto a cart with all the checked bags and deliver them on the conveyor. Obviously this is not the best thing that could happen. BTW, if you put several of those bright red FRAGILE stickers on your roll-aboard that seems to ensure that the bag will be thrown higher and farther than it usually would be….
When the bag man says, “I’ll take that,” your reply is, “Thanks. I spoke to the gate agent (I usually do that) and she said that it would be OK (they usually but not always say “OK”) to try and get it on the plane either under an empty seat or in the crew locker.
I have never had a problem getting past the bag man.
The next step is crucial. When the flight attendant greets you as you get on board, you say, with your biggest smile, “Good morning. I need your help. I am traveling with (fill in the correct amount) thousands of dollars of fragile camera gear. May I try to get it under the seat in front of me or, better yet, under the seat in front of an empty row?” (The latter of course if the flight is not full.) If that does not pan out, you can ask, “Is there any chance of stowing my bag in the crew locker?”
Most of what happens next has 100% to do with the flight attendant. Guys tend to have better luck with female flight attendants, women with male flight attendants. Either way I believe that it there some sort of macho thing going on….
Here are the two extremes. I once had a female flight attendant take her bag from the crew locker and gate check it so that I could get my bag in the storage closet. How nice is that I got her e-mail address and sent her a print.
On another puddle jumper flight, to somewhere in Ohio, I think, the flight attendant was a male and the flight was empty; there were about a dozen empty seats on a 29-seater. At first he was amenable to my suggestions. I was thrilled that there were two empty seats on the left side of the plane all the way in the back. It took some maneuvering to get my bag under the seats in front of that row, and I turned it sideways. I walked forward and took my assigned seat thinking that all was well.
Two minutes later, the guy approached me and said, “Come with me.” We walked to the back of the row and he pointed at my bag and said, “Your bag is obstructing the aisle. You need to gate-check it.” I said, “It’s sticking out perhaps 1/2 inch from under the seat and this is not an emergency row aisle. Nobody will be walking back here. He said, “Your bag is obstructing the aisle. You need to gate-check it.”
This time I replied. “Thanks a lot. It is obvious that you are a bitter unhappy person wearing a uniform. I’ll be glad to gate-check my bag. I did, secure in the knowledge that Karma was on my side and that all of the gear would be OK when I picked it up plane-side at the destination airport. And that is exactly what happened.
Sometimes you just gotta love it.
When it becomes obvious that you are not gonna get your gear bag on the small plane, some folks use a different strategy. They remove their big lens, grab a camera body or two, stuff a sweatshirt into the bag for extra padding, gate check the rolling bag or back pack, simply carry the gear on board. Wearing a great vest like my custom-made X-trahand Vest, makes things a lot easier in these situations. And a great vest can help similarly overseas where you are often busted for the weight of your carry-on rather than the size. Strangely enough they never mind that you are hand carrying six additional items on board as long as the weigh of the bag does not exceed their maximum….
Yesterday morning en route to Albuquerque on a small United Express puddle jumper I had the good fortune to run into a very nice flight attendant named Janel. On the line to board the plane I met and old birding/photography friend from Pennsylvania, a Brit by the name of Adrian Binns. He had a smaller rolling bag and he too was anxious to avoid the dreaded gate check and get it on the plane. The flight was nearly full. The flight attendant kindly allowed Adrian to put his bag under the seat in front of him. I waited and was happy to see the next-to-last two seats on the left side of the plane unoccupied. Perfecto. It was a hassle getting it under the seats but it worked, and there was lots of room for my feet.
Then, just a moment before the door shut, a couple got on. They were sitting together in guess what row… I wrestled my bag out and walked forward unsure of what to do besides gate-check it. Then I noticed that the seat next to Adrian was empty. He kindly took my bag and since it was impossible to get it under the seat without extensive maneuvering simply stood it up in front of the seat next to him. I was a bit concerned that the flight attendant would hassle us and justifiably so. But she walked up and down for her pre-flight checks and did not utter a sound.
I got her e-mail address and will be sending her a print of my windblown Monet/Dahlia blur. Sometimes you just gotta love it.
Bosque IPTs/Late Registration Discounts Increased
It’s Getting Late!
Register now; apply a $1000 discount to the 7-DAY IPT!
For information on both the 7-Day and the recently announced short version of the 2013 Bosque IPTs please scroll down here. If you would like to join us for the first 3 or 4 days of this IPT please shoot me an e-mail. Please call Jim at 863-692-0906 or e-mail for late registration discount info.
BIRDS AS ART 2nd International Bird Photography Competition
Learn more and enter the BIRDS AS ART 2nd International Bird Photography Competition here. Twenty-five great prizes including the $1000 Grand Prize and intense competition. Bring your best.
Support the BAA Blog. Support the BAA Bulletins: Shop B&H here!
We want and need to keep providing you with the latest free information, photography and Photoshop lessons, and all manner of related information. Show your appreciation by making your purchases immediately after clicking on any of our B&H or Amazon Affiliate links in this blog post. Remember, B&H ain’t just photography!
Amazon
Everyone buys something from Amazon, be it a big lens or deodorant. Support the blog by starting your search by starting your search by clicking on the logo-link below. No purchase is too small to be appreciated; they all add up. Why make it a habit? Because I make it a habit of bringing you new images and information on an almost daily basis.
Typos
In all blog posts and Bulletins feel free to e-mail or leave a comment regarding any typos, wrong words, misspellings, omissions, or grammatical errors. Just be right. 🙂
IPT Info
Many of our great trips are filling up. You will learn more about how to make great images on a BAA IPT than anywhere else on the planet. Click here for the schedule and additional info.
November 21st, 2013 On the Road Again
I am working on this blog post at Orlando Airport, waiting to board my early morning flight to Houston and then continuing on to Albuquerque. Then I drive down to Socorro to spend my 19th straight year photographing at one of my soul places. If you would like to join us at the last minute, see the Bosque IPT feature below.

|
|
This Yellow Lady-Slipper image was created in Torres del Paine National Park, Chile with the hand held Canon EF 100mm f/2.8L IS macro lens and the Canon EOS 5D Mark III Digital camera body. ISO 400. Evaluative metering +2/3 stop: 1/40 sec. at f/5.6 in Av mode.
I was really pushing things here trying to stay at ISO 400 and making images when the breeze stopped here and there.
Central sensor/AI Servo Rear Focus AF on the bottom of the flower and re-compose. Click here to see the latest version of the Rear Focus Tutorial. Click on the image to enjoy a larger version.
|
Nice to Have Along…
I have owned the Canon EF 180mm f/3.5L Macro USM lens seemingly forever, but unless I am doing a strictly flowers trip or know in advance that we will be working with captive herps it stays in Indian Lake Estates on a shelf in our air-conditioned garage. While I love the reach afforded by the 180mm focal length the 180 macro is simply too heavy to travel with. The Canon EF 100mm f/2.8L Macro IS USM lens on the other hand is light and small. It barely takes up any room at all in my Think Tank rolling bag or my X-trahand vest so it is easy to carry it into the field, or, if you will be working from your vehicle, to grab it when needed.
It was a cloudy morning at Paine. We stopped to make some scenic images but I was pretty much the only one interested. As I got back in the jeep I saw a splash of yellow on the otherwise seemingly barren ground just to the right of my right foot. “Who would throw a bottle cap on the ground in such a beautiful place?” I thought to myself. As I bent down to pick it up I realized that it was a flower, a very beautiful flower. I grabbed the 100 macro from my rolling bag and went to work. Soon Denise and Rodrigo and Cristina were out of the jeep lying on the cold, rocky ground making images. Having IS made my life easier as getting a tripod-mounted lens on this 1 1/2 inch tall beauty would have been pretty much impossible.
There was no chance to have made this image with either the 70-200 or the 24-105. Score one for the 100 macro.

|
|
This image of the Paine massif with the towers and Condor Nest in the background was created with the hand held Canon EF 100mm f/2.8L IS macro lens and the Canon EOS 5D Mark III Digital camera body. ISO 400. Evaluative metering +1 stop: 1/3200 sec. at f/9 in Av mode.
Central sensor/AI Servo Rear Focus AF on the edge of the large dark mountain on our left and re-compose. Click here to see the latest version of the Rear Focus Tutorial. Click on the image to enjoy a larger version.
|
Why the 100 Macro for Landscapes?
I was so impressed with the sharpness of the 100 macro with my Swan Island dahlias (see “Learning About and Working with a New Lens” here) that when I found myself working at about 100mm with the 24-105 I went to the 100 macro as I felt it was much sharper than my favorite all-purpose B-roll lens. I was right.

|
|
This dead plant skeleton image was also created in Torres del Paine National Park, Chile with the hand held Canon EF 100mm f/2.8L IS macro lens and the Canon EOS 5D Mark III Digital camera body. ISO 800. Evaluative metering +1 stop: 1/100 sec. at f/16 in Av mode.
Central sensor/AI Servo Rear Focus AF on closest portion of the skeleton, lower right third, and re-compose. Click here to see the latest version of the Rear Focus Tutorial. Click on the image to enjoy a larger version.
|
Close Focus Versatility
Two days after our wonderful session with the Torrent Duck Family (see “Torrential Miracle” here) we returned to the scene of our triumph. We found the ducks, but they were on the other side of the river. I took a short walk to see what I could find and was intrigued by intricate patterns in the dead plant skeletons. When I found one that presented itself relatively flat I grabbed the 100 macro and began making images. Making this image with the 70-200 would not have been possible with its much greater minimum focusing distance. I could not have gotten directly above the subject as was easy to do with the 100 macro.

|
|
This black and white version of the image above was created in NIK Silver EFEX Pro. See below for details.
|
The Black and White Version
The black and white version was created in SIlver EFEX Pro. I used the High Contrast Red filter.
Your Favorites?
Which of the four images above is your favorite? Which of the two dead plant skeletons do you like best? In each case, please let us know why.
Bosque IPTs/Late Registration Discounts Increased
It’s Getting Late!
Register now; apply a $1000 discount to the 7-DAY IPT!
For information on both the 7-Day and the recently announced short version of the 2013 Bosque IPTs please scroll down here. If you would like to join us for the first 3 or 4 days of this IPT please shoot me an e-mail. Please call Jim at 863-692-0906 or e-mail for late registration discount info.
BIRDS AS ART 2nd International Bird Photography Competition
Learn more and enter the BIRDS AS ART 2nd International Bird Photography Competition here. Twenty-five great prizes including the $1000 Grand Prize and intense competition. Bring your best.
Support the BAA Blog. Support the BAA Bulletins: Shop B&H here!
We want and need to keep providing you with the latest free information, photography and Photoshop lessons, and all manner of related information. Show your appreciation by making your purchases immediately after clicking on any of our B&H or Amazon Affiliate links in this blog post. Remember, B&H ain’t just photography!
Amazon
Everyone buys something from Amazon, be it a big lens or deodorant. Support the blog by starting your search by starting your search by clicking on the logo-link below. No purchase is too small to be appreciated; they all add up. Why make it a habit? Because I make it a habit of bringing you new images and information on an almost daily basis.
Typos
In all blog posts and Bulletins feel free to e-mail or leave a comment regarding any typos, wrong words, misspellings, omissions, or grammatical errors. Just be right. 🙂
IPT Info
Many of our great trips are filling up. You will learn more about how to make great images on a BAA IPT than anywhere else on the planet. Click here for the schedule and additional info.
|
|