
no images were found |
|
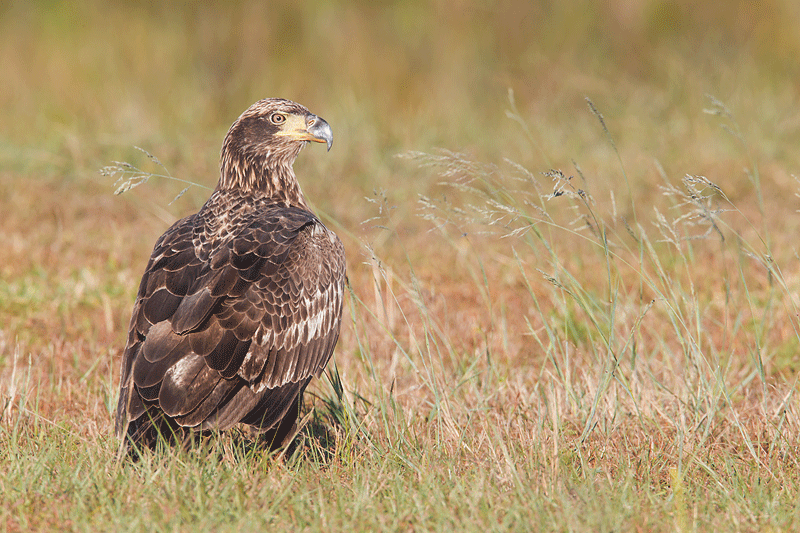
Immature Bald Eagle, Indian Lake Estates, FL. Canon 800mm f/5.6L IS lens with the 1.4X II TC and the EOS-1D Mark IV. ISO 200. Evaluative metering +1/3 stop: 1/200 sec. at f/13 in Manual mode. From the car with the BLUBB (Big Lens Ultimate BeanBag) |
Over-the-Shoulder Tips
When photographing birds facing away from you (can you say northwest winds on clear mornings?) there are two main things to consider. First off, you will want to use extra depth-of-field if at all possible. Notice here that I set the aperture at f/13. (Wide open with the 800 and the 1.4X I TC is f/8.) I stopped down in an effort to have enough depth-of-field to render the whole bird sharp from the bill tip all the way back to the tail tip. In this case I opted to focus on the eye and recompose. An option that I do not use unless I am right at minimum focusing distance would be to use even more depth-of field and focus halfway from the tail tip to the bill tip. In this case that would have been on the upper back. (Note: depth-of-field with big lenses and TCs is 50-50 not 1/3 in front, 2/3 behind as it is with short focal length lenses.) You could always use your depth-of-field preview button to check but I do not like doing that when my great subject might fly away.
The second thing to consider is the head angle. Ideal for most over-the-shoulder poses is perfectly square to the imaging sensor. Here the head is turned a bit more towards us than the preferred 90 degrees but the HA is certainly acceptable.
Because depth-of-field (at a given aperture) increases as the distance to the subject increases, using very small apertures is most important when you are photographing small birds at minimum focusing distance; if you focus on the wing of a point blank, frame-filling Painted Bunting while working wide open the eye will not even be close to being sharp.
Before and After Photoshop Quiz
Below is an animated GIF showing the before and after versions of the image above. Please leave a comment and let me know what changes I made to the original. There are three or four relatively significant changes (in addition to the standard workflow stuff). Are you as sharp-eyed as an eagle? I will be back in a few days to see how y’all did and to let you know what Photoshop techniques I used.
|
|
Below is a list of the gear that I used to create the images above.
Thanks a stack to all of those who have been purchasing major items via our B&H links as a way of thanking us for the great free info that we provide here and elsewhere; it is greatly appreciated 🙂
Canon 800mm f/5.6L IS lens
Canon EF Teleconverter 1.4X II
Canon EOS-1D Mark IV professional digital camera body
And from the BAA On-line Store:
BLUBB (Big Lens Ultimate BeanBag; designed by yours truly)
Double Bubble Level
If you are considering the purchase of a major piece of photographic gear be it a new camera, a long lens, a tripod or a head, or some accessories be sure to check out our complete Shopper’s Guide.


a) Healing Brush Tool – to remove the grass blade on the back of the bird
– to remove the bug on the right of the bird
– at the base of the photo right below its hidden feet and right by the root of the grass that you removed from the back of the bird, a blurry spot that was fixed up
– near the base of the bird – a white spot that would detract from the photo
– likely used the curve or levels darken the area a touch by the beach and his feathers
– I would have used a different program to aim specifically at the area by the beak to darken and to add structure
– I would have used a different program aimed at the feather only to darken them somewhat and to add a bit of structure
In this photo looking at the position of the bird – I think you did a good job to have the entire bird in focus since it is looking basically over its back – However I am not a great fan of focusing on the middle of the bird – to meet I would always focus on the eyes, for it is the eyes that give life to any photo. A good photo but not outstanding – but again salable –
I lived in the bush a lot and this photo reminds me of a grouse – we have seen too many of them and this is why I would prepre a different type of posing but one has to take waht they are offered and you did a good job.
The photo just seems flat – is there something you can do to make the photo pop more ? I will check back in a few days to see if you can answer this quesiton ? jk
Grass blade this side of tail, dark spot on grass blade LR, blurred lead below the R wing at bottom all removed. Dark area across top lightened. White on face and bill darkened.
Very nice shot. You cloned out the grass blade overlapping with the bottom of its tail feathers as well as a OOF grass blade in the very foreground just to the right of the aforementioned grass. To the right about a quarter in from the left frame edge and within the focal plane of the eagle you cloned out a shadow on a grass blade. In the upper left corner you cloned out a bright spot.
The grass is ever so slightly darker in the optimized image with the OOF background a bit stronger than the foreground. Possibly a contrast boost.
Most importantly, the appearance of the eagle doesn’t change much between the two images but for a darkening of the yellow parts of the beak (e.g. dodge) and a somewhat lesser darkening of its head. (e.g. contrast boost).
I am actually surprised that you didn’t eliminate the grass blade which goes across the eagles chest behind its body. Also, there are a few grass blades on the right side of the eagle which appear to encroach on it. Not that they would bother me enough to clone them out though…
JR
I don’t think you did much at all!
Artie,
As noted by others you removed some distracting grass and a dark spot. Looks like maybe a quick mask and linear burn just behind the beak but overall it looks like maybe just a tweak of SH, levels, curves and some very minimal USM like 500% at 0.2 pixels and finally then some NR on the background. Just a guess.
I would love a chance at some Eagles…Happy Holidays
Joel
Nice shot! Like the head work but maybe also try blurr the grass pointing towards the left from the head.
Removed grass covering part of tail; “content-awared” black spot on grass, also a bit of fuzzy grass under bird; decreased brightness on head to more yellow. I would have also removed the reed sticking out of the bird’s lower neck on the left.
Removal of the “yellow” grass overlapping the tail. Removing the “yellow” grass below the eagle (bottom of frame). darkened the face and lower beak. Darkened the blinkie in the lower right area.
Nice capture.
Artie
You cleared out the out of focus grasses in fron of the bird, darkened the bill with selective sharpening, and cleared out a black area in the RLQ