|
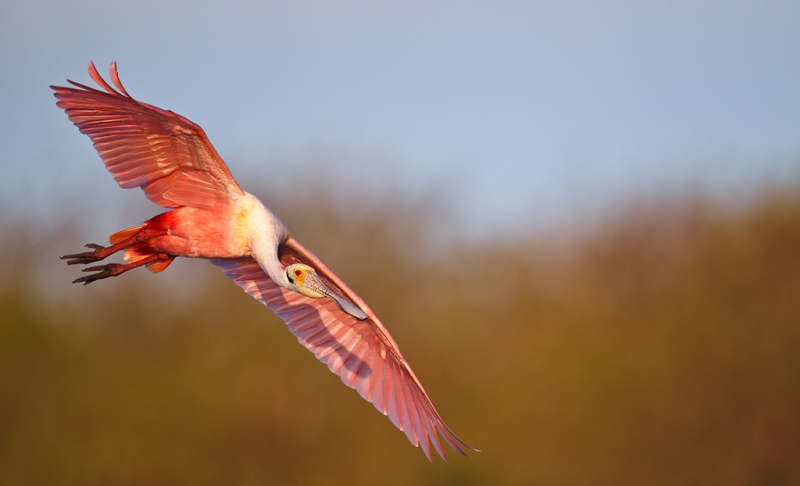
Roseate Spoonbill in flight, Alafia Banks, Tampa Bay, FL aboard the Hooptie Deux, February 14, 2012. With the tripod-mounted Canon 800mm f/5.6L IS lens and the EOS-1D Mark IV. ISO 400. Evaluative metering +1 stop off the blue sky: 1/1250 sec. at f/5.6 in Manual mode. Central Sensor AI Servo/Rear Focus AF active at the moment of exposure. Click here if you missed the Rear Focus Tutorial. For a greater appreciation of the image, click on the photo. |
Solving Underwing Problems
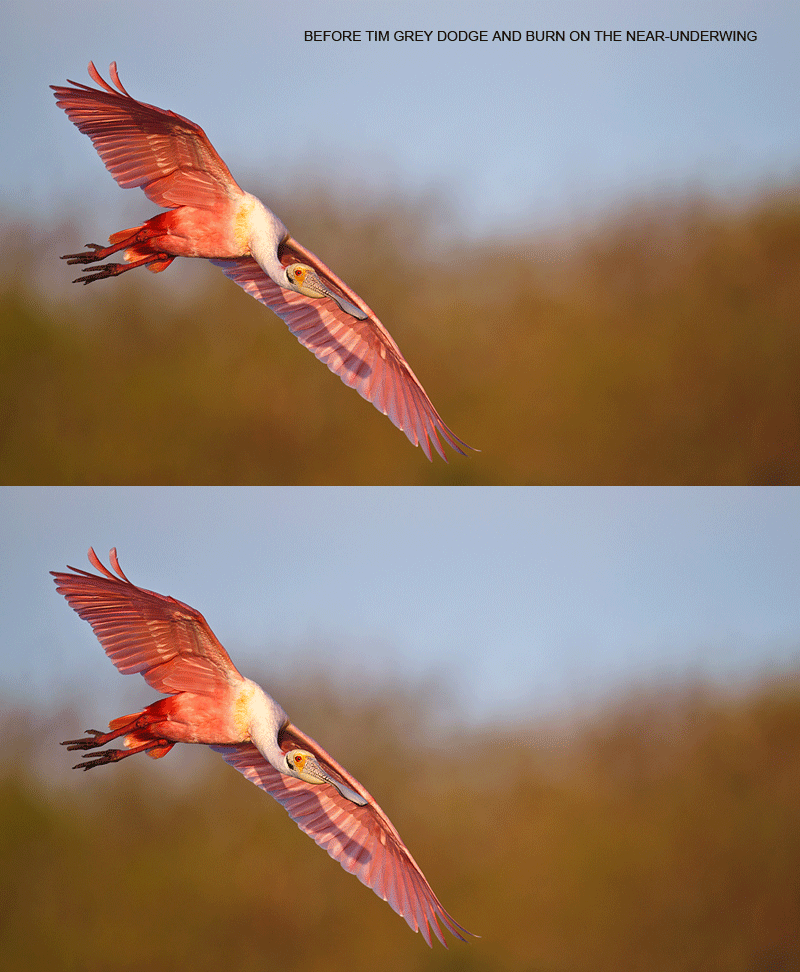
I am not a bit fan of flight images where the near-wing is not in the full upstroke position and the near primaries are curved down a bit. I almost deleted the image above when I decided to see ii I could selectively lighten the shadow on the near-underwing–see below. By using the Tim Grey Dodge and Burn technique I was able to do so quickly and easily. I do realize that some folks would prefer the image with the shadow but I like to see my birds in flight evenly lit from below so the image above works for me. You can see the before and after images in the animated GIF below. Note also that I selectively sharpened and lightened the bird’s face and bill. Which one do you like best, with the shadow or without? Please let us know and let us know why.
There are other ways to lighten the shadow but none give you the control that Tim Grey Dodge and Burn does. You can find detailed instructions on using this technique in our Digital Basics File. This PDF documents my complete digital workflow, contains dozens and dozens of great Photoshop tips, and is updated roughly once a year. The next update will be sent no later than June 2013.

|
James Shadle and the Hooptie Deux
I am always amazed when folks who visit Florida for the express purpose of photographing Roseate Spoonbill go home disappointed. To say that Ding Darling ain’t what it used to be is a vast understatement…. If you want to photograph lots of spoonbills all that you need to do is spend a few days with James Shadle on his photo-customized pontoon boat, the Hooptie Deux. Click here and scroll down for complete details and to see some of James’ incredible images from Alafia Banks.
James’ “In the Field Workshops” is the original Tampa Bay nature photography (by boat) workshop and tour leader. He has an exciting list of locations that will give you the opportunity to create incredible images of dramatic behavior and stunning plumages. He knows the bay better than anyone as he has been doing it longer than anyone and as the images show, he knows how to make great pictures and can teach you to do the same. James owns and operates a 20′ tri-toon boat (The Hooptie Deux) that has been customized specifically for photography workshops. It’s roomy, comfortable, and stable. The boat is equipped with a quiet and environmentally friendly E-Tec outboard motor. It also has a powerful, silent, electric trolling motor with wireless remote control. The boat can be configured with no top for on-board photography or with a bimini top to provide shelter from sun and rain. Refreshments are available at all times.
Call or e-mail in advance to inquire about dates and rates. You can get in touch with James for additional info or to schedule a Custom Workshop or Tour via e-mail, by cell phone at (813) 363-2854 or on his home phone (early evenings best) at (813-689-5307). If by cell phone it is best to call back rather than to leave a message.
Hooptie Deux Practicalities
While it is possible to photograph from the boat, the best opportunities for spoonbills usually occur when you exit the boat and wade in the Gulf. The bottom is hard but you do of course need to wade slowly and carefully while being careful for rocks, holes, and oyster beds. By wading under James’ careful supervision and with his guidance, you will be able to get much closer to the birds and have more control over light angle and perspective. Waders and surf booties will be provided for those who need them. Do note however that folks without super-telephoto lenses and those who want to stay out of the water can create some great flight images by working from the boat. For those who exit the boat with their big tripod-mounted telephoto lenses it is often best to take only a single lens; having a flight lens on your shoulder may lead to all types of gear disasters….
Here are simple directions for getting to the dock in Gibsonton, FL, just east of Tampa: From I-75 north or south take exit 250, Gibsonton Drive. Head west a bit more than one mile to S. Tamiami Trail which is US 41. If the light at 41 is red do not stop on the RR tracks. 🙂 Turn right (or north) on 41 and cross the low bridge over the Alafia River. The first traffic light will be at Riverview Drive. Turn left there and then turn left immediately, and I do mean immediately, onto the road that leads into Williams Park. Take a spot on the right at the far end of the lot which is closest to the boat ramp. Find James and get ready for the time of your life.
James will let you know when to be at the dock. In a word, early. Here’s a great tip: you will almost always have some great chances to create pleasing blurs of the Fish Crow and White Ibis blast offs with handheld telephoto lenses. Intermediate telephotos and telephoto zooms are ideal. Be sure to set the RGB histogram check it often to avoid burning the red channel. To learn to when, why, and how to work in Tv mode when creating pleasing blurs see A Guide to Pleasing Blurs by yours truly and Denise Ippolito.
Breeding plumage spoonbill photography is generally best from late February through early April. In addition to the spoonbills you will get to photograph Brown Pelican, Double-crested Cormorant, Reddish Egret, Great Blue Heron, and Great Egret in flight. As the season progresses you can add Glossy Ibis, a variety of shorebirds, and by June and July, baby spoonbills just out of the nest. You can see some of my very recent Hooptie Deux images by clicking here and scrolling down.
My Comments on Your Comments
With some free additional free time in Tokyo today I was able to post respond to your comments at the January 17, 2012 post: “Just Duckie: Two Depth-of-Field Questions and Additional Lessons.” Though only a few folks replied they covered all the important points. This one is highly recommended reading for all using big glass on birds at close range. The topics covered include exposure, rapid firing, and of course, depth-of-field at close range.
The Adventure Begins
We leave Tokyo tomorrow morning at 7am, February 21, 2012. That works out to 5pm Monday evening on the east coast of the USA. We are headed for the Snow Monkeys.
Support both the Bulletins and the Blog by making all your B & H purchases here.
Remember: you can earn free contest entries with your B & H purchases. Eleven great categories, 34 winning and honored images, and prize pools valued in excess of $20,000. Click here for details.
Shopper’s Guide
Below is a list of the gear used to create the images talked about in this blog post. Thanks a stack to all who have used the Shopper’s Guide links to purchase their gear as a thank you for all the free information that we bring you on the Blog and in the Bulletins. Before you purchase anything be sure to check out the advice in our Shopper’s Guide.
Canon 800mm f/5.L IS lens. Right now this is my all time favorite super-telephoto lens.
Canon EOS-1D Mark IV professional digital camera body. My two Mark IVs are my workhorse digital camera bodies.
And from the BAA On-line Store:
LensCoats. I have a LensCoat on each of my big lenses to protect them from nicks and thus increase their re-sales value. All my big lens LensCoat stuff is in Hardwood Snow pattern.
LegCoat Tripod Leg Covers. I have four tripods active and each has a Hardwood Snow LegCoat on it to help prevent further damage to my tender shoulders 🙂 And you will love them in mega-cold weather….
Gitzo GT3530LS Tripod. This one will last you a lifetime.
Mongoose M3.6 Tripod Head. Right now this is the best tripod head around for use with lenses that weigh less than 9 pounds. For heavier lenses, check out the Wimberley V2 head.
CR-80 Replacement Foot for Canon 800. When using the 800 on a Mongoose as I do, replacing the lens foot with this accessory lets the lens sit like a dog whether pointed up or down and prevents wind-blown spinning of your lens on breezy days by centering the lens directly over the tripod.
Double Bubble Level. You will find one in my camera’s hot shoe whenever I am not using flash.
The Lens Align Mark II. I use the Lens Align Mark II pretty much religiously to micro-adjust all of my gear an average of once a month and always before a major trip. Enjoy our free comprehensive tutorial here.
Canon EOS-1D Mark IV User’s Guide. Learn to use your Mark IV the way that I use mine. Also available for the 7D and the Mark III here.
BreezeBrowser. I do not see how any digital photographer can exist without this program.


From a natural history point of view the image is superb. Tha whole bird appears off balance and the head down attitude almost more goofy than usual. But it’s coming in to land and selecting a spot, so multiple adjustments are being made in split seconds in the birds mind. So it’s ‘wings akimbo’ until the langing place is pinpointed. I don’t mind the alterations at all.
Sweet picture! All lightening done so far is good. I agree with Jack about lightening the shadow silhouette of the head. Plus I’d suggest darkening more the area of the rear wing that is just behind the head. It already has some shadow and if darkened would bring the brightened head out more.
I like the second one, the one with the lesser shadow and the sharpened facial area. The sharpening helps a lot. However, I wonder about lightening the shadow of the head and neck on the underside of the far wing. That shadow keeps bringing my eye to that area of the image, while I feel I should be looking mainly at the head area????