

|
|
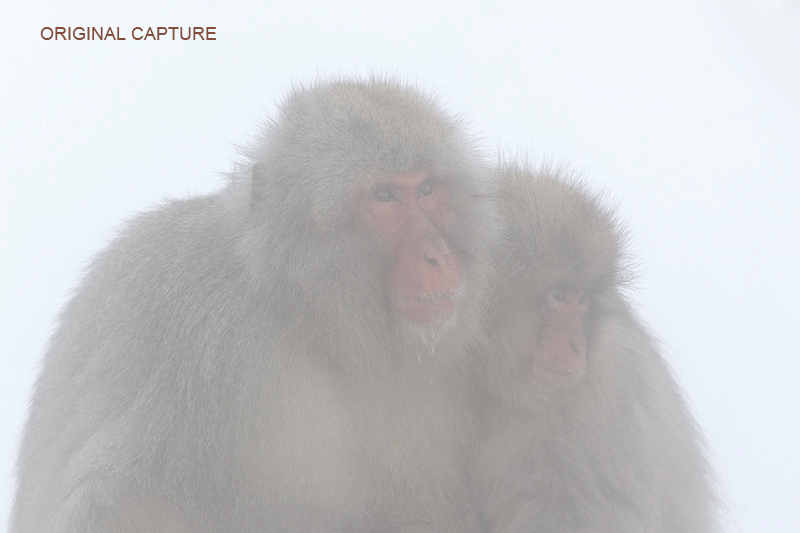
This image was created with the tripod-mounted Canon 70-200mm f/2.8L IS II lens, the 1.4X III TC (at 280mm), and the Canon EOS 5D Mark II. ISO 400. Evaluative metering +2 1/3 stops: 1/320 sec. at f/6.3 in Manual mode. |
I Haven’t the Foggiest…
Would you keep this image? I am sure that for the many who do not realize the vast potential of digital captures and those who have no experience working in fog this would be an insta-delete. Heck, many would delete it in the field after chimping. Note: I never delete in the field, even if I take eight images of the out-of-focus ground; there are simply too many ways to screw up. As you may have figured out by now, I kept it.
The image above is from the very first series that I created when we got to the main pool. The steam was swirling off the hot spring pool.Not realizing that the white fog comes and goes with the breezes I began photographing….

|
|
This is the optimized image that was created from the original above. No kidding. |
The first step when working with properly exposed images made in foggy conditions is to set the white and black points in ACR while holding down the Alt key and boost the contrast just a bit. These two processes are described in detail in Digital Basics. Next I brought the image into NIK Color Efex Pro 4 and Details Extractor at about 75% and Tonal Contrast at 20%. Volia! You will have a better understanding of the progression by studying the animated GIF below.
|
NIK
As regular readers well know, Color Efex Pro 4 is now an integral part of my workflow. You can save 15% on all NIK products by clicking here and entering BAA in the Promo Code box at check-out. Then hit Apply to see your savings. You can download a trial copy that will work for 15 days and allow you to create full sized images.

|
My Comments on Your Comments
I responded to each and every comment made at the January 20, 2012 blog post here. By a small margin more folks preferred the misty blue version to the B&W rendition.
Support both the Bulletins and the Blog by making all your B & H purchases here.
Remember: you can earn free contest entries with your B & H purchases. Eleven great categories, 34 winning and honored images, and prize pools valued in excess of $20,000. Click here for details.
Shopper’s Guide
Below is a list of the gear used to create the images talked about in this blog post. Thanks a stack to all who have used the Shopper’s Guide links to purchase their gear as a thank you for all the free information that we bring you on the Blog and in the Bulletins. Before you purchase anything be sure to check out the advice in our Shopper’s Guide.
Canon 70-200mm f/2.8L IS II lens. Man, I am loving this lens on my shoulder with the 2X III teleconverter. I also use it a lot–as I did for the image above–with fish–with the 1.4X III TC.
Canon EOS-1D Mark IV professional digital camera body. My two Mark IVs are my workhorse digital camera bodies.
And from the BAA On-line Store:
LegCoat Tripod Leg Covers. I have four tripods active and each has a Hardwood Snow LegCoat on it to help prevent further damage to my tender shoulders 🙂 And you will love them in mega-cold weather….
Gitzo GT3530LS Tripod. This one will last you a lifetime.
Mongoose M3.6 Tripod Head. Right now this is the best tripod head around for use with lenses that weigh less than 9 pounds. For heavier lenses, check out the Wimberley V2 head.
Double Bubble Level. You will find one in my camera’s hot shoe whenever I am not using flash.
The Lens Align Mark II. I use the Lens Align Mark II pretty much religiously to micro-adjust all of my gear an average of once a month and always before a major trip. Enjoy our free comprehensive tutorial here.
Canon EOS-1D Mark IV User’s Guide. Learn to use your Mark IV the way that I use mine. Also available for the 7D and the Mark III here.
BreezeBrowser. I do not see how any digital photographer can exist without this program.


Dang me dang me take me by the neck and hang me!
Well you learn something new every day!!!! The optimised image is wonderful!! I never realised or even considered that one could ‘remove’ fog. I would definitely have shot the image, because the monkeys are worth it, and I probably would have kept it too. You really are an education Artie. Thanks :¬)
Splendor in the fog.—
Speaking of salvage, how did your 1 D IV cameras finally get returned to full service after their watery episode in antartica?
One is fine and working perfectly in Japan. The other had White Balance issues and was sent back to Canon repairs. It was replaced with a loaner. That one is also doing great. As am I :).
Thanks for the tips on salvaging foggy images. About a week ago I went out with James Shadle to get the famous spoonbills. the morning was very foggy. I hated to think all of the morning images would be trashed. I tried your approach on an image and am confident I can recover quite a few.
Glad to have helped. I have had a foggy morning or two with Captain Froggie myself.
I am really confused as to why you would remove the one thing that made the image different. I understand bringing in a little more contrast/detail. But to remove the fog altogether is perplexing. I also realize you are trying to show what software can do but this doesn’t seem like a good example. BTW your ACR version is nicely processed.
Then perplexed you shall be. Remember that all processing decisions are subjective.
I accidentally replied to another post. I agree that image processing is subjective but it should not be random. I’d much appreciate it if you shared the reason why you chose to process the image the way you did. It will give me an idea of your though process. Thanks!
I actually like all three versions. Each has a different mood. I do like the additional fine detail in the final version but I do like all the fog in the original capture and the softer look in the middle image. The purpose of the post was to show folks that they need not be deleting images taken in very foggy conditions. See the rear cover image of ABP II for additional proof of that: two Great Blue Herons at a nest. And in part the final image is intended to convince folks to purchase the NIK stuff using our link so that I can earn a few bucks for all of this writing.
Thanks for sharing your thoughts Art! Keep the beautiful images coming.
You are most welcome sir. Will do. later and love, artie
The third version is absolutely stunning. I love the saturation and contrast. I pray my sight will always allow me to see detail and color in God’s awesome creations. I’m so glad you didn’t delete this shot.
Me too :).
I just ried the technique on some misty elephant seal shots and was pretty impressed. I made and saved a recipe like you suggested previously. Thanks for the info and keep those tutorials coming on this software. BTW, I added to the effect by duplicating the Nik layer twice more and masking out the background which I wanted to keep misty.
Good tip. I have some good news for you coming soon!
You were given a lemon and you made lemonade out of it. Nik Color Efex Pro 4 comes to the rescue. All the more reason for using it in your workflow. Good job,Artie.
Thanks Charlie!
I think “never delete in the field” is really good advice, unless your card is full, and if your card is full and you don’t have another one you have planned badly. I wish I always took my own advice on this matter.
Thanks for the tutorial. Another fine image.
By the way, even untouched the first image wasn’t an insta-delete; it has its own charms, although you have to work at liking it.
David
The first one was a bit too foggy for me.