

|
|
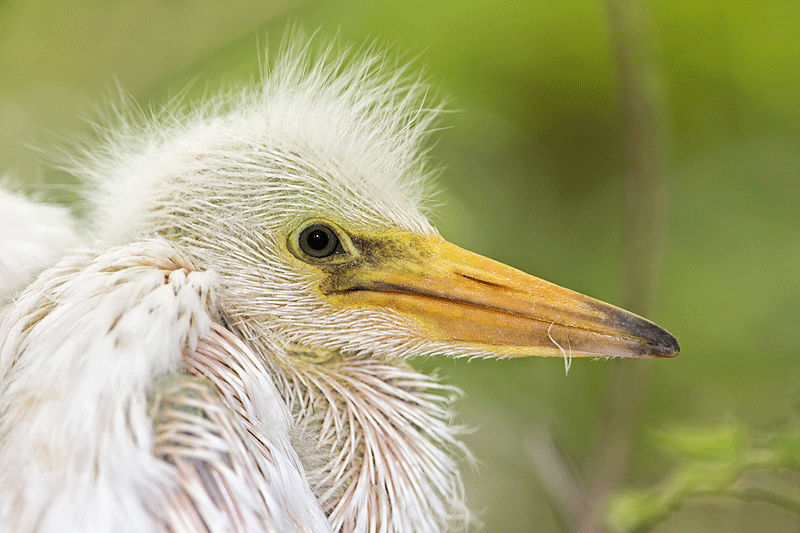
This head portrait of a Snowy Egret chick was created with the tripod-mounted Canon 300mm f/2.8 L IS II lens, the 2X III teleconverter, and the Canon EOS-5D Mark III. ISO 400. Evaluative metering +1/3 stop: 1/80 sec. at f/8 in Av mode. Fill flash at -1 stop with my brand new Canon Speedlite 600EX-RT and a Better Beamer. Good news there: the FX-3 fits the Canon Speedlite 600EX-RT perfectly. For a greater appreciation of this image, click on the photo. |
Beginning Bird Photography Lessons
I created this image this morning while working with a private client. Ann is a beginning bird photographer. But very smart and a quick study. She arrived knowing when and why to use AI Servo AF and when and why to use One-Shot. She knew how add or subtract light while working in Av mode and knew how to view the histogram. She did not know how to evaluate a histogram or the importance of having at least some data in the fifth (highlight) box. And she had blinkies turned off. We educated her in short order. To start I let her work with the 300mm f/2.8 L IS II lens and the 2X III teleconverter with her Canon EOS-7D, all on a Mongoose M3.6 and a Gitxo 3530 LS tripod. (Note: the 3530 LS has been replaced by the GT3532 LS.)
Within a few minutes she had learned to produce good if not perfect histograms. Once I showed her how, she was a natural at holding the big lens to ensure sharp images and she had a good eye for composition. After an hour I set her up with a 70-200mm f.4 L IS and a 1.4X III TC. She took to hand holding it correctly immediately by bracing her elbows on the boardwalk railings.
She went off by herself making images and honing her newly learn skills. I photographed for a while on my own and then went off the see if she needed any additional help. She had found a wide open Snowy Egret nest with two medium sized chicks! I taught her how to use the pop-up flash in a rather dark situation. Then it was my turn. After hand holding my 70-200mm f/2.8L IS II for a while I went to the 300 with the 2X on a tripod so that I could create some head portraits. As there was a branch blocking the flash as it sat on the 4th Generation Design Integrated Flash Arm. Ann kindly agreed to hold the flash and point it at the bird.
Voila!
|
Why Stop There?
As you can see by viewing the animated GIF above, I did considerable bill clean-up but opted to leave the single sliver of feather. Why? Clean-up as usual was with the Patch Tool, the Spot Healing Brush, and a series of small Quick Masks. All are described in detail in Digital Basics.
NIK 15% Discount
As regular readers here know, NIK Color Efex Pro has drastically changed my digital workflow. Remember that you can save 15% on all NIK products by clicking here and entering BAA in the Promo Code box at check-out. Then hit Apply to see your savings. You can download a trial copy that will work for 15 days and allow you to create full sized images.

|
|
This Adobe Camera RAW screen capture shows my default values. Note the pretty darned good histogram right out of the box…. Click on the image to enlarge it–it’s a lot easier to read then. |
Canon Speedlite 600EX-RT
Today was the first chance that I had to use my new flash, the Speedlite 600EX-RT, Canon’s most powerful-ever flash. The controls are a bit different from the last several Speedlites so I actually had to read the flash manual. But just enough to get started….
Here are the listed features:
- Wireless Radio Multiple Flash SystemTTL
- E-TTL II & A-TTL Compatible
- GN 197′ (60 m) @ ISO100
- Exceptionally Dust- and Water-Resistant
- Zoom Flash Head: 20-200mm
- Range Dot Matrix LCD Panel and Backlit Button
- Color Filter Holder for Gelatin Filters
- 18 Custom Functions
- Full 180-Degree Swivel in Each Direction
- AF Assist Beam
I obviously have a lot more studying to do. What intrigued me the most were the comprehensive easy-to-follow instructions for Multi/Stroboscopic Flash that includes a section on calculating the shutter speed. I have a good plan for using this feature for bird photography at some point in the future. Maybe on Midway…. See pages 33-35 of the Instructional Manual.
Shopper’s Guide.
Support both the Bulletins and the Blog by making all your B & H purchases here.
Below is a list of the gear talked about in this blog post. Thanks a stack to all who have used the Shopper’s Guide links to purchase their gear as a thank you for all the free information that we bring you on the Blog and in the Bulletins. Before you purchase anything be sure to check out the advice in our Shopper’s Guide.
Canon 300mm f/2.8 L IS II lens. Both on my Southern Oceans and Japan trip this lens proved to be ideal on a tripod for both birds and wildlife with both the 1.4X and 2X III TCs. All images were super-sharp and the lens was light enough for hand-holding from any type of watercraft.
2X III teleconverter. The new 2X TC is sharper than the older Series II 2X TC and is designed to work best with the Series II super-telephoto lenses–two out and two more coming sometime in 2012.
70-200mm f.4 L IS. Ann is planning on buying one of these lightweight, relatively inexpensive beauties as her starter lens. Teamed with a 1.4X III TC and her Canon EOS-7D she will have a decent effective reach of 448mm (or 9.96X magnification).
Canon EOS 5D Mark II Digital Camera. Canon’s lightweight full frame body is perfect for serious landscape photography and worked out great for wildlife on my Southern Oceans voyage.
Speedlite 600EX-RT. Canon’s latest greatest professional flash has more features than I will ever use or need.
And from the BAA On-line Store:
LensCoats. I have a LensCoat on each of my big lenses to protect them from nicks and thus increase their re-sales value. All my big lens LensCoat stuff is in Hardwood Snow pattern.
LegCoat Tripod Leg Covers. I have four tripods active and each has a Hardwood Snow LegCoat on it to help prevent further damage to my tender shoulders 🙂 And you will love them in mega-cold weather….
GT3532 LS. This one replaces the GT3530LS Tripod and will last you a lifetime.
Mongoose M3.6 Tripod Head. Right now this is the best tripod head around for use with lenses that weigh less than 9 pounds. For heavier lenses, check out the Wimberley V2 head.
Double Bubble Level. You will find one in my camera’s hot shoe whenever I am not using flash.
Better Beamer. Triples flash output. Saves battery power. Increases range. Folds flat for travel. And lots more.
4th Generation Design Integrated Flash Arm. Lightweight and efficient; what more could you ask for?
The Lens Align Mark II. I use the Lens Align Mark II pretty much religiously to micro-adjust all of my gear an average of once a month and always before a major trip. Enjoy our free comprehensive tutorial here.
Canon EOS-1D Mark IV User’s Guide. Learn to use your Mark IV the way that I use mine. Also available for the 7D and the Mark III here.
BreezeBrowser. I do not see how any digital photographer can exist without this program.


Heh, I reckon the strand of feather gives the impression that no clean up was done. 😉 But it spans many different colour areas, and I assume that is tricky to sort out?
Was not difficult at all; I just left the single feather strand as is…..
Hi Art,
Very nice shot. So you are keeping the Canon 300mm II lens after all? Thought you were sending it back due to other upcoming lens purchases. I sure like mine, but I’m not buying any others near term!
Best,
Tom Wilberding
I borrowed one again from CPS. I still want to buy one. I should.
I enjoy the blog, Artie. I do not understand, however what you mean by 45% tonal contrast and 45% detail enhancer. I only see a % slider in detail enhancer. Tonal contrast has several sliders but nothing for overall % effect.
Miss just one blog post and you miss important stuff. 🙂 From “One Songbird Image; So Many Lessons:
NIK Tips
Once I had the dark feathers on their own layer I opened NIK Color Efex Pro. When the plug in opens you will see the selected area in a box that is smaller than the complete image but that includes stuff other than the selection. As you apply one or more filters will affect everything inside the box. No to worry; when you click OK and the image opens in Photoshop you can toggle the NIK layer on and off. You will see that the filters have been applied only to the selection. And that is just what you want.
For this image I ran Tonal Contrast at 70%. To reduce the effect of a given filter click on the words “Control Points” near the bottom of the Control Panel (on the right). An Opacity slider will open just below. Then adjust the Opacity slide to taste. To note the effect of an individual filter click the check box to the left of the name of the filter at the top of the control panel on and off.
To stack or add a second filter click on “+ Add Filter” at the bottom of the Control Panel. For the tree sparrow image I added Detail Extractor at 20%. It is very easy to over-do Detail Extractor.
As you practice feel free to experiment by adjusting the opacity of various filters and clicking the effects on and off to compare. In time you will become more comfortable and more confident when using NIK Color Efex Pro 4. And your images will begin to look better and better. (Note: the directions above my not make sense if you are using a version earlier than CE Pro 4.)
I really enjoy your blog. With the 200mm zoom on the new 600Ex flash do you find that you still need to use the better beamer? Not sure how much more reach you get with the 200mm.
Thanks Rich, The beamer covers 300mm. So if you are working at focal lengths of 300mm or more and not using a beamer you are wasting flash power and battery power. But only 99% of the time. Anyone know the exception??? In other words, when is the only time that you remove the Better Beamer (or more conveniently, the Fresnel lens) when working with a focal length > 300mm??? I know.
I would assume you’d want to remove it if you are working close with extension tubes.
Charles, why would you need to remove the Fresnel when working close?
Because, in my experience anyway, the Fresnel tends to create a flash hot spot in the center of the frame at close range. The only other reason I could think to remove the lens is if you are pointed toward the sun, in which case the lens WILL melt your flash!
Close on the hot spot but no cigar. ETTL flash works because the flash shuts itself off when it determines by reading off the sensor that the desired level of exposure has been achieved. The flash can never “know” that a Better Beamer is in place so its understanding of the relationship of flash output and subject to sensor distance is messed up somewhat. Still with me? When using a Better Beamer at close range the flash simply does not have enough time to shut itself off before the image is over-flashed…. Even when it is set to -3 stops. So when working at point blank range it is best to remove the Fresnel screen and stow it safely somewhere. artie
ps: And yes to removing the Fresnel whenever your rig is pointed anywhere near the sun (such as when working backlit).
The feather adds interest whereas the other stuff just makes it look like a dirty bill. I like it.
Art, it is interesting to see your defaults in ACR – you have to add that much tint by default? It seems like a lot?
The tint is set automatically for each image. I never touch that….
Tint and temperature are controlled by the white balance settings from the original capture, unless you select something other than “As Shot” from the drop down box.
Nice Shot Artie. I think you left the single feather so the juvenile bird would appear as natural as possible, while the rest of the cleanup was done to avoid distraction from the main subject. The single remaining feather does not detract, and allows one to see the bird as it was at the time.
I believe that the 70-200mm 4L IS paired with the 1.4 extender and the 7D would be 280mm not 320mm–or am I incorrect—? Enjoy your site very much.
Thanks on all counts. We are both wrong :). With the crop factor it is actually 448 or 9.96X magnification…
Could you explain a little on how 448(mm?) or 9.96X are calculated? (By the way, Art, I truly enjoyed the class/trip, learnt a lot, and felt a lot more to learn, too! It is addictive!) Also, for the first set-up, I think you said it was equivalent to 960mm?
Hi Ann, Thanks again for joining me. I enjoyed working with you. And thanks for the snowy nest and for your help.
The 448 and the 9.96 applies to the 70-200 with a 1.4X teleconverter. 200 X 1.4 for the TC is 280 X the 1.6X crop factor of the camera gives you 448. Divide by 50 to get the maginifcation.
The 960mm was with the 300 f/2.8L IS II, the 2X TC, and the 1.6 crop factor. Let’s see if I did that correctly: 300 X 2 = 600 X 1.6 = 960 effective focal length. 19.2X magnification. Good luck.
Ah, the 1.6X crop factor, thanks! Was there any particular reason that the 1.4X III TC (instead of the 2X TC) was paired with the 70-200mm during the trip? By the way, the link to the 1.4 III TC (above) was no longer active(?) Artie, thanks again for this inspiring class! I want to go to Galapagos (one day)!
Hi Ann, I like your new e-mail name :). AF with the 7D and the 2X II TC on the 70-200 f/4 would be slowed considerably. In addition, you lose two full stops of light (only one with the 1.4X TC) and thus you also lose two full stops of shutter speed. In addition, unsharpness caused by movement of the lens are while hand holding are much greater with the 2X than with the 1.4X as those errors are a function of the square of the effective focal length… As for the Galapagos, my trips are simply the best for serious photographers. My 2013 may very well be my last…. There are spots open for you and Dana and Juan loves having non-photographers along as he has so much knowledge to share. We often tell him, “Quiet; we are photographing!” The info is below. later and love, artie
GALAPAGOS Photo Cruise of a Lifetime IPT/The Complete Galapagos Photographic Experience. July 2-16, 2013 on the boat. 13 FULL and two 1/2 days of photography: $12,749. Limit 13/Openings: 6.
July 2-16, 2013 on the boat. Fly to Quito on June 30. Travel insurance day: July 1. Fly to the archipelago on July 2. Get off the boat on July 16. Spend that afternoon and evening in Puerto Ayora (lunch & dinner on your own). Fly to Quito on July 17. Fly home on the early morning of July 18. $12,749 includes just about everything including all transfers, guide and park fees, all food on the boat, your flights to the archipelago, and four nights in top notch hotels–three in Quito and one on Puerto Ayora. Non-refundable deposit: $5,000. Limit 14 including the leader/Openings: 8
Briefly, my two-week trips are without equal. The world’s best guide, a killer itinerary, a great boat (the Samba), and the best leader with seven Galapagos cruises under his belt. The great spots include Tower Island (including Prince Phillips Steps and Darwin Bay), Hood Island (including Punta Suarez, the world’s only nesting site of Waved Albatross, and Gardner Bay)—each of the preceding are world class wildlife photography designations that rank right up there with Antarctica, Africa, and Midway), Fernandina, Puerto Ayora for the tortoises, Puerto Egas—James Bay, North Seymour, South Plaza, Black Turtle Cove, Floreana, Urbina Bay, and China Hat. Plus tons more. And lots of snorkeling for those who wish to partake. All park fees, meals except as noted above, guide fees, ground transportation, and the flights to and from the Galapagos are included.