|
|
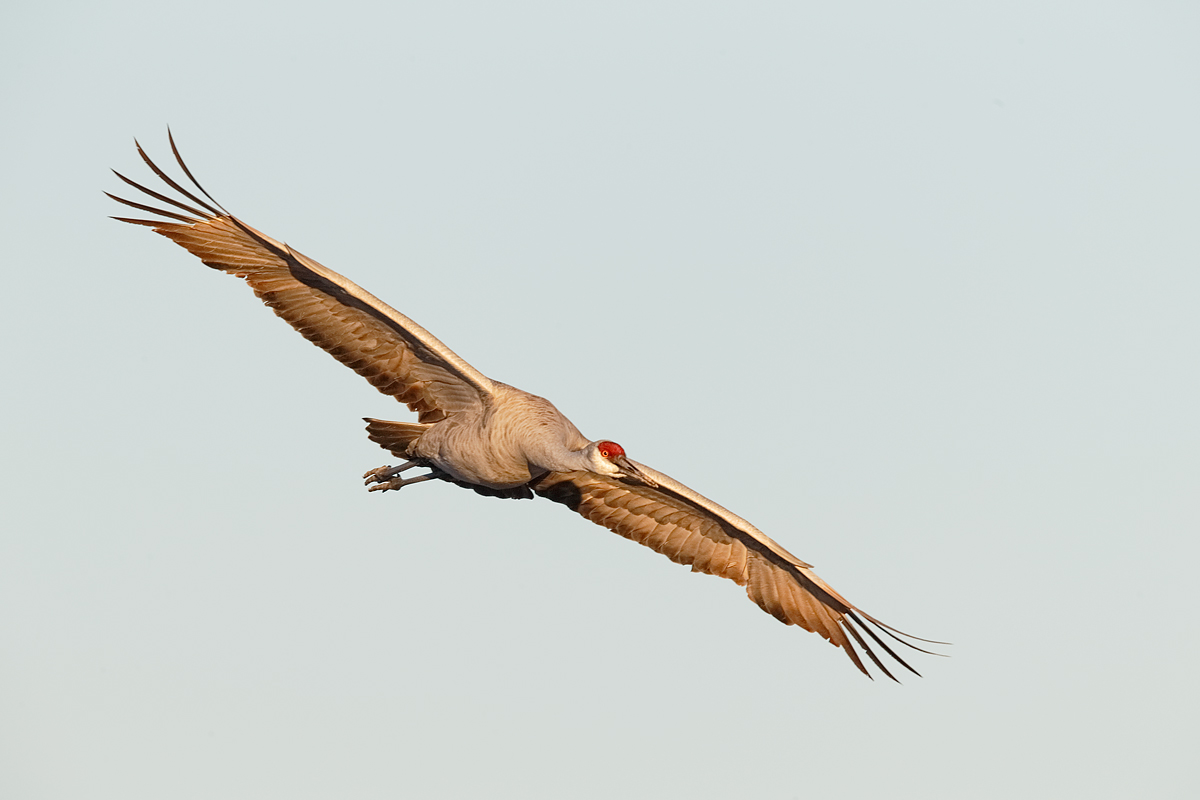
This image was created on the 2013 Bosque IPT with the Gitzo 3532 LS carbon fiber tripod, the Mongoose M3.6 head, the Canon EF 600mm f/4L IS II USM lens, the Canon 2x EF Extender III (Teleconverter), and the Canon EOS-1D X. ISO 800. Evaluative metering +1 stop as framed: 1/1000 sec. at f/9 in Manual mode. I set the exposure manually at +1 1/3 stops off the light blue sky in late afternoon light. That worked out to +1 stop as framed here because the bird is somewhat darker than the sky. In the crane image below, +1 1/3 stops off the sky worked out to the metered exposure…. See more in the next image caption below.Central sensor (by necessity) Expand/AI Servo Rear Focus AF on the head of the crane active at the moment of exposure. But it is likely that one of the Surround AF points took over and just caught that bird’s head. Click here if you missed the latest version of the Rear Focus Tutorial. Click on the image to see a larger version. |
Manual… Av… Tv… Program… Which is The Best Shooting Mode?
This is one of the age old photography questions: what is the best shooting mode? There are many who state definitively: “Real photographers work in Manual mode 100% of the time.” Many who preach this as gospel are hard-headed, obnoxious, loud-mouthed, and ignorant. Others simply prefer to work in Manual mode most or all of the time but realize that other modes might be best for other photographers (or clients) in a given situation.
At present I work in Manual mode most of the time, probably about 80% I would guess. I often work in Av mode, probably about 15% of the time. I occasionally work in Tv mode, probably about 4% of the time, but more than that when I am at Bosque del Apache NWR late each fall. (BTW, happy winter; it began today just after noon on December 21, 2013, at 12:11pm EST.) And I actually work in Program mode on rare occasion.
So what is the best shooting mode? The best shooting mode is the one that works best for you in a given situation. I will share my Shooting Mode preferences with you here.
Manual Mode
As I mentioned above, I now work in Manual mode about 80% of the time on average. When photographing birds against backgrounds of rapidly changing tonality or when that possibility exists, working in Manual mode is mandatory. This is such an important principle that I will state it again: when photographing birds against backgrounds of rapidly changing tonality working in Manual mode is mandatory.
Why? If you are in an automatic mode like Av or Tv and the background goes from light sky to dark trees you are dead in the water. Nobody can change the exposure compensation (EC) from say plus 2 to minus 1/3 stop instantly. Not to mention the times when the framing might yield both sky and trees or mountains in varying proportions. To learn to work in Manual Mode click here.
Similarly, you must be in Manual mode when the size of a very light or very dark subject in the frame is changing. Why? Unusually light or dark subjects have a big influence on your camera’s meter.
|
|
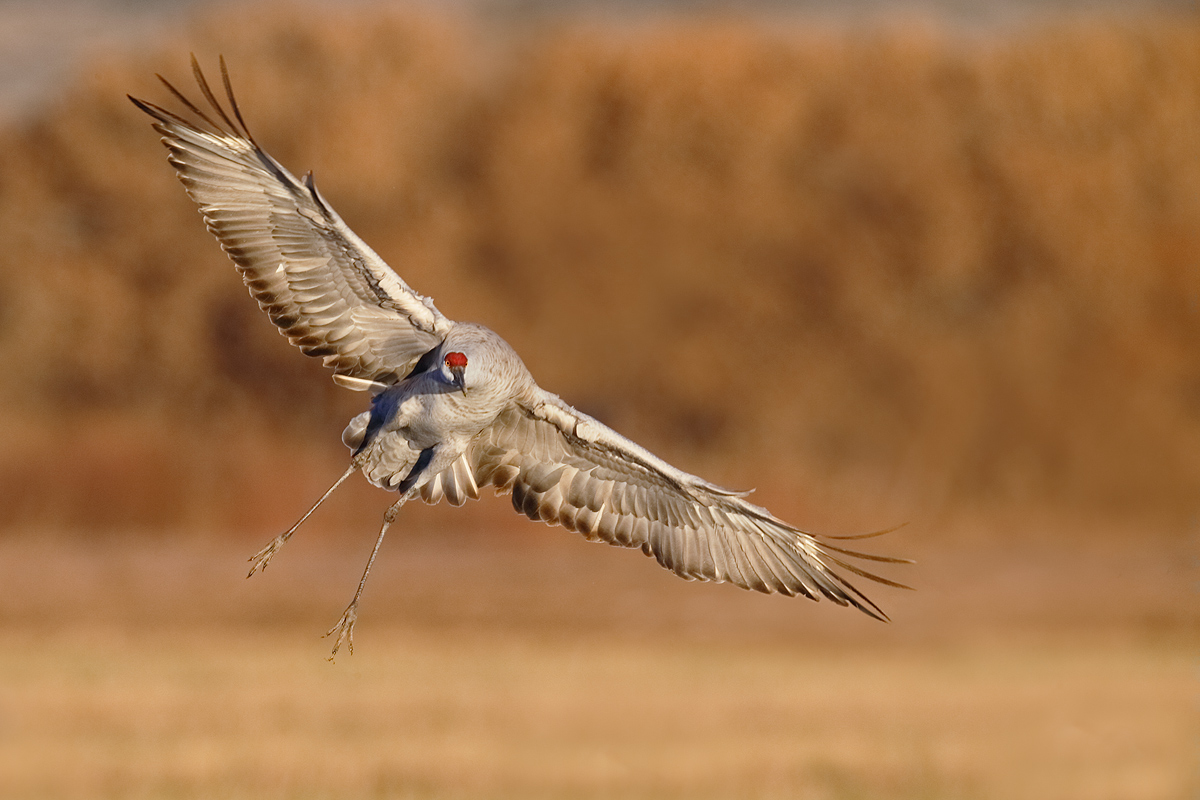
This image was also created on the 2013 Bosque IPT with the Gitzo 3532 LS carbon fiber tripod, the Mongoose M3.6 head, the Canon EF 600mm f/4L IS II USM lens, the Canon 2x EF Extender III (Teleconverter), and the Canon EOS-1D X. ISO 800. Evaluative metering at zero as framed: 1/1000 sec. at f/9 in Manual mode. The two crane images here were made about two minutes apart; the light on the subject was constant. I began by metering the sky and adding 1 1/3 stops in the late afternoon light. When working in Manual mode you strive to get the right exposure for the subject. That is what I did here. Note that the exposure for both images was 1/1000 sec. at f/9 at ISO 800. With the bird against the sky the exposure worked out to +1 as framed. With the bird set against the yellowish brown trees in the distance, the exposure worked out to the metered exposure, that is 0 EC or no exposure compensation. Understand that the exposure settings for each image were identical: 1/1000 sec. at f/9 at ISO 800. As the light on the birds was constant the correct exposure for the subjects were the same regardless of the background. Had I been working in Av mode at f/9 I would have needed to have been at +1 stop for the first image and then at zero for the image here. Changing the exposure compensation from +1 to 0 in less than an instant is simply not possible. That is why you need to learn to work in Manual mode whenever the background tonality might change.Central sensor (by necessity) Expand/AI Servo Rear Focus AF on the bird’s lower breast active at the moment of exposure. Click here if you missed the latest version of the Rear Focus Tutorial. Click on the image to see a larger version. |
Manual Mode Misconceptions and Myths
One common Manual mode misconception is that when the light is changing from moment to moment that it is easier and better to work in Manual mode. This is definitely true when the background and the light are or may be changing quickly. But when the light is changing and the background is of uniform and constant tonality, working in Av (or Tv) is often simpler, better, and faster.
Let say that you are working at the beach and all of your subjects are on the sand and average to middle light in tonality. Most gulls and most shorebirds come to mind. Nothing is flying around. But the sun is peeking in and out of the clouds. As long as you understand exposure and the way that your camera’s meter works you may find it easier, more intuitive, and faster to work in Av mode: when the sun is out you make all of your images at 0 or +1/3 stop depending on your camera body. When the sun is behind a cloud you will set something like +1 2/3stops EC. For Nikon folks these values would likely be -1/3 or -2/3 stop when the sun is out and +1 stop or so when a cloud covers the sun.
This brings us to another Manual mode myth: “If you work in Manual mode you will always get the right exposure.” Nothing could be further from the truth. In fact, the statement is laughable. If you understand exposure it does not matter which shooting mode you are in. The fact is that Manual mode is Av mode is Tv mode as far as exposure is concerned. If you set your ISO, shutter speed, and aperture correctly in Manual mode so that you wind up with the right exposure and the analog screen in your viewfinder shows +2/3 stop, then you can simply work in Av or Tv mode and set +2/3 stop EC. As long as the framing and background remain the same the exposure will be identical.
Do not, however, forget the original premise above: When photographing subjects against backgrounds of rapidly changing tonality working in Manual mode is mandatory. If you attempt to work in any automatic mode against backgrounds of changing tonalities you will wind up with many exposure errors.
|
|
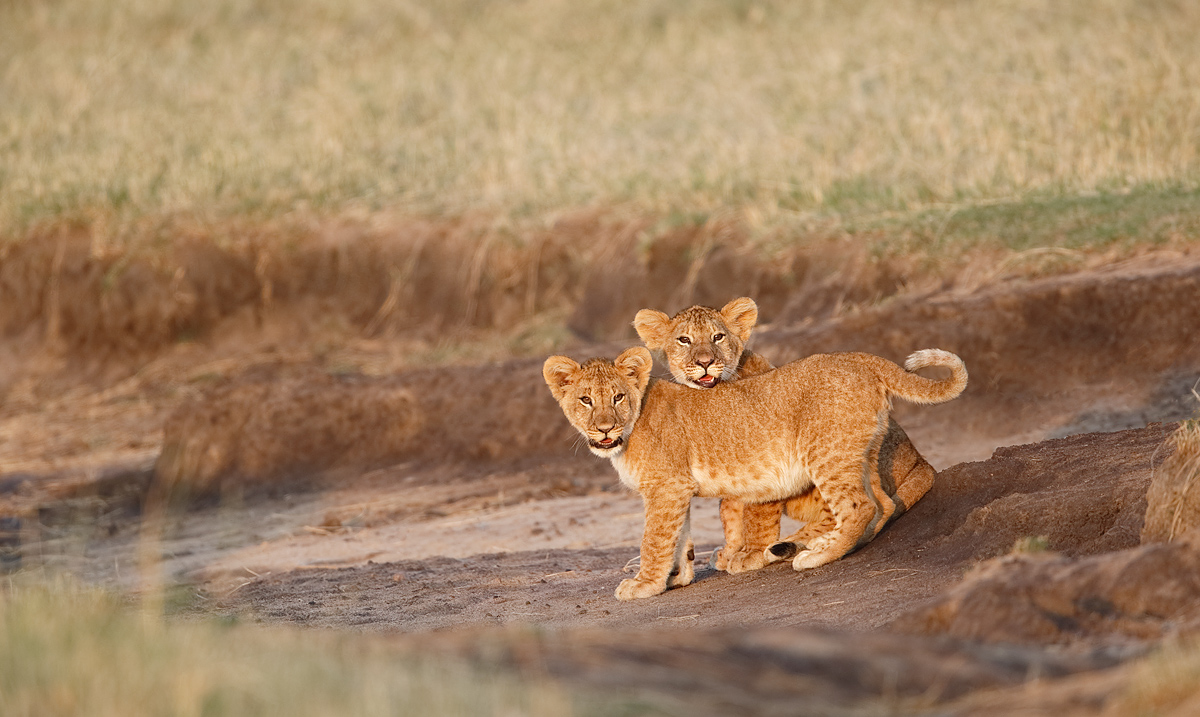
This image of a pair of playful African Lion cubs was created with the Todd-pod mounted Canon EF 600mm f/4L IS II USM lens, the Canon 1.4x EF Extender III (Teleconverter), and the Canon EOS-1D X Digital SLR camera. ISO 800 Evaluative metering +1/3 stop: 1/400 sec. at f/5.6.in Av mode in soft morning light. One sensor below the central sensor/AI Servo Surround/Rear Focus AF on the face of the closest cub active at the moment of exposure. Click here if you missed the Rear Focus Tutorial. Click on the image to see a larger version. In situations where I happen to be in Av mode and I am absolutely sure of the correct EC (exposure compensation), it is faster and easier to continue working in Av mode than it is to switch to Manual mode. That was the case here as I knew that +1/3 stop would be perfect. It was. As always, getting the right exposure has nothing to do with what shooting mode you are in. |
Getting the Right Exposure: Shooting Mode Does Not Matter!
The key to getting the right exposure depends on your knowledge of exposure theory, on understanding how to get the right exposure, on understanding how your camera’s meter works, on understanding the quality and direction of the light, and on knowing how to evaluate your histogram, check for blinkies, and adjust your exposure accordingly. Getting the right exposure has nothing to do with what shooting mode you are in. Again, do not forget the original premise above: When photographing subjects against backgrounds of rapidly changing tonality or when light or dark subject size is changing, working in Manual mode is mandatory.
To learn exposure theory, to begin to gain an understanding of how to get the right exposure, and to learn to properly evaluate you histograms, check for flashing highlight alerts, and adjust your exposure parameters, we recommend getting a copy of The Art of Bird Photography (soft cover) with its classic treatment of Exposure Theory, and a copy of The Art of Bird Photography II (916 pages on CD only). See and study the section on Exposure Simplified in the latter. You can save $10 by purchasing the 2-book bundle here.
|
|
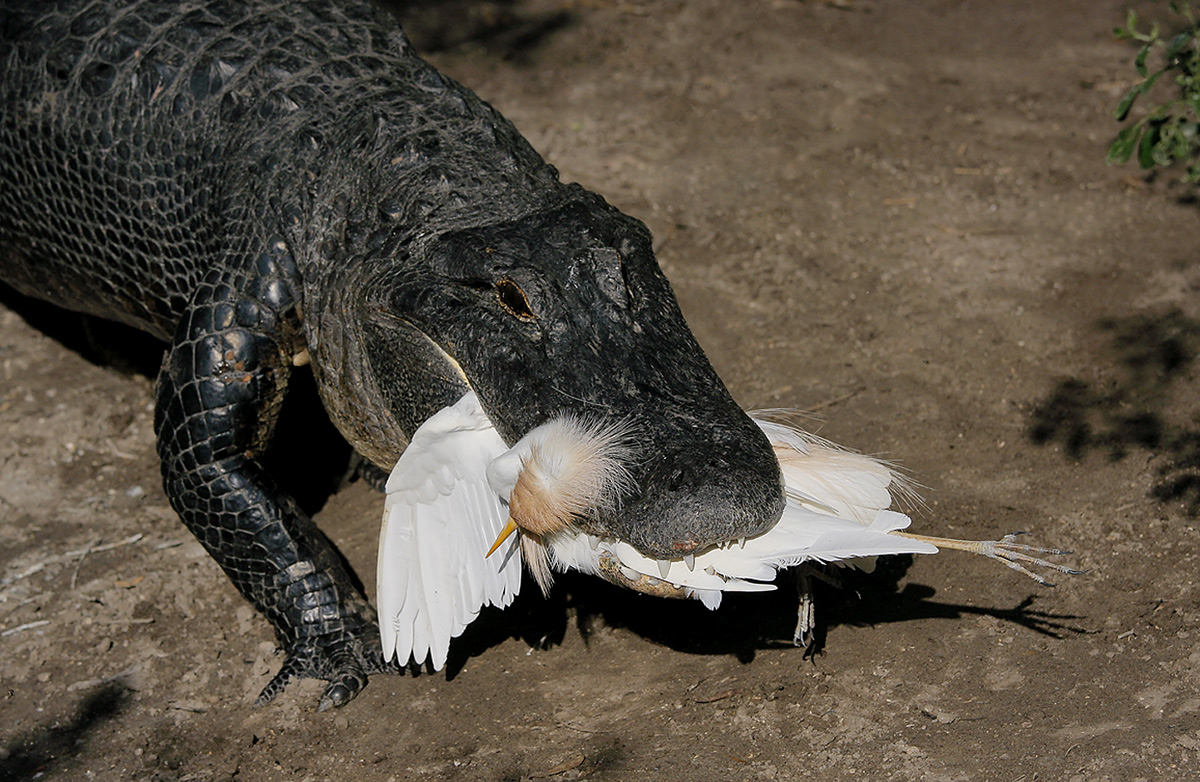
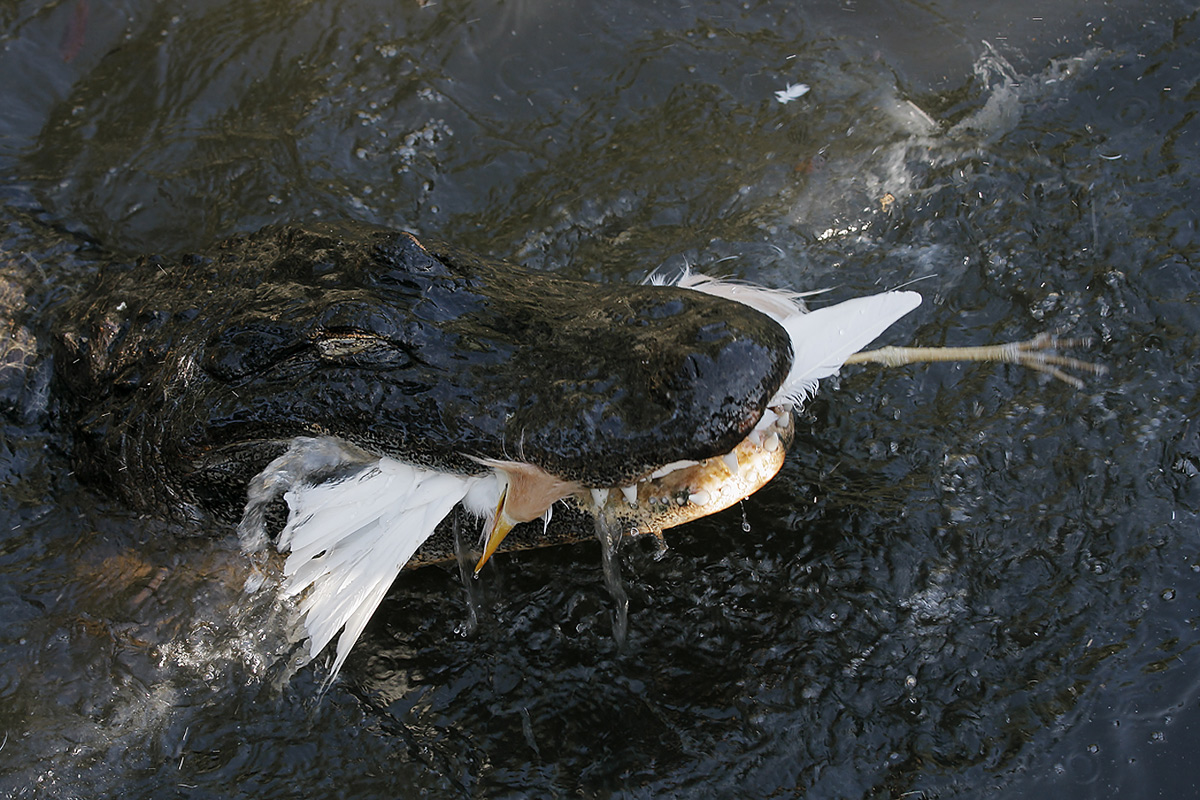
This American Alligator with a Cattle Egret in its jaws was photographed at the St. Augustine Alligator Farm with the Canon EF 70-200mm f/2.8L IS II USM lens (hand held at 111mm) and the EOS-40D (now replaced for me by the Canon EOS 5D Mark III Digital camera body ISO 400. Evaluative metering -1 stop as framed: 1/4000 sec. at f/5.6 in Av mode. Central Sensor AI Servo shutter button AF as framed. Be sure to click on the image to enjoy a larger version. When you have no clue as to what the situation might be, you are far better off being in Av mode than in Manual mode; you are never more than a few clicks away from the perfect exposure. See image next. |
Av Mode
There are many situations where I find it best to work in Av mode. Most times when I am taking a walk with a long lens on my shoulder I set the camera to Av mode. If it is sunny, I set the ISO to 400. If it is cloudy, I set the ISO to 800. If it is cloudy dark I set the ISO to 800. I usually work wide open or close to it.
Why Av mode when taking a walk?
When I do not know what or where the subject might be and when I do not know if the subject will be in the sun or in the shade, I will always set Av mode so that I can quickly dial in something close to the correct EC and make an image or three. Note I: this is 100% dependent on having a thorough understanding of exposure. Note II: this same understanding is required to come up with the right exposure when working in Manual mode.
The classic example is as follows: I am at the St. Augustine Alligator Farm. I hear a woman scream. I have the 70-200 f/4L IS in my hands and start running. I see a big gator on the dirt in the sun with a Cattle Egret in its mouth. I instinctively dial in -1 stop EC as the gator is black and in the sun and taking up a good part of the frame and the egret is brilliant white. I make several images each with a good exposure. I see that the gator is heading under the boardwalk. I know that I will not need as much minus EC as the action will now be in the shade. I push the shutter button half-way and dial back to -1/3 stop with two counter-clockwise clicks of the thumb wheel. I make a few more images each with a perfect exposure.
|
This same American Alligator with a Cattle Egret in its jaws was photographed at the St. Augustine Alligator Farm only a few seconds after the image above was created. Again, I used the Canon EF 70-200mm f/2.8L IS II USM lens (hand held at 70mm) and the EOS-40D (now replaced for me by the Canon EOS 5D Mark III Digital camera body ISO 400. Evaluative metering -1/3 stop as framed: 1/160 sec. at f/5.6 in Av mode. Central Sensor AI Servo shutter button AF as framed. Be sure to click on the image to enjoy a larger version. Had God been working in Manual mode not even he (or she) would have been able to make 14 the needed 14 clicks in the second it took this gator to slip from the bright sun into the shade of the boardwalk; if you are counting, that’s a difference of 4 2/3 stops…. |
If I had been working in Manual mode it would have taken 14 clicks of the shutter speed dial to come up with the right exposure. Nobody, not even the most obnoxious loud-mouthed Manual mode proponent could do quickly to get the right exposure when the gator slipped into the shadows.
While the above is an extreme situation it proves the point: when you are not sure what the situation will be Av mode is best. It allows you to come up with the right exposure quickly and easily, more quickly and easily than if you were working in Manual mode.
Similarly, as noted above in paragraph 3 in the Manual mode section, I often use Av mode when the light is changing and the background is of uniform and constant tonality.
Furthermore, if I happen to be in Av mode and I come upon a good situation where I am absolutely sure of the correct EC (exposure compensation) it is faster and easier to continue working in Av mode than it is to switch to Manual mode.
|
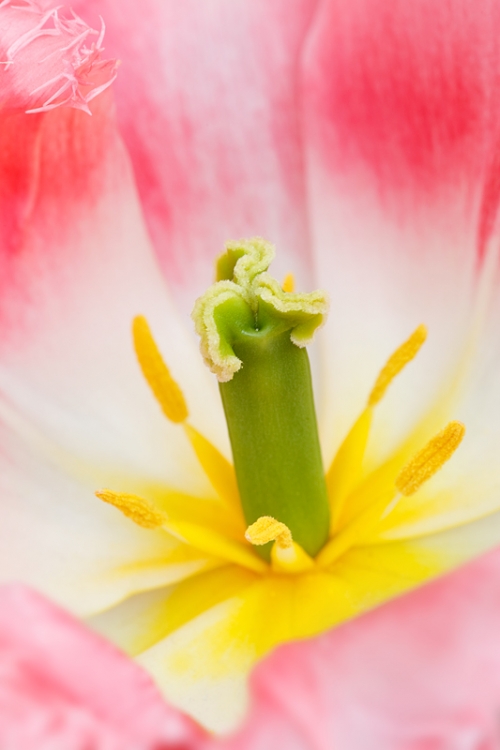
This image was created at the Willem-Alexander Pavilion at Keukenhof, Lisse, Holland with the tripod-mounted Canon Telephoto EF 180mm f/3.5L Macro USM Autofocus lens, the Canon 1.4x EF Extender III (Teleconverter) Manual Focus on the tip of the pistil and re-compose. Click on the image to see a larger version. When photographing flowers in windless situations I find it easier and faster to work in Av mode than to work in Manual mode. |
Av Mode Best for Flowers?
When photographing flowers in windless situations I also find Av mode best and more efficient than working in Manual mode. I found myself doing just that when photographing the tulips in Keukenhof Gardens, the Netherlands on last spring’s Tulip IPT.
I’d see and frame an image. Focus. Set Live View and the 2-second timer. Live View gave me mirror lock and the RAW RGB histogram. The 2-second timer assured sharp images at slow shutter speeds. Once I had fine-tuned the exposure I’d make a long series of images changing the aperture in one stop increments from wide open to f/22 or so. Once I had dialed in the right EC changing the aperture required only three clicks of the thumb wheel—the camera set the shutter speed each time. Had I been working in Manual mode I would have needed three clicks for the aperture and three more clicks the other way for the shutter speed. Where I come from six clicks is more work than three clicks. Working in Av mode made it fast and easy to crank out a series of images each with a different aperture….
Interestingly enough one image in a series would often stand out as clearly best.
Here is the principle that applies here: if the light and framing are constant and the only thing that you wish to change is the aperture it is faster and easier to work in Av mode. Can you do the same thing in Manual mode? Of course. But you will need to change more parameters than you would if you were working in Av mode. I prefer easier and faster 🙂
Tv Mode
As with Av mode, there are situations where working in Tv mode is far easier, far faster, far more intuitive, and far more efficient than working in Manual mode. For starters, one advantage of working in Tv mode is that it gives you absolute control of shutter speed.
|
|
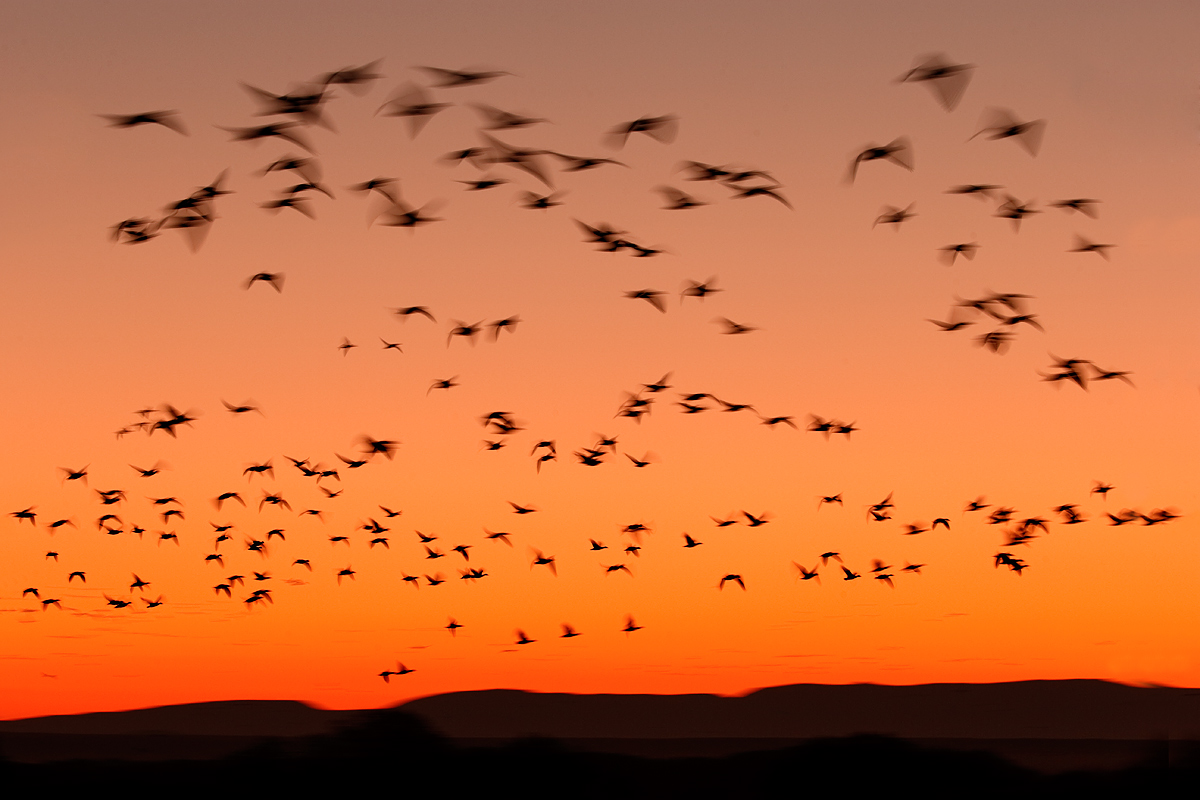
This Snow Geese fly-in image was created at 6:21am on the early morning of November 27, 2013 at Bosque del Apache NWR with the Gitzo 3532 LS carbon fiber tripod, the Mongoose M3.6 head, the Canon EF 200-400mm f/4L IS USM Lens with Internal 1.4x Extender (at 200mm) and the Canon EOS-1D X. ISO 400. Evaluative metering +1/3 stop as framed in Tv Mode: 1/13 sec. at f/8. Color temperature 8000K. Tv mode +1/3 stop. ISO Safety shift. As described in the text below this is a simple recipe for creating pleasing blurs in the pre-dawn. Beginning and intermediate photographers would have a very tough time in situations like this if they were working in Manual mode.Central sensor/AI Servo/Surround–Rear Focus AF as framed active at the moment of exposure. Click here to see the latest version of the Rear Focus Tutorial. Click on the image to see a larger version. |
Tv Mode for Blurs
As regular readers know, I love creating pleasing blurs, often in pre-dawn situations with beautiful color in the sky. Trying to create sharp images in these situations is almost always a huge waste of your mega-high ISO time. Working in Tv mode in conjunction with either ISO Safety Shift or Auto ISO is the way to go. You simply pick a slow shutter speed that is appropriate for the EV (light) level and the distance to the birds, dial in the right EC—usually +1/3 stop to +2 stops depending on the colors and tonality of the predawn skies, and fire away. The camera will set the needed ISO. As it gets brighter, the only thing that you need to do is pick the shutter speed that you want and dial in the right EC.
Teaching this method in the dark at Bosque allows even beginning photographers to create some wonderful images on their very first try.
Folks working in Manual mode in this situation need to change the ISO, the shutter speed, and the aperture every minute or two as the skies brighten. This is relatively easy for experienced photographers but working in Tv mode as described above is much easier and much more efficient for many folks.
To learn more about creating pleasing blurs see “A Guide to Pleasing Blurs” by Denise Ippolito and yours truly. This PDF is sent via e-mail and would make a great gift for all aspiring photographers,
|
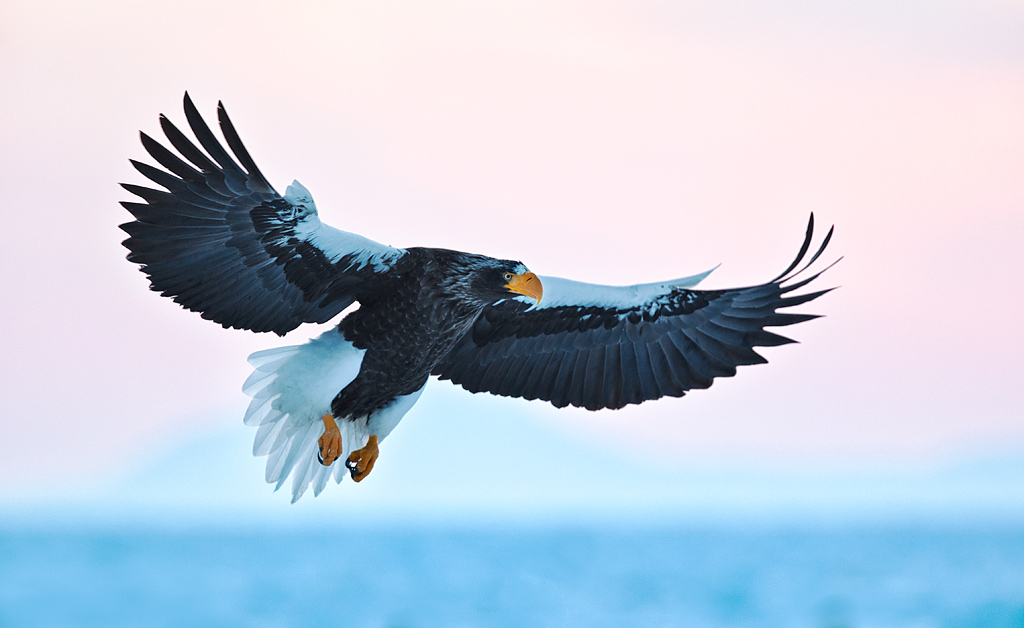
This Steller’s Sea Eagle image was created on my first Japan trip with the hand held Canon EF 300mm f/2.8L IS II USM lens, Canon 1.4x EF Extender III (Teleconverter), and the Canon EOS-1D X. ISO 500. Evaluative metering +1 stop stop as framed: 1/500 sec. at f/5.6 in Tv mode. I knew that +1 was right and I knew that I wanted a shutter speed of 1/500 sec. Tv mode was fast, simple, and perfect.Central sensor/AI Servo/Surround–Rear Focus AF as framed active at the moment of exposure. Click here to see the latest version of the Rear Focus Tutorial. Click on the image to see a larger version. |
Tv Mode When You Need a Minimum Shutter Speed
There are many situations where you want to be sure of having a minimum shutter speed, often when working in relatively low light and often when working from some sort of water craft. Unlike many flight photographers I do not subscribe to the theory that you need a minimum shutter speed of 1/1600 sec for flight photography. In many situations I would rather work at 1/500 sec. than choose a higher ISO. I have made many sharp flight images at 1/500 second.
The single rejoinder is that the background be of fairly uniform tonality. If the tonality of the background is constantly changing then as above, it is imperative that you work in Manual mode.
On my last Japan trip we were working with Steller’s Sea Eagles in flight in pink pre-dawn light. Both the ice and the sky were of about the same tonality—light middle, and I knew that +1 EC would give me a pretty darned good exposure most of the time. So I set Tv mode and chose 1/500 sec. I dialed in +1 stop EC and let the camera set the ISO and determine the aperture (which would always be wide open or close to it). I created many fine images that morning. And I have done the same thing often on Galapagos trips in similar situations. Fast, simple, and easy.
|
|
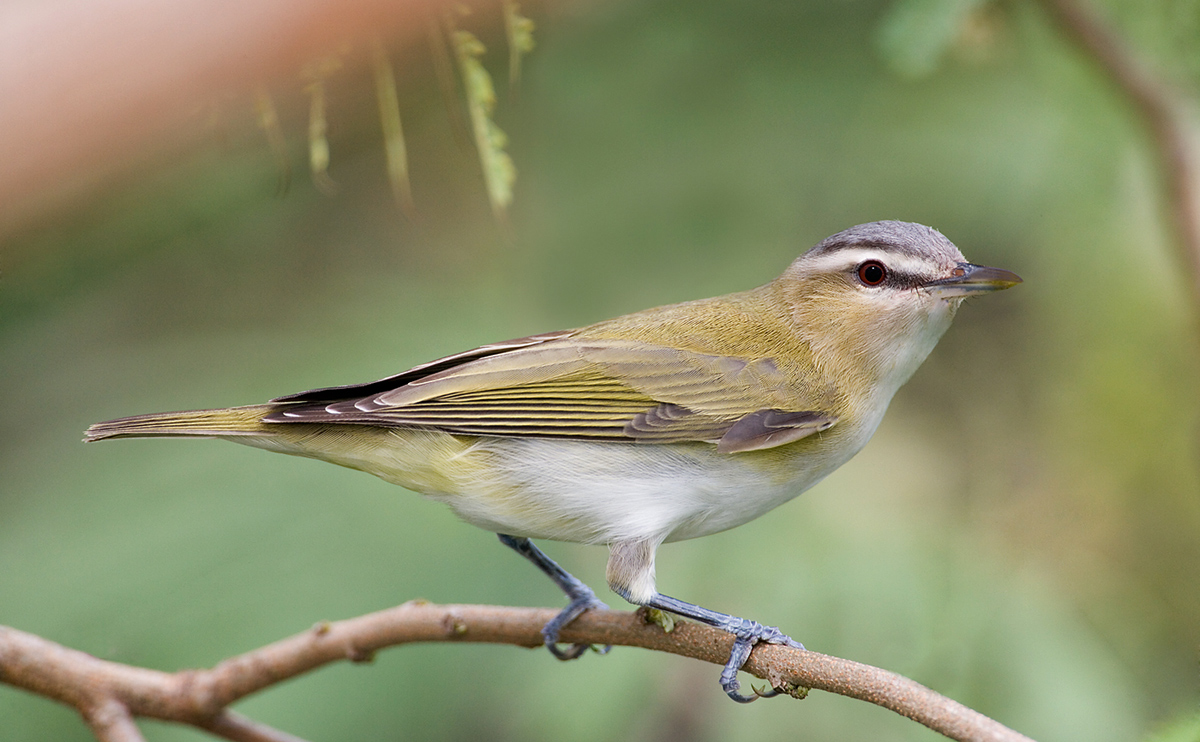
This image of a Red-eyed Vireo was created on South Padre Island, TX with the predecessor of the Gitzo 3532 LS carbon fiber tripod, the Mongoose M3.6 head, the 500mm f/4L IS lens (now replaced by the Canon EF 500mm f/4L IS II USM lens), the 2X II TC (now replaced by the Canon 2x EF Extender III (Teleconverter), and the full frame EOS-1Ds Mark II (now replaced by the Canon EOS-1D X). ISO 400. Evaluative metering at zero: 1/160 sec. at f/9 in Program mode. When photographing songbirds in relatively low, changing light with fill flash I like to work in Program mode and simple dial in the correct EC if needed. Doing so prevents the problems that you might encounter using Av or Tv and is much faster than working in Manual when the light is changing.Fill flash with the Canon Speedlite 600EX-RT, the Canon CP-E4 Compact Battery Pack (for faster recycling), and the Canon OC-E3 Off Camera Shoe Cord 3n a Better Beamer at -3 stops with the Mongoose Integrated Flash Arm. Central sensor (by necessity)/AI Servo Rear Focus AF on the bird’s upper back active at the moment of exposure. Click here to see the latest version of the Rear Focus Tutorial. Click on the image to see a larger version. |
Program Mode
“Program mode?” you ask. “Are you nuts?”
There are actually two situations when I find that program mode is the best mode. When photographing family parties or friends’ weddings indoors with on-camera flash, I get fairly consistent results by setting the flash to -1/3 or -2/3 stops, working in Program mode, and dialing in EC as required; usually some plus EC for overall light subjects and scenes and some minus EC for dark subjects with a few bright highlights. Happy birthday!
The other time that I’d use program mode is when photographing songbirds with flash in low, changing light. First, I simply dial in the flash exposure compensation (on the flash not on the camera), usually about -1 2/3 stops for fill flash, set my ISO, dial in the right EC (as always depending my understanding of exposure theory), and begin making images. After I am set up the only thing that I need to change is the exposure compensation. If you are working in Manual mode you will spend most of your time changing two or more of the exposure parameters as the light changes.
I have not photographed many songbirds in recent years but would not hesitate to work in program mode when the right situation arises. I should be so lucky.
Which is The Best Shooting Mode?
I am hoping that by now that everyone realizes that there is no single best shooting mode for all situations. Study hard and learn to get the right exposure in all lighting conditions. Learn to use each of your camera’s shooting modes. And learn when it is best for you to use Manual, Av, Tv, or even Program. You will become a much stronger photographer.


Reflections, and An Invitation
Those of you who missed my career celebration gallery in yesterday’s blog post may click here and then click on the gallery link to view it. Here’s the best news: after viewing the 120 images and picking your 5 or more favorites–most folks could not limit their choices to 5, you will not have to hit the back button 122 times



Artie:
Happy new year. I was wondering if the new IDX firmware changes anything in your recommendation here? Specifically does the availability of Exposure Compensation in Manual mode make it easier or more practical to using manual mode in walk around situations rather than AV mode?
Artie:
I have now read your exchange with Mike on this comment trail; sorry I went from article to posting a question directly! I am learning more and more about exposure from you. I used the method you outlined in your books recently to photograph Bald Eagles in flight in Conwingo Dam very effectively. Still not sure why this feature would not be useful though. Seems to me if I set the right manual exposure using the horizon, and then using EC in manual mode to get the right exposure compensation, I can maintain shutter speed and aperture.
Why do you refer to anyone (including some highly respected professional wildlife photographers) who proposes a different way of working to you as hard headed, obnoxious, loud mouthed and ignorant?
Isn’t that rather headed, obnoxious, loud mouthed and ignorant?
Not at all. I am fine with folks working in whatever manner they choose. I was referring to a very small number of folks who state emphatically that “real photographers work in Manual mode 100% of the time.” They are the obnoxious ones. It is you who chose to paint with a broad brush.
Still re-reading this one on a daily basis Artie.
Good plan. Be sure to bookmark it 🙂 artie
A lot of great information as always Artie.I found the TV info interesting since I seldom shoot in TV.
Another time when I use AV seems obvious but a lot of photographers ignore it and that is when it becomes critical to control your DOF for a pleasing image without distractions.
Best Wishes and good shooting.
Hi Artie, Merry Christmas!! Great stuff!! In anticipation of the new 1DX firmware, will you soon talk to us about using auto ISO in manual mode??
Mike
Yes, if I ever come to understand it….
The biggy for me is EC in manual with auto-ISO. If I’m thinking correctly, when I walk, I can set the shutter to the lens (or situation), set the ap for the depth-of-field I want, then simply adjust the EC to the situation and let the ISO fall where it may. Thanks again.
All good, but the big advantage of being in Manual mode is that it gives you a good exposure when the background tonality changes…. For this great new thing to work the background tonality needs to be constant. Different backgrounds will reqire different EC. Not to mention that as the light changes you will also need a different EC. That’s why I never understood Nikon folks getting excited by similar features… Actually, I suspect that nearly all of them had any clue as to how to get the right exposure consistently….
Maybe I’m missing something but won’t it be a great advantage working in manual mode with auto ISO to be able to choose shutter speed and aperture and EC without one being dependent on the other two? Again letting ISO fall where it may, within reason of course. Ughh, too much custard pudding this morning!
Yeah great. But either you are not reading or not understanding what I wrote above…. As the background and/or the light changes you will need to constantly be changing EC…. So for me, no great advantage as far as I can figure out right now…. artie
Yes, I get it now. Although I look forward to experimenting with manual/auto-ISO/EC, any “auto” setting (even auto ISO) will not work with birds in flight (or anything in motion) with a varying background. Thanks
Great summary article Artie. This helps bring everything together. Have a great New Year.
Dan
Thanks Dan, and ditto. artie
Great stuff Arthur,
Helped link everything up for me and will provide invaluable to others who are just starting out – ‘the definitive article’ …you could say! 🙂
Wishing you a great Christmas and prosperous new year.
Warm regards,
Julian.
Thanks Julian! And ditto. artie
Artie and all: I want to wish you and all your BAA colleagues and readers wonderful holidays and a great new year. Thanks again for all you do and in particular for this post. I’m joining Alan Lillich in the knowledge drip!
David
Thanks as always David. And ditto on the holiday wishes. artie
Great post, Thanks for the time you put into your blog, I always enjoy them!
On MIGUEL’s question on AV mode and blurred images of birds – you asked him if he was using the 7D, why? I shoot with that body and often in AV mode, and TV for birds in flight. I am comfortable with manual mode also – anything else on modes and 7d use you can offer?
Thanks again, and Have a Wonderful Holiday!
You are welcome. The 5D III is a full frame body so Miguel is working at effective 420mm or 8.4X. If you used the same rig with its 1.6 crop factor you would be working at effective 420 X 1.6 or 672 or 13.44X. You would need to be a lot more careful about preventing errors from lens shake than he would… A lot. You’d need to be on a tripod for most applications.
Thanks for a great summary of exposure mode and your testament to the KISS principle. My days with a camera date back when manual was the only mode available. Since then, they haven’t built in all those other modes for nothing, and as you’ve shown, each one has its uses. For myself and usual subjects, Av is the poison of choice, but do often still use manual for those BIF opportunities.
Thanks John. There are times when Av is right and times when it is poison…. artie
Wonderful writeup, thanks for the effort and patient repetition (with ABP and other writing)! Sometimes I feel like a stalagmite, stay under the knowledge drip and it slowly accretes.
:)!
Perfect flight shot artie. I just started reading your book: Art of Bird Photography and can’t put it down. I love your writing style!
Thanks Rob. ABP I or ABP II???
When I shoot birds in Av, most of the time birds come out slightly blurred. If the bird moves just a little, shutter speed is usually too slow to freeze the moment completely. How do you avoid that when you are using Av?
Use a wide aperture. Are you talking about birds in flight or perched birds? What lens?
Perched birds. 300mm f/4+tc 1.4x and/or 400mm f/5.6
One last question :(: what camera body? I am guessing 7D?
Guessed wrong 🙂 5D Mark III (birds are my main focus but not solely)
Before I had a 60D and I used it mostly on Manual, but since I got the 5D mark III I’m using Tv with auto ISO more than ever. But after reading this great article I’m thinking that I must be doing something wrong when I use the Av. I’m going to try a wider aperture as you suggested.
Thanks and good plan. A wider aperture will always give you a faster shutter speed. Tv with Auto ISO would be great if you set the shutter speed at 1/500 sec. (and you understand exposure…) artie
ps: if you are relatively new to bird photography I would strongly suggest getting a copy of at least ABP II (and ABP I would not hurt you either :)).
Save $10 by getting the 2-book bundle.
Excellent Blog, Artie, one of the best, THANKS a lot.
ALL THE BEST for a HAPPY, HEALTHY and PRODUCTIVE 2014
I am so appreciative of this article. I am no expert by any means but love photography and have felt lesser than because I don’t use manual 100% of the time. I admit I need to become more efficient at it but enjoy the other modes also. Thank you so much for the article and the permission to use the mode that suits the situation. I’m surprised the only comments so far are on typos! Who cares! (I know you appreciate the heads up though) The article was beautiful and I will be book marking it.
Thanx…oh sorry…Thanks
Artie…
This is by far the best blog that I have read on using the different modes.. I am primarily an AV Mode shooter, but I am going to practice more with the MANUAL mode so that I may learn to master the “M” mode.. Thanks again for a great blog..
Oh… and wishing you and your family a very “MERRY CHRISTMAS” and a “HAPPY NEW YEAR”..
Thanks, Artie. As you say, extremely helpful. I have never used Tv mode because so far I almost always get it wrong. I’m glad to learn you choose it only 4%of the time. In Av mode, the ISO is whatever I set it to be and the camera changes the aperture. If there’s too much light for the ISO and the maximum shutter speed, the image is overexposed. In Tv mode, does the camera change the ISO to maintain the chosen shutter speed rather than changing the aperture?
“Unlike many flight photographers I do subscribe.” Typo, should be “do not subscribe”?
Thanks Alan. And fixed. artie
Another, “always be wide open of close”‘ should be “or close”.
That would be correct. Tanks! I actually re-worked that sentence and closed the parens 🙂 a
“Tanks!” Typo, should be “Thanks!”. :)Sheeez, Artie. Great Article.
YAW but it’s tanks, and planes and warships! artie