
Hand Update 🙂
Saw Dr. Poupolo on Monday afternoon. He feels that healing is progressing very nicely. And there is no sign of infection. I am down to just bandaids. The middle finger will need some work to get back to 100%. Dr. Pop did of course give it a good flex–he can’t resist :)–and the middle knuckle hurts a lot more this morning than it did over the weekend. Best advice: stay on the antibiotics to make sure that every last bug in the tendon sheath is eliminated to prevent a flare up. I will continue to extend and flex the finger gently. More good news, the swelling on the back of the hand is much reduced. The end of the tunnel is in sight and so far there is no on-coming train in sight. 🙂
You Be the Photo Contest Judge/Part I Update
With 57 comments as of Tuesday morning, You Be the Photo Contest Judge/Part I has proven to be very popular. As of 8:34am on May 24, no one has matched my three picks… The odds of a correct random guess are 6 X 5 X 4 = 120 to 1 against.
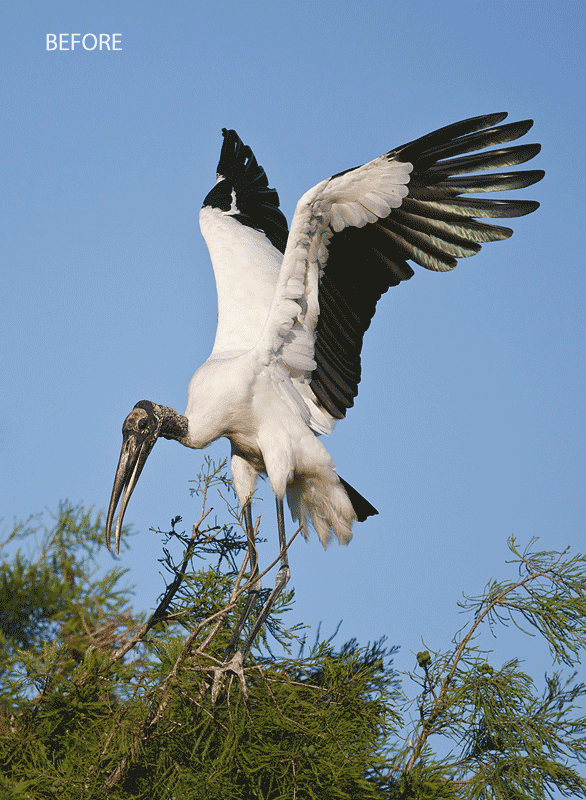
Wood Stork animated GIF showing before and after Linear Burn. This image was created with the Canon 70-200mm f/2.8L IS II lens, the Canon EF 1.4X III TC (hand held at 280mm), and the Canon EOS-1D Mark IV. ISO 400. Evaluative metering at zero: 1/4000 sec. at f/4 in Manual mode. |
Linear Burn E-mail with Screen Caps
Please take a few seconds to study the animated GIF. Note that the WHITEs in the before image are very bright while in the after image, the one with a 40% Linear Burn applied to the brightest highlights, the WHITEs are denser and show more detail. For the after image I also sharpened the head and upper bill with a contrast mask and then lightened it. (Eagle-eyed observers may note that the WHITEs in the after image, the one with the Linear Burn, look just a bit lumpy. This is somewhat expected due to the increase in contrast that comes with JPEG creation.) The WHITEs in the optimized master file looks superb: smooth and silky. You can learn to create a layer with the brightest WHITEs on it by using Select/Color Range on pages 86-87 of Digital Basics.
E-mail exchange with Roger Williams
RW: In response to your blog entitled, “Dip-sticking a Nearly Impossible Situation” (5/11), I asked a question about linear burns but did not receive a response.
AM: Roger, I am sorry that I missed your question. I try very hard to respond to each and every question in the Comments but with me traveling and photographing, spending 20+ hours per week on the blog, another 20 hours answering e-mails, about ten more hours on each Bulletin, and another ten or so hours per week on BPN, I sometimes miss something. 🙂 Oh, and I forgot the five days in the hospital last week with my infected hand.
RW: I’d like to try the process extolled in the above mentioned post, as well as in other posts, but have been unable to do so. I have PhotoShop CS4. Following the instructions on pages 88-89 in the 2011 update of Digital Basics has not been helpful.
AM: “Explained” 0r “detailed” might have been a better choice of words than “extolled.” 🙂 Having just re-read the relevant section in Digital Basics I am confused as to why you are confused but keep reading and I will try to help.
RW: First off, there is no Linear Burn option in the Blending Mode dropdown menu – in fact, there is no “blending mode” dropdown menu.
AM: Linear Burn goes back at least to CS-3 and is very much present in CS-4. Here is the direct quote from Digital Basics: “Once you are happy with your selection and have placed it on its own layer, select Linear Burn from the Blending Mode dropdown menu on the top left side of the Layers Dialogue Box.”.
RW: The closest sequence to what you describe seems to be Layers/layer style/blending options – but it produces no “linear burn”.
AM: Now I am the one who is confused. 🙂
RW: Perhaps Digital Basics was written around a previous versions of PhotoShop making it of limited value to those of us who have updated versions. Suggestions would be appreciated.
AM: Or perhaps not. It seems that you simply have been unable to follow these simple directions: “Once you are happy with your selection and have placed it on its own layer, select Linear Burn from the Blending Mode dropdown menu on the top left side of the Layers Dialogue Box.
To help you out, I have prepared the JPEG below.
| [Not a valid template] |
On the left is the Layers Dialogue Box. If you look on the top left side of this dialogue box, you see the word Normal with a downward facing arrow just to the right. This is the Blending Mode dropdown menu. By clicking on the downward facing arrow, you will open the dropdown menu. As you can see, the sixth item from the top is Linear Burn. Select that and your selected highlights will usually appear much too dark. Now reduce the opacity to taste. Note: for the after Wood Stork JPEG image in the Animated GIF I added 40 points of BLACK to the WHITEs in Selective Color only to the highlight Layer. To do so I used my personalized Keyboard Shortcut for Selective Color on a Layer: Alt-Cntrl-S. (Otherwise you need to go to Image/Adjustments/Selective Color.)
I hope that the screen capture clarifies things for you. BTW, if you do not have either a Background Copy or a Layer with your highlights on it the Blending Mode dropdown menu will not be active as there is nothing to blend.
Everything above including all of my personalized Keyboard Shortcuts and how to create those or yours is of course detailed in Digital Basics.
Shopper’s Guide
Below is a list of the gear that I used to create the images above (along with some related items). Thanks a stack to all who have used the Shopper’s Guide links to purchase their gear as a thank you for all the free information that we bring you on the Blog and in the Bulletins. Before you purchase anything be sure to check out the advice in our Shopper’s Guide.
Canon 70-200mm f/2.8L IS II lens. Man, I am loving this lens on my shoulder with the 2X III teleconverter. I also use it a lot with the 1.4X III TC.
Canon 1.4X III TC. This new Series III TC is designed to work best with the new Series II super-telephoto lenses.
Canon EOS-1D Mark IV professional digital camera body. My workhorse professional digital camera bodies.
And from the BAA On-line Store:
The Lens Align Mark II. I use the Lens Align Mark II pretty much religiously to micro-adjust all of my gear an average of once a month and always before a major trip. Enjoy our free comprehensive tutorial here.
Delkin 32gb e-Film Pro Compact Flash Card. These high capacity cards are fast and dependable.

|
I pack my 800 and tons of other gear in my ThinkTank Airport SecurityTM V2.0 rolling bag for all of my air travel and recommend the slightly smaller Airport InternationalTM V2.0 for most folks. These high capacity bags are well constructed and protect my gear when I have to gate check it on short-hops and puddle jumpers. Each will protect your gear just as well. By clicking on either link or the logo below, you will receive a free gear bag with each order over $50.


Hey Charlie, Don’t forget: I drove a cab in NYC in the early 70s!
Good tip – I use this technique often since seeing you do it in Alaska. No matter how much you know about Photoshop, you can always learn from watching someone else use it.
Oh and if you need some good exercise for that middle finger while you are up here, just take a few drives in NYC during rush hour. I’m certain it will be back to normal in no time at all! 😛
Charles
Love that combo, 70-200 II and the 1.4X III TC. Thnx.
Nice capture and great tip!
sweet
Good to hear your hand is recovering, keep with the antibiotics as long as the hand doc says
Good Luck
Jim
Many thanks 🙂 Dr. Jim
Hi Art
I have always appreciated your post processed Images. I have purchased your publications but I feel that from time to time, if you show us detailed workflow of how you were able to achieve excellent end result, this will add to the guidance one seeks from your e books.
Just to recollect, we once met in Ndutu, Tanzania, when you were there.
Regards/ Kunj Trivedi
Kunj, I am unsure of what you mean. I explain my workflow in detail. Please let me know what you are looking for….
Re: hand update. This is the news l wished and it arrived with the sun today! Triumph of the energies! You’ve made my day with this update! Patricia