
Hand Update 🙂
The hand continues to improve slowly each day. Stitches out next Wednesday. I am planning on getting out to photograph some shorebirds this afternoon.
You Be the Photo Contest Judge/Part I/Nature: Update
With 76 comments as of Thursday morning, You Be the Photo Contest Judge/Part I has continued to be very popular. As of 8:06am on May 26, no one has matched my three picks… A $10 discount good at the BAA On-Line Store will go to the winner… The odds of a correct random guess are 6 X 5 X 4 = 120 to 1 against. I will share my three choices and the reasons I chose them late on Sunday.
| [Not a valid template] |
|
This image of a Least Tern with a baitfish for courtship was created at Matanzas Inlet, FL with the Canon 800mm f/5.L IS lens, the EF 1.4X III TC, and the EOS-1D Mark IV. ISO 400. Evaluative metering +1 stop: 1/100 sec. at f/8 in Av Mode confirmed by histogram and blinkies check. AI Servo AF with rear focus (and recompose). Lens Micro-Adjustment +3. |
Select Color Range Basics
Here is a free excerpt adapted from Digital Basics.
Advanced Photoshop Techniques/Making Color Range Selections
Learning to make selections based on color range can often simplify the selection process. Once the selections are made, you can make a variety of targeted adjustments on the selected area(s). The areas selected via color range are almost always non-contiguous, that is, the selected areas will not be connected to one another. I often make a selection based on color range to remove color casts or to increase the density of highlight areas that do not contain any over-exposed pixels. (See Digital Basics for detailed instructions on each of the above and tons more plus the complete BAA digital workflow.)
To make a selection based on color range, follow these steps:
Make sure that your Background Copy Layer is active (highlighted).
Click on Select/Color Range
When the Color Range Dialogue Box opens, click on the color or tonality in the image that you would like to select. This may be the brightest highlight, the darkest shadow, or a specific color.
If you need to add to the selection, click on the + eyedropper and continue clicking.
Once you are happy with the basic selection, you can fine tune it by adjusting the Fuzziness slider. Move the slider to the right to increase the range of colors selected; move it to the left to decrease the range of the selected colors.
Once you are happy with the selection, click enter. It will take a few seconds for the selection to be made. After the selected areas are processed, they will be encircled by the marching ants.
Now hit Control J to place the selection on its own layer.
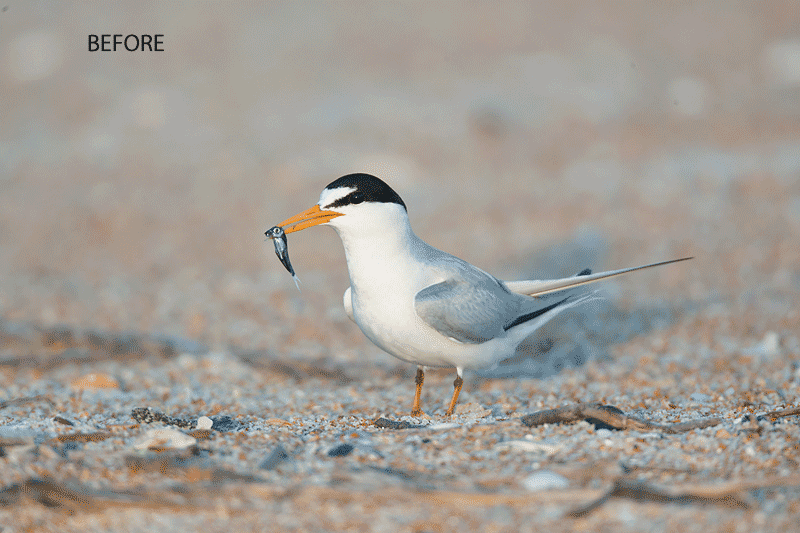
The animated GIF above shows the before and after images for the opening image. Note the nice Linear Burn on the breast, the beach clean-up, and the improved look of the eye. For the beach clean-up I used both the Clone Stamp Tool at reduced opacity and the Patch Tool. Digital Eye Doctor techniques were used to darken the pupil slightly and to lighten the iris just a tad; resist the urge to overdo the Eye Doctor stuff. All of the techniques used are of course detailed in Digital Basics, a PDF that is sent by e-mail. |
Select Color Range Advanced Tip
Here is a Color Range selection tip from Tim Grey.
When the Color Range Dialogue Box opens check the Localized Color Clusters box in the upper left hand corner. This will (to some degree) limit the selected areas to the colors and tonalities that you have clicked on and will–to some degree–prevent the selection of similar colors and tonalities in other parts of the image. This setting should be sticky so the odds are that after you do it once Photoshop will remember it.
Shopper’s Guide
Below is a list of the gear that I used to create the image above (along with some related items). Thanks a stack to all who have used the Shopper’s Guide links to purchase their gear as a thank you for all the free information that we bring you on the Blog and in the Bulletins. Before you purchase anything be sure to check out the advice in our Shopper’s Guide.
Canon 800mm f/5.L IS lens. Right now this is my all time favorite super-telephoto lens.
Canon 1.4X III TC. This new Series III TC is designed to work best with the new Series II super-telephoto lenses.
Canon EOS-1D Mark IV professional digital camera body. My workhorse professional digital camera bodies.
And from the BAA On-line Store:
Gitzo GT3530LS Tripod. This one will last you a lifetime.
Mongoose M3.6 Tripod Head. Right now this is the best tripod head around for use with lenses that weigh less than 9 pounds. For heavier lenses, check out the Wimberley V2 head.
CR-80 Replacement Foot for Canon 800. When using the 800 on a Mongoose as I do, replacing the lens foot with this accessory lets the lens sit like a dog whether pointed up or down and prevents wind-blown spinning of your lens on breezy days by centering the lens directly over the tripod.
Double Bubble Level. You will find one in my camera’s hot shoe whenever I am not using flash.
The Lens Align Mark II. I use the Lens Align Mark II pretty much religiously to micro-adjust all of my gear an average of once a month and always before a major trip. Enjoy our free comprehensive tutorial here.
Delkin 32gb e-Film Pro Compact Flash Card. These high capacity cards are fast and dependable.

|
I pack my 800 and tons of other gear in my ThinkTank Airport SecurityTM V2.0 rolling bag for all of my air travel and recommend the slightly smaller Airport InternationalTM V2.0 for most folks. These high capacity bags are well constructed and protect my gear when I have to gate check it on short-hops and puddle jumpers. Each will protect your gear just as well. By clicking on either link or the logo below, you will receive a free gear bag with each order over $50.


Cheapo, This is already cropped a bit; I am fine with the framing (though a bit bigger in the frame would be a fine option).
I’m glad you’re having a Turn for the better. 😉
The image is very nice, and I see the improvement. But would a tighter crop not suit it? I mean, to be honest it could have an almost blank background and I’d still like it.
You are welcome Bob. Thanks for stopping by. Please remember to use our B&H link for all of you B&H purchases. 🙂
Hi Artie, Glad you hand is about well. Thanks for the tips in this BLOG.