|
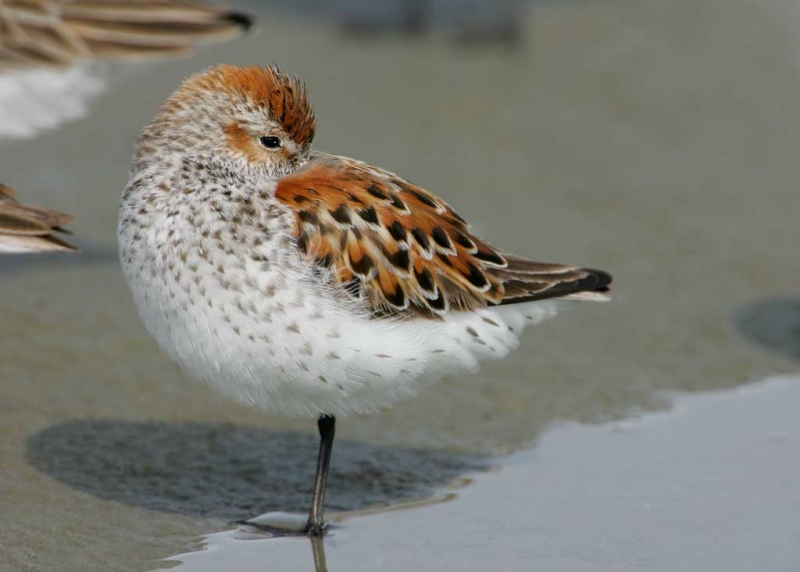
Western Sandpiper, breeding plumage, Cordova, AK. May 6, 2005. This image was created with the tripod mounted Canon 500mm f/4 L IS lens, the 2X II TC (now replaced by the 2X III teleconverter) and the Canon EOS-1D Mark II (now replaced by the EOS-1D Mark IV). ISO 400. Evaluative metering +1/3 stop: 1/500 sec. at 11. Central sensor One-Shot AF and recompose. For a greater appreciation of the image, click on the photo. Then click on the enlarged version to close it. |
Family Jewel Improvement
In the October 4th blog post, Capture and Beyond Workflow Lessons That You Cannot Afford to Miss, I wrote about the importance of saving and protecting your RAW files because as the years go by our image optimization skills get better and better and our image optimization software also gets better. While it is impossible for any serious photographer to go back every year or two and rework all of the images in their files, it can be fun to go back to a few old friends and make them better….
I visited Cordova to speak at the big shorebird festival there. After much research I planned my trip around the average peak numbers of Western Sandpiper: May 7. To be sure not to miss peak, I arrived on May 2nd and stayed until May 12. When I got off the plane my host and guide Milo Burcham’s first words were, “35,000 Western Sandpipers flew north last night.” He did find me a mat of several thousand birds that first afternoon roosting behind the AC Value Center, the local supermarket. My best image from that session was honored in a recent BBC Wildlife Photographer of the Year Competition. The next day, those birds were gone.
But a smattering of gorgeous breeding plumage Westerns remained. The image above shows how I first optimized the image more than six years ago. The subject was a gorgeous bird and I was able to get fairly close, but it was surrounded by others so I could not go any lower (or my subject would have been blocked). But I was never happy with the other tails in the frame, with the shadow on the right, and with the dark area at the top. But that was before I learned about Quick Masks from Robert O’Toole’s APTATS I. Do note that I created the eye highlight in the opening image. But did not do a very good job of it…. That was before I developed the Eye Doctor techniques detailed in Digital Basics.
|
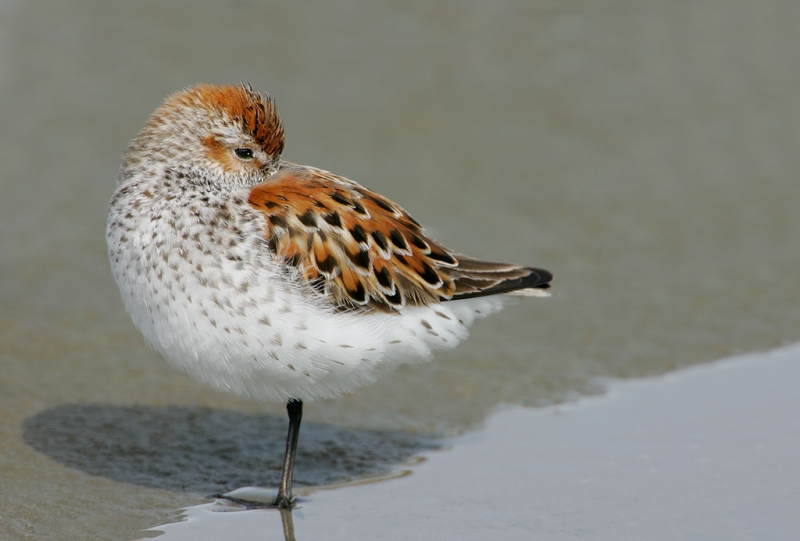
Here I started with the old optimized file and added canvas. Then I covered the two unwanted birds, the shadow on the right, and the dark area at the top using several Quick Masks. And kept the crummy eye highlight…. |
I was proud of my efforts and posted the reworked image here on BirdPhotographer’s.Net. The post was entitled, “Another Gem Found.” Folks like the image but there are many sharp eyes on BPN. BPN member Sidharth Kodikal, the first to comment, asked, “Was the catchlight added?” At this point I still did not realize what a poor job I had done so I promised to have a look for the RAW file…. This one I found :).
|
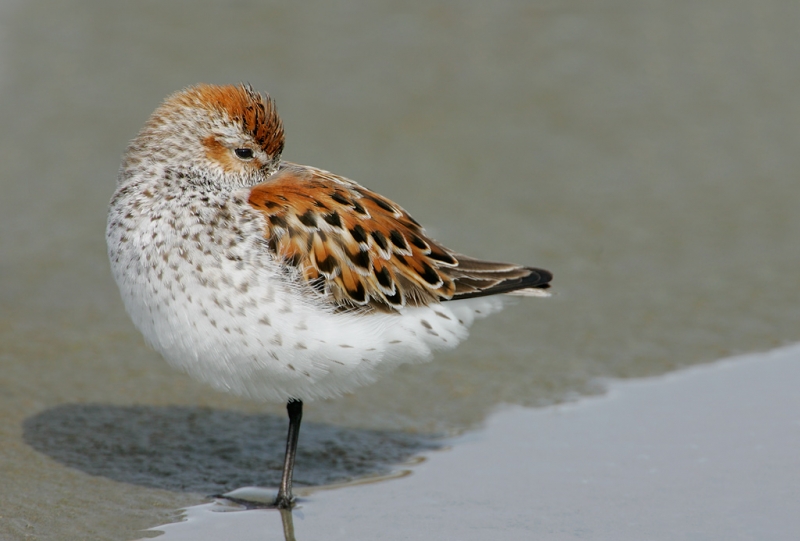
Here, with the help of Sidharth (and several others who mentioned the crummy catchlight), is the final optimized image, a far cry from the opening image in this blog post. And one that I can be truly proud of. It is amazing that such a tiny change can have a huge effect on the final result. For a greater appreciation of the image, click on the photo. Then click on the enlarged version to close it. |
Once I went back to the RAW file I saw that I had done an horrific job. Rather than start from scratch I re-converted the RAW file and changed it to 8-bit so that it would match the optimized file. Then I painted a quick Mask of the eye and brought it into the re-worked file. As I had added canvas I needed to resize it for a perfect match (Control T for the Transform Tool). I flatted the image and went to work on the original eye that now hid my botch job. This time I created a tiny, tiny irregularly-shaped catchlight using a 1 pixel Clone Stamp Tool brush and made sure to place the catchlight in the center of the naturally-occurring light area at the top of the eye. As the folks on BPN said, “Much Better.”
Earn Free Contest Entries and Support both the Bulletins and the Blog by making all your B & H purchases here.
More and more folks are earning multiple contest entries with their B & H purchases. See here for details on that. Eleven great categories, 34 winning and honored images, and prize pools valued in excess of $20,000. Click here to visit the competition home page.
Shopper’s Guide
Below is a list of the gear used to create the image in today’s blog post. Thanks a stack to all who have used the Shopper’s Guide links to purchase their gear as a thank you for all the free information that we bring you on the Blog and in the Bulletins. Before you purchase anything be sure to check out the advice in our Shopper’s Guide.
Canon 500mm f/4 L IS lens. Surely the world’s most popular super-telephoto lens. And for good reason. And the 500 f/4L IS II promises to be a lot better!
2X III teleconverter. This new 2X TC is considerably sharper than the 2X II model.
Canon EOS-1D Mark IV professional digital camera body. My two Mark IV bodies serve as my workhorse digital camera bodies.
And from the BAA On-line Store:
LensCoats. I have a LensCoat on each of my big lenses to protect them from nicks and thus increase their re-sales value. All my big lens LensCoat stuff is in Hardwood Snow pattern.
LegCoat Tripod Leg Covers. I have four tripods active and each has a Hardwood Snow LegCoat on it to help prevent further damage to my tender shoulders 🙂
Gitzo GT3530LS Tripod. This one will last you a lifetime.
In 2005 I was using the Wimberley V2 head full time. Today many folks still prefer the Wimberley head to the Mongoose M3.6 that I use. That’s why we carry both.
Wimberley P-40 Plate. We sell dozens of P-40 plates each year for a variety of 500mm lenses.
Double Bubble Level. You will find one in my camera’s hot shoe whenever I am not using flash.
Be sure to check out our camera body User’s Guides here.
The Lens Align Mark II. I use the Lens Align Mark II pretty much religiously to micro-adjust all of my gear an average of once a month and always before a major trip. I am borrowing a 500 f/4 for Bosque; the first that that I will do is micro-adjust it. Enjoy our free comprehensive tutorial here.
Canon EOS-1D Mark IV User’s Guide. Learn to use your Mark IV the way that I use mine. Also available for the 7D and the Mark III here.


Heh. I was so enthralled by the beauty of this little bird that I didn’t notice the ‘extras spoiling the image. That, basically describes me when I first look at an image of an animal. If the subject deserves attention, everything else can go whistle in the wind! But the adjusted image is great.
You are absolutely right – huge improvement. And such a beautiful bird!
OK, I get it. Hard to tell without a closeup of the eye. The method I mentioned results in a brightening of the existing catch light so it is as irregular as the catch light actually is.
For whatever reason, there was no actual catchlight in the original image. artie
Yep, much better! It always amazes me how a little catch light can make a photo come alive. I presume you used the clone tool to clone from the existing but too small highlight???? Another way I have found effective in some situations is to add a levels adjustment layer set to screen mode with a black (hide all) mask. I then use a white paint brush to open the mask over the existing catch light to brighten it. The levels sliders can then be adjusted to fine tune the effect. This sometimes brightens the existing highlight enough to not have to add any artificial areas which I prefer to avoid if possible. If it is not enough, just delete the adjustment layer and try something else.
And a bit catchlight can kill it :). No on the presumption…. I Quick Masked in the original eye and use a one pixel Clone Stamp Tool as I mentioned to create the new smaller catchlight. I simply placed it in the light area, the sky reflected. Your way would work to as long as you can make it irregular. Best way to do that is with a tiny brush…. artie
[…] Continue reading here: Family Jewel Improvement […]
Thank you, Artie! I am very happy that my feedback was helpful.
Thanks to this wonderful image for inspiring me to try the 2x with the 500mm. I used this combo the last weekend and was very happy with the results. I’m certainly going to be carrying with me from now on; in case extra reach is needed.