|
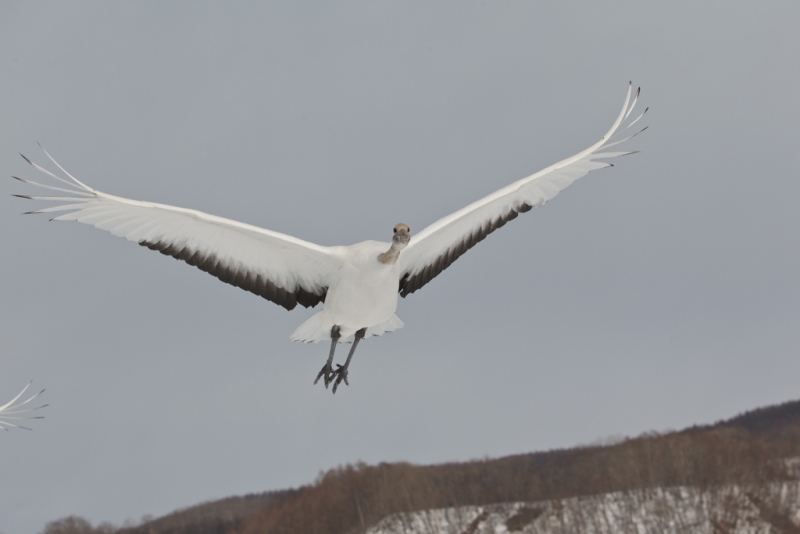
This image of a young Red-crowned Crane was created at the Akan Crane Center, Hokkaido, Japan on March 4, 2012 with the Canon 70-200mm f/2.8L IS II lens, the 1.4X III TC (hand held at 98mm), and the Canon EOS-1D Mark IV. ISO 400. Evaluative metering +2/3 stop: 1/3200 sec. at f/8 in Manual mode. Central Sensor/AI Servo Rear Focus active at the moment of exposure. Click here if you missed the Rear Focus Tutorial. Click on the image to enjoy a larger version. |
Crane Park Clear Morning Lessons
Once we got to the two crane parks we had two lousy mornings. Why? It was clear as a bell with bright sun and blue skies. The Akan Crane Center where this image was created does not open till 8am. When we arrived we noted that the birds were 100% sidelit. Not my cup or tea at all. The next morning we got up way early in hope of photographing backlit cranes flying into the fields. It was -16 Celsius, about 3 degrees above zero Fahrenheit. We set up at the Tsurui Itoh Sanctuary only to learn that the birds do not fly in till mid morning…. As you will see in coming blog posts we killed on the sunny afternoons.
Today is March 6th. We woke up to three inches of fresh snow. It is still falling. We are excited and will be heading to Tsurui Itoh at 8:30am.
The young crane in the image above was photographed at 12:40pm in very bright overcast light on our first day at Akan.
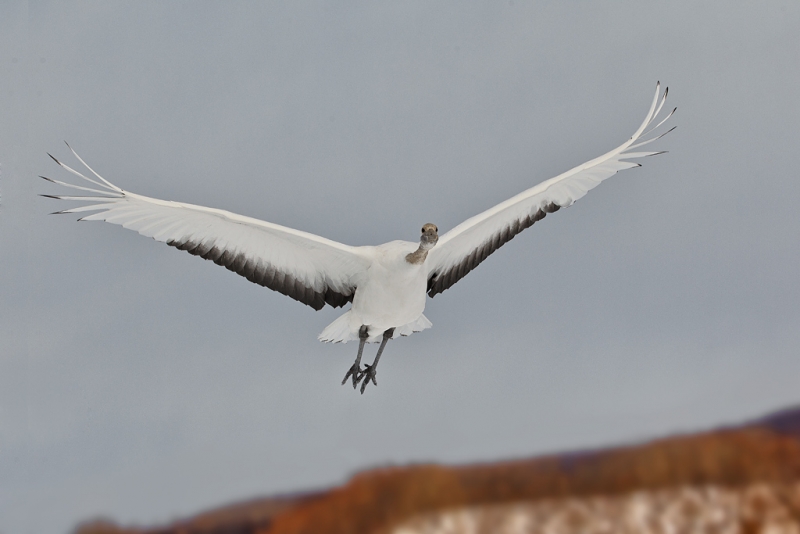
The optimized image is below.
|
Red-crowned Crane in flight above ridge, Akan Crane Center, Hokkaido, Japan. This is the optimized version. |
Many Lessons: How Would Your Optimize This Image?
Here’s what I did beginning in Photoshop CS-5:
I converted the image in ACR moving the Recovery Slider a bit to the right to ensure that I had know RGB values great than 230 and then set the black points by holding down the ALT key and moving it to the right until I noticed some speckling on the white field and backed off. All as detailed in Digital Basics.
Next I needed to move the bird away from the frame edge. I hit Control A, Control J placing the entire image on its own layer. Then I hit V for the Move Tool. I moved the bird (and the ridge below) to the right. Then I used a large Clone Stamp Tool to erase the faint edge where the two slightly different tonalities of sky met. This is the most basic of the many tutorials in Robert O’Toole’s APTATS II.
(This amazing CD covers the following topics in detail with numerous screen captures: Composition Correction: Increase Lead Room Without Cropping/Basic, Composition Correction: Increase Lead Room Without Cropping/Intermediate, Composition Correction: Increase Space Near a Frame Edge/Advanced, Super-Fast Element Removal: Basic, Super-Fast Element Removal Plus Composition Improvement, Gradient Background Blur, Mask Blending for Mega-Depth-of-Field, Selective Highlight Detail Enhancement, Selective Noise Reduction and Sharpening, Selective Sharpening with Finely Detailed Edges, and his killer Average Blur Color Balance Trick. Robert teaches you to create actions for most of the above techniques to speed up your workflow even more. This CD is only for serious Photoshop folks who wish to learn advanced techniques; some study will be required.)
Once I moved the bird to our left the primary tips on the layer below showed through. They were removed with multiple passes of a 60% hard Clone Stamp Tool followed by Patch Tool clean-up to restore detail in the repaired areas. The same techniques were used to remove the primaries of the second crane on the left frame-edge. Again, all as detailed in Digital Basics.
Once clean-up was complete I painted a Quick Mask of the ridge and ran a 35% Gaussian Blur to soften the details and then increased the saturation of the ridge only (Control U) and painted the effect from the sky after applying a regular Layer Mask. The basics of Quick Masking and Layer Masking are detailed in Digital Basics; the advanced Quick Masking techniques that I use on more than 50% of my images are covered in detail with screen captures in Robert’s APTATS I CD.
I increased Contrast globally in NIK’s Viveza and boosted Brightness as there as well. Then I used the Quick Selection Tool to select the black portions of the secondary feathers, the head, and the legs. I put the selection on its own layer and ran a 100% Tonal Contrast filter from NIK Color Efex Pro on that layer only. Then I selected the whites using Select/Color Range and applied at 20% round of Detail Extractor (again from NIK Color Efex Pro). The final touch was selectively sharpening the crane’s head and face with a Contrast Mask (Unsharp Mask at 15/65/0).
The entire image optimization process took less than ten minutes. It took a lot longer to write it in a clear, easy to understand style (almost 1 1/2 hours) than to do it!
Take a Moment
Take a moment to leave a comment and let us know what you think of the final image and let me know if you have any questions on the image optimization process.
NIK
As regular readers know NIK’s Color Efex Pro 4 is now an integral part of my workflow. You can save 15% on all NIK products by clicking here and entering BAA in the Promo Code box at check-out. Then hit Apply to see your savings. You can download a trial copy that will work for 15 days and allow you to create full sized images.
NIK Creative Efex Collection
NIK recently announced the availability of a special limited production bundle of 3 of their most popular products, Color Efex Pro 4, Silver Efex Pro 2, and HDR Efex Pro. You can save more than $200 on the bundle which is available only through NIK affiliates. If you would like additional info, please e-mail with the words “Creative Efex Collection” in the Subject line. If you have been on the fence about purchasing the plug-ins mentioned above this is a great chance to save some significant bucks.
Support both the Bulletins and the Blog by making all your B & H purchases here.
Remember: you can earn free contest entries with your B & H purchases. Eleven great categories, 34 winning and honored images, and prize pools valued in excess of $20,000. Click here for details.
Shopper’s Guide
Below is a list of the gear used to create the images talked about in this blog post. Thanks a stack to all who have used the Shopper’s Guide links to purchase their gear as a thank you for all the free information that we bring you on the Blog and in the Bulletins. Before you purchase anything be sure to check out the advice in our Shopper’s Guide.
Canon 70-200mm f/2.8L IS II lens. Man, I am loving this lens on my shoulder with the 2X III teleconverter. I also use it a lot–as I did for the image of the eagle with fish–with the 1.4X III TC.
Canon EOS-1D Mark IV professional digital camera body. My two Mark IVs are my workhorse digital camera bodies.
And from the BAA On-line Store:
The Lens Align Mark II. I use the Lens Align Mark II pretty much religiously to micro-adjust all of my gear an average of once a month and always before a major trip. Enjoy our free comprehensive tutorial here.
Canon EOS-1D Mark IV User’s Guide. Learn to use your Mark IV the way that I use mine. Also available for the 7D and the Mark III here.
BreezeBrowser. I do not see how any digital photographer can exist without this program.


Also: thank you for taking the time. It means a lot to a lot of us. You’re a great teacher, Arthur Morris, and a rara avis…
A couple of questions, Artie:
“[…] then increased the saturation of the ridge only (Control U)”…
But that’s a destructive way of doing it, isn’t it? — why not do it via a layer?
…”and painted the effect from the sky after applying a regular Layer Mask”
I’m not sure I follow the second part — what effect have you painted from the sky?
Thanks for clarification!
-Tomasz
I was on a Layer…. I painted away the effects of the Gaussian blur on the edge of the sky and the top of the ridge where the two meet….
A fine ghost bird indeed! This is what I like to call a “layercake image” and to my eye(s) it’s a healthy lesson and whizbang piece of art…and don’t you get punny about it…thank you for sharing this. I really like the worked-on image. Speaks to the heart…
To use the content-aware fill, simply hit “L” and make the selection, then Shft+F, and enter. My fill is almost always set to content-aware. Seems much quicker than making clone tool choices and many passes.
L brings up the Lasso Tool. Making the selection is easy from there. Hitting Shift F toggles the view in Photoshop. As a teacher it helps if your tutorials actually work for those trying to follow along….
Instead of using the quick selection tool on the blacks to run the Tonal Contrast filter and the select/color range on the whites to run the Detail Extractor filter, couldn’t you have simply run the filters and then put “+” control points on the corresponding areas, dragging out the control points to cover only the areas you’r interested in adjusting? That should only apply the filters to those specific areas, saving yourself the trouble of making those selections. Just a suggestion.
The processed version is much better. I think I would have tried sliding the Black slider a bit to the right in ACR once I had added exposure.
Confused by your comments….
Becky, nope!
I Always like seeing images of birds around the world that I haven’t had the pleasure of photographing (At least not yet). Did you have to blacken the eyes a bit to make them stand out? Difficult head angle, but nice flight shot. The foliage does perhaps look a bit over saturated, but it adds definition to the image.
Jay Gould, are you the same guy I used to bid against for cigar box art? :o)
Tonal Contrast in NIK makes the blacks blacker.
Very Informative. Just thinking while you were shooting those cranes. I was banging my head in the office in India. You lucky people!
Many thanks. We are blessed, but you are warm 🙂
As to the final image, while it isn’t my cup of tea, it has certainly made a wonderful learning exercise. I don’t believe the head is sharp enough to meet your exacting standards, and I think the foliage is a bit too saturated.
Why not remove those offending primaries on the left with a quick lasso selection and a content-aware fill instead of multiple passes of the clone stamp tool? OR Use a content-aware bush to make them disappear?
Jay, As for the sharpness, best to check your meds. The face and eyes are razor sharp. And of course there are lots of ways to skin a variety of cats in Photoshop. Using Content Aware involves making a selection and then working with a dropdown menu–the latter is time consuming and bothersome; I avoid them when I can.
I may have overdone the saturation a bit. Enjoy your tea.
Have never thought of selectively choosing areas and creating separate layers to apply different effects in Color Efex Pro. Like the results, so will give this a shot myself!
Try it. You’ll like it.