|
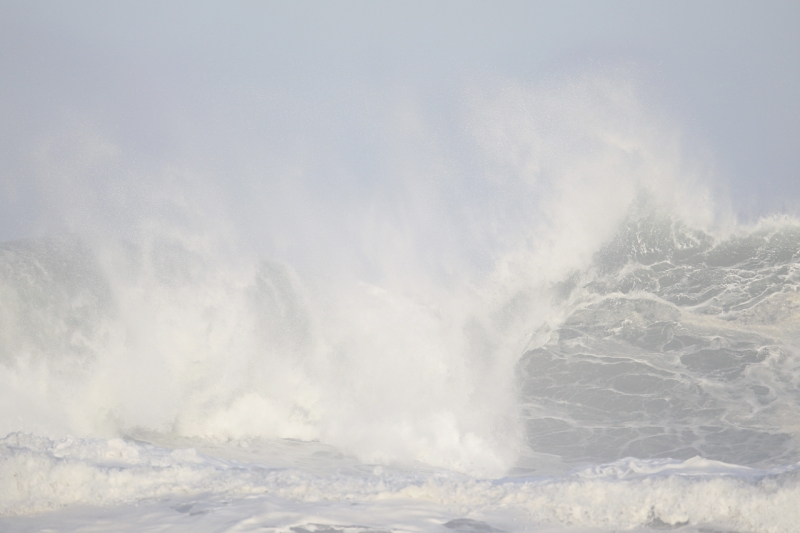
This image of a huge breaking wave was created at 7:23 am on April 1, 2012 just north of Morro Rock with the with the tripod-mounted Canon 800mm f/5.6L IS lens and the Canon EOS-1D Mark IV. ISO 400. Evaluative metering +1 2/3 stops: 1/800 sec. at f/5.6 in Manual mode. Central Sensor/AI Servo Rear Focus active at the moment of exposure. Click here if you missed the Rear Focus Tutorial. Click on the image to enjoy a larger version. |
Keep or Delete?
Would you keep or delete the image above? Before you answer, there are several important concepts to understand:
1-With images of over-all light-toned scenes made when the sun is at less than full strength you generally need to add at least two stops of light to get some data half way into the right most box of the histogram.
2-When you expose such images properly they will (properly) look washed out on the back of your camera and then again on your computer monitor.
3-Such properly exposed digital images have huge potential.
4-The reason that you need to expose to the right in these low light/overall light-toned situations is to produce files with the greatest amount of information. If you do not believe me, simply photograph the pre-dawn sky at -1 stop and then again at +3 stops. Now download the images and compare the file size…. Let me know what you learn.
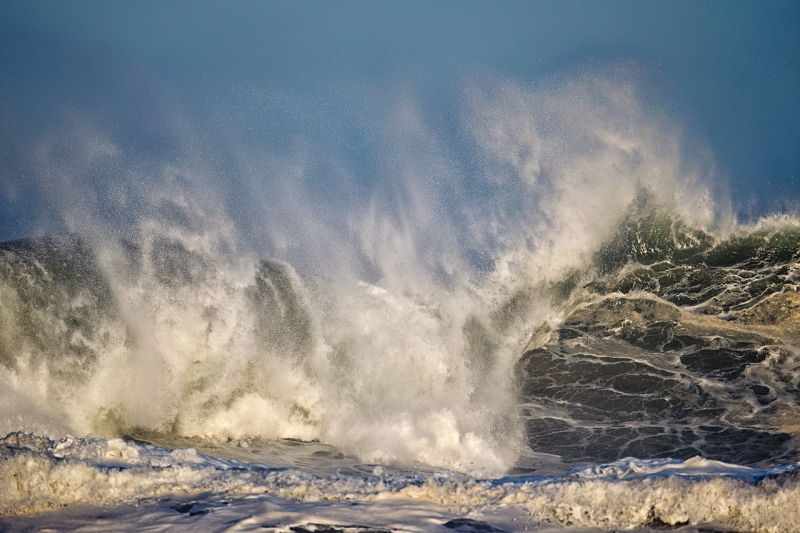
The optimized image that I created from the image above appears below and was first published in this recent blog post: “Frozen and Battered.” If you missed that one click here.
|
This is the optimized image created from the image capture above. |
Magic?
Nope. There was no magic involved. The image was converted in ACR as described in detail in Digital Basics. Note: if you set the Black point by moving the Black slider to the right while holding down the Alt key (the Command key for Mac) and your image looks too dark or too contrasty simply move it back to the left to taste.
After converting the RAW file to a TIFF and bringing it into Photoshop I brought the image into NIK Color Efex Pro. I ran Tonal Contrast at 80% and Detail Extractor at 50%. I guess that that might qualify as magic as it really juiced up the image. I used a large soft brush to erase the NIK effects from the sky; you almost never want to run Detail Extractor on the sky and the same is usually true of Tonal Contrast….
BTW, though I saw the top image while looking at the back of the camera I saw the optimized image in my mind’s eye. Heck I visualized it as I looked through the viewfinder. And even though the image on the back of the camera looked totally washed out I loved it from the moment I saw it :).
ps: I kept it!
NIK
As regular readers know NIK’s Color Efex Pro 4 is now an integral part of my workflow. You can save 15% on all NIK products by clicking here and entering BAA in the Promo Code box at check-out. Then hit Apply to see your savings. You can download a trial copy that will work for 15 days and allow you to create full sized images.
Contest Deadline Extended
The contest deadline has been extended until April 30, 2012. In case you missed the big news, click here.
Earn Free Contest Entries and Support both the Bulletins and the Blog by making all your B & H purchases here.
More and more folks are earning multiple contest entries with their B & H purchases. See here for details on that. Eleven great categories, 34 winning and honored images, and prize pools valued in excess of $20,000. Click here to visit the competition home page.
Shopper’s Guide
Below is a list of the gear used to create the images in today’s post. Thanks a stack to all who have used the Shopper’s Guide links to purchase their gear as a thank you for all the free information that we bring you on the Blog and in the Bulletins. Before you purchase anything be sure to check out the advice in our Shopper’s Guide.
Canon 800mm f/5.6L IS lens. Right now this is my all time favorite super-telephoto lens.
Canon EOS-1D Mark IV professional digital camera body. The very best professional digital camera body that I have ever used.
And from the BAA On-line Store:
LensCoats. I have a LensCoat on each of my big lenses to protect them from nicks and thus increase their re-sales value. All my big lens LensCoat stuff is in Hardwood Snow pattern.
LegCoat Tripod Leg Covers. I have four tripods active and each has a Hardwood Snow LegCoat on it to help prevent further damage to my tender shoulders 🙂 And you will love them in mega-cold weather….
Gitzo GT3530LS Tripod. This one will last you a lifetime.
Mongoose M3.6 Tripod Head. Right now this is the best tripod head around for use with lenses that weigh less than 9 pounds. For heavier lenses, check out the Wimberley V2 head.
CR-80 Replacement Foot for Canon 800. When using the 800 on a Mongoose as I do, replacing the lens foot with this accessory lets the lens sit like a dog whether pointed up or down and prevents wind-blown spinning of your lens on breezy days by centering the lens directly over the tripod.
Double Bubble Level. You will find one in my camera’s hot shoe whenever I am not using flash.
The Lens Align Mark II. I use the Lens Align Mark II pretty much religiously to micro-adjust all of my gear an average of once a month and always before a major trip. Enjoy our free comprehensive tutorial here.
BreezeBrowser. I do not see how any digital photographer can exist without this program.


A DEFINITE keeper!! Happy Pesach!
I think you hit the target with your comment that you “visualized” the image as you shot it. If more people can start visualizing what they would like to see as an end product, more thought would go into the actual photo taking . A beautiful photo Art
Love ’em both for different reasons. #1 has a magical feeling to it and #2 has stark realism. To me, they’re both keepers. Happy Passover,Artie.
Hi, Artie. This reminds me of the foggy monkey you showed us a few weeks ago that you also processed to dramatically increase the contrast. It’s a pretty impressive image.
David
It’s powerful, but to my eye it doesn’t look real. Perhaps it’s just a bit too contrasty? Great composition, and it’s nice to know how much can be done with digital software apps. I know, you’re going to say it’s the way your eye saw it. Perhaps if I hadn’t seen the original capture it would feel more convincing.
Also,
A sweet and Happy Passover
For me they would be great shots, but for you am I not sure.
I learned a while back that overexposure is no problem for RAW images. So a photographer can happily go over when shooting RAW. It’s a keeper. With RAW, you can put your digital shades on afterwards. 😉
The original is not over-exposed. It is properly exposed.
I see your point. If the image looks good on the back of the camera, it won’t necessarily create a sufficiently exposed file. The overexposed appearance gives you a better chance later. So we just need to learn the ratio of stops to use.
Artie,
I really love the first image, it is surreal to me. I deftly would keep both in display both. Each image appeals to different people.
Regards and happy Passover,
Myer