Can’t Fit the Bird in the Frame; What to Do?
|
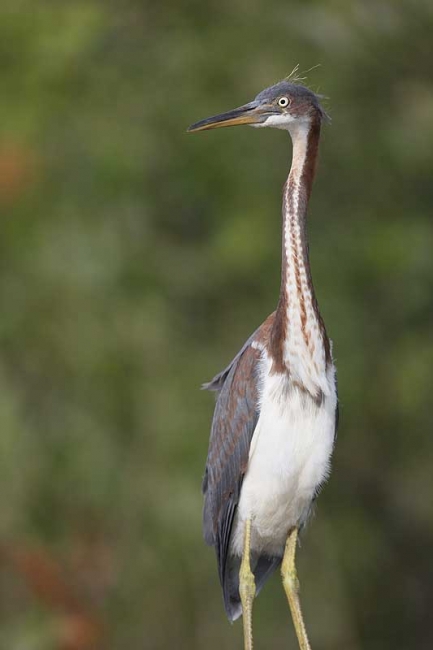
This image of a just-out-of-the-nest Tricolored Heron was created on the Hooptie Deux with James Shadle with the tripod-mounted Canon 800mm f/5.L IS lens and the Canon EOS-5D Mark III. ISO 400. Evaluative metering +1/3 stop: 1/1250 sec. at f/5.6 in Manual mode. Central sensor/Expand AF area/AI Servo Rear Focus AF and recompose. Click here if you missed the Rear Focus Tutorial. |
Can’t Fit the Bird in the Frame; What to Do?
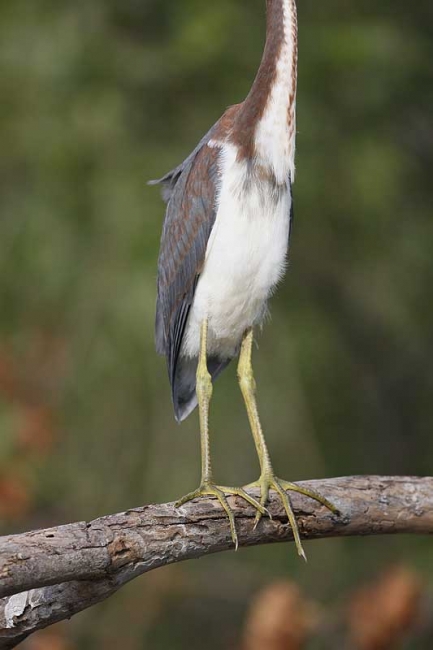
You are wading in thigh-deep 87 degree water with your big lens on a tripod. Avery nice just fledged Tricolored Heron lands too close to you on a fairly decent perch with a distant background. But you can’t fit the whole bird in a vertical frame. What do you do? Create two originals and plan on creating a stitched vertical panorama. Frame 1 is above. Frame 2 is below.
|
Same gear. Same exposure. Just point the lens down. Central sensor/Expand AF area/AI Servo Rear Focus AF and recompose. Click here if you missed the Rear Focus Tutorial. |
The Problem
Though it is not easily seen until you bring the two images into Photoshop, this bird, like most birds on a perch, was not staying completely still as landscapes usually do. With landscapes or stock still birds you can simply hit File/Automate/Photomerge, select the two (or more) images, select Reposition Only, and hit OK. But with the bird moving a bit it is usually better to take another tack. And that is what I did here.
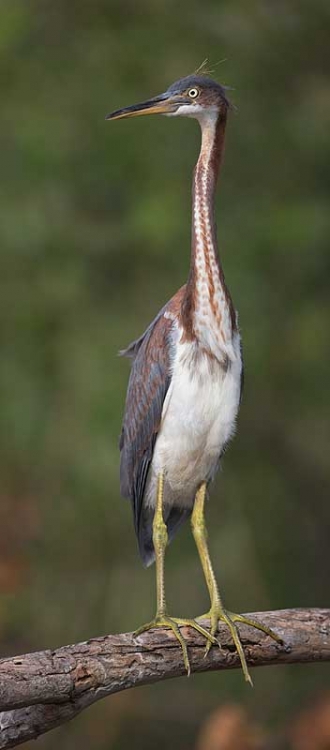
I selected the head and upper neck from frame 1 using the Rectangular Marquee Tool and put the selection on its own Layer. With frame two I expanded canvas vertically using the Crop Tool and then used the Move Tool (V) to bring the head Layer from Frame 1 onto Frame 2, hit Control T, and zoomed in to the spot where the necks from each frame met. The I used the Transform and Warp commands so that the two necks meshed perfectly. Last, I added a regular Layer Mask and erased the lower part of the head Layer leaving only what I needed. The final image is below.
|
This is the stitched panorama that I created by hand from the two images above. Tripod-mounted Canon 800mm f/5.L IS lens and the Canon EOS-5D Mark III. ISO 400. Evaluative metering +1/3 stop: 1/1250 sec. at f/5.6 in Manual mode. Central sensor/Expand AF area/AI Servo Rear Focus AF and recompose. Click here if you missed the Rear Focus Tutorial. |
I opted to go with a skinny vertical crop to fit the shape of the bird. Using the Warp and Transform commands are described in detail in APTATS I. Advanced Layer Masking Techniques are described in APTATS II. Much of what is discussed above (including Layer Masks for Idiots and several ways of expanding canvas) is detailed in Digital Basics along with my complete Digital Workflow and dozens of great Photoshop tips.
Captain Froggie
To learn more about getting out to Alafia Banks with James Shadle scroll down here or click here or here.
IPT Updates
Click here for the current IPT schedule. Click here for info on the August BAA Photo-Tour to Nickerson Beach, Long Island and the East Pond at Jamaica Bay WR, NY and lots of great images from both Nickerson and JBWR. There is just one spot left.
Shopper’s Guide
Below is a list of the gear used to create the images in today’s post. Thanks a stack to all who have used the Shopper’s Guide links to purchase their gear as a thank you for all the free information that we bring you on the Blog and in the Bulletins. Before you purchase anything be sure to check out the advice in our Shopper’s Guide.
Canon 800mm f/5.6L IS lens. Right now this is my all time favorite super-telephoto lens.
Canon EOS-5D Mark III. Man, I am in love with this camera body. Both the files and the AF system are superb.
And from the BAA On-line Store:
LensCoats. I have a LensCoat on each of my big lenses to protect them from nicks and thus increase their re-sales value. All my big lens LensCoat stuff is in Hardwood Snow pattern.
LegCoat Tripod Leg Covers. I have four tripods active and each has a Hardwood Snow LegCoat on it to help prevent further damage to my tender shoulders 🙂 And you will love them in mega-cold weather….
Gizo GT3532 LS CF Tripod. This one replaces the GT3530LS Tripod and will last you a lifetime.
Mongoose M3.6 Tripod Head. Right now this is the best tripod head around for use with lenses that weigh less than 9 pounds. For heavier lenses, check out the Wimberley V2 head.
Double Bubble Level. You will find one in my camera’s hot shoe whenever I am not using flash.
The Lens Align Mark II. I use the Lens Align Mark II pretty much religiously to micro-adjust all of my gear an average of once a month and always before a major trip. Enjoy our free comprehensive tutorial here.
BreezeBrowser. I do not see how any digital photographer can exist without this program.


Thanks all. Just got back from Alaska. Jim picked me up at 10am. We are headed to Publix, the fish store, and then home.
The key is to learn to think digitally in the field.
Nicely done and a nice little tutorial…what impresses me most is the seamless work done on the neck.
Crazy ….. Thanks for the tip Arthur. You can do anything with PS nowadays, can’t you? Hope you are doing well and having fun! xoxo
Great idea that I need to try to remember….on the fly and quickly when its needed.
Well. duh. Who wouldn’t have done that on their own?
Besides me, that is.
It takes the cake! That is truly impressive!