What’s Up?
With the image optimizations, This blog post took well more than four hours to prepare. When you purchase some new gear, please remember to use the BAA B&H affiliate links or get in touch with Steve Elkins at Bedford. It is the best way (aside from joining an IPT) to thank me for my educational efforts here. Using either of the BAA affiliates will not cost you one penny. Steve has been delivering lots of SONY 200-600s to happy folks in recent weeks.
I enjoyed a great 1200mm Black Vulture head-shot session on Sunday morning and will be headed back down to the lake hopefully for some more vulture flight photography.
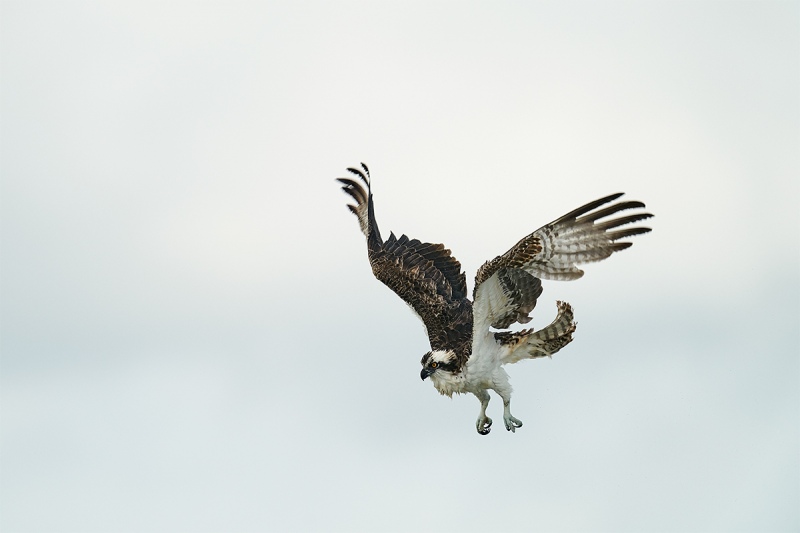
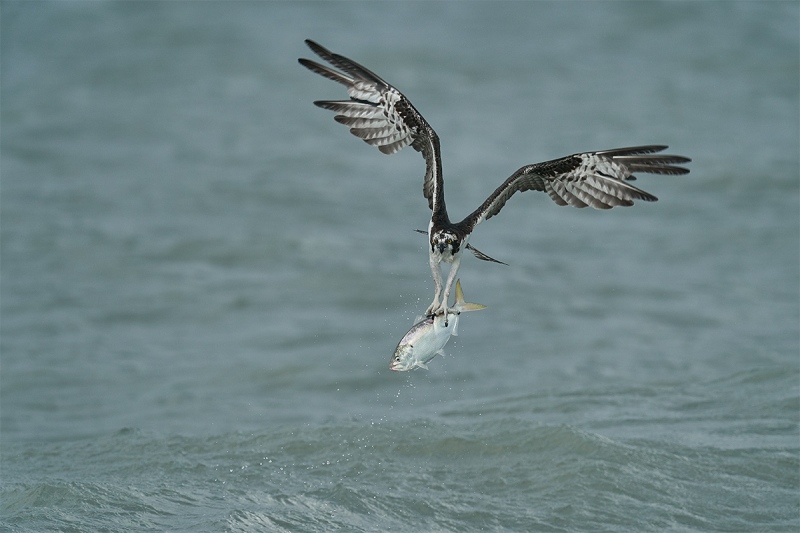
Please take a moment to let us know which is yoru favorite Osprey image and why you made your pick.
Sebastian Inlet In-the-Field Sessions
If you would like to set up a Sebastian Inlet In-the-Field Session, please contact me via e-mail. Morning sessions will run from 7:30 till 9:30am. Afternoon sessions from 4:30 till 6:30pm. Cheap: $200 per session. Add $75 to any morning session for lunch in Vero Beach and an image review session. I will likely be there this weekend but my schedule for the next two weeks is quite open so it is likely that I can fit my schedule to your needs. Lastly, if you live not-to-far away scheduling can be weather dependent.
Need System or Upgrade Advice?
These are certainly exciting and volatile times in bird and nature photography: Canon, Nikon, SONY? Upgrade or switch systems? Yikes! If you are thinking about switching or upgrading and have questions, feel free to call me on my cell at 863-221-2372 for a free ten-minute consultation. The only thing that I ask in return is that you make a firm commitment to use my B&H affiliate links or to buy from Bedford using the BIRDSASART discount code at checkout if you decide to go forward. Remember that Steve Elkins at Bedford can save you a few additional bucks on lens/camera/accessories packages. See the blog for his contact details. Either way, it will not cost you one penny more.
Be sure to leave a message if I do not pick up and I will get back to you. And please follow that up with an e-mail or a text stating your name and a good time for me to call you back. I spend lots of time each day walking, swimming, and watching football and baseball 🙂 And napping.
IPT Updates
- The Return to Bosque Reduced Rate Scouting IPT. NOV 26-28, 2019 — 3 FULL DAYS: $1199.00. Limit: 8/Openings: 6. Extra Day Options: Join me for one to three extra In-the-Field Days at the end of the IPT as follows: FRI 29 NOV, SAT 30 NOV, and SUN 1 DEC for only $300.00/day.
- The 2020 San Diego 4 1/2-DAY BIRDS AS ART Instructional Photo-Tour (IPT) WED JAN 8, 2020 thru and including the morning session on SUN JAN 12: 4 1/2 days: $2099.(Limit: 8/Openings: 5)
BIRDS AS ART
BIRDS AS ART is registered in the U.S. Patent and Trademark Office.
FlexShooter Pro News
All FlexShooter Pro BigFeet are now in stock in the BAA Online Store. You can click on the chart above or here for more information.
Coming Soon
The FlexShooter Mini
Csaba has found an excellent operation and the anodizing of the black balls for the Minis is underway. We should have our first batch to ship in about two weeks. Thanks to the many who have pre-ordered by phone for their patience.
Several months ago I had a FlexShooter Mini to test on both the UK Puffins and Gannets IPT and the Galapagos Photo-Cruise of a Lifetime. It is a smaller, lighter (one pound!) version of the amazing FlexShooter Pro. I used it often with both the Nikon 500 PF and the SONY 100-400 GM with great success and in a pinch, I was able to make sharper images with the Nikon 600 and the TC-E14. All with the Mini mounted on the lighter Induro GIT 204. I suggested to developer/manufacturer Csaba Karai that the Mini needed a bit more spring tension. As there was a problem getting the balls for the new Minis anodized properly, delivery will be delayed several weeks. 🙁 When we do receive our first shipment, the Minis will have my suggested changes.
The FlexShooter Mini with the lighter Induro GIT 204 is dead-solid-perfect for those whose intermediate telephoto or telephoto zoom is their workhorse lens for bird and nature photography. It will sell for $579 plus shipping. Folks who wish to be assured of getting one from our first shipment can order theirs by phone by calling Jim at 863-692-0906 asap. Your card will not be charged until your Mini is shipped. We already have five orders to ship from our first shipment.
FlexShooter Pro Update
We currently have only one FlexShooter Pro head in stock here. All BigFeet are in stock in the BAA Online Store here. Click here to access the pretty-much-complete FlexShooter Pro story with videos.
Money Saving Reminder
If you need a hot photo item that is out of stock at B&H, would enjoy free overnight shipping, and would like a $50 discount on your first purchase over $1000.00, click here to order and enter the coupon code BIRDSASART at checkout. If you are looking to strike a deal on Canon or Nikon gear (including the big telephotos) or on a multiple item order, contact Steve Elkins via e-mail or on his cell at (479) 381-2592 (Eastern time) and be sure to mention your BIRDSASART coupon code and use it for your online order. Steve has been great at getting folks the hot items that are out of stock at B&H. Those include the SONY a7r IV, the SONY 200-600, the SONY 600mm f/4 GM, and the Nikon 500mm PF. Steve is eager to please.


Gear Questions and Advice
Too many folks attending BAA IPTs and dozens of photographers whom I see in the field and on BPN, are–out of ignorance–using the wrong gear especially when it comes to tripods and more especially, tripod heads… Please know that I am always glad to answer your gear questions via e-mail. Those questions might deal with systems, camera bodies, accessories, and/or lens choices and decisions.
|
|
|
This image was created on October 26, 2019 at Sebastian Inlet. I used the Induro GIT 304/FlexShooter Pro-mounted Sony FE 600mm f/4 GM OSS lens, the Sony FE 1.4x Teleconverter, and the AF King, the Sony Alpha a9 Mirrorless Digital Camera Body. ISO 1600. Exposure determined by Zebras with ISO on the rear dial: 1/2500 sec. at f/6.3 in Manual mode. AWB at 9:16am on a variably cloudy morning. Center Zone Continuous/tracking AF was active at the moment of exposure and performed to perfection. Click on the image to enjoy a larger version. Image #1: Osprey hunting low |
Thanks, Michael!
Thanks to the brilliant Michael Tapes for inviting me to Sebastian Inlet to enjoy the Osprey Flying Circus! Michael, of Michael Tapes Design, is the creator of LensAlign/FocusTune. I drove over early on Saturday, October 26 from my home at Indian Lake Estates. With no traffic early on a weekend morning, the trip took 90 minutes. I had visited this site many, many years ago; it was so long ago that I would not even hazard a guess. I do remember that there were lots of folks fishing on the jetty; more than a few were catching some really large snook. I do remember taking a very few images on a cloudy day (or two?) but don’t ask me what I photographed …
|
|
|
This image was also created on October 26, 2019 at Sebastian Inlet. I used the Induro GIT 304/FlexShooter Pro-mounted Sony FE 600mm f/4 GM OSS lens, the Sony FE 1.4x Teleconverter, and the AF King, the Sony Alpha a9 Mirrorless Digital Camera Body. ISO 1600. Exposure determined by Zebras with ISO on the rear dial: 1/2500 sec. at f/6.3 in Manual mode. AWB at 9:17am on a variably cloudy morning. Center Zone Continuous/tracking AF was active at the moment of exposure and performed to perfection. Click on the image to enjoy a larger version. Image #2: Osprey with menhaden |
My SONY Gear Takes a Saltwater Bath …
When I first arrived, I headed out with the a9 on the 200-600. I quickly realized that I needed more reach so I went back to the car and set up the 600 GM with the 1.4X TC and the aforementioned a9. I had done quite well with the fishing Sandwich Terns at DeSoto on the Sandbar Secrets IPT using the 600 GM, the 1.4X, and the a7r IV. You can learn more and see those images in the SONY a7r IV 840mm tripod-mounted Flight Success. With some failure … blog post here.
I decided to give the a9 a chance with the same rig. Remember, I only got the 600 a month ago right and immediately fell in love with the 61MP files of the a7R IV.
So anyhoo, with the wind strong from the southeast and the sun peeking in and out, I made my way to the end of the jetty despite the fact that there were some big waves crashing over the walkway … The two simple rain covers that I had packed were in my SUV>. I figured that with the wind behind me I could shield the gear with my head and shoulders. How’d that work out? Not well. The lens pretty much got drenched and the a9 took several direct heavy splashes. The good news is that everything kept working that day (as the tide dropped and conditions became more benign). And both the lens and the camera body worked perfectly on Sunday morning. I realize that I am not fully out of the woods yet as saltwater damage sometimes does not surface for days or even weeks. Time will tell …
IAC, the weather sealing on the a9 seemed to do just fine on Saturday …
|
|
|
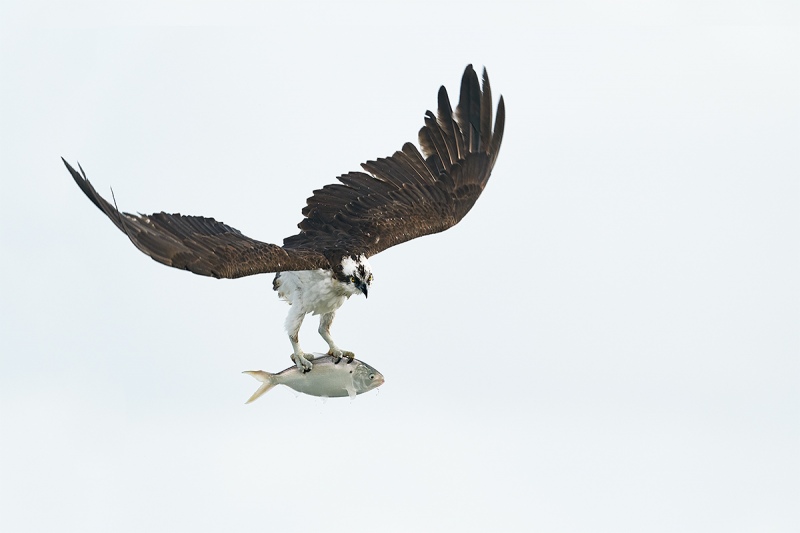
This image was also created on October 26, 2019 at Sebastian Inlet. Again I used the Induro GIT 304/FlexShooter Pro-mounted Sony FE 600mm f/4 GM OSS lens, the Sony FE 1.4x Teleconverter, and the AF King, the Sony Alpha a9 Mirrorless Digital Camera Body. ISO 1600. Exposure determined by Zebras with ISO on the rear dial: 1/2500 sec. at f/6.3 in Manual mode. AWB at 9:17am on a variably cloudy morning. Center Zone Continuous/tracking AF was active at the moment of exposure and performed to perfection. Click on the image to enjoy a larger version. Image #3: White Sky Osprey with menhaden |
The Osprey Flying Circus
At any given moment, there were twenty-five or more Ospreys looking for the menhaden schools in the inlet. Many were diving well past the end of the jetty we were on, miles off of sun angle. The Ospreys were joined by Royal Terns looking for smaller baitfish, and Brown Pelicans. There was tons of flight action.
BTW, menhaden are also known as mossbunker or bunker. I think that the bunkers now running in the inlet are yellowfin menhaden. Learn lots more about menhaden in the Wikipedia article here. As bunkers are prized as chum and bait, they have been severely over-fished in recent times. The story of their attempted conservation is an interesting one.
Stunned!
While the experience of seeing so many Ospreys diving and catching was great, I was stunned later that day while checking out the images on my Macbook Pro. Pretty much every single image was tack sharp. And the a9’s effective 15 fps frame-rate gave me lots of poses to choose from. I had several eight- to 10-frame sequences of Ospreys taking flight with a big menhaden in its talons with every one of them sharp-on-the-eyes. While the a7r IV did well with the 600 GM/1.4X TC combo, the a9 was very close to perfect when it came to AF tracking accuracy. I can’t wait to get to Bosque so that I can continue testing my still relatively new SONY gear for flight photography.
|
|
|
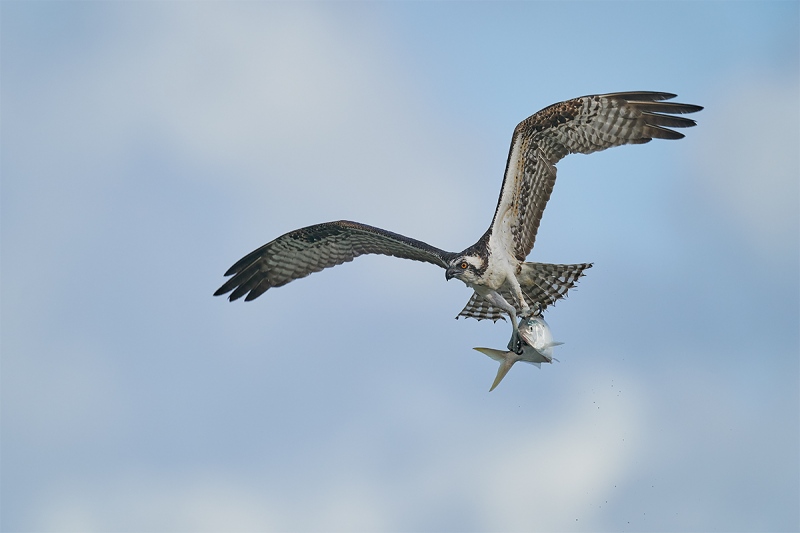
This image was also created on October 26, 2019 at Sebastian Inlet. Again I used the Induro GIT 304/FlexShooter Pro-mounted Sony FE 600mm f/4 GM OSS lens, the Sony FE 1.4x Teleconverter, and the AF King, the Sony Alpha a9 Mirrorless Digital Camera Body. ISO 800. Exposure determined by Zebras with ISO on the rear dial: 1/2500 sec. at f/6.3 in Manual mode. AWB at 9:20am on a variably cloudy morning. Center Zone Continuous/tracking AF was active at the moment of exposure and performed to perfection. Click on the image to enjoy a larger version. Image #4:Osprey turning in flight with menhaden |
The FlexShooter Pro
Shooting flight off the FlexShooter Pro continues to be an absolute pleasure. It pans smoothly and easily. Knowing that I would be working off the relatively flat (and level) walkway, I leveled the silver ball in the parking lot after making sure that the tripod legs were extended to the same length. So when I got to the jetty I simply put the tripod down, made sure that the legs were fully spread, and was able to get right to work knowing that no matter where I pointed my 840mm rig, the images would be square to the world.
Speaking of Set It and Forget It
Speaking of set it and forget it, note that when I began working I set the shutter speed to 1/2500 sec. and the aperture to f6.3 (stopped down one-third stop or one click from the wide-open aperture of f/5.6). And never changed those settings. I simply set the correct exposure by using the rear thumb-wheel to raise the ISO when it was cloudy or lower it when the sun came out, always aiming for just a very few faint Zebras on the image in the viewfinder. Checking the ISO setting for each image will give you a good idea as to whether it was totally cloudy at the moment of exposure or if the sun was peeking out a bit or more.
High-Level Exposure Question …
If you looked at most of my images from this great session, the Ospreys would look too-dark on a properly calibrated monitor. Why did I opt to keep the Ospreys slightly underexposed?
|
|
|
This image was also created on October 26, 2019 at Sebastian Inlet. Again I used the Induro GIT 304/FlexShooter Pro-mounted Sony FE 600mm f/4 GM OSS lens, the Sony FE 1.4x Teleconverter, and the AF King, the Sony Alpha a9 Mirrorless Digital Camera Body. ISO 1250. Exposure determined by Zebras with ISO on the rear dial: 1/2500 sec. at f/6.3 in Manual mode. AWB at 9:25am on a variably cloudy morning. Center Zone Continuous/tracking AF was active at the moment of exposure and performed to perfection. Click on the image to enjoy a larger version. Image #5:Osprey ruffling in flight |
The Ruffle
When the Ospreys emerge from a dive, successful or not, they will almost always ruffle their feathers in flight to shed water thus enabling them to fly more efficiently. I did get several ruffling in flight with a bunker in their talons, but the nictitating membrane was always covering their eyes.
Give Me Five Good Minutes
I got started with the 600 GM at 7:58am and finished up at 9:41am. From more than 900 images I wound up with 135 keepers after the first edit. That is now down to 111. Note, however, that all six of today’s featured images were created in a single ten-minute span of time, from 9:16 to 9:26. Why? The schools of bunker moved into the inlet and the birds diving after them were right down sun angle. I say it often, “Give me five good minutes.” That was amended on Saturday past to “Give me ten good minutes.”
|
|
|
This image was also created on October 26, 2019 at Sebastian Inlet. Again I used the Induro GIT 304/FlexShooter Pro-mounted Sony FE 600mm f/4 GM OSS lens, the Sony FE 1.4x Teleconverter, and the AF King, the Sony Alpha a9 Mirrorless Digital Camera Body. ISO 800. Exposure determined by Zebras with ISO on the rear dial: 1/2500 sec. at f/6.3 in Manual mode. AWB at 9:26am on a variably cloudy morning. Center Zone Continuous/tracking AF was active at the moment of exposure and performed to perfection. Click on the image to enjoy a larger version. Image 6: Osprey with menhaden |
Image Optimization Strategies and Comments
All of today’s images were converted with Capture One. For many of the images, I began by adjusting the White Balance. As noted above, all of the Ospreys were purposely underexposed. Working with the Exposure, Brightness, Highlight, and Shadow sliders after setting (and sometimes) re-setting the White and Black Points, I was able to come up with a good exposure for each Osprey while avoiding toasting the brightest highlights. Once the TIFs were brought into Photoshop, I began with some Eye Doctor work. With their deep-set eyes, I needed to lighten the iris and darken the pupil on the visible eye (or eyes) of Pandeon hileatus. Lastly, I re-worked the sky color of each image using Selective Color on a separate layer. I added Black to the Whites to make the sky bluer, and subtracted Black from the Whites to make the sky whiter. At times, I needed to add a Regular Layer Mask and erase those effects from the bird itself. IAC, I enjoyed giving a different look to images made in the same light at the same settings.
|
|
The BIRDS AS ART Current Workflow e-Guide (Digital Basics II).You can order your copy from the BAA Online Store here, by sending a Paypal for $40 here, or by calling Jim or Jennifer weekdays at 863-692-0906 with your credit card in hand. |
The BIRDS AS ART Current Workflow e-Guide (Digital Basics II)
Everything mentioned above (except for Capture One RAW conversions) and tons more — including all of my personalized Keyboard Shortcuts — is covered in detail in the BIRDS AS ART Current Workflow e-Guide (Digital Basics II), an instructional PDF that is sent via e-mail. Learn more and check out the free excerpt in the blog post here. While the new e-Guide reflects my Macbook Pro/Photo Mechanic/DPP 4/Photoshop workflow, folks using a PC and/or BreezeBrowser will also benefit greatly by studying the material on DB II. Do note that you will find the RGB Curves Adjustment Color Balancing tutorial only in the new e-guide. Note: folks working on a PC and/or those who do not want to miss anything Photoshop may wish to purchase the original Digital Basics along with DB II while saving $15 by clicking here to buy the DB Bundle.
The two most recent and many of the older MP4 Photoshop Tutorial videos releases go hand and hand with the information in DB II): Note: all of the videos are now priced at an amazingly low $5.00 each.
Folks who learn well by following along rather than by reading can check out the complete collection of MP 4 Photoshop Tutorial Videos by clicking here.
I continue to optimize my old Canon images in DPP 4. You can learn how and why I converted (and still convert) nearly all of my Canon digital RAW files in DPP 4 in the DPP 4 RAW Conversion Guide here. And, yes, I still have many Canon images to work on. 🙂 More recently, though I had become proficient at converting my Nikon RAW (NEF) files in Adobe Camera Raw, I began converting my Nikon and Sony RAW files in Capture One Pro 12. Learn more about Capture One Pro 12 in the Capture One Pro 12 Simplified MP4 Video here. The next step would be to get a copy of Arash Hazeghi’s “The Nikon Photographers’ Guide to Phase One Capture One Pro e-Guide” in the blog post here.
You can learn advanced Quick Masking and advanced Layer Masking techniques in APTATS I & II. You can save $15 by purchasing the pair. Folks can learn sophisticated sharpening and (NeatImage) Noise Reduction techniques in the The Professional Post Processing Guide by Arash Hazeghi and edited by yours truly. Please use this link to purchase NeatImage.
To introduce folks to our MP.4 videos and the basics involved in applying more NeatImage noise reduction to the background and less on the subject, I’d be glad to send you a free copy of the Free Noise Reduction Basics MP.4 Video. Simply click to shoot me an e-mail to get your free copy.
If In Doubt …
If you are in doubt about using the BAA B&H affiliate link correctly, you can always start your search by clicking here. Please note that the tracking is invisible. Web orders only. Please, however, remember to shoot me your receipt via e-mail.


Please Remember to use my Affiliate Links and to Visit the BAA Online Store 🙂
To show your appreciation for my continuing efforts here, we ask, as always, that you get in the habit of using my B&H affiliate links on the right side of the blog or Bedfords, for all of your photo and electronics purchases. Please check the availability of all photographic accessories in the New BIRDS AS ART Online Store, especially the Mongoose M3.6 tripod head, Wimberley lens plates, Delkin flash cards and accessories, and LensCoat stuff.
As always, we sell only what I have used, have tested, and can depend on. We will not sell you junk. We know what you need to make creating great images easy and fun. And please remember that I am always glad to answer your gear questions via e-mail.
I would, of course, appreciate your using our B&H affiliate links or Bedfords for all of your major gear, video, and electronic purchases. For the photographic stuff mentioned in the paragraph above, and for everything else in the new store, we, meaning BAA, would of course greatly appreciate your business. Here is a huge thank you to the many who have been using our links on a regular basis and those who will be visiting the New BIRDS AS ART Online Store as well.
Be sure to like and follow BAA on Facebook by clicking on the logo link upper right.
Typos
In all blog posts and Bulletins, feel free to e-mail or to leave a comment regarding any typos or errors. Just be right :).


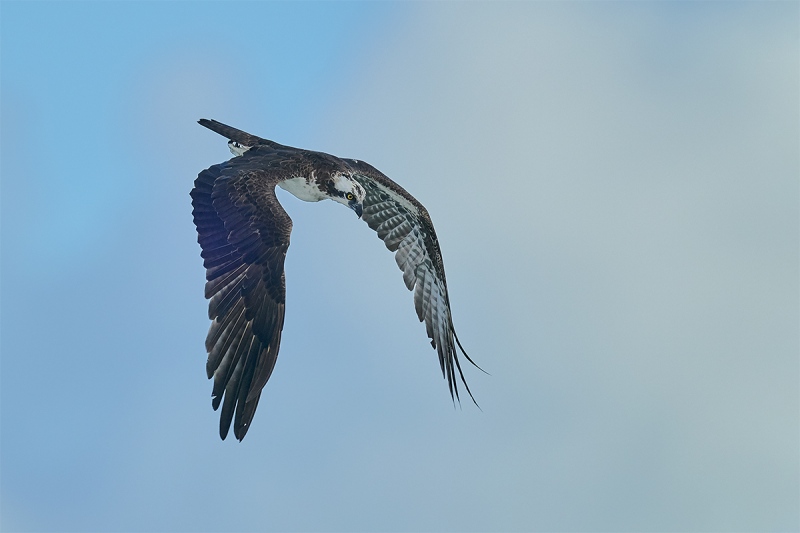
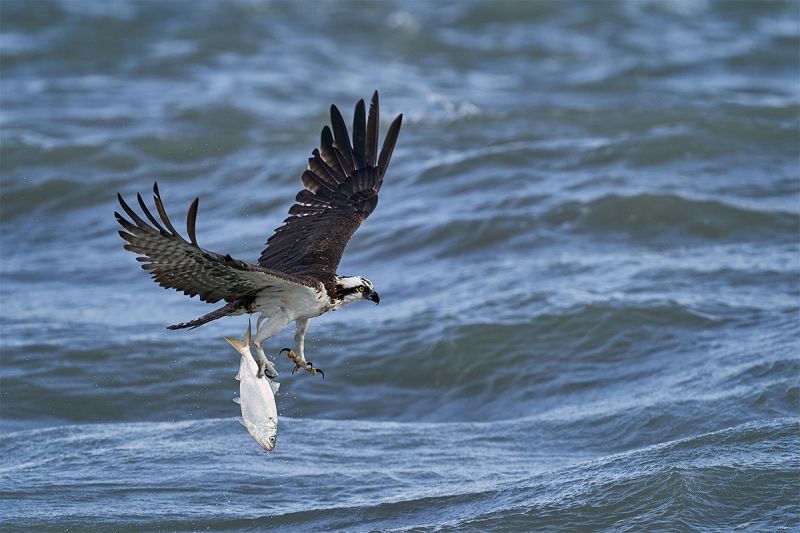


Pity the poor menhaden, swimming peacefully near the surface, when silent death comes unexpectedly from above!
When you say that menhaden have been severely over-fished in recent times, what species HASN’T been overfished? It is a consequence of too many people chasing too few resources.
Certainly true with other species. But if you delve into the bunker story it is astounding. They feed on algae. Check out what happened to Chesapeake Bay over the past few decades as a result of the decimation of menhaden stocks …
with love, artie
“Why did I opt to keep the Ospreys slightly underexposed?”
You wanted to maintain some detail in the sky without completely blowing it out.
Warren,
Nope 🙂
with love, artie
#6 for me, though all are great. I love the combination of in-focus wave and soft background water. I love the shape of the bird that is almost an abstract arrow drawing the eye to the impressive fish. I love the symmetric and pretty patterns on the undersides of the wings.
Thank you sir!
with love, artie
Image #4 is my favorite. I like the wing position that shows details under both wings and the body and head angle of the bird. I also love how the fish is “curved” to show the tail. I also like the sky with some clouds and some blue as opposed to all white or all blue.
Thanks, Muhammad. See you in Bosque 🙂
with love, artie
Hey Artie, I like the third image posted the best. I wing position, the head free of the body, the stare and of course the fish all combine to make a great image. My only wish otherwise is the background, I wish it did not have to be overexposed to expose the Osprey correctly. Thank you for sharing.
The sky was not over-exposed in the RAW file. That was my post-processing option. I love white skies.
with love, artie
It’s the Photographer who creates great images – not the equipment.
Therefore, I commend my Guru for those amazing shots.
I’m sure you would have made similar shots even with a Bridge Camera.
All the best Guru.
Agree with thanks. and love, artie
Looks like I opened a can of worms on Auto ISO. I use Canon cameras and evaluative metering. I use manual aperture and shutter speed, but Auto ISO along with exposure compensation. The ISO floats as needed to account for ambient light available. I assign EC to the SET button. To compensate an exposure, I press and hold the SET button in, rotate the main dial to whatever EC setting is needed
No can of worms. If it works for you, great. BUT. It is very difficult — heck — close to impossible — to dial in the correct EC with changing light and especially with rapidly changing backgrounds. And that goes triple since you have to press and hold the SET button.
with love, artie
Hi, Artie, I think I like the second image the best. Head is not so much blended into the wing, and I like the background water better than the skies in some of the others. Given my experience trying to just find the bird at >800 mm can be difficult, and getting focus to lock on in the small time I sometimes get is impressive. I need more practice, I guess.
Regarding the question on under-exposure, for me the bright whites contrasting with shaded dark feathers can make recovery of detail in the whites problematic (if not compensated for). In the case of Ospreys, the whites on the head can be overly bright while the breast areas are more likely shaded; with the possibility of having fish in the image, the reflectivity of wet fish scales in daylight would make the same problem worse. I have always been able to deal with recovery of detail in dark areas better than from blown highlights.
Have a good time at the Bosque. I will be back in NM mid-Feb, but in my experience, most of the migratory birds are heading out by then. There is actually a cranes festival in Othello, WA, each year. Not as big as the Bosque, but it does attract some photographers; you do not get anywhere near as close to the birds and there are not as many as the Bosque. When I mentioned having shot sandhills there, the observation was that shooting at the Bosque was akin to cheating. Bosque has more birds, and you do get much closer to them.
Hope the Sony survives its saltwater baptism. All the best.
Wrong answer on the underexposure but you were that only person who even tried. Ask yourself, “In Images 2, 4, 5, and 6 what is the brightest part of the scene, by far?” Then you will have the answer …
Thanks for commenting, with love, artie
So overcoming the influence of the backgrounds might be closer to the answer you were looking for. Given that it was a cloudy day, the amount of EC is fairly modest. I would have suspected that the images #2 and 6 with the water backgrounds might use a minus correction, while the 3, 4 and 5 might use a + correction due to the brighter sky backgrounds.
Just my thoughts, All the best.
No. I needed to underexpose the Ospreys so as not to burn the bright silver sides of the bunkers. The fish were much brighter than the whites on the birds …
with love, artie
Not to beat a dead fish, but isn’t that what I said in the second paragraph?
“…the reflectivity of wet fish scales in daylight…”
Anyway, I can always learn something from everybody.
Thanks for all your work on the blog.
You are both welcome and correct. I quit reading that sentence when I read the first part: In the case of Ospreys, the whites on the head can be overly bright while the breast areas are more likely shaded;. I should have kept reading. My bad with apologies.
with love, artie
I like them all, Artie. “Ruffling”? I didn’t know that term. I love watching ospreys shake themselves like a dog, with spray flying, after each dive, as you say whether or not they got a fish.
Some of the online dictionaries are close when it comes to a bird ruffling its feathers. This one was pretty good “Ruffled feathers: Birds will ruffle or fluff their feathers during the preening process.”
But terns and gulls and other birds that dive into the water often shake or ruffle their feathers when they take flight. At least according to me 🙂
with love, a
Although I like all of today’s images, #3 is my favorite because it immediately reminds me of a WW-II torpedo bomber searching for it’s target.
Bombs away!
Larry, This is not Arthur, but Byron. I do as A says and set my speed and F-stop ahead of time. I tried using BOTH the rear wheel for setting iso and setting my camera on auto iso and using the exposure compensation wheel.
Both methods using zebras do the same thing. What I found using auto iso method is that the exposure is always closer to bring right on with auto iso than with using the rear wheel setting the iso. On the other hand the rear wheel is bigger and maybe easier for some to change. Both methods work with A/Sony’s brilliant zebras. As far as I am concerned setting exposure except for special situations (eg moving water) is childs play with A’s zebras method….it is so simple and fast.
I shoot sports, rock climbing, street, landscape, wild animals, some bif…. and the technique is applicable to them all. It should be a marketing selling point for Sony and A should have expensive classes on just how to use the technique.
Byron,
What metering pattern are you using with Auto ISO?
with love, a
Byron, As you did not answer my question, I will say simply, with no disrespect intended, that you are 100% wrong. The two methods you describe are totally different. Thanks, though for the kind words.
with love, a
The text repeatedly mentions that you were using the 600/1.4x combo, but each of the images has the specs as the 600mm only.
Thanks, Matthew for catching my six cut and pasted errors. I have added the TC. At least I had the right widget 🙂
with love, artie
Image 4 for me! I like the position of the bird and its enormous catch in the frame. The head of the Osprey is clearly visible and the background is pale and unfussy enough not to detract from the main subject.
Your thoughts on using Auto ISO. Would doing so accomplish the same goal? I do know that Auto ISO has become popular with many photographers.
AUTO ISO accomplishes nothing unless you know the right exposure compensation. That alone is difficult enough. But with SONY, you need to turn a dumb dial on top of the camera to enter the EC. In other words, a very bad idea.
with love, a
ps: whatever the system, I am betting that fewer than 5% of them at most make it work properly.
If one wants to shoot in manual with Auto ISO, it is easy. In the custom functions, you can set the rear thumb wheel to change the exposure compensation. You can then set your ISO on Auto, leave the hard to reach EC dial on top of the camera at zero, and adjust your compensation while shooting with just a turn of the thumb wheel.
Even for a genius, dialing in the proper EC as the BKGR changes is very close to if not impossible. If you consider what Patrick and I are doing you will see that it is a much better system. I have taught it to many SONY beginners who have grasped it almost instantly. So yes, you can use AUTO ISO. But why?
with love, a