What’s Up?
North Beach was dead again on Saturday morning. And again, the weather was gorgeous and the wind perfect. I did not wait long before heading to my back-up spot, intent on making some nice head portraits of a killer-plumaged Laughing Gull at 1200mm. And I did just that. Miraculously, the single most beautiful Laughing Gull landing right in front of me right down sun angle. It posed and preened for nearly fifteen minutes.
I headed back to my favorite afternoon beach, but there were lots of people. The wind was stronger and from a slightly different direction so the still blue water was gone. I stayed only a short while and worked a silly tame young Great Egret with the handheld 200-600. This bird simply posed and posed and posed some more while allowing me to approach as closely as I wanted. (Being seated helped.) In such situations, I work on the very fine points of exposure and image design while comparing results with Tracking Expand Flexible Spot and Zone AF. The goal is to always learn something. I did that and came away with some very nice images as well. As with Face Detection plus Tracking with animal eye, the more you practice with Tracking Expand Flexible Spot, the better you become at creating perfect compositions. For more on that subject see the recent Can Operator Error Trump Science-fiction-like Autofocus? blog post here.
I had made a reservation for dinner for one at The Left Bank Bistro ($$$$) for 7:15pm. The restaurant was — coincidentally. — less than two blocks from my AirBnB in St. Pete. I called and moved my reservation up to 5:30. The host, a very nice lady named Rhonda, suggested a Libbot Sauternes to go with my Potato Crusted Snapper — Gulf snapper, vegetable ratatouille, citrus beurre blanc, & roquette vinaigrette. My server was named Skyler; he was a wonderful waiter. My main course was superb, and the wine was fine and yummy. Bad enough, but then I had a Pot de Creme — dark french chocolate custard with bing cherries for dessert. It was like the richest, thickest chocolate pudding you ever dreamed of. My meal was a fine end to a great day.
R5/RF 100-500 shooter Steve King will be joining me for Sunday morning at DeSoto, so I will be shooting only my Canon gear. I should be headed back to ILE by about 10:00am.
Today is Sunday 28 February 2021. The forecast for this morning for Tierra Verde is for partly cloud with southeast winds — pretty good, but the more sun the better! Wherever you are and whatever you are doing, I hope that you have a great day.
This blog post took two hours to prepare and makes sixty-nine days in a row with a new one. Please remember …
Please Remember
With income from IPTs now at zero, please, if you enjoy and learn from the blog, remember to use one of my two affiliate programs when purchasing new gear. Doing so just might make it possible for me to avoid having to try to get a job as a Walmart greeter and will not cost you a single penny more. And if you use Bedfords and remember to enter the BIRDSASART code at checkout, you will save 3% on every order and enjoy free second-day air shipping. In these crazy times — I am out at least forty to sixty thousand dollars so far due to COVID 19 (with lots more to come) — remembering to use my B&H link or to shop at Bedfords will help me out a ton and be greatly appreciated. Overseas folks who cannot order from the US because of import fees, duties, and taxes, are invited to help out by clicking here to leave a blog thank you gift if they see fit.
Wanted to Buy
If you have a Canon EF 100-400mm f/4.5-5.6L IS II USM lens that you would like to part with, please contact me via e-mail. I now have two interested buyers.
|
|
RawDigger e-Guide with Two Videos |
The RawDigger e-Guide with Two Videos
by Arthur Morris with Patrick Sparkman
The RawDigger e-Guide was created only for serious photographers who wish to get the absolute most out of their raw files.
Patrick and I began work on the guide in July 2020. At first we struggled. We asked questions. We learned about Max-G values. We puzzled as to why the Max G values for different cameras were different. IPT veteran Bart Deamer asked lots of questions that we could not answer. We got help from RawDigger creator Iliah Borg. We learned. In December, Patrick came up with an Adapted Histogram that allows us to evaluate the exposures and raw file brightness for all images created with all digital camera bodies from the last two decades. What we learned each time prompted three complete beginning to end re-writes.
The point of the guide is to teach you to truly expose to the mega-Expose-to-the-Right so that you will minimize noise, maximize image quality, best utilize your camera’s dynamic range, and attain the highest possible level of shadow detail in your RAW files in every situation. In addition, your properly exposed RAW files will contain more tonal information and feature the smoothest possible transitions between tones. And your optimized images will feature rich, accurate color.
We teach you why the GREEN channel is almost always the first to over-expose. We save you money by advising you which version of RawDigger you need. We teach you how to interpret the Max G values for your Canon, Nikon, and SONY camera bodies. It is very likely that the Shock-your-World section will shock you. And lastly — thanks to the technical and practical brilliance of Patrick Sparkman — we teach you a simple way to quickly and easily evaluate your exposures and raw file brightness using an Adapted RawDigger histogram.
The flower video takes you through a session where artie edits a folder of images in Capture One while checking the exposures and Max-G values in RawDigger. The Adapted Histogram video examines a series of recent images with the pink histograms and covers lots of fine points including and especially how to deal with specular highlights. The directions for setting up the Adapted Histogram are in the text.
If we priced this guide based on how much effort we put into it, it would sell it for $999.00. But as this guide will be purchased only by a limited number of serious photographers, we have priced it at $51.00. You can order yours here in the BAA Online Store.
Great Topaz News!
Folks who use the BAA Topaz link to purchase Sharpen AI, DeNoise AI, or the Utility Bundle (or any other Topaz plug-ins) will receive a 15% discount by entering the ARTHUR15 code at checkout. If the stuff is on sale (as it usually is), you save 15% off of the sale price! To get the discount you must use my link and you must enter the discount code. Be sure to start with this link.
Those who purchase Sharpen AI, DeNoise AI, or any other Topaz plug-ins using my link and then entering the ARTHUR15 code at checkout can e-mail to request a short Getting Started with Topaz e-Guide. Please include a copy of your Topaz receipt that shows the discount. Aside from the basics, the guide explains how to install the plug-ins so that they appear in the Photoshop Filter Menu.
Canon EOS R5 Camera User’s e-Guide
On Thursday, I sent out about a dozen copies of the almost finished Canon EOS R5 Camera User’s e-Guide for review to folks who had previously gotten free copies of the R5/R6 AF e-Guide by using my affiliate links to purchase their Canon mirrorless gear. In the same vein, I will be contacting everyone who purchased the R5/R6 AF e-Guide on Monday.
Because the camera and the Menus are so complex, this guide has required a ton of research, a lot of time, and a lot of effort (and will continue to do so until it is complete). It should be finished by the first week in March. 2021. The final update of the R5/R6 AF e-Guide has become part of the complete Camera User’s e-Guide; it will be revised if warranted.
The complete Camera User’s guide will sell for $75.00. Folks who purchased their Canon gear using my links will receive a $65.00 discount; the guide will cost them a nominal $10.00. Folks who spent more than $7500.00 on Canon mirrorless gear using either of my affiliate links (B&H or Bedfords), will receive the User’s Guide for free. Folks who purchased the R5/R6 AF e-Guide will receive a $10.00 discount on the User’s e-Guide. The best news is that the end is in sight.
New and Better Bedfords Discount Policy!
You can now save 3% on all of your Bedfords photo gear purchases by entering the BIRDSASART coupon code at checkout. Your discount will be applied to your pre-tax total. In addition, by using the code you will get 2nd day air shipping via Fed Ex.
Grab a Nikon AF-S Teleconverter TC-14E III and save $14.99. Purchase a Canon EOS R5 and your discount will be $116.97. Purchase a Sony FE 600mm f/4 GM OSS lens and save a remarkable $389.94! Your Bedford’s purchase no longer needs to be greater than $1,000.00 for you to receive a discount. The more you spend, the more you save.
Money Saving Reminder
Many have learned that if you need a hot photo item that is out of stock at B&H and would enjoy free second-day air shipping, your best bet is to click here, place an order with Bedfords, and enter the coupon code BIRDSASART at checkout. If an item is out of stock, contact Steve Elkins via e-mail or on his cell phone at (479) 381-2592 (Central time). Be sure to mention the BIRDSASART coupon code and use it for your online order to save 3% and enjoy free 2nd-day air shipping. Steve has been great at getting folks the hot items that are out of stock at B&H and everywhere else. The wait lists at the big stores can be a year or longer for the hard to get items. Steve will surely get you your gear long before that. For the past year, he has been helping BAA Blog folks get their hands on items like the SONY a9 ii, the SONY 200-600 G OSS lens, the Canon EOS R5, the Canon RF 100-500mm lens, and the Nikon 500mm PF. Steve is personable, helpful, and eager to please.


Gear Questions and Advice
Too many folks attending BAA IPTs (remember those?) and dozens of photographers whom I see in the field and on BPN, are–out of ignorance–using the wrong gear especially when it comes to tripods and more especially, tripod heads… Please know that I am always glad to answer your gear questions via e-mail. Those questions might deal with systems, camera bodies, accessories, and/or lens choices and decisions.
|
|
|
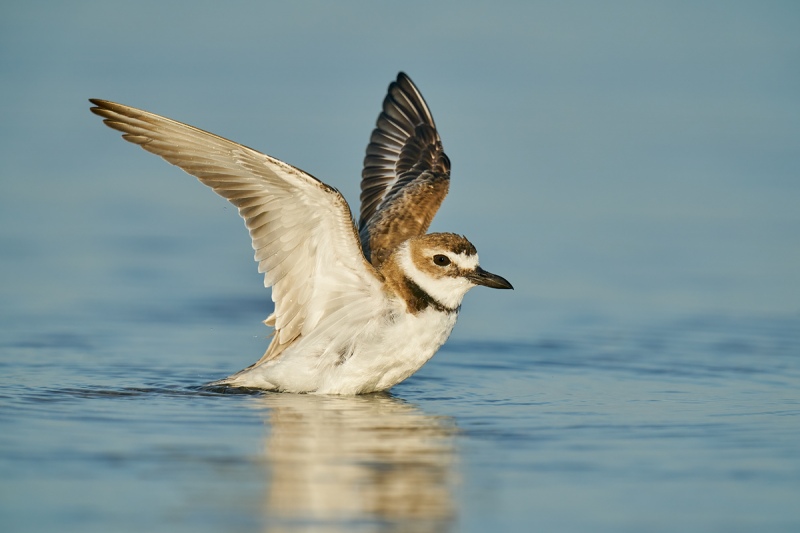
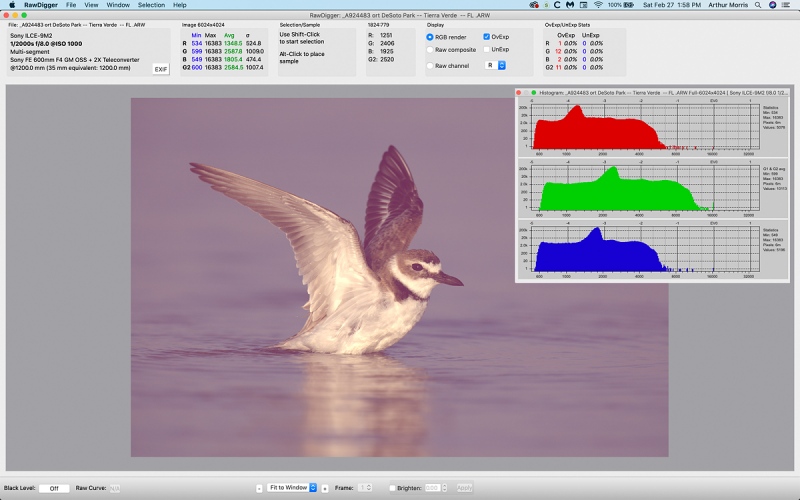
This image was created on 26 February 2021 at my favorite afternoon morning spot at Fort DeSoto Park. I used the Induro GIT 304L/Levered-clamp FlexShooter Pro-mounted Sony FE 600mm f/4 GM OSS lens, the Sony FE 2.0x Teleconverter, and the blazingly fast AF King, the Sony Alpha a9 II Mirrorless Digital camera body). ISO 1000. The exposure was determined by Zebras with ISO on the rear wheel: 1/2000 sec. at f/8 (wide open) in Manual mode. RawDigger showed this exposure to be perfect; see the screen capture below. AWB at 5:40pm on a clear afternoon. Center Zone/AF-C was active at the moment of exposure and performed to perfection; again, see the screen capture below. Click on the image to enjoy a larger version. Image #1: Wilson’s Plover flapping after bath |
THE Best Image from a Really Great Afternoon!
I killed on Friday afternoon. I worked exclusively with the SONY 600 GM, the 2X TC, and the a9 ii. Overall, as expected, the images were all insanely sharp as long as I managed to do a halfway decent job of framing. For the most part, I lowered the tripod, sat on the wet sand, and worked with the lens about 18 inches off the ground. At that height, working at 1200mm, the angle of declination (to the subject) is relatively shallow; it appears as if you are working from a much lower perspective. Here’s the rule: with subject size constant, the longer the focal length, the shallowed the angle of declination (or inclination if you are photographing a bird above your position.
That said, at times, I lowered the tripod so that the lens was about 8 inches off the ground. Then I tilted out the rear monitor and used that to frame and focus without having to get down in the muck to get my (left) eye to the viewfinder. Even with my reading glasses on, it is difficult to note head angle and other small yet important details. Thus, I was shooting much more aggressively than I usually do. I did activate the level on the rear monitor and was able to see that go green, so that eliminated one potential problem. Getting really low is, however, a big plus.
At times, thinking that 8 inches was too high, I placed the lens foot on the sand, made a huge mess of the CR-X5 low foot, struggled to stay level, and got even lower. From now on I will bring a Skimmer II and a Ground Pod to facilitate super-low angle shooting while keeping the lens foot out of the muck.
I must say that the titling rear screen of the SONY a9 series bodies kills the articulating screen on the Canon R5. Rather than tilting the screen out as on the SONY, the rear monitor on the R5 needs to be flipped and then moved out to the left side of the camera body. I have tried several times to use the R5’s articulating screen to get low, and have given up quickly each time. It just is not practical.
ps: You will be seeing lots more images from that great afternoon here soon.
|
|
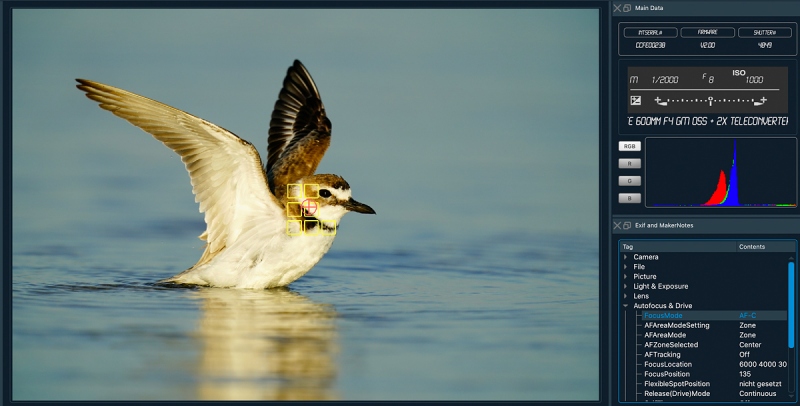
Image #1A: SONY AF points for the Wilson’s Plover flapping after bath image |
SONY Zone AF-C
As I wrote in the The Sony Camera User’s e-Guide and One Camera Set-up Video, Zone AF is not always as accurate as Tracking Expand Flexible Spot, but it is a lot easier to use and is much more forgiving. It acquires focus faster and does not require any great skill to stay locked on. Here, it performed flawlessly by tracking the bird’s cheek, right on the same plane as the bird’s eye. I can’t wait to see what the new Sony Alpha a1 can do in these situations.
|
|
Image #1B: RawDigger screen capture for the Wilson’s Plover flapping after bath image |
Exposure is so much easier with SONY Zebras …
Set the shutter speed and aperture that you want, dial up the ISO until you see Zebras, click the ISO down until the Zebras disappear, and then raise the ISO one click until they re-appear. If you have Zebras set up as detailed in the The Sony Camera User’s e-Guide and One Camera Set-up Video, you will have a perfect or near perfect exposure every time. In the guide, we differentiate between the degree of Zebras you want in the sun versus what you are looking for in low light or on cloudy days.
BTW, this one is perfect. The 26 OvExp pixels all reside in the specular catchlight (of the eye).
In the RawDigger e-Guide, you will learn exactly how to set up the Adapted “pink” RawDigger Histogram and how to use it to quickly and easily evaluate the exposure or raw file brightness of images from all digital cameras currently in use.
|
|
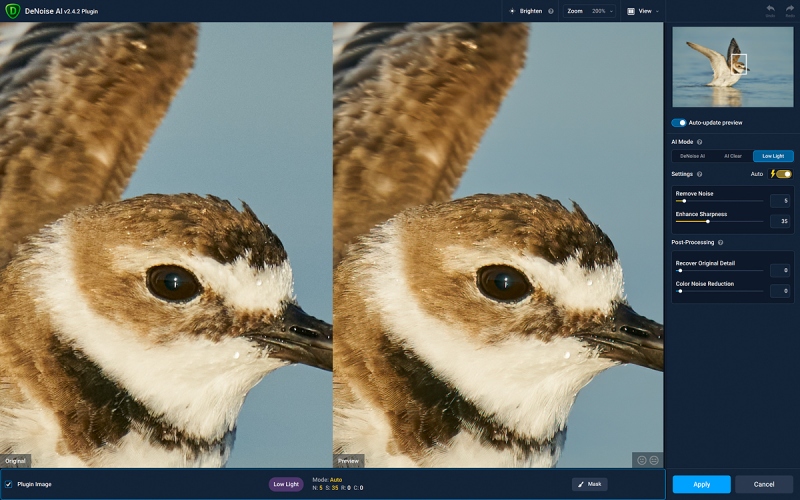
Image #1C: Topaz DeNoise screen capture for the Wilson’s Plover flapping after bath image |
A Huge Benefit of Learning to Mega-Expose-to-the Right
By learning to truly mega-expose your raw files to the right (s I have done with RawDigger), noise is minimized. In the original on our left, there is very little noise visible. Click on the image to enlarge it and see that DeNoise on Low Light on Auto cleaned the noise up beautifully, and sharpened the already sharp image nicely and non-destructively.
|
|
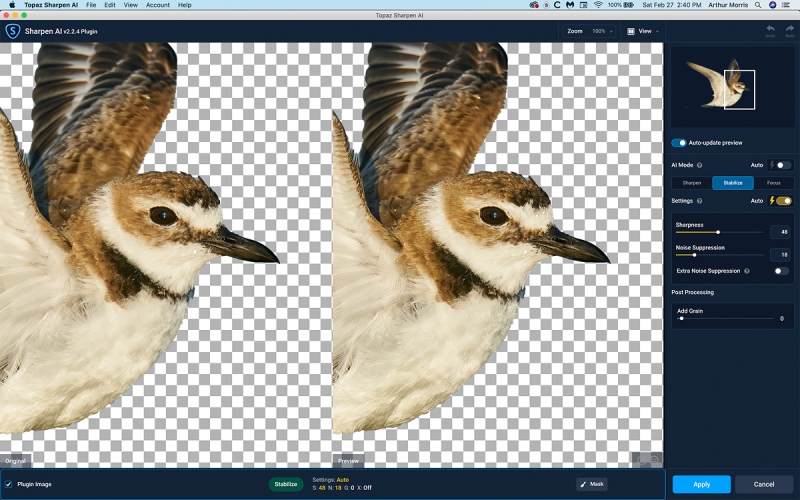
Image #1D: Topaz Sharpen AI 100% screen capture for the Wilson’s Plover flapping after bath image |
Selecting the Subject in Photoshop
I recently updated my Adobe Photoshop subscription (now Photoshop 2021) to the 22.2.0 Release. I gotta say that Select > Subject was greatly improved in the new version. Here I selected the subject (with just one click!), placed the selection on its own layer, and brought the image into Sharpen AI. I was not surprised that the plug-in selected Stabilize as even with the fast shutter speed of 1/2000 second, I knew that there would be some degree of motion blur.
|
|
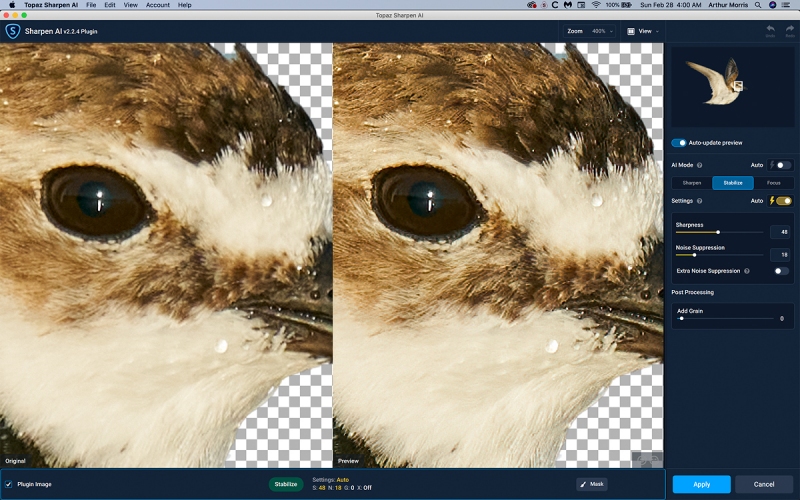
Image #1D: Topaz Sharpen AI 400% screen capture for the Wilson’s Plover flapping after bath image |
The Elongated Second Catchlight
A bird in the water will often show two catchlights in the eye. The upper catchlight is from the sun, the lower one from the sun reflected off the water. If the water was moving at the moment of exposure (as it was here because the bird was flapping), the lower catchlight will often be elongated. At least that is my theory … You will need to magnify the eye to 400% or so in order to see the elongated specular highlight. With this image I chose to eliminate the second catchlight during post processing and to darken the pupil as well. You can learn about Eye Doctor techniques and tons more in Digital Basics II.
Typos
In all blog posts and Bulletins, feel free to e-mail or to leave a comment regarding any typos or errors.




A BIG THANK YOU TO ARTHUR MORRIS
I read about Bedford Camera in your blog and placed an order for a Canon R5 and a lens on Monday. I had them in my hand in California on Thursday! This was fantastic as I had ordered the gear from one of the big companies in November and was sill on their waiting list!
So here is a heartfelt thank you. I have learned quite from you over the years by watching many videos, quite a few on B&H. My first trip to Bosque del Apache was due to your insistence that Bosque was a great place; and indeed it was! Thank you for everything Mr. Morris.
You are most welcome, and thank you for your kind words, Ray. Bosque used to be great …
with love, artie
Artie I love that you were testing me!
We had 45 degrees yesterday but today back to mid to upper 20ies but spring is in the air.
Just watched the Alpha Event today and one Artisan talked about the Alpha1 having double exposure but he didn’t elaborate much just mentioned it.
much love b
In-camera multiple exposures?
Glad that it is warming up.
with love, a
>> Exposure is so much easier with SONY Zebras <<
For those of us who haven't seen what the "zebras" look like, would it possible for you to show us a viewfinder image that demonstrates them?
I can do that if you come on an IPT :). And I think there there is an on-camera demo in one of the videos in the big SONY guide.
a
Hi Artie
Its tough at the top but it is even tougher at the bottom which is where I am, but things will change one day for the better.
Best and love
Ken
At the top of what?
a
Howdy Artie
I love the image #1 and with the single catchlight and getting low i can see the results. I am a bit confused though above you said… As with Ice Detection plus Tracking with animal eye, the more you practice with Tracking Expand Flexible Spot, the better you become at, did i miss something on focusing!
Or are you talking Face Detection?
Finally warming up here.
with love b
Thanks, Bob. In Florida it is Face Detection. In Wisconsin, it is Ice Detection 🙂
with love, a
It sounds like a delicious dinner and an extremely productive day. These are incredibly powerful gifts to be cherished. BTW, “I can’t wait to see what the new Sony Alpha a9…” I think is a typo with the intent being a1?
Thanks, Adam. It was a top 200 day for sure. But then you have to consider how blessed I have been :). Thanks for catching my brain typo.
with love, artie