What’s Up?
On Tuesday, Clemens, Anita, and I had another very good morning at Lake Blue Cypress. The highlight was a just-fledged Osprey on a relatively clean (but tall) perch. I got lots of practice hand holding at 1200mm. Clemens kindly dropped me back at the dock at 8:45am so that I could make my dental cleaning appointment. He and Anita stayed out for another two hours looking for and photographing Osprey chicks.
Today is Wednesday 5 May 2021. It is still and cloudy. Anita headed down to the lake to visit with the two crane families. I opted to take the morning off. Wherever you are, and whatever you are doing, I hope that you have a great day.
I will be addressing the points raised in the last two blog posts tomorrow. Promise.
This blog post took less than an hour to prepare and makes 132 consecutive days with a new one. Please remember that if an item — a Delkin flash card, or a tripod head, for example, that is available from B&H and/or Bedfords and is also available in the BAA Online Store, it would be great if you opt to purchase from us. We will match any price. Please remember also to use my B&H affiliate links or to save 3% at Bedfords by using the BIRDSASART discount code at checkout. Doing either often earns you free guides and/or discounts. And doing so always earns my great appreciation.
Please Remember
With income from IPTs greatly reduced, please, if you enjoy and learn from the blog, remember to use one of my two affiliate programs when purchasing new gear. Doing so just might make it possible for me to avoid having to try to get a job as a Walmart greeter and will not cost you a single penny more. And if you use Bedfords and remember to enter the BIRDSASART code at checkout, you will save 3% on every order and enjoy free second-day air shipping. In these crazy times — I am out at least forty to sixty thousand dollars so far due to COVID 19 (with lots more to come) — remembering to use my B&H link or to shop at Bedfords will help me out a ton and be greatly appreciated. Overseas folks who cannot order from the US because of import fees, duties, and taxes, are invited to help out by clicking here to leave a blog thank you gift if they see fit.
New and Better Bedfords Discount Policy!
You can now save 3% on all of your Bedfords photo gear purchases by entering the BIRDSASART coupon code at checkout. Your discount will be applied to your pre-tax total. In addition, by using the code you will get 2nd day air shipping via Fed Ex.
Grab a Nikon AF-S Teleconverter TC-14E III and save $14.99. Purchase a Canon EOS R5 and your discount will be $116.97. Purchase a Sony FE 600mm f/4 GM OSS lens and save a remarkable $389.94! Your Bedford’s purchase no longer needs to be greater than $1,000.00 for you to receive a discount. The more you spend, the more you save.
Money Saving Reminder
Many have learned that if you need a hot photo item that is out of stock at B&H and would enjoy free second-day air shipping, your best bet is to click here, place an order with Bedfords, and enter the coupon code BIRDSASART at checkout. If an item is out of stock, contact Steve Elkins via e-mail or on his cell phone at (479) 381-2592 (Central time). Be sure to mention the BIRDSASART coupon code and use it for your online order to save 3% and enjoy free 2nd-day air shipping. Steve has been great at getting folks the hot items that are out of stock at B&H and everywhere else. The wait lists at the big stores can be a year or longer for the hard to get items. Steve will surely get you your gear long before that. For the past year, he has been helping BAA Blog folks get their hands on items like the SONY a9 ii, the SONY 200-600 G OSS lens, the Canon EOS R5, the Canon RF 100-500mm lens, and the Nikon 500mm PF. Steve is personable, helpful, and eager to please.


Gear Questions and Advice
Too many folks attending BAA IPTs (remember those?) and dozens of photographers whom I see in the field and on BPN, are–out of ignorance–using the wrong gear especially when it comes to tripods and more especially, tripod heads… Please know that I am always glad to answer your gear questions via e-mail
|
|
|
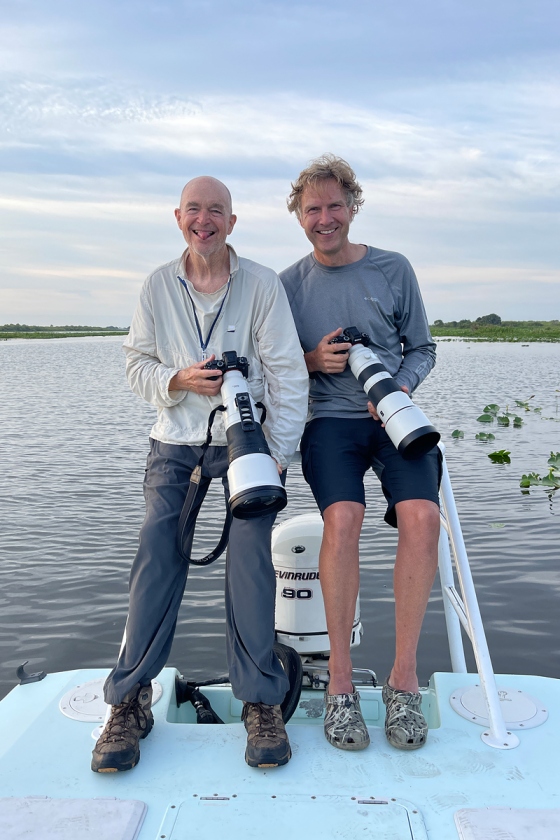
This i-phone image was created on 4 May 2021 by Anita North. Image #1: artie and Clemens |
artie and Clemens
I’ve got Clemens by about twenty years. And though it is hard to tell from this image — he’s pretty much sitting while I am pretty much standing, he’s got me by about eight inches. Clemens will often stand up on the platform we are leaning against and has been known to place his big Yeti cooler on the platform and stand on top of the cooler! All that while I have some trouble just standing up in the boat …
|
|
|
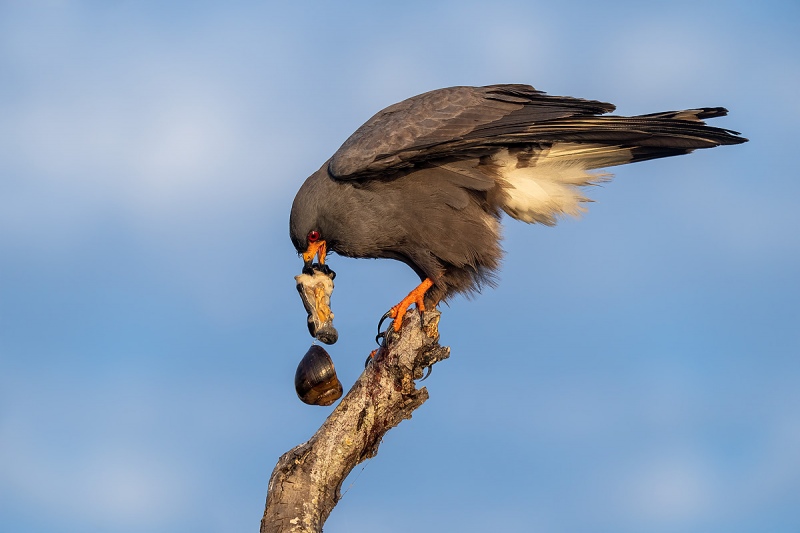
This image was created on 3 May 2021 by Clemens Van der Werf. He used the hand held Sony FE 200-600mm f/5.6-6.3 G OSS lens (at 397mm) and The One, the Sony Alpha 1 Mirrorless digital camera. ISO 1250: 1/1250 sec. at f/6.3 (wide open) in Manual mode. AWB at 7:17:17am on a clear, sunny morning. Wide/AF-C was active at the moment of exposure and performed perfectly. Click on the image to see a larger version. Image #2: Snail Kite extracting meat from snail |
Clemens and SONY
Clemens has used Canon gear for all of his nature photography for more than a decade. Anita kindly loaned him a 200-600/a1 rig. He created this image while standing atop the platform at the back of the boat. With just a very bit of instruction, Clemens — not unexpectedly, began making great images from the get-go. He was quite impressed with the AF system, and when I loaned him my 600 GM, he was amazed its light weight. He also loved the a1’s 30 fps frame rate as it enabled him to catch the shell of the snail in flight! He has the Canon 600mm f/4L IS II lens and his main camera body is the 1DX III. Together, those weigh a proverbial ton.
Note that I have removed the lens hood from the 600 GM to save a bit of weight.
|
|
|
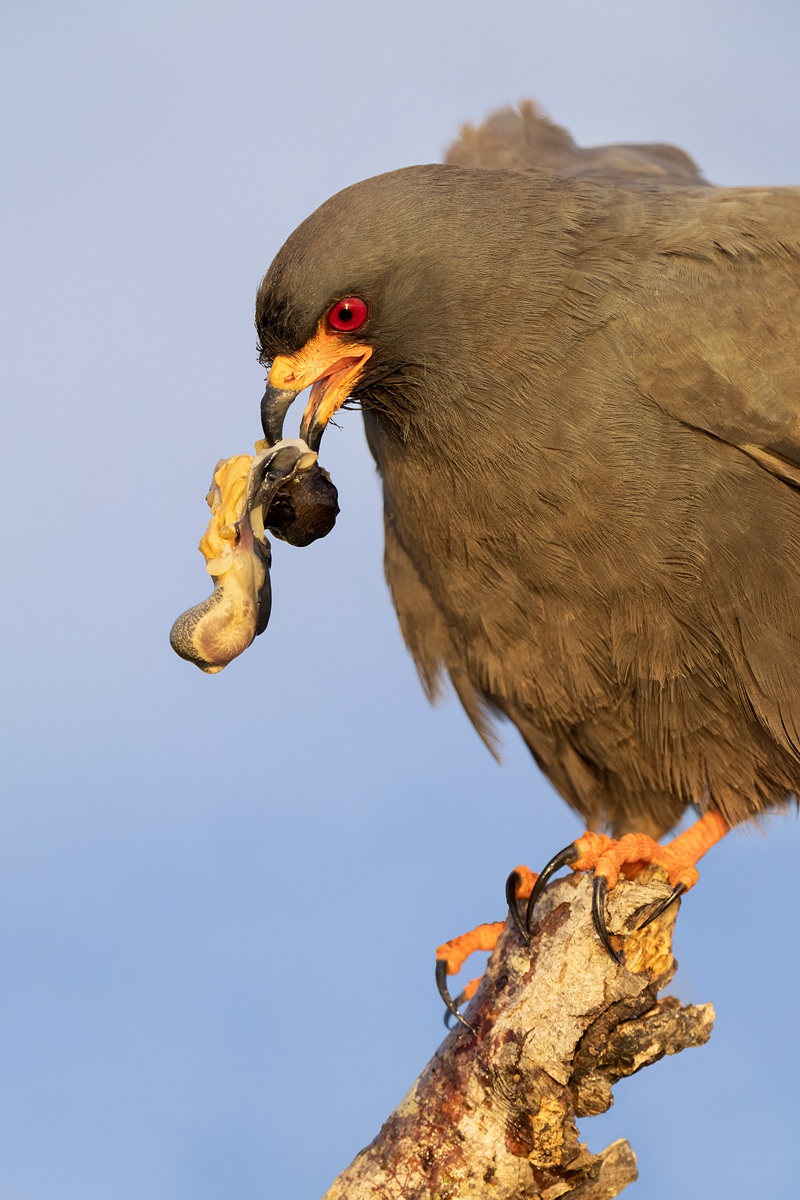
This image was created on 3 May 2021 by yours truly. I used the hand held Sony FE 600mm f/4 GM OSS lens with the Sony FE 1.4x Teleconverter and The One, the Sony Alpha 1 Mirrorless digital camera (while standing –double gasp!). ISO 2000. Exposure determined via Zebras with ISO on the rear dial: 1/1600 sec. at f/5.6 (wide open) in Manual mode. AWB at 7:18:39am on a clear morning. Center Zone/AF-C was active at the moment of exposure and performed perfectly. Image #2: Image #3: Snail Kite with extracted meat from snail |
A Different Vision
I was standing on the deck at the back of the boat hand holding the 600 when the kite landed quite close to us right down sun angle. After making a very few frames, I went for the gusto by adding the 1.4X TC to get me tighter at 840mm. I figured that it would take a minute or two for the bird to extract the meat from the shell. After the first edit I kept 23 images made at 840 and three made at 600.
On Processing Differences …
I’ve long said that if you process an image on Monday and then again on Tuesday while working in the same ambient light, that the results will vary. Often considerably. It would be expected then, that images of the same subject made in the same light just a minute or so apart would have a different look when processed by to different photographers. In the image that Clemens processed, the kite is much darker than the same bird in my image. Image processing is always done to one’s personal taste.
A Sky Question
This is a tough one, but there are lots of clues above. Apart from processing tastes, why is the sky in Clemens’ image so much bluer than the sky in my image? When I asked Clemens why his sky was bluer, he could not figure it out …
|
|
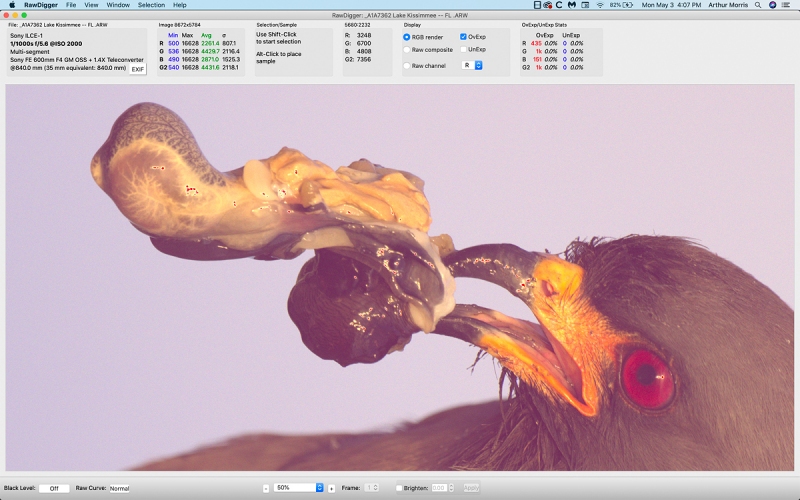
Image #2A: RawDigger screen capture for the Snail Kite with extracted meat from snail image |
RawDigger
Clicking on the screen capture to enlarge it will enable you to see the the 2,586 OvExp pixels are all from the specular highlights (that were toned down during the post-processing). Note that out of 51,000,000 pixels, those worked out to zero percent OvExp. In other words, the raw file brightness was dead-solid-perfect.
RawDigger — not for the faint of heart …
Nothing has ever helped me learn to create perfect exposures to the degree that RawDigger has. I think that many folks are reluctant to learn that most of their images are underexposed by one or more full stops and that highlight warnings in Photoshop, Lightroom, Capture One, and your in-camera histogram are bogus as they are based on the embedded JPEGs. Only your raw files tell the truth all the time. Heck, I resisted RawDigger for several years … Once you get over that feeling, RawDigger can become your very best exposure friend no matter what system you are using. On the recent IPTs and In-the-Field sessions, we have demonstrated that fact. Convincingly.
The RawDigger (pink) Adapted Histogram
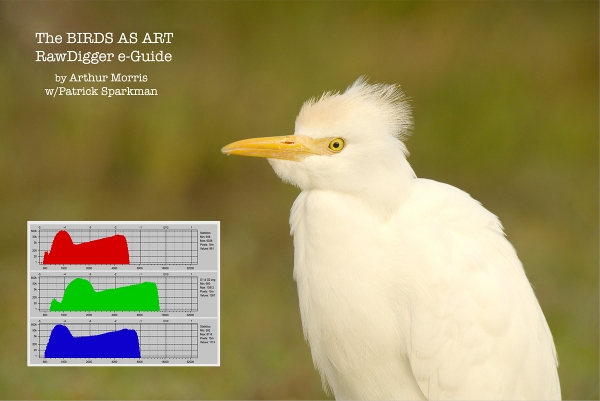
In the RawDigger e-Guide, you will learn exactly how to set up the Adapted “pink” RawDigger Histogram and how to use it to quickly and easily evaluate the exposure or raw file brightness of images from all digital cameras currently in use. RawDigger was especially helpful to me as I struggled with R5 exposures and learned my new camera body, the Sony Alpha a1.
|
|
RawDigger e-Guide with Two Videos |
The RawDigger e-Guide with Two Videos
by Arthur Morris with Patrick Sparkman
The RawDigger e-Guide was created only for serious photographers who wish to get the absolute most out of their raw files.
Patrick and I began work on the guide in July 2020. At first we struggled. We asked questions. We learned about Max-G values. We puzzled as to why the Max G values for different cameras were different. IPT veteran Bart Deamer asked lots of questions that we could not answer. We got help from RawDigger creator Iliah Borg. We learned. In December, Patrick came up with an Adapted Histogram that allows us to evaluate the exposures and raw file brightness for all images created with all digital camera bodies from the last two decades. What we learned each time prompted three complete beginning to end re-writes.
The point of the guide is to teach you to truly expose to the mega-Expose-to-the-Right so that you will minimize noise, maximize image quality, best utilize your camera’s dynamic range, and attain the highest possible level of shadow detail in your RAW files in every situation. In addition, your properly exposed RAW files will contain more tonal information and feature the smoothest possible transitions between tones. And your optimized images will feature rich, accurate color.
We teach you why the GREEN channel is almost always the first to over-expose. We save you money by advising you which version of RawDigger you need. We teach you how to interpret the Max G values for your Canon, Nikon, and SONY camera bodies. It is very likely that the Shock-your-World section will shock you. And lastly — thanks to the technical and practical brilliance of Patrick Sparkman — we teach you a simple way to quickly and easily evaluate your exposures and raw file brightness using an Adapted RawDigger histogram.
The flower video takes you through a session where artie edits a folder of images in Capture One while checking the exposures and Max-G values in RawDigger. The Adapted Histogram video examines a series of recent images with the pink histograms and covers lots of fine points including and especially how to deal with specular highlights. The directions for setting up the Adapted Histogram are in the text.
If we priced this guide based on how much effort we put into it, it would sell it for $999.00. But as this guide will be purchased only by a limited number of serious photographers, we have priced it at $51.00. You can order yours here in the BAA Online Store.
Typos
With all blog posts, feel free to e-mail or to leave a comment regarding any typos or errors.




I relation to the perch the head is considerably higher in your image. That would put more white cloud in the frame affecting metering and making the blue lighter in yours not darker in Clemens.
Artie,
Forgot to say how nice both images are. All my Snail Kites, from a boat in Belize with the original 600 IS at either 840mm or 1200mm, were “pushed” to ISO 200.
It appears that you are using a warmer white balance than Clemens, thereby taking some blue out of the sky?
Based on the EXIF data, your image is 2/3 of a stop lighter than Clemens, at least before any adjustments that were made in processing. In addition, the tighter FOV in your image plus the differences in the kite’s posture and framing when you compare images results in a different proportion of clouds filling in the background. Almost all of your background includes sky (although you can see a gradient of more to fewer clouds from top to bottom), whereas only a small portion of Clemens’ image includes clouds.
Rather …almost all of your background includes sky with clouds… It’s also likely that the overall differences in framing affected the AWB processing.
The different focal length could be the answer. With auto white balance the camera is trying choose a color temp that it “thinks” will work best. In scenes with little or no white it can become confused. With your image being much tighter on the bird there is little or no white and most likely the camera “chose” a different kelvin value.
The cloud in Clemens photo are “higher” in the sky. From your lower shooting position, your background will show the higher area of the sky. Also, the bird is standing more up-right in your image, so it results in even a “higher” background, i.e. where the clouds are…
Artie: great images. As for the sky, if Clemens’s snail kite is darker than in your image, then the sky will be as well, so it will look a deeper blue (or “bluer”).
Thanks, David. In part. But there is another very and perhaps more important reason that his sky is darker, a deeper blue as you say …
with love, a
Howdy Artie
Great photo of you and Clemens always a card as showing tongue!
Even before i read your comment about the 2 different photos i was trying to figure out what was different and why the color difference in the sky. Could it be the slower shutter speed combined with the iso of 1250 vs 2000 and perhaps the focal length from 397mm to 840 at 6.3 vs 5.6 again i am guessing on my thoughts but if one affects this it would be a great lesson to learn from!
I do love the cotton clouds on the blue in Clemens shot!
Great to see the smiles!
Always with love b
Hi Bob, Thanks. You are correct in saying that Clemens image was capture darker than mine. But the tonality of the sky can be changed during the processing. As with David, you missed the more important reason that his sky is darker …
with love, artie
Typo: “The 29 OvExp pixels are all in the specular highlight in the gull’s eye.”
I’m assuming the AWB shown for both images was as shot. But was color balance left alone in processing? Clemens might easily have gone bluer in processing. Different sky too, given a taller shooter in a higher position.
Hey Cliff,
Thanks for catching my cut and paste error.
More folks should read the rest of your comment as I am looking for a reason other than differences in processing. Why? With the difference in our height and the fact that Clemens was shooting from a higher position as well, his bird was set against a darker portion of sky. (Note: in general the farther you are from the horizon the darker the blue sky; but that was not the case here.)
with love, a
With both of you using AWB your shot has more clouds as a percentage than Clemens’.
Thanks for leaving a comment. Ask yourself why Clemens’ image has more clouds than mine (aside from the difference in angles of view) and you will get to the main reason that his sky is bluer.
with love, artie