|
|
The Digital Basics III Video Series |
The Digital Basics III Video Series
I realized about a year ago that my digital workflow had changed significantly and was toying with the idea of writing a Digital Basics III. More recently, I have learned and begun working with two great new Photoshop Tools, the Remove Tool and the Luminance Targeted Adjustment Tool. The former is like a smarter Spot Healing Brush Tool on steroids and the latter is a huge step up from the fabulous Color Mixer Tool. During that same time frame, I came up with a new and improved 2-step noise reduction technique. I still use Divide and Conquer, Quick Masks, Layer Masks, an expanded array of personalized keyboard shortcuts, and tons of other stuff from both versions of Digital Basics.
As soon as I realized that I did not want to take on another large writing project, I realized that by creating a series of videos I could much more easily share all the details of my current digital workflow and much more easily incorporate additional new tips, techniques, and tools as I went. And so, The Digital Basics III Video Series was born. You can check out Volume I/#1 here.
You might opt to purchase single videos or to subscribe to Volume I and save $26 by ordering the first five videos in one fell swoop. You can purchase the five videos in Volume I by clicking here. The videos will be most valuable for folks using the latest version of Photoshop (2024) or Lightroom along with Topaz DeNoise AI and Topaz Sharpen AI.
My Call
In the Colors of San Diego in Winter blog post here, my two top favorite images were the Pelagic Cormorant pan blur (for the sharpness, the degree of blurring, and the wonderful colors), and the Brown Pelicans on cliff in predawn pink/blue (for the soft pastel colors, the image design, and the incredible sharpness). The alert drake Wood Duck was a close third.
What’s Up?
I headed down to the lake on Sunday morning but things were pretty dead; I never even raised a lens. I’ve been swimming my half mile every day along with my 1 1/2 mile vitamin D walk.
Today is Monday 20 November 2023. I will be heading down to the lake again as soon as I publish this. Wherever you are a whatever you are doing, I hope that you too have a great day.
Please remember to use the B&H and Amazon links that are found on most blog pages and to use the BIRDSASART discount code at checkout when purchasing your new gear from Bedfords to get 3% back on your credit card and enjoy free second-day air FedEx. Please, also, consider joining a BAA IPT. You will be amazed at how much you will learn!
You can find some great photo accessories (and necessities, like surf booties!) on Amazon by clicking on the Stuff tab on the orange/yellow menu bar above. On a related note, it would be extremely helpful if blog-folks who, like me, spend too much money on Amazon, would get in the habit of clicking on the Amazon logo link on the right side of each blog post when they shop online. As you might expect, doing so will not cost you a single penny, but would be appreciated tremendously by yours truly. And doing so works seamlessly with your Amazon Prime account.
If an item — a Delkin flash card, or a tripod head — for example, that is available from B&H and/or Bedfords, is also available in the BAA Online Store, it would be great, and greatly appreciated, if you would opt to purchase from us. We will match any price. Please remember also to use my B&H affiliate links or to earn 3% cash back at Bedfords by using the BIRDSASART discount code at checkout for your major gear purchases. Doing either often earns you free guides and/or discounts. And always earns my great appreciation.
|
|
Image #1: The Photo Mechanic screen capture for today’s featured image |
Mega Exposing-to-the-Right in Low Light Conditions
When photographing birds in flight (especially this with some dark feathers) in low light on white sky days, you need to ever-expose the sky by at least three stops in order to come up with a good exposure for the subject. The whole sky was (properly) covered with Zebras. The trick with Sony is to turn Zebras Off once you are confident of a good exposure. If you do not do that, you will not be able to see the subject for the Zebras. Details on toggling Zebras On and Off can be found in the Sony Info and Updates Group e-mails.
Note the mega exposed-to-the-right Photo Mechanic histogram.
Simply put, Photo Mechanic is by far the world’s fastest and best image browsing program. If you have been thinking about purchasing a Photo Mechanic license, you are advised to purchase yours here very soon as there may be some changes coming at Camera Bits. Use this link and then shoot me an e-mail with proof of purchase and request a free Getting Started with Photo Mechanic e-mail guide.
|
|
Image #2: The RawDigger screen capture for today’s featured image |
Why 12 Million, 2 Thousand Over-Exposed Pixels?
What can I say? The combination of Zebras live in the viewfinder (with your camera set up properly) and post-capture study of the raw files in RawDigger makes it pretty much child’s play to come up with perfect exposure after perfect exposure, even in very difficult situations. It would be impossible to overstate how much I have learned by studying RawDigger and how much better my exposures have become since I started with the program almost three years ago. With the G channel climbing well up the 16000 line, the raw file brightness for today’s featured image is exactly what I wanted — well over-exposed for the sky. As a general rule, most folks are under-exposing their images by one to two stops on average in low light conditions when working with overall light-toned backgrounds.
RawDigger — not for the faint of heart …
Nothing has ever helped me learn to create perfect exposures to the degree that RawDigger has. I think that many folks are reluctant to learn that most of their images are underexposed by one or more full stops and that the highlight warnings in Photoshop, Lightroom, Capture One, and the in-camera histograms are bogus as they are based on the embedded JPEGs. Only your raw files tell the truth all the time. Heck, I resisted RawDigger for several years … Once you get over that feeling, RawDigger can become your very best exposure friend no matter what system you are using. On the recent IPTs and In-the-Field sessions, we have demonstrated that fact over and over again. Convincingly.
The RawDigger Adapted (pink) Histogram
In the RawDigger e-Guide, you will learn exactly how to set up the Adapted “pink” RawDigger Histogram and how to use it to quickly and easily evaluate the exposure or raw file brightness of images from all digital cameras currently in use.
|
|
RawDigger e-Guide with Two Videos |
The RawDigger e-Guide with Two Videos
by Arthur Morris with Patrick Sparkman
The RawDigger e-Guide was created only for serious photographers who wish to get the absolute most out of their raw files.
Patrick and I began work on the guide in July 2020. At first, we struggled. We asked questions. We learned about Max-G values. We puzzled as to why the Max G values for different cameras were different. IPT veteran Bart Deamer asked lots of questions that we could not answer. We got help from RawDigger creator Iliah Borg. We learned. In December, Patrick came up with an Adapted Histogram that allows us to evaluate the exposures and raw file brightness for all images created with all digital camera bodies from the last two decades. What we learned each time prompted three complete beginning to end re-writes.
The point of the guide is to teach you to truly expose to the mega-Expose-to-the-Right so that you will minimize noise, maximize image quality, best utilize your camera’s dynamic range, and attain the highest possible level of shadow detail in your RAW files in every situation. In addition, your properly exposed RAW files will contain more tonal information and feature the smoothest possible transitions between tones. And your optimized images will feature rich, accurate color.
We teach you why the GREEN channel is almost always the first to over-expose. We save you money by advising you which version of RawDigger you need. We teach you how to interpret the Max G values for your Canon, Nikon, and SONY camera bodies. It is very likely that the Shock-your-World section will shock you. And lastly — thanks to the technical and practical brilliance of Patrick Sparkman — we teach you a simple way to evaluate your exposures and the raw file brightness quickly and easily the Adapted RawDigger histogram.
The flower video takes you through a session where artie edits a folder of images in Capture One while checking the exposures and Max-G values in RawDigger. The Adapted Histogram video examines a series of recent images with the pink histograms and covers lots of fine points including and especially how to deal with specular highlights. The directions for setting up the Adapted Histogram are in the text.
If we priced this guide based on how much effort we put into it, it would sell it for $999.00. But as this guide will be purchased only by a limited number of serious photographers, we have priced it at $51.00. You can order yours here in the BAA Online Store.
|
|
|
This image was also created on 3 November 2022, the wonderful fourth morning of the third DeSoto IPT. While seated on a hard-sand path, I used the shortened Robus RCM-439 4-Section Carbon Fiber Monopod, 65″/Wimberley MonoGimbal Head-supported Sony FE 400mm f/2.8 GM OSS lens Tracking: Zone/AF-C with Bird Face/Eye detection enabled performed to perfection. Be sure to click on the image to enjoy a high-res version. Image #3: Turkey Vulture soaring flight |
The Amazing New Luminance Targeted Adjustment Tool
I absolutely love cloudy days both for general bird photography and for flight. No shadows and revealing underwing detail come with the clouds. As we saw in Image #1, exposing properly to the right rendered the sky a featureless white. Learn to use the amazing new Luminance Targeted Adjustment Tool (L-TAT) in the Digital Basics III Video Series. Not only will it enable you to bring your white skies to life, L-TAT will also help you to adjust the Saturation and Luminance of all colors and thus bring your images to life. Note that I rarely do anything with the Hue slider.
Exposure reminder: properly exposed raw files should look dull and washed out, especially those made on cloudy days. Properly exposed-to-the-right raw files are larger in size than under-exposed raw files and contain far more valuable color and detail information.
The complete image optimization of today’s image will be one of three featured in the next DB III video, Volume I #2, coming later this week. L-TAT is available only in the latest versions of Photoshop and Lightroom. Scroll down for details.
Won’t You Make My White Skies Blue?
Apologies to songwriter Richard Leigh and American country music singer Crystal Gayle for crudely paraphrasing the title of their big hit, Don’t It Make My Brown Eyes Blue.
|
|
|
Click on the composite to view a larger version and be even more impressed. The Art & Science of Photographing Birds in Flight with the Sony α-1
|
The Art & Science of Photographing Birds in Flight with the Sony α-1
by Arash Hazeghi and Arthur Morris
First of all, if you use Nikon or Canon (or Olympus or Fuji) gear, do not be put off by the title. While a portion of the guide deals with the Sony α-1, there is a ton of priceless information, tips, and techniques that can help you become a better flight photographer. No matter what system you are using. If you do not use an α-1, be sure to read down to the bottom to save a few bucks.
Arash Hazeghi and Arthur Morris have created the definitive and most comprehensive ever treatise on photographing birds in flight. With more than sixty years of experience photographing birds, they know what you need to know but have not figured out yet! You will be astounded by the depth of their knowledge and the tips they have to offer. More than six months in the making, the guide contains 229 pages, 24,321 words,97 exceptional and inspirational flight images — each with a legendary, enlightening BIRDS AS ART caption, and 22 screen captures. The guide contains a wealth of useful, practical, and for the most part — never-before-available information.
Purchase
Click here to purchase your copy in the BAA Online Store.
What Everyone Will Learn
We will teach you the basic concepts that you need to master to become a great flight photographer along with the techniques used by the world’s best flight photographers.
You will learn that most any telephoto lens can be perfect for flight photography in a given situation; focal lengths for the images in the book range from 200mm to 1200mm and everywhere in between.
We discuss the merits of various lenses in depth, including and especially comparing the 400mm f/2.8 lenses with the 600mm f/4s.
We guide you in getting your hands on the flight photography lens that will best meet your needs. We offer a variety of handholding and rest position tips and include tips on working with a big lens on a tripod when working with a flight lens that is otherwise too heavy for you.
Both authors offer their thoughts on getting the right exposure when photographing birds in flight. You will learn to get the right exposure on foggy days and even when photographing black birds in white sky conditions.
You will learn the tremendous importance of pre-focusing, of finding the bird in the viewfinder quickly, acquiring focus almost instantly (with tips on doing all three).
You will learn the role of image stabilization in flight photography and the best settings.
Both authors share their thoughts on using the focus range limiter switch. In the same vein, you will learn to use Direct Manual Focus to make your flight photography life easier.
All will learn about the best wing positions and the importance of the background with images of birds in flight. With lots of examples.
You will learn about the best shutter speeds (and the best aperture) to use when photographing flying birds.
You will learn to photograph flight while seated and the many advantages of doing so.
You will learn the best methods of controlling high ISO noise.
All will learn to format their flash cards properly and safely.
You will learn what to do when your AF system is temporarily blinded.
All will learn the huge effect that wind strength and direction has on flight photography and to evaluate the quality and direction of the light on both sunny and cloudy days.
You will learn why it is vitally important to shoot aggressively when photographing birds in flight.
You will learn to carefully observe and evaluate a variety of bird behaviors that may shine light on some excellent opportunities for photographing birds in flight. And about getting into the best position from which to photograph.
You will learn to be a much better flight photographer.
What Sony Folks Will Learn
Exactly how Artie uses Zebras to come up with perfect exposure after perfect exposure.
The fine points and recommended settings for Optical Steady Shot (OSS).
The concept of Auto-Focus (AF) tracking in the α-1.
Everything there is to know about the complex Sony autofocus system.
About all the AF patterns, how to quickly switch them, and about those favored by each author. And why.
The Tracking and Non-tracking AF patterns. When and why Arash uses Non-Tracking Zone. And why Artie uses only two AF patterns.
How to set and use Bird Face-Eye detection for flight photography.
How and why to assign various custom functions to the various programmable buttons on the α-1 body.
The perfect settings for the many, many Menu items that are vitally related to flight photography.
How and why the Sony α-1 uses both contrast and phase detection AF to determine focus (and the benefits thereof).
Which are the best memory cards for the Sony α-1.
To quickly access frequently used menu items.
Non-Sony α-1 Discount
Using the honor system, folks who do not use a Sony α-1 body are invited to click here to save $25.00 on the purchase price of the guide.
Typos
With all blog posts, feel free to e-mail or to leave a comment regarding any typos or errors.


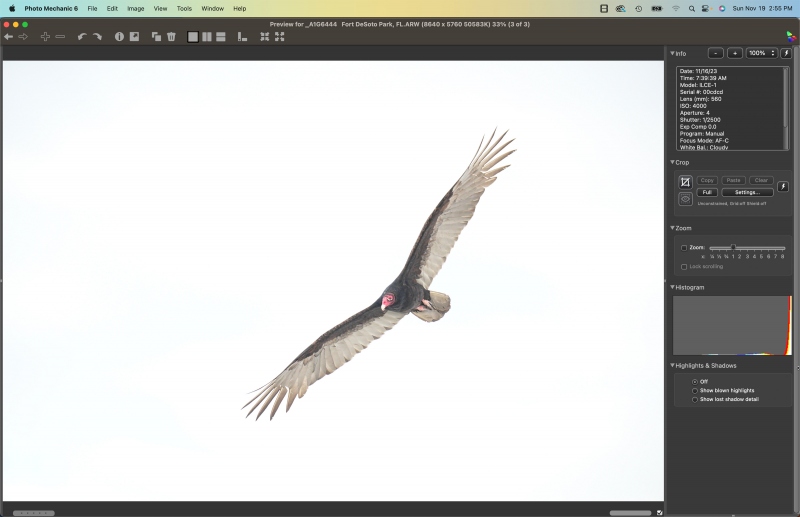
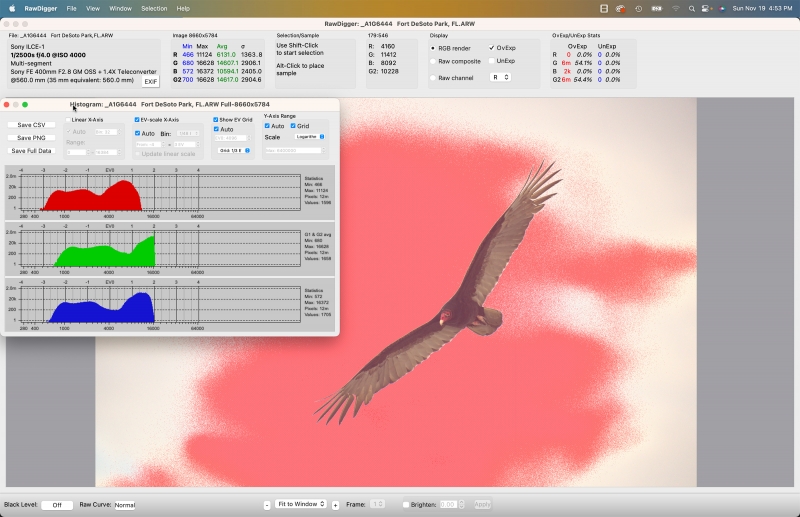
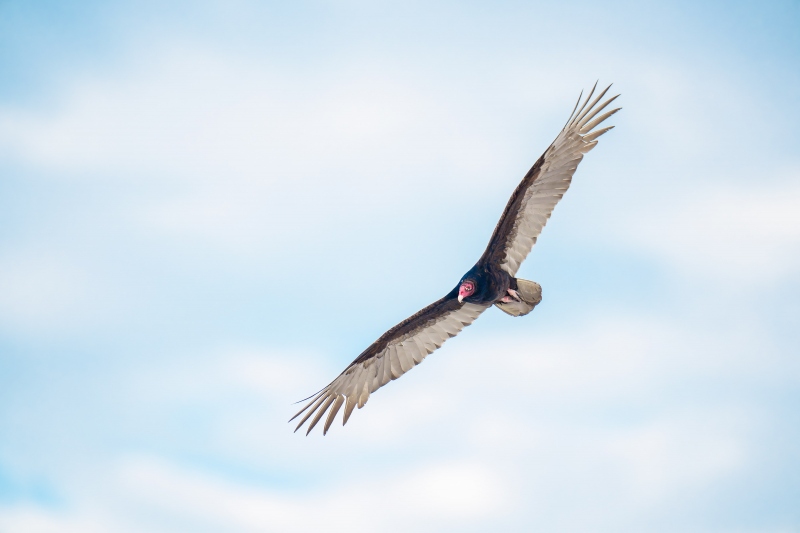
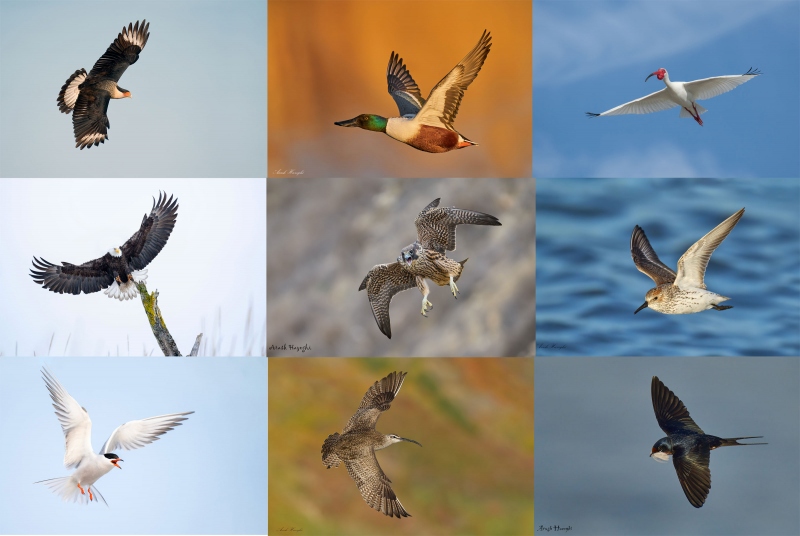


Image #1 looks the same as Image #3 Turkey Vulture soaring flight! Image #2 is the same as Image #1 and #3 but is real dark and has a form on it. The picture of 9 birds is interesting!
I got the reference to the song, one of my favorites, immediately. Well done. Making photographic images is increasingly manipulating computers. I still like the physical, mechanical aspects of photography, and miss some of them. I tried to photograph Jupiter last night with my new Canon R7 but I couldn’t find it in the EVF, so I had to use my 7D2 with its beautiful bright OVF.
Hi David,
Thanks for enjoying my reference to “Don’t It Make My Brown Eyes Blue.” Not sure about your problems finding Jupiter other than to say that the brightness of EVFs is controlled by the exposure settings.
re:
“Making photographic images is increasingly about {sic} manipulating computers.”
With digital, the photographer get to control how his or her images look. With film, that was the job of the lab. I far prefer the former, in fact, for me, processing images is one of the great joys of digital photography.
with love, artie