What’s Up?
I kept only 102 of the 2712 images that I created on Saturday afternoon, a keeper rate of only 3.7%. That for the first edit. While there were a zillion skimmer midair battles, it was very difficult to keep the birds in the frame; the south wind was so strong that the birds were being blown to the north as soon as they took flight to squabble. on Sunday morning, the sun was out for a bit. With the wind from the southwest, I was glad that it clouded over quickly. I did well at sunrise on a single skimmer and then worked the birds with fish and the chicks. I kept 102 out of 1150 images, a keeper rate of 8.8%.
The Met game was great. I attended with younger daughter Alissa and my younger grandson, Idris. Mets all start pitcher Jacob DeGrom was spectacular. He had a perfect game for 5 2/3 innings. Then he walked a batter and gave up a home run with the Mets leading 5 to nothing. The Mets pitchers struck out 19 Braves to tie the team record. The Mets are now 6 1/2 games ahead of the Braves in the National League East. I lived in Brooklyn when the Miracle Mets won the World Series in 1969, and in Queens when they won again in 1986. Maybe this is there year too!
I should have mentioned that our seats were in the sun until the 7th inning. It rained hard at 2:30pm. Then the sun came out with a vengeance. By 3:00pm the temperature on the field was 93° but it felt like 111°. Can you say sauna?
Today in Monday 8 August 2022. The forecast for the morning is a repeat of the last few days; partly cloudy turning sunny with a brisk wind from the southwest. Wherever you are and whatever you are doing, I hope that you too have a great day. This blog post took about two hours to prepare and makes one hundred thirty-seven days in a row with a new one.
So far, seven folks have been in touch about joining me at either Nickerson or JBWR in the coming weeks for an In-the-Field session or two. The first window for doing shorebirds at the East Pond at Jamaica Bay Wildlife Refuge is from 10-12 August, the second window is 24-26 August. See the additional details below.
Please remember to use the B&H and Amazon links that are found on most blog pages and to use the BIRDSASART discount code at checkout when purchasing your new gear from Bedfords to get 3% back on your credit card and enjoy free second-day air FedEx. Please, also, consider joining a BAA IPT. You will be amazed at how much you will learn!
Missed Anniversary
On 7 August 1983, I purchased my first telephoto lens, the Canon FD 400mm f/4.5FD lens. Yesterday marked 39 years of bird photography for me. Mazel tov!
|
|
|
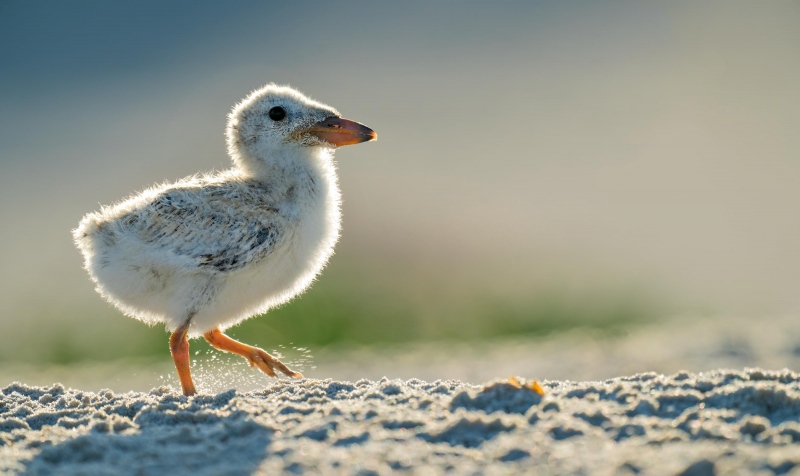
This image was created on 6 August 2022 at Nickerson Beach Park, Lido Beach, Long Island, NY. Working off the titled rear monitor, I used the flattened, no-longer available Induro GIT 304L tripod/Levered-Clamp FlexShooter Pro-mounted Sony FE 600mm f/4 GM OSS lens, the Sony FE 2.0x Teleconverter, and The One, the Sony Alpha 1 Mirrorless Digital Camera). The exposure was determined via Zebra technology with ISO on the thumb dial. ISO 800. 1/800 sec. at f/8 (wide open) in Manual mode. When evaluated in RawDigger, it was determined that there were 124,000 over-exposed pixels. Keep reading to learn why that was a perfect exposure in this situation. AWB at 7:08:23am on a mostly sunny morning. Tracking: Spot S/AF-C with Bird-Eye/Face Detection performed perfectly. Be sure to click on the image to enjoy a high-res version. Image #1: Backlit Black Skimmer chick |
Was It Worth It?
In yesterday’s blog post here, I wrote:
Conditions for bird photography were extremely challenging on Saturday morning. The wind was from the west southwest, blowing straight at the sun. A large cloud on the eastern horizon blocked the red sunrise light on the beach for ten minutes. When the sun finally cleared the cloud, there were few birds left on the beach due to too many bicycle riders, and the beach, was a mess with seaweed.
Then, I tried and failed on some backlit landing skimmers. My only successful image was that of a single backlit skimmer chick. I sat behind the tripod along the western colony ropes with the ground level 600mm f/4 GM lens/2X TC combo and going after backlit chicks for more than an hour. All in all, photography was very difficult, but I did make one very special image. Was getting up very early, working hard for more than two hours, and getting one very good image worth it?
Yes. All that I ever hope for is one good image. After that, I get greedy.
Note that the keys to creating a successful image here were working at 1200mm to isolate the subject and getting the lens just inches above the ground to soften the background by effectively moving it farther from the subject and create an intimate perspective.
The Lesson
When the wind is blowing against the sun, creating backlit images is one of your best options.
Backlit Basics
1- Use your longest effective focal length for a narrow angle of view that reduces background clutter.
2- Set your exposure so that the rim light is over-exposed.
3- Place the subject on the same line as the sun to get the most dramatic backlight. Only rarely will you want the sun in the frame on clear days as it is far too bright.
|
|
Image #2: RawDigger screen capture for the “Backlit Black Skimmer chick” image |
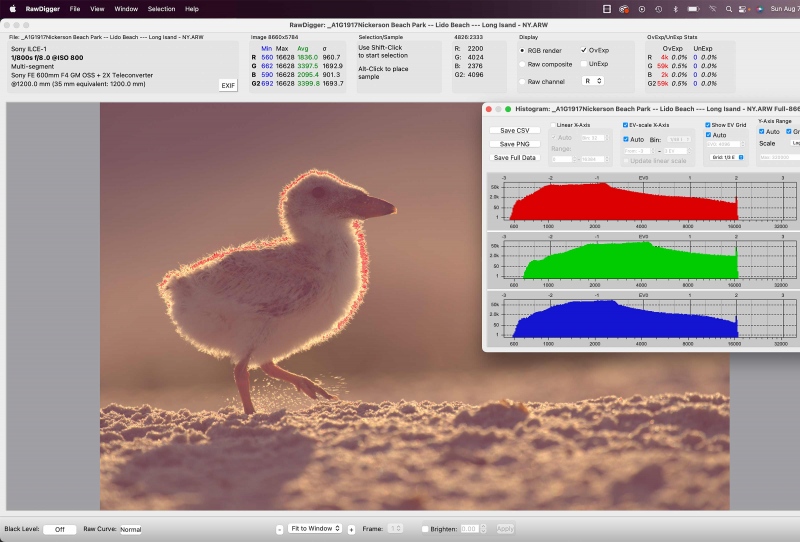
How Can an Image with 124,000 OvExp Pixels be the Best Exposure?
When shooting backlit creatures, we strive to capture rim-lit feathers or fur so that we can create dramatic images. If you expose dark enough to avoid over-exposing the rim light, the shaded side of the subject will be grossly under-exposed. Lightening it will introduce lots of noise and some muddy colors. By pushing the exposure to the right and toasting the rim light, you will create a raw file with at least some detail in the shaded feathers and will have produced an image that you can work with.
What can I say? The combination of Zebras live in the viewfinder (with your camera set up properly) and post-capture study of the raw files in RawDigger makes it pretty much child’s play to come up with perfect exposure after perfect exposure, even in super-difficult situations. It would be impossible to overstate how much I have learned by studying RawDigger and how much better my exposures have become since I started with the program almost two years ago. The raw file brightness for today’s featured image is perfect with the G channel almost making the 16000 line. In other words, the raw file brightness is perfect.
RawDigger — not for the faint of heart …
Nothing has ever helped me learn to create perfect exposures to the degree that RawDigger has. I think that many folks are reluctant to learn that most of their images are underexposed by one or more full stops and that highlight warnings in Photoshop, Lightroom, Capture One, and your in-camera histogram are bogus as they are based on the embedded JPEGs. Only your raw files tell the truth all the time. Heck, I resisted RawDigger for several years … Once you get over that feeling, RawDigger can become your very best exposure friend no matter what system you are using. On the recent IPTs and In-the-Field sessions, we have demonstrated that fact. Convincingly.
The RawDigger Adapted (pink) Histogram
In the RawDigger e-Guide, you will learn exactly how to set up the Adapted “pink” RawDigger Histogram and how to use it to quickly and easily evaluate the exposure or raw file brightness of images from all digital cameras currently in use. RawDigger was especially helpful to me as I have struggled with R5 exposures and learned my new camera body, the Sony Alpha a1.
|
|
RawDigger e-Guide with Two Videos |
The RawDigger e-Guide with Two Videos
by Arthur Morris with Patrick Sparkman
The RawDigger e-Guide was created only for serious photographers who wish to get the absolute most out of their raw files.
Patrick and I began work on the guide in July 2020. At first, we struggled. We asked questions. We learned about Max-G values. We puzzled as to why the Max G values for different cameras were different. IPT veteran Bart Deamer asked lots of questions that we could not answer. We got help from RawDigger creator Iliah Borg. We learned. In December, Patrick came up with an Adapted Histogram that allows us to evaluate the exposures and raw file brightness for all images created with all digital camera bodies from the last two decades. What we learned each time prompted three complete beginning to end re-writes.
The point of the guide is to teach you to truly expose to the mega-Expose-to-the-Right so that you will minimize noise, maximize image quality, best utilize your camera’s dynamic range, and attain the highest possible level of shadow detail in your RAW files in every situation. In addition, your properly exposed RAW files will contain more tonal information and feature the smoothest possible transitions between tones. And your optimized images will feature rich, accurate color.
We teach you why the GREEN channel is almost always the first to over-expose. We save you money by advising you which version of RawDigger you need. We teach you how to interpret the Max G values for your Canon, Nikon, and SONY camera bodies. It is very likely that the Shock-your-World section will shock you. And lastly — thanks to the technical and practical brilliance of Patrick Sparkman — we teach you a simple way to evaluate your exposures and the raw file brightness quickly and easily the Adapted RawDigger histogram.
The flower video takes you through a session where artie edits a folder of images in Capture One while checking the exposures and Max-G values in RawDigger. The Adapted Histogram video examines a series of recent images with the pink histograms and covers lots of fine points including and especially how to deal with specular highlights. The directions for setting up the Adapted Histogram are in the text.
If we priced this guide based on how much effort we put into it, it would sell it for $999.00. But as this guide will be purchased only by a limited number of serious photographers, we have priced it at $51.00. You can order yours here in the BAA Online Store.
|
The Image Optimization
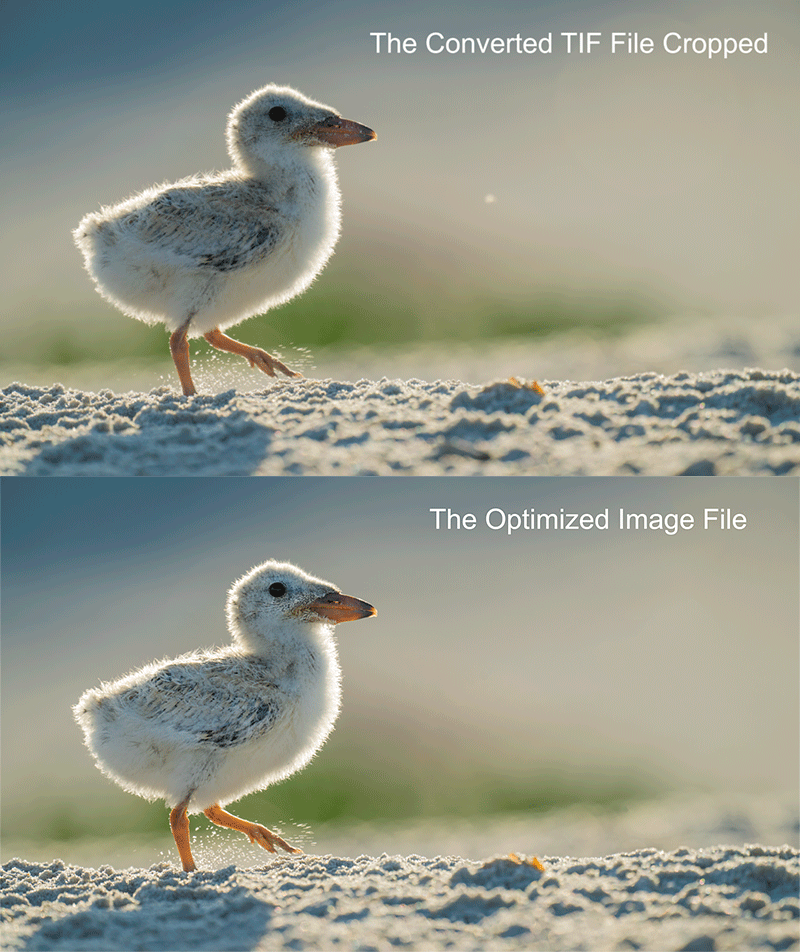
The image optimization here was relatively straightforward. For the raw conversion in Adobe Camera Raw (ACR), I pulled the Whites slider to -100, moved the Shadow slider to +100, and surprisingly, left the Highlights slider at zero. Why the latter? I did not want to darken the white feathers on the shadow side of the bird. By experimenting with the Highlights slider and the Whites slider I came up with something completely new that worked.
I removed the white speck in the background, eliminated one or two distracting elements from the beach, and did some extensive bill cleanup work. I used Tim Grey Dodge and Burn to lighten the shadowed side of the bird in 10% increments with a large, soft brush. I selected the bill and the legs with a Color Range selection, increased the Orange saturation and Luminance, again in ACR. Technically, I should have played with the Orange tones during the raw conversion.
|
|
The BIRDS AS ART Current Workflow e-Guide (Digital Basics II).You can order your copy from the BAA Online Store here, by sending a PayPal for $40 here, or by calling Jim or Jennifer weekdays at 863-692-0906 with your credit card in hand. Be sure to specify Digital Basics II. |
The BIRDS AS ART Current Workflow e-Guide (Digital Basics II)
Almost all of the techniques mentioned above and tons more great Photoshop tips and techniques including my clean-up tools and techniques — along with my complete digital workflow, Digital Eye Doctor Techniques, and all my personalized Keyboard Shortcuts — are covered in detail in the BIRDS AS ART Current Workflow e-Guide (Digital Basics II), an instructional PDF that is sent via e-mail. Note: folks working on a PC and/or those who do not want to miss anything Photoshop may wish to purchase the original Digital Basics along with DB II while saving $15 by clicking here to buy the DB Bundle.
Folks who learn well by following along rather than by reading can check out the complete collection of MP 4 Photoshop Tutorial Videos by clicking here. Note: most of the videos are now priced at an amazingly low $5.00 each.
You can learn how and why I converted all of my Canon digital RAW files in DPP 4 in the DPP 4 RAW Conversion Guide here. More recently, I became proficient at converting my Nikon RAW (NEF) files in Adobe Camera Raw. About three years ago I began converting my Nikon and Sony RAW files in Capture One and did that for two years. You can learn more about Capture One in the Capture One Pro 12 Simplified MP4 Video here. The next step would be to get a copy of Arash Hazeghi’s “The Nikon Photographers’ Guide to Phase One Capture One Pro e-Guide” in the blog post here. Today, I convert my Sony raw files in Photoshop with Adobe Camera Raw.
You can learn advanced Quick Masking and advanced Layer Masking techniques in APTATS I & II. You can save $15 by purchasing the pair.
Typos
With all blog posts, feel free to e-mail or to leave a comment regarding any typos or errors.




Artie, Happy anniversary (a day late). You continue to inspire with your beautiful images, love of learning and teaching, and passion for your art. Here’s to many more.
Thanks, Artie. I have done that from time to time. You do have to work harder for opportunities in those conditions. Your tips are much appreciated.
My pleasure, David. I should have mentioned that I took 100s of similar images, kept perhaps six or eight, but that this one was best by far in very way 🙂
with love, artie
Definitely worth it! I’d rather have one good image than 100 mediocre ones. I throw away so many images that other photographers would consider to be “keepers.”
Thanks, Pat. Don’t forget that for years, I have been deleting thousands of images that others would die for (he said modestly).
with love, artie
Beautiful !
Thanks! I agree.
a