Supporting My Efforts Here
If you enjoy and learn from the blog, please consider using one of my affiliate links when purchasing new gear. It will never cost you a single penny. To support my effort here, please order from B&H by beginning your search here. Or, click here, to order from Bedfords and enter the discount code BIRDSASART at checkout to receive 3% cash back to your credit card and enjoy free Second-Day Air Fed-Ex shipping. It is always best to write for advice via e-mail.
In many cases, I can help you save some serious dollars.
Live Life to the Fullest
Join an Instructional Photo-Tour. Better yet, sign up for both Homer trips.
Important Notice
After a recent update, Word Press stopped sending post notifications. We are aware of the issue and are working on rectifying it. You can always visit the blog by visiting or bookmarking www.BIRDSASART-Blog.com.
What’s Up?
Both of my programs were well received at the 2024 Bedfords Little Rock Photo Expo. Huge thanks to John Rose and Steve Elkins for the invite. The hotel was great as was the food. And the folks. On Saturday afternoon, I walked a bit more than a mile up the hill (and back) to the Arkansas State House to visit the statues of the Little Rock Nine, the high school students who, in 1957, were at first prevented from attending the school of their choice (Little Rock Central High School) when then-Governor Faubus called out the National Guard to stop them. However, President Eisenhower issued Executive Order 10730, which federalized the Arkansas National Guard and ordered them to support the integration on September 23 of that year, after which they protected the nine African American students.
Check out the Wikipedia entry here and follow the various links to learn more about the Little Rock Crisis, an important part of the Civil Rights Movement. I did and learned a ton. As I am about six years younger then them, I was surprised to learn that eight of them were still alive and have been doing great since then.
Today, on the surface at least to a visitor, race relations appear to be very fine. Folks of both races greeted me and each other with a friendly smile. Just the way things should be.
Today is Sunday 19 May 2024. I have an early morning flight to Dallas. Jim will be picking me up at Orlando mid-afternoon today. Wherever you are, please choose to have a wondrous day.
|
|
|
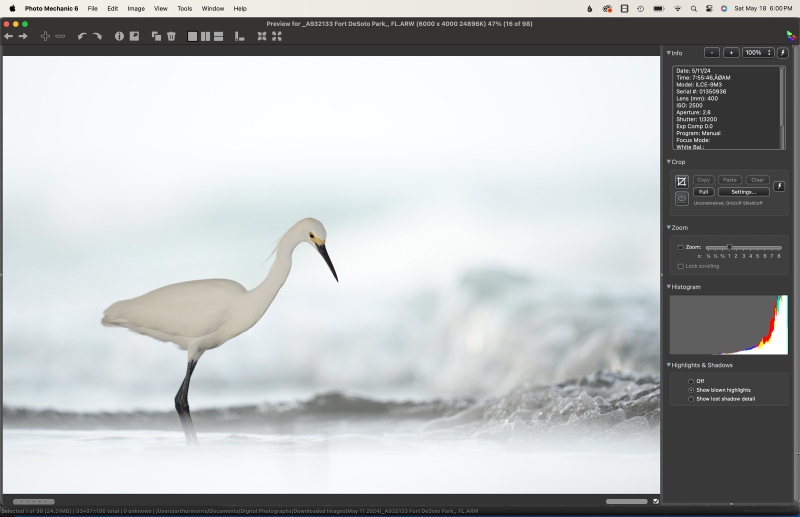
This image was also created on 11 May 2024 on the Spring 2024 Fort DeSoto IPT. Seated on damp sand I used the toe-pod technique with the handheld Sony FE 400mm f/2.8 GM OSS lens and the ridiculously amazing Sony a9 III Mirrorless Camera. The exposure was determined via Zebra technology with ISO on the Thumb Dial. ISO 2500: 1/3200 sec. at f/2.8 (wide open) in Manual mode. When evaluated in RawDigger, the raw file brightness was determined to be dead solid perfect. AWB at 7:55:46am on a partly cloudy, variably sunny morning. Tracking: Zone/AF-C with Bird Face/Eye detection enabled performed perfectly. Be sure to click on the image to enjoy a high-res version. Image #1: This Photo Mechanic screen capture represents the raw file for the Snowy Egret foraging image |
Exposed to the Right
Check out the histogram above and note how far to the right this image was exposed. Note also that a properly exposed raw file will usually look bland without my color. See the two optimized versions below to see how they might be processed.
As the bird was fishing under a pier, it was in shadow. The Gulf background, while not in the sun, was many stops brighter. Therefore, I needed to add a ton of light to the exposure in order to render the egret white. The distant water was totally Zebra-ed when I pressed the shutter button. See what RawDigger had to say about this one immediately below and then check out the two optimized versions below that.
|
|
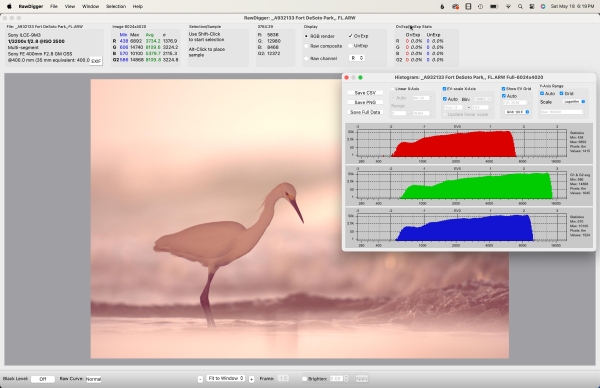
This is the RawDigger screen capture for today’s featured e-Guide for today’s featured image. |
Ho Hum, Another Perfect Exposure
What can I say? The combination of Zebras live in the viewfinder (with your camera set up properly) and post-capture study of the raw files in RawDigger makes it pretty much child’s play to come up with perfect exposure after perfect exposure. Not o worry. Canon, Nikon and others can still learn a ton by evaluating their raw files in RawDigger.
It would be impossible to overstate how much I have learned by studying RawDigger and how much better my exposures have become since I started with the program almost four years ago. With the G channel approaching the 16000 line, the raw file brightness for today’s featured image is dead solid perfect. I was surprised that there were no Ov-Exp warnings on the bright Gulf water. That meant that I could have pushed the exposure even a bit farther to the right.
The RawDigger Adapted (pink) Histogram
In the RawDigger e-Guide, you will learn exactly how to set up the Adapted “pink” RawDigger Histogram and how to use it to quickly and easily evaluate the exposure or raw file brightness of images from all digital cameras currently in use. RawDigger was especially helpful to me when I struggled with R5 exposures and learned my new camera body, the Sony Alpha a1.
RawDigger — not for the faint of heart …
Nothing has ever helped me learn to create perfect exposures to the degree that RawDigger has. I think that many folks are reluctant to learn that most of their images are underexposed by one or more full stops and that highlight warnings in Photoshop, Lightroom, Capture One, and your in-camera histogram are bogus as they are based on the embedded JPEGs. Only your raw files tell the truth all the time. Heck, I resisted RawDigger for several years … Once you get over that feeling, RawDigger can become your very best exposure friend no matter what system you are using. On the recent IPTs and In-the-Field sessions, we have demonstrated that fact over and over again. Convincingly.
|
|
RawDigger e-Guide with Two Videos |
The RawDigger e-Guide with Two Videos
by Arthur Morris with Patrick Sparkman
The RawDigger e-Guide was created only for serious photographers who wish to get the absolute most out of their raw files.
Patrick and I began work on the guide in July 2020. At first, we struggled. We asked questions. We learned about Max-G values. We puzzled as to why the Max G values for different cameras were different. IPT veteran Bart Deamer asked lots of questions that we could not answer. We got help from RawDigger creator Iliah Borg. We learned. In December, Patrick came up with an Adapted Histogram that allows us to evaluate the exposures and raw file brightness for all images created with any digital camera bodies from the last two decades. What we learned each time prompted three complete beginning to end re-writes.
The point of the guide is to teach you to truly expose to the mega-Expose-to-the-Right so that you will minimize noise, maximize image quality, best utilize your camera’s dynamic range, and attain the highest possible level of shadow detail in your RAW files in every situation. In addition, your properly exposed RAW files will contain more tonal information and feature the smoothest possible transitions between tones. And your optimized images will feature rich, accurate color.
We teach you why the GREEN channel is almost always the first to over-expose. We save you money by advising you which version of RawDigger you need. We teach you how to interpret the Max G values for your Canon, Nikon, and SONY camera bodies. It is very likely that the Shock-your-World section will shock you. And lastly — thanks to the technical and practical brilliance of Patrick Sparkman — we teach you a simple way to evaluate your exposures and the raw file brightness quickly and easily the Adapted RawDigger histogram.
The flower video takes you through a session where artie edits a folder of images in Capture One while checking the exposures and Max-G values in RawDigger. The Adapted Histogram Video examines a series of recent images with the pink histograms and covers lots of fine points including and especially how to deal with specular highlights. The directions for setting up the Adapted Histogram are in the text.
If we priced this guide based on how much effort we put into it, it would sell it for $999.00. But as this guide will be purchased only by a limited number of serious photographers, we have priced it at $51.00. You can order yours here in the BAA Online Store.
|
|
|
This image was also created on 11 May 2024 on the Spring 2024 Fort DeSoto IPT. Seated on damp sand I used the toe-pod technique with the handheld Sony FE 400mm f/2.8 GM OSS lens and the ridiculously amazing Sony a9 III Mirrorless Camera. The exposure was determined via Zebra technology with ISO on the Thumb Dial. ISO 2500: 1/3200 sec. at f/2.8 (wide open) in Manual mode. When evaluated in RawDigger, the raw file brightness was determined to be dead solid perfect. AWB at 7:55:46am on a partly cloudy, variably sunny morning. Tracking: Zone/AF-C with Bird Face/Eye detection enabled performed perfectly. Be sure to click on the image to enjoy a high-res version. Image #2: This JPEG represents the first optimized version of the Snowy Egret foraging image. |
Why Birds Fish Under and Around Piers
Why do birds hang around piers? Because fish like hanging around piers. Why? Because piers provide shade and some degree of shelter. And food. Changes in the current and invertebrates that live on or around the pilings and other support structures attract small baitfish that in turn attract both larger predatory fish and hungry birds.
The Situation
On the last IPT morning, we went straight to my back-up location as both remaining clients had afternoon flights home from TPA. In addition, we had done well there the previous day. We had a second great morning photographing foraging Sanderlings on a clean, wave-washed beach. Then we killed on Ruddy Turnstones. Last was a cooperative Great Blue Heron that we photographed both front-lit and back lit. Images here soon.
Image #2, the First Version
Image #2 is the first version of today’s featured image that I optimized as usual with my current workflow. I set the White Balance and the Black and White points, moved the Highlight slider well to the left and the shadow slider a bit to the right, set the Clarity and Dehaze sliders by rote, opened the Color Mixer tab, clicked on the icon for the Luminance Targted Adjustment Tool, adjusted the Saturation and Luminance of the GREENS, AQUAS, and BLUES, ran Step 1 of my new 2-step Noise Reduction technique, and finally hit Open.
All of the above as detailed in both BIRDS AS ART Current Workflow e-Guide (Digital Basics II) and in the Digital Basics III video series.
|
|
|
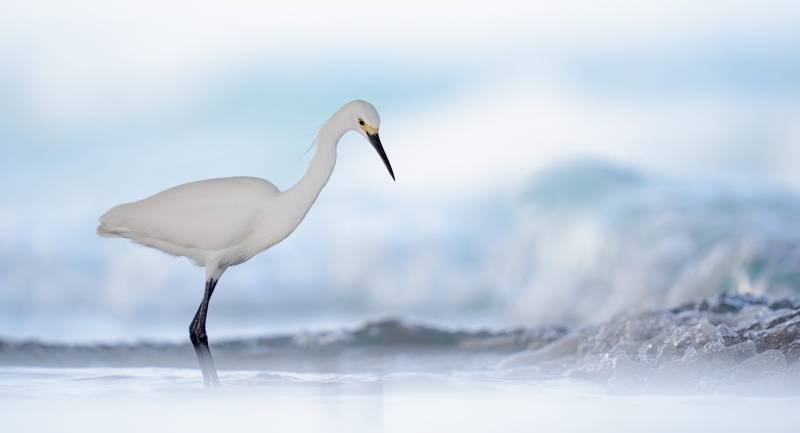
This image was created on 11 May 2024 on the Spring 2024 Fort DeSoto IPT. Seated on damp sand I used the toe-pod technique with the handheld Sony FE 400mm f/2.8 GM OSS lens and the ridiculously amazing Sony a9 III Mirrorless Camera. The exposure was determined via Zebra technology with ISO on the Thumb Dial. ISO 2500: 1/3200 sec. at f/2.8 (wide open) in Manual mode. When evaluated in RawDigger, the raw file brightness was determined to be dead solid perfect. AWB at 7:55:46am on a partly cloudy, variably sunny morning. Tracking: Zone/AF-C with Bird Face/Eye detection enabled performed perfectly. Be sure to click on the image to enjoy a high-res version. Image #3: This JPEG represents the second version of the Snowy Egret foraging image |
Image #3: More CYAN
After viewing Image #1, I realized that the image might look even better if I juiced up the color a bit more. To do that, I re-opened the image in Photoshop, created a new layer (Command > J), and hit Command > U) to add Hue Saturation adjustment on the new layer. I selected CYAN from the drop-down menu, and boosted the CYAN to +40.
Your Call?
Do you prefer the color in the first version, Image #2, or in the juiced up version, Image #3? Why?
|
|
The BIRDS AS ART Current Workflow e-Guide (Digital Basics II).You can order your copy from the BAA Online Store here, by sending a PayPal for $40 here, or by calling Jim or Jennifer weekdays at 863-692-0906 with your credit card in hand. Be sure to specify Digital Basics II. |
The BIRDS AS ART Current Workflow e-Guide (Digital Basics II)
The techniques mentioned above and tons more great Photoshop tips and techniques — along with my complete digital workflow, Digital Eye Doctor Techniques, and all my personalized Keyboard Shortcuts — are covered in detail in the BIRDS AS ART Current Workflow e-Guide (Digital Basics II), an instructional PDF that is sent via e-mail. Note: folks working on a PC and/or those who do not want to miss anything Photoshop may wish to purchase the original Digital Basics along with DB II while saving $15 by clicking here to buy the DB Bundle.
Please note: the Divide and Conquer technique was inadvertently omitted from DB II. It is detailed in a free excerpt in the blog post here.
Folks who learn well by following along rather than by reading can check out the complete collection of MP 4 Photoshop Tutorial Videos by clicking here. Note: most of the videos are now priced at an amazingly low $5.00 each.
You can learn how and why I converted all of my Canon digital RAW files in DPP 4 in the DPP 4 RAW Conversion Guide here. More recently, I became proficient at converting my Nikon RAW (NEF) files in Adobe Camera Raw. About three years ago I began converting my Nikon and Sony RAW files in Capture One and did that for two years. You can learn more about Capture One in the Capture One Pro 12 Simplified MP4 Video here. The next step would be to get a copy of Arash Hazeghi’s “The Nikon Photographers’ Guide to Phase One Capture One Pro e-Guide” in the blog post here. Today, I convert my Sony raw files in Photoshop with Adobe Camera Raw.
You can learn advanced Quick Masking and advanced Layer Masking techniques in APTATS I & II. You can save $15 by purchasing the pair.
|
|
The Digital Basics III Video Series |
The Digital Basics III Video Series
I realized about a year ago that my digital workflow had changed significantly and was toying with the idea of writing a Digital Basics III. More recently, I learned and begun working with two great new Photoshop Tools, the Remove Tool and the Luminance Targeted Adjustment Tool. The former is like a smarter Spot Healing Brush Tool on steroids and the latter is a step up from the fabulous Color Mixer Tool. During that same time frame, I came up with a new and improved 2-step noise reduction technique. I still use Divide and Conquer, Quick Masks, Layer Masks, an expanded array of personalized keyboard shortcuts, and tons of other stuff from both versions of Digital Basics.
As soon as I realized that I did not want to take on another large writing project, I realized that by creating a series of videos I could much more easily share all the details of my current digital workflow and much more easily incorporate additional new tips, techniques, and tools as I went. And so, The Digital Basics III Video Series was born.
You can save $26 by ordering the first five videos in Volume I by clicking here. The videos will be most valuable for folks using the latest version of Photoshop (2024) or Lightroom along with Topaz DeNoise AI and Topaz Sharpen AI.





#2 for me. Though we made great strides in the past, the current generation appears lost, uninformed and susceptible to the same old “isms”. I’ll leave it there.
Yes, there is some strange stuff going on …
a
Another example of a great background making the image. My initial thought was that the first version was colorful enough, but I’d give the nod to the second because the added blue in the background makes the white bird stand out more, creating a greater feeling of depth.
One of the earliest newspaper headlines I remember seeing in our local paper (1956?) was “I Like Ike.”
Agree 100%. I took several hundred more images of this bird without the perfectly timed wave and kept exactly one of them. I remember that too, vaguely. I was only 11 in ’57.
with love, artie