May 3rd, 2011
Afternoon Farming Lessons II
Tip #1:
In late afternoon search out relatively low perches with distant backgrounds. You will find the one in the image above in a bit of a clearing near the start of the boardwalk. It will be on your right (as your are facing north, that is, toward the ramp that leads up to the Gomek exhibit). If there is nothing on the perch, hang out; there will be soon!
Tip #2:
On bright sunny afternoons look for subjects that (as above) are completely shaded. Birds often perch close to the boardwalk on the left (again, as you are facing north). Birds in bright sun–especially white ones–do not make good photographic subjects until the sun is quite low in the sky (yet not obscured by trees or by other vegetation).
| [Not a valid template] |
|
This image of a young spoonbill with its wings raised was created with the Canon 800mm f/5.L IS lens and the
Canon EOS-1D Mark IV. ISO 400. Evaluative metering +1 stop: 1/800 sec. at f/5.6 in Av mode.
The dark brown primary tips indicate that this is a young bird, most likely about ten months old.
|
Tip #3:
If you own a long lens, look for the large bare tree that looms over the boardwalk; it will be hard to miss. Stay well back. (You will be facing south/southeast with the sun going down somewhat behind you.) Use a teleconverter if need be to reduce you angle of inclination; in general you do not want to stand right under the tree shooting up at the birds. Be patient. Most evenings a variety of birds will land and take off from the tree and at times there are some decent squabbles. The bird in the image above had just landed.
Shopper’s Guide
Below is a list of the gear that I used to create the images above (along with some related items). Thanks a stack to all who have used the Shopper’s Guide links to purchase their gear as a thank you for all the free information that we bring you on the Blog and in the Bulletins. Before you purchase anything be sure to check out the advice in our Shopper’s Guide.
Canon 70-200mm f/2.8L IS II lens. Man, I am loving this lens on my shoulder with the 2X III teleconverter. I also use it a lot with the 1.4X III TC.
2X III teleconverter. This new TC, which is noticeably sharper than the 2X II TC, is designed to work best with the new Series II super-telephoto lenses.
Canon 800mm f/5.L IS lens. Right now this is my all time favorite super-telephoto lens.
Canon EOS-1D Mark IV professional digital camera body. My workhorse professional digital camera bodies.
And from the BAA On-line Store:
Gitzo GT3530LS Tripod. This one will last you a lifetime.
Mongoose M3.6 Tripod Head. Right now this is the best tripod head around for use with lenses that weigh less than 9 pounds. For heavier lenses, check out the Wimberley V2 head.
Delkin 32gb e-Film Pro Compact Flash Card. These high capacity cards are fast and dependable.
I pack my 800 and tons of other gear in my ThinkTank Airport SecurityTM V2.0 rolling bag for all of my air travel and recommend the slightly smaller Airport InternationalTM V2.0 for most folks. These high capacity bags are well constructed and protect my gear when I have to gate check it on short-hops and puddle jumpers. Each will protect your gear just as well. By clicking on either link or the logo below, you will receive a free gear bag with each order over $50.
May 2nd, 2011 Home 🙂
I drove home from St. Augustine this morning (Monday, May 2, 2011), took a good nap, and am looking forward to resting up a bit and getting lots of work done before my Connecticut/Long Island trip. I fly to Hartford on May 14th. Click here for details of the May 15th program in Storrs, CT. There are already well more than 100 folks signed up; I hope to see you there.
Farming Lessons
With many hundreds of pairs of nesting wading birds at the St. Augustine Alligator Farm each spring it is obvious that you can show up and create thousands of images in a single hour. The trick, however, is to make a few good images. To do this, you need to learn to recognize the good situations. The Alligator Farm offers a wonderful photography pass. Get in early. Tip the keeper on duty $5 and stay late. One of my favorite times there is the half hour after the sun has dropped out of sight. Many of the breeding birds are flying back to their nests and hundreds of additional birds that spend only the evenings at the farm are flying in to roost. Mount a flash on your intermediate telephoto lens, add lots of light to your exposure, and make lots of images of the birds in flight from below–the best will usually be when the birds are directly above you. I start off using a lot of flash, usually at zero, and then reduce the setting in third stop increments as it gets darker and darker….
Two lessons here. First, use a long lens often with a teleconverter to isolate your subject. Rookeries are cluttered places. By working tight with long glass you can eliminate much of the clutter by carefully choosing your perspective. Next, one of my favorite situations is subject in shade, background in sun as in the image immediately above. Add a bit of light and your background will really glow.
Shopper’s Guide
Below is a list of the gear that I used to create the images above (along with some related items). Thanks a stack to all who have used the Shopper’s Guide links to purchase their gear as a thank you for all the free information that we bring you on the Blog and in the Bulletins. Before you purchase anything be sure to check out the advice in our Shopper’s Guide.
Canon 70-200mm f/2.8L IS II lens. Man, I am loving this lens on my shoulder with the 2X III teleconverter. I also use it a lot–as I did to create the opening image here–with the 1.4X III TC.
Canon EF 1.4X III TC. This new TC is designed to work best with the new Series II super-telephoto lenses.
Canon 800mm f/5.L IS lens. Right now this is my all time favorite super-telephoto lens.
Canon EOS-1D Mark IV professional digital camera body. My workhorse professional digital camera bodies.
Canon 580 EX II Speedlight. This is Canon’s most powerful, top of the line flash.
Canon CP-E4 Compact Battery Pack. Powers the flash. Allows more consecutive flashes and faster recharging times.
Better Beamer. Using a Better Beamer with long lenses concentrates the light from the flash and yields an increase in flash output of about 2 2/3 stops, allows you to work at greater distances with smaller apertures, reduces battery drain, weighs just 2 1/2 ounces, and holds the Fresnel lens in place with no sagging or flopping. It fits in your pocket and set up and removal is quick and easy.
And from the BAA On-line Store:
Gitzo GT3530LS Tripod. This one will last you a lifetime.
Mongoose M3.6 Tripod Head. Right now this is the best tripod head around for use with lenses that weigh less than 9 pounds. For heavier lenses, check out the Wimberley V2 head.
Mongoose Integrated Flash Arm. Lightweight yet fully functional. This accessory allows you to mount the flash well above the central axis of the lens thus eliminating or reducing problems with red-eye, flash-eye, steel eye, purple eye with birds and green eye with many mammals.
ProMaster Flash Cord. This flash cord is sturdy and reliable.
Delkin 32gb e-Film Pro Compact Flash Card. These high capacity cards are fast and dependable.
I pack my 800 and tons of other gear in my ThinkTank Airport SecurityTM V2.0 rolling bag for all of my air travel and recommend the slightly smaller Airport InternationalTM V2.0 for most folks. These high capacity bags are well constructed and protect my gear when I have to gate check it on short-hops and puddle jumpers. Each will protect your gear just as well. By clicking on either link or the logo below, you will receive a free gear bag with each order over $50.
May 1st, 2011 Been Swamped
After three days of virtually non-stop programs and In-the-Field Instructional Photo-Walks at the Florida Birding and Photo Fest in St. Augustine, my keynote address, “A Bird Photographer’s Story was warmly received last night by about 135 folks. From the get-go I have been (and still am) fighting a tickley cough, a bit of chest congestion, a slightly sore throat, and a mild case of laryngitis. (That after giving myself a kinehora last week by saying, “I have not had a cold in well more than a year….”) Today is a relatively light day with just two In-the-Field walks at the St. Augustine Alligator Farm. I will pack up during the day and head back to Indian Lake Estates on Monday morning.
Low and Behold: Best Ever Lesson on Getting Down and Sandy
The image above was created while I was standing. While I do like the inclusion of the shadow I would best describe the image as butt ugly. The sharply defined irregularities of the beach are visually disruptive. The key to the success of the image below was getting down flat on the soft sand; doing so reduced the photo to just the key element on a pure white high key background. My hope is that after comparing the two images here you will not soon forget the advantages of getting low when working on relatively flat ground: a sharp subject pleasingly set against a background of pure color.
To learn why the wing of a Laysan Albatross was sticking out of the sand check out Tsunami Evidence on Midway.
Shopper’s Guide
Below is a list of the gear that I used to create the image above. Thanks a stack to all who have used the Shopper’s Guide links to purchase their gear as a thank you for all the free information that we bring you on the Blog and in the Bulletins. Before you purchase anything be sure to check out the advice in our Shopper’s Guide.
Canon 70-200mm f/2.8L IS II lens. Man, I am loving this lens on my shoulder with the 2X III teleconverter. I also use it a lot–as I did here–with the 1.4X III TC.
Canon EF 1.4X III TC. This new TC is designed to work best with the new Series II super-telephoto lenses.
Canon EOS-1D Mark IV professional digital camera body. The very best professional digital camera body that I have ever used.
And from the BAA On-line Store:
Delkin 32gb e-Film Pro Compact Flash Card. These high capacity cards are fast and dependable.
I pack my 800 and tons of other gear in my ThinkTank Airport SecurityTM V2.0 rolling bag for all of my air travel and recommend the slightly smaller Airport InternationalTM V2.0 for most folks. These high capacity bags are well constructed and protect my gear when I have to gate check it on short-hops and puddle jumpers. Each will protect your gear just as well. By clicking on either link or the logo below, you will receive a free gear bag with each order over $50.
April 27th, 2011
| [Not a valid template] |
|
This Bald Eagle juxtaposition image was created from a rocking boat near Homer, AK on the March IPTs with the Canon 800mm f/5.L IS lens, the 1.4X III TC, and the
Canon EOS-1D Mark IV. ISO 400: 1/1250 sec. at f/8 set manually.
In the above situation with a large bird occupying a good portion of the frame it is imperative to figure out the correct exposure in advance by checking the histogram to make sure that it is well to the right without any blinkies. Once you determine the correct exposure, set it manually. And that is just what I did in this case. By doing so your exposure will not be thrown off if there is more black in the frame one moment and more white the next. To learn exposure theory study the chapter on exposure in the original The Art of Bird Photography; it is the great strength of a book that has sold more than 35,000 copies and laid the foundation for many of today’s great bird photographers.
|
Working In Manual Mode.
Below is a (free) excerpt adapted from The Art of Bird Photography II (916 pages on CD only). There is a huge on-going thread on BPN that I started a few days ago: Manual vs. Av and Other Modes. At the time I was working on this blog post there were 154 replies and the thread had 2,636 views. Quite interesting to say the least. I began the thread because there are a small number of folks out there who firmly believe that if you are not working in Manual mode 100% of the time, you are not a real photographer. If you read through the thread, you will quickly learn that I disagree most emphatically. 🙂
BTW, thanks to all for the get well wishes. The hand and especially the finger are doing and feeling great. I am in the motel on St. Augustine Beach getting ready to attend the Speaker’s dinner. Now here is the very best news. When I am done at the festival I will write a blog post or possibly several on when and why I use the various modes.
Working In Manual Mode
Many professional and serious amateur photographers work in Manual mode most of the time. Over the past few years I have been working in Manual mode more and more. I still use Av mode with exposure compensation whenever the background is of a relatively constant tonality and the subject is at a constant distance. When the background tonality is changing from moment to moment but the light is constant, it is best, however, to work in Manual mode. In either case, I rely on Evaluative Metering. Here are some examples of rapidly changing backgrounds: a shorebird on a rock along the edge of the ocean with waves breaking behind it. Birds flying against a blue sky with occasional white clouds and then dropping below the horizon. Cranes flying by in front of a variety of backgrounds that might include sky, mountains, yellowed grasses, or water. As many folks are confused as to how to work in or set exposure compensation when working in Manual mode, I offer the following basic tutorial.
#1: When you work in Manual mode you select and set the shutter speed and you select and set the aperture. With my Canon cameras the default has you changing the shutter speed with your index finger dial and the aperture with the thumb wheel.
#2: After selecting Manual mode, point your camera at a scene or stationary subject and lock your tripod head so the framing remains constant. Next select and set the desired aperture. Then adjust the shutter speed until the analog scale in the viewfinder nulls out to zero. With Canon pro bodies this scale is laid out vertically along the right side of the viewfinder display (when you are working in horizontal format). With many of the pro-sumer bodies the analog scale is laid out horizontally at the bottom of the viewfinder display. The zero or null indicator is at the center of the analog scale. The three full stops above the null symbol (marked in 1/3-stop increments) indicate overexposure. The three full stops below the null symbol (also marked in 1/3-stop increments) indicate underexposure. If you change the aperture and you do not see the small square moving, check either the top or the bottom of the analog scale. You will note a small triangle at the top if you are way overexposed or a small triangle at the bottom if you are way underexposed. If the former, rotate the dial and choose faster shutter speeds, if the latter, choose slower shutter speeds. In either case, you will soon see the small square moving up or down the analog scale. At first, you will simply want to practice nulling the meter, that is, getting the small square to rest on the null symbol. This indicates that you have now set the metered exposure (as determined by the camera’s Evaluative Metering system.
#3: When you work in Manual mode it is not possible to set exposure compensation. To come up with the exposure that you wish, simply change the aperture or shutter speed as above until the small square indicates the amount of over- or under-exposure that you desire. If you wish to work at +2 stops, you need adjust either the shutter speed or the aperture until the small square rests on the symbol that is two full stops above the null symbol. If you wish to underexpose by 1/3 stop, you need adjust either the shutter speed or the aperture until the small square rests on the symbol that lies just below the null symbol.
With a bit of practice you should quickly become comfortable whenever the need to work in Manual mode arises. Which is often 🙂
Just Think.
Just think how much you would learn if you purchased the two book bundle (ABP and ABP II) and studied hard….
Shopper’s Guide
Below is a list of the gear mentioned in today’s post and some other stuff that I use regularly to keep my sensors clean. Thanks a stack to all who have used the Shopper’s Guide links to purchase their gear as a thank you for all the free information that we bring you on the Blog and in the Bulletins. Before you purchase anything be sure to check out the advice in our Shopper’s Guide.
Canon 800mm f/5.L IS lens. Right now this is my all time favorite super-telephoto lens.
Canon EF 1.4X III TC. This new TC is designed to work best with the new Series II super-telephoto lenses.
25mm Extension Tube. This vaulable accessory allows for closer focusing.
Canon EOS-1D Mark IV professional digital camera body. The very best professional digital camera body that I have ever used.
And from the BAA On-line Store:
Gitzo GT3530LS Tripod. This one will last you a lifetime.
Mongoose M3.6 Tripod Head. Right now this is the best tripod head around for use with lenses that weigh less than 9 pounds. For heavier lenses, check out the Wimberley V2 head.
Double Bubble Leve.l You will find one in my camera’s hot shoe whenever I am on a tripod and not using flash.
Delkin Sensor Scope. This cool, indispensable device allows you to see sensor dust so that you know where to clean.
Lens Pen Combo Kit. The answer to your sensor cleaning problems. Use the small pen on your sensor, the larger one on your lenses and teleconverters.
Giotto’s Super Rocket Blower. Don’t waste your time with smaller versions; you need to power of this large blower to clean your sensor successfully.
Delkin 32gb e-Film Pro Compact Flash Card. These high capacity cards are fast and dependable.
I pack my 800 and tons of other gear in my ThinkTank Airport SecurityTM V2.0 rolling bag for all of my air travel and recommend the slightly smaller Airport InternationalTM V2.0 for most folks. These high capacity bags are well constructed and protect my gear when I have to gate check it on short-hops and puddle jumpers. Each will protect your gear just as well. By clicking on either link or the logo below, you will receive a free gear bag with each order over $50.
April 26th, 2011
| [Not a valid template] |
|
This mega-high key image was first inspired by a Todd Gustafson Cheetah image that he intentionally over-exposed four stops on a bright sunny day. All that you saw against the over-exposed background were the eyes, the bright pink gums,. and the yellowed teeth–everything in shadow. When I shared a Laysan Albatross image of the same ilk at the introductory Midway slide program everyone loved it. Then Paul Mckenzie suggested that the same approach might work well with a White Tern on a bright sunny day. So I tried it.
This image was created with the Canon 800mm f/5.L IS lens, a 25mm Extension Tube, the 1.4X III TC, and the
Canon EOS-1D Mark IV. ISO 400. Evaluative metering at +2 stops: 1/400 sec. at f/11 set manually.
The original image was intentionally over-exposed at creation and lightened further during conversion. I did lots of bill clean-up as the bird’s beak was a mess.
Note: if you put the extension tube in front of the TC as I did here you will be able to focus closer than if the TC were mounted in front of the tube. You will however need to focus manually. These situations are discussed in detail in ABP II (916 pages on CD only).
|
Minor Surgery…
Knowing that I had to get up early, I was asleep on Monday evening by 9pm. Still a bit jet-lagged from the Midway trip, I woke wide awake at 10pm, my body thinking that it had had a nice nap. I read for 90 minutes and then slept fitfully for a few hours, finally getting up for good at 2:50 am completely awake…. Jim had his alarm set for 4:45 am and we both were in the car right on schedule at 5:15am Tuesday morning and headed north. Jim drove and I finished editing the Midway To Transfer folder. I created about 5,000 images on the trip. After my daily first edits that was down to about 1500. After additional culling I began this morning with 994 images. Right now I am down to 426 keepers. I will do one more edit before moving the folder onto the main computer.
We arrived at the Orlando Surgery Center a few minutes before 7am. After the required paperwork was filled out I was called in, changed into hospital gown, head net, and sock-slippers. An IV line was inserted and I spoke to a nurse and to the anesthesiologist, and then Hand surgeon George White stopped in for a chat. I was wheeled into the OR where they put a tourniquet on my left arm and started the dream sleep drip. I awoke in what seemed like minutes to learn that everything had gone just fine. The rather simple A-1 pulley surgery to repair the trigger finger–middle flinger left hand–was a 20-minute success. Left hand bandaged and left arm in a sling to keep it elevated we headed home, stopping at CVS to fill a pain-killer prescription that it seems I will not need. I have felt great all day and am–at 8:02 pm, just starting to get feeling back in the middle finger, numb all day from the local anesthetic. I gotta say that it feels great. I have been icing the hand off and on and making a fist many times each hour as instructed.
Cards, flowers, and sympathy are not required. 🙂
Tomorrow afternoon I drive up to the 9th Annual Florida’s Birding & Photo Fest in St. Augustine (scheduled for April 27-May 1, 2011). Click here for details. It is not too late to attend and there are a slew of great presenters and field trips. My field trips are all sold out. 🙂
Shopper’s Guide
Below is a list of the gear mentioned in today’s post and some other stuff that I use regularly to keep my sensors clean. Thanks a stack to all who have used the Shopper’s Guide links to purchase their gear as a thank you for all the free information that we bring you on the Blog and in the Bulletins. Before you purchase anything be sure to check out the advice in our Shopper’s Guide.
Canon 800mm f/5.L IS lens. Right now this is my all time favorite super-telephoto lens.
Canon EF 1.4X III TC. This new TC is designed to work best with the new Series II super-telephoto lenses.
25mm Extension Tube. This vaulable accessory allows for closer focusing.
Canon EOS-1D Mark IV professional digital camera body. The very best professional digital camera body that I have ever used.
And from the BAA On-line Store:
Gitzo GT3530LS Tripod. This one will last you a lifetime.
Mongoose M3.6 Tripod Head. Right now this is the best tripod head around for use with lenses that weigh less than 9 pounds. For heavier lenses, check out the Wimberley V2 head.
Double Bubble Leve.l You will find one in my camera’s hot shoe whenever I am on a tripod and not using flash.
Delkin Sensor Scope. This cool, indispensable device allows you to see sensor dust so that you know where to clean.
Lens Pen Combo Kit. The answer to your sensor cleaning problems. Use the small pen on your sensor, the larger one on your lenses and teleconverters.
Giotto’s Super Rocket Blower. Don’t waste your time with smaller versions; you need to power of this large blower to clean your sensor successfully.
Delkin 32gb e-Film Pro Compact Flash Card. These high capacity cards are fast and dependable.
I pack my 800 and tons of other gear in my ThinkTank Airport SecurityTM V2.0 rolling bag for all of my air travel and recommend the slightly smaller Airport InternationalTM V2.0 for most folks. These high capacity bags are well constructed and protect my gear when I have to gate check it on short-hops and puddle jumpers. Each will protect your gear just as well. By clicking on either link or the logo below, you will receive a free gear bag with each order over $50.
April 25th, 2011
Sensor Cleaning Update with a Surprise!
On my recent trip to Midway I left my sensor cleaning kit at home to save a few ounces in my luggage; in retrospect, this was a bad move. 🙂 And I had had some nasty sensor dust on my EOS-1D Mark IV EOS-1D Mark IV bodies is micro-adjusted for the Canon 800mm f/5.L IS lens–both the 1.4X III TC and the 2X III teleconverter require separate micro-adjustments, and my other Mark IV is micro-adjusted for my Canon 70-200mm f/2.8L IS II–and again, both the 1.4X III and the 2X III teleconverter require separate micro-adjustments.)
To about the Lens Align Mark II and to read the tutorial on how to micro-adjust your lenses and cameras, click here.
I any case I spent a lot of time cleaning dust bunnies off my best Midway images. One of the first things that I did when I got home was to clean the sensor on my 70-200 2.8 Mark IV. The first step of course was to find my sensor cleaning kit. Try as I might, I could not find it. Jim–who helps me find everything–is not here on the weekends so I grabbed a brand new Delkin Sensor Scope, a Giotto’s Super Rocket Blower, and a Lens Pen Combo Kit from stock. When I opened the Sensor Scope I had a pleasant surprise. First off the Sensor Scope now comes in a neat, zippered, protective pouch. And in instead of having to press and hold a flat switch to keep the light on, you now press an on-off button; press it once and the lamp stays on. (Do remember to turn the lamp off when you are done.) Best of all, the lamp is brighter.
Next I followed the detailed instructions as per the sensor cleaning guide that we send to everyone who purchases a Lens Pen Combo Kit from us. To the letter. After the first cleaning I had eliminated 99% of the dust spots. Note: there are a lot more dust spots in the image than you can see in the before JPEG above. Those are the big ones. There were dozens more smaller ones; I call those f/22 dust bunnies as they are evident only when you have worked at tiny apertures and then only when you blow the image up to 100% in Photoshop. And they are much softer/fainter/less noticeable than the big ones. It took me six more cleanings (ten minutes total) to achieve f/22 perfection and even then there was one tiny, faint dust spot in the top left corner that I could not eliminate…. The idea is to get the sensor a lot cleaner than it was when you began.
The procedure that we use and recommend is simple and safe. Thousands of folks have adapted our method with great results and a perfect safety record. We offer a complete package with all of the sensor cleaning gear that I use here.
| [Not a valid template] |
|
This Laysan Albatross image was created with the Canon 800mm f/5.L IS lens and the
Canon EOS-1D Mark IV. ISO 400. Evaluative metering at +1 2/3 stops off the sky: 1/640 sec. at f/5.6 in Manual mode. (Early morning light.)
I tried hard to get at least a strip of the lagoon in the image to add interest. The waves in the distance are breaking on the reef that surrounds the atoll. Working with a camera with a clean sensor is a pleasure as you do not waste time during image optimization having to clean dust spots. I use the Spot Healing Brush to clean dust spots from uniform areas. For complete details and lots more check out our Digital Basics File.
|
BIRDS AS ART Bulletin #371
BIRDS AS ART Bulletin #371 is on-line now and can be accessed here.
FEATURES
- THE MIDWAY TRIP REPORT
- MIDWAY e-MAIL AND FUTURE MIDWAY TRIP?
- MAY 15th CONNECTICUT PROGRAM
- POSSE NEWS/DENISE IPPOLITO
- IPT UPDATES
Shopper’s Guide
Below is a list of the gear mentioned in today’s post. Thanks a stack to all who have used the Shopper’s Guide links to purchase their gear as a thank you for all the free information that we bring you on the Blog and in the Bulletins. Before you purchase anything be sure to check out the advice in our Shopper’s Guide.
Canon 70-200mm f/2.8L IS II lens. Man, I am loving this lens on my shoulder with the 2X III teleconverter. I also use it a lot–depending on the situation–with the 1.4X III TC.
Canon EF 1.4X III TC. This new TC is designed to work best with the new Series II super-telephoto lenses.
Canon 800mm f/5.L IS lens. Right now this is my all time favorite super-telephoto lens.
2X III teleconverter. The new 2X III TC is sharper than the older 2X II version.
Canon EF 1.4X III TC. This new TC is designed to work best with the new Series II super-telephoto lenses.
Canon EOS-1D Mark IV professional digital camera body. The very best professional digital camera body that I have ever used.
And from the BAA On-line Store:
Gitzo GT3530LS Tripod. This one will last you a lifetime.
Mongoose M3.6 Tripod Head. Right now this is the best tripod head around for use with lenses that weigh less than 9 pounds. For heavier lenses, check out the Wimberley V2 head.
Double Bubble Leve.l You will find one in my camera’s hot shoe whenever I am on a tripod and not using flash.
Delkin Sensor Scope. This cool, indispensable device allows you to see sensor dust so that you know where to clean.
Lens Pen Combo Kit. The answer to your sensor cleaning problems. Use the small pen on your sensor, the larger one on your lenses and teleconverters.
Giotto’s Super Rocket Blower. Don’t waste your time with smaller versions; you need to power of this large blower to clean your sensor successfully.
Delkin 32gb e-Film Pro Compact Flash Card. These high capacity cards are fast and dependable.
I pack my 800 and tons of other gear in my ThinkTank Airport SecurityTM V2.0 rolling bag for all of my air travel and recommend the slightly smaller Airport InternationalTM V2.0 for most folks. These high capacity bags are well constructed and protect my gear when I have to gate check it on short-hops and puddle jumpers. Each will protect your gear just as well. By clicking on either link or the logo below, you will receive a free gear bag with each order over $50.
April 23rd, 2011
Silhouette Flash Lessons
This image was created only a few minutes after the image that I shared with you yesterday here. The sun had slipped below the horizon and the color in the sky had lost its glow and its intensity but the varying shades of orange and peach were still quite lovely. I had brought my flash along but did not have my external battery pack (the Canon CP-E4 Compact Battery Pack), my flash cord, the Integrated Flash Arm for my Mongoose, or my Better Beamer. Though ill-equipped, I thought that lighting the (effectively) shadowed side of the bird was worth a try. I knew that with the flash mounted on the camera that severe flash eye/silver eye would be the result but that I could deal with that easily during image optimization.
(Using an external battery pack allows for more consecutive flashes and faster recharging times. A flash cord allows you to mount the flash off-camera on a flash bracket. Using a flash bracket allows you to mount the flash well above the central axis of the lens thus eliminating or reducing problems with red-eye, flash-eye, steel eye, purple eye with birds and green eye with many mammals. With the flash mounted on camera the light from the flash reflects off the subject’s retina causing a variety of problems. Using a Better Beamer concentrates the light from the flash and yields an increase in flash output of about 2 2/3 stops, allows you to work at greater distances with smaller apertures, reduces battery drain, weighs just 2 1/2 ounces, and holds the Fresnel lens in place with no sagging or flopping. It fits in your pocket and set up and removal is quick and easy.)
When you are lighting the shadowed side of the subject you are effectively using Flash As Main Light Techniques; you want to fully illuminate the dark side of the subject. Experience with flash told me that I would need lots of flash as the bird was about 79 feet from me so I immediately went to maximum flash, manual flash at 1:1. The image on the LCD looked pretty bright so I cut back to 1:2 for the second test frame but the histogram was nowhere near the fifth box so I went back to 1:1. To learn about flash as main light, fill flash, and manual flash, see the Flash Simplified section in ABP II (916 pages on CD only).
| [Not a valid template] |
|
This JPEG represents the converted RAW file, in effect, the original. Note the horrific flash eye 🙂 Note the grass clean-up done using the techniques described in Digital Basics File (an PDF sent by e-mail).
|
To eliminate the huge flash eye problem in the original image above I painted a Quick Mask of the pupil, hit Control U (Hue/Saturation) on a layer, reduced the Saturation, moved the Lightness Slider to the left, added a Layer Mask to the QM layer, and painted away the mask to reveal the catch light. For complete details and to learn all of my Digital Eye Doctor techniques, check out our amazing Digital Basics File (an PDF sent by e-mail). Digital Basics also includes my complete digital workflow from capture through image optimization and dozens and dozens of great Photoshop tips.
Shopper’s Guide
Below is a list of the gear that I used to create the images above. Thanks a stack to all who have used the Shopper’s Guide links to purchase their gear as a thank you for all the free information that we bring you on the Blog and in the Bulletins. Before you purchase anything be sure to check out the advice in our Shopper’s Guide.
Canon 800mm f/5.L IS lens. Right now this is my all time favorite super-telephoto lens.
Canon EOS-1D Mark IV professional digital camera body. My workhorse professional digital camera bodies.
Canon 580 EX II Speedlight. This is Canon’s most powerful, top of the line flash.
Canon CP-E4 Compact Battery Pack. Powers the flash. Allows more consecutive flashes and faster recharging times.
Better Beamer. Using a Better Beamer concentrates the light from the flash and yields an increase in flash output of about 2 2/3 stops, allows you to work at greater distances with smaller apertures, reduces battery drain, weighs just 2 1/2 ounces, and holds the Fresnel lens in place with no sagging or flopping. It fits in your pocket and set up and removal is quick and easy.
And from the BAA On-line Store:
Gitzo GT3530LS Tripod. This one will last you a lifetime.
Mongoose M3.6 Tripod Head. Right now this is the best tripod head around for use with lenses that weigh less than 9 pounds. For heavier lenses, check out the Wimberley V2 head.
Mongoose Integrated Flash Arm. Lightweight yet fully functional. This accessory allows you to mount the flash well above the central axis of the lens thus eliminating or reducing problems with red-eye, flash-eye, steel eye, purple eye with birds and green eye with many mammals.
ProMaster Flash Cord. This flash cord is sturdy and reliable.
Delkin 32gb e-Film Pro Compact Flash Card. These high capacity cards are fast and dependable.
I pack my 800 and tons of other gear in my ThinkTank Airport SecurityTM V2.0 rolling bag for all of my air travel and recommend the slightly smaller Airport InternationalTM V2.0 for most folks. These high capacity bags are well constructed and protect my gear when I have to gate check it on short-hops and puddle jumpers. Each will protect your gear just as well. By clicking on either link or the logo below, you will receive a free gear bag with each order over $50.
April 22nd, 2011
Spectacular Midway Silhouette
On my two-week Midway visit in 2010 I visited Rusty Bucket many times but the sunset possibilities there never struck me. This year the light bulb came on in my head early in the visit and we visited almost daily as long as there was a hint of color in the western sky. Bird photography is most often about recognizing a potentially good situation. (See the Rusty Bucket silhouetted head portrait here.)
To see a somewhat darker version and what the folks on BPN had to say about this image, click here.
To create the strongest silhouettes place the subject right in front of the most brightly colored patch of sky. This can be a challenge with a large group especially when you have taught them too well 🙂
| [Not a valid template] |
|
This is the properly exposed original image. I moved the BLACK Slider well to the right for the RAW conversion as I like my silhouettes blacker than black.
|
Note the big dust spot in near the top of the image above the center of the bird’s back; I made the Midway trip without my Delkin Sensor Scope and my Lens Pen to save weight and paid the price… To learn how I keep my sensor clean click here. And for additional tips on making your silhouettes pop in post processing, see my Enhancing Silhouettes blog post.
Stay tuned for the Silhouette Flash Lessons post tomorrow.
Shopper’s Guide
Below is a list of the gear that I used to create the images above. Thanks a stack to all who have used the Shopper’s Guide links to purchase their gear as a thank you for all the free information that we bring you on the Blog and in the Bulletins. Before you purchase anything be sure to check out the advice in our Shopper’s Guide.
Canon 800mm f/5.L IS lens. Right now this is my all time favorite super-telephoto lens.
Canon EOS-1D Mark IV professional digital camera body. The very best professional digital camera body that I have ever used.
And from the BAA On-line Store:
Gitzo GT3530LS Tripod. This one will last you a lifetime.
Mongoose M3.6 Tripod Head. Right now this is the best tripod head around for use with lenses that weigh less than 9 pounds. For heavier lenses, check out the Wimberley V2 head.
Sensor cleaning supplies. I spent way too much time on Midway cleaning dust bunnies because I did not have my sensor cleaning kit with me. Never again. 🙂
Delkin 32gb e-Film Pro Compact Flash Card. These high capacity cards are fast and dependable.
I pack my 800 and tons of other gear in my ThinkTank Airport SecurityTM V2.0 rolling bag for all of my air travel and recommend the slightly smaller Airport InternationalTM V2.0 for most folks. These high capacity bags are well constructed and protect my gear when I have to gate check it on short-hops and puddle jumpers. Each will protect your gear just as well. By clicking on either link or the logo below, you will receive a free gear bag with each order over $50.
April 20th, 2011
Taking Advantage…
I was out on the beach in front of the Clipper House after lunch photographing tropicbirds in flight–they love sunny, hot, windy afternoons. (More on that in a post soon.) IAC, I looked down the beach and saw a bird on the edge of the gentle surf. I assumed that it was Laysan Albatross but wanted to see why it was pretty much out of habitat…. I walked towards it and pretty quickly realized that it was too small to be an albatross. Size-wise the most likely candidate was Red-footed Booby which is common on Eastern Island. As I walked closer I realized that it was a Masked Booby. It is pretty much identical to Nazca Booby; I am quite familiar with that species from my Galapagos trips. (The two species were formerly a single species but were split several years ago.)
Not wanting to scare the bird away, I got low and created some standard portraits with the Canon 70-200mm f/2.8L IS II and the 2X III teleconverter. Pretty soon I realized that the bird was tame. And would come to realize that in typical booby fashion, it was what I would call stupid-tame. I screamed and waved at the two photographers in the group who were down the beach. Kevin Dowie heard (actually saw) me, Jean-Luc Valliant did not. The sun was tamed by some passing clouds and I made some very nice images (including the opening image here). When the sun came back out, I opted to run down the beach to alert Jean-Luc. Then I headed for Charlie Barracks to let folks know that they should get their butts down to the beach asap. (Masked Booby is uncommon at best anywhere on Midway and is usually seen only on Eastern Island….)
When I alerted the whole group I ran to my room and grabbed the fisheye lens and the flash. I used my flash at zero as I often do in bright sunny conditions to fill in harsh shadows and even out the exposure.
With the sun barely peeking through, I got a bit higher than I was for the first two images of the Masked Booby so as to include the lagoon with its various shades of blue. With the bird scratching itself a slightly faster shutter speed would have been ideal but I went with my recommendation: when unexpected action occurs, push the shutter button. Failing to do so usually results in your coming away empty-handed.
After ten minutes, most of the group left the Masked Booby and went off looking for greener pastures (or for whiter sand???) All in all I stayed with this beautiful, tame bird for more than three hours. I took advantage not only of the bird’s tameness but of the situation. I created exactly 332 images keeping 65 of them after the first edit. Only 19 survived the final edit.
Shopper’s Guide
Below is a list of the gear mentioned in today’s blog post. Thanks a stack to all who have used the Shopper’s Guide links to purchase their gear from B&H as a thank you for all the free information that we bring you on the Blog and in the Bulletins. Before you purchase anything be sure to check out the advice in our Shopper’s Guide.
Canon 15mm fisheye lens. It takes a while to learn to create pleasing images with this fun lens.
Canon 70-200mm f/2.8L IS II lens. Man, I am loving this lens on my shoulder with the 2X III teleconverter. I also use it a lot–depending on the situation–with the 1.4X III TC.
Canon EF 1.4X III TC. This new TC is designed to work best with the new Series II super-telephoto lenses.
2X III teleconverter. The new 2X III TC is sharper than the older 2X II version.
Canon EOS-1D Mark IV professional digital camera body. The very best professional digital camera body that I have ever used.
Canon EOS-1Ds Mark III. At present, this is Canon’s only full frame digital professional camera body.
Canon 580 EX II Speedlight. This is Canon’s most powerful, top of the line flash.
And from the BAA On-line Store:
Gitzo GT3530LS Tripod. This one will last you a lifetime.
Mongoose M3.6 Tripod Head. Right now this is the best tripod head around for use with lenses that weigh less than 9 pounds. For heavier lenses, check out the Wimberley V2 head.
Double Bubble Leve.l You will find one in my camera’s hot shoe whenever I am on a tripod and not using flash.
Delkin 32gb e-Film Pro Compact Flash Card. These high capacity cards are fast and dependable.
I pack my 800 and tons of other gear in my ThinkTank Airport SecurityTM V2.0 rolling bag for all of my air travel and recommend the slightly smaller Airport InternationalTM V2.0 for most folks. These high capacity bags are well constructed and protect my gear when I have to gate check it on short-hops and puddle jumpers. Each will protect your gear just as well. By clicking on either link or the logo below, you will receive a free gear bag with each order over $50.
April 19th, 2011
| [Not a valid template] |
|
This somewhat ghastly/ghostly image of an adult Laysan Albatross floating in the Sand Island harbor lagoon was created with the Canon 70-200mm f/2.8L IS II lens, the 2X III teleconverter (hand held at 292mm), and the Canon EOS-1D Mark IV. ISO 800. Evaluative metering at zero: 1/320 sec. at f/6.3. I wanted to create an image that showed at least a partial view of the bird’s bill and spent more than an hour trying.
|
Tsunami Evidence on Midway
The tsunami took more than 100,000 Laysan Albatross chicks and about 1,000 adult birds. On the relatively tiny Spit Island virtually all was lost: 15,000 albatross chicks were swept away to their death. Only four, caught in the bushes, survived the four waves that washed completely over this low island. The losses on Eastern Island were great: about 1/4 of the total Midway nests each with a single chick were destroyed. Damage and loss on Sand Island, the only island of the three Midway islands now inhabited by humans, was minimal.
Though the tsunami flooded Midway just a bit more than a month ago, by mid-April, evidence of its passing was scant.
Amazing, there were very few albatross carcasses on the beaches; the ghost crabs buried and devoured them leaving only the wing tips protruding from the sand as evidence.
Those who searched the runways on Eastern Island with a bit of diligence found lots of flying fish and needlefish carcasses.
On my previous two-week visit in March, 2010, it was common to see dead chicks as chick mortality is always significant. But is was rare then to see dead adults.
Shopper’s Guide
Below is a list of the gear that I used to create the images above. Thanks a stack to all who have used the Shopper’s Guide links to purchase their gear as a thank you for all the free information that we bring you on the Blog and in the Bulletins. Before you purchase anything be sure to check out the advice in our Shopper’s Guide.
Canon 70-200mm f/2.8L IS II lens. Man, I am loving this lens on my shoulder with the 2X III teleconverter. I also use it a lot–depending on the situation–with the 1.4X III TC.
Canon 16-35mm f/2.8L IS lens. I am not very good with this versatile wide angle zoom lens….
Canon EF 1.4X III TC. This new TC is designed to work best with the new Series II super-telephoto lenses.
2X III teleconverter. The new 2X III TC is sharper than the older 2X II version.
Canon EOS-1D Mark IV professional digital camera body. The very best professional digital camera body that I have ever used.
And from the BAA On-line Store:
Gitzo GT3530LS Tripod. This one will last you a lifetime.
Mongoose M3.6 Tripod Head. Right now this is the best tripod head around for use with lenses that weigh less than 9 pounds. For heavier lenses, check out the Wimberley V2 head.
Double Bubble Leve.l You will find one in my camera’s hot shoe whenever I am on a tripod and not using flash.
Delkin 32gb e-Film Pro Compact Flash Card. These high capacity cards are fast and dependable.
I pack my 800 and tons of other gear in my ThinkTank Airport SecurityTM V2.0 rolling bag for all of my air travel and recommend the slightly smaller Airport InternationalTM V2.0 for most folks. These high capacity bags are well constructed and protect my gear when I have to gate check it on short-hops and puddle jumpers. Each will protect your gear just as well. By clicking on either link or the logo below, you will receive a free gear bag with each order over $50.
April 18th, 2011
| [Not a valid template] |
|
This image was created last night (4/17/11) at Rusty Bucket with the tripod-mounted Canon 800mm f/5.L IS lens, the 1.4X III TC, and the Canon EOS-1D Mark IV. ISO 400. Evaluative metering -1 2/3 stops: 1/1600 sec. at f/16 in Av Mode. I had been working against the somewhat muted but still very bright sun, had dialed in the minus EC, and in my excitement, had “forgotten” go back to zero. But with the intense colors my “mistake” saved me from burning the RED channel 🙂
|
I’ll Miss This Place….
The end of my third week on Midway comes to an end today. I did back-to-back trips last year, and another week this year. Over time this series of desolate islands really grows on folks that love nature. My good weather Karma has held for yet another trip as we have enjoyed a mix of clouds and sun. When it is blue sky sunny the persistent north winds have been a challenge but good photographers figure out a way to create good image with wind-against-sun conditions and clear skies. I will be packing up my one checked bag and my great Think Tank Airport Security rolling bag this afternoon. We fly to Honolulu leaving here on the same G-2 charter plane that President Obama used for the first four months of his presidential campaign, getting into Honolulu between one and two am. After a short night’s sleep, I grab a red-eye to Dallas late on Tuesday afternoon and arrive in Orlando at 10:20 am on Wednesday.
The food–including lots of Thai dishes–has been great, and it will be great to quit eating ice cream after lunch and dinner…
Not to worry; I will be posting lots more great Midway images over the next week or so.
And yes, I will miss this place.
Shopper’s Guide
Below is a list of the gear that I used to create the images above. Thanks a stack to all who have used the Shopper’s Guide links to purchase their gear as a thank you for all the free information that we bring you on the Blog and in the Bulletins. Before you purchase anything be sure to check out the advice in our Shopper’s Guide.
Canon 800mm f/5.L IS lens. Right now this is my all time favorite super-telephoto lens.
1.4X III TC. My 1.4X III TC is so valuable to me that I routinely have two of them with me in the field. I will purchase a third one as a back-up as soon as I get home.
Canon EOS-1D Mark IV professional digital camera body. The very best professional digital camera body that I have ever used.
And from the BAA On-line Store:
Gitzo GT3530LS Tripod. This one will last you a lifetime.
Mongoose M3.6 Tripod Head. Right now this is the best tripod head around for use with lenses that weigh less than 9 pounds. For heavier lenses, check out the Wimberley V2 head.
Double Bubble Level. You will find one in my camera’s hot shoe whenever I am on a tripod and not using flash.
Delkin 32gb e-Film Pro Compact Flash Card. These high capacity cards are fast and dependable. Click here to learn why I choose to use large cards.
I pack my 800 and tons of other gear in my ThinkTank Airport SecurityTM V2.0 rolling bag for all of my air travel and recommend the slightly smaller Airport InternationalTM V2.0 for most folks. These high capacity bags are well constructed and protect my gear when I have to gate check it on short-hops and puddle jumpers. Each will protect your gear just as well. By clicking on either link or the logo below, you will receive a free gear bag with each order over $50.
April 17th, 2011
| [Not a valid template] |
|
This image was created on Eastern Island, Midway. Each group gets to spend one long day there. It is accessible only by boat. We went over on Thursday past. This image was created with the tripod-mounted Canon 800mm f/5.L IS lens and the Canon EOS-1D Mark IV. ISO 400. Evaluative metering at -1/3 stop: 1/200 sec. at f/13 set manually.
|
Murphy’s Law of Nests…
Murphy’s Law of Nests states that all bird nests have at least once branch or stick too many. For the past 28 years, this law has proven true without exception…
| [Not a valid template] |
|
This is the original image.
|
Try as I might by changing my perspective, I could not lose the ugly branch in the lower left corner. Many folks would opt to leave that branch saying that it was there, that it was part of the image. They would continue by saying that it is not a distraction. I am fine with that. For me, however, the branch is a huge distraction. My feelings are that the image with the stick is an image of a male Great Frigatebird sitting on the nest with it pouch inflated and that the image with the stick removed is an image of a male Great Frigatebird sitting on the nest with it pouch inflated…. The natural history of the situation has not been changed by the removal of the stick.
| [Not a valid template] |
|
This composite shows the lower left hand corner before the stick was dealt with (on our right, of course), and that same corner after the stick (and a bit of feather fluff) was removed (on the left).
|
Combatting Murphy’s Law of Nests…
The offending stick was “removed” (actually covered) with a series of Quick Masks, probably more than 25 in all. Many of the Quick Masks had to be transformed and/or warped (so as to match the shape of the leaf where the Quick Mask was being placed). In addition I used the Clone Stamp Tool (often set at about 60% Opacity). I also used the Patch Tool usually to even out any repeat patterns caused either by the Clone Stamp Tool or more often by duplicating a Quick Mask Layer (one or more times). The basics of Quick Masking as well as the use of the Patch and the Clone Stamp Tools are described in detail in the recently updated version of Digital Basics. (Updates will continue to be free for as long as I am pushing the shutter button :)). Advanced Quick Masking techniques are detailed in Robert O’Toole’s APTATS I.
Optimizing the image took about 45 minutes. Was it worth it you ask? For me, the answer is a resounding, “Yes.” Frigatebird nests are often quite messy affairs and this was the cleanest nest that I have ever run across.
Shopper’s Guide
Below is a list of the gear that I used to create the images above. Thanks a stack to all who have used the Shopper’s Guide links to purchase their gear as a thank you for all the free information that we bring you on the Blog and in the Bulletins. Before you purchase anything be sure to check out the advice in our Shopper’s Guide.
Canon 800mm f/5.L IS lens. Right now this is my all time favorite super-telephoto lens.
Canon EOS-1D Mark IV professional digital camera body. The very best professional digital camera body that I have ever used.
And from the BAA On-line Store:
Gitzo GT3530LS Tripod. This one will last you a lifetime.
Mongoose M3.6 Tripod Head. Right now this is the best tripod head around for use with lenses that weigh less than 9 pounds. For heavier lenses, check out the Wimberley V2 head.
Double Bubble Leve.l You will find one in my camera’s hot shoe whenever I am on a tripod and not using flash.
Delkin 32gb e-Film Pro Compact Flash Card. These high capacity cards are fast and dependable.
I pack my 800 and tons of other gear in my ThinkTank Airport SecurityTM V2.0 rolling bag for all of my air travel and recommend the slightly smaller Airport InternationalTM V2.0 for most folks. These high capacity bags are well constructed and protect my gear when I have to gate check it on short-hops and puddle jumpers. Each will protect your gear just as well. By clicking on either link or the logo below, you will receive a free gear bag with each order over $50.
April 16th, 2011
| [Not a valid template] |
|
I created this tight head portrait of a Laysan Albatross on our second morning at 8:58 am with the Canon 70-200mm f/2.8L IS II lens with the 1.4X III TC (hand held at 280mm) and the EOS-1D Mark IV. ISO 400. Evaluative metering at zero: 1/1000 sec. at f/9 set manually after histogram check.
What can I say? I love my style. Though one might think that images like these are are a dime a dozen it does take some care to achieve perfection. With the distant azure-blue lagoon background I was able to stop down considerably to ensure a sharp head and bill at close range and took lots of images to ensure getting at least one with the absolute perfect head angle. (The above comment was excerpted from BAA Bulletin #370.) For more on my style, click here.
|
Midway Revelation
The revelation is a simple one yet is one that needs to be reinforced every so often…. Yes, it is possible to make great images in your own backyard, in your own neighborhood, in your home state, and in your region, but when you travel to beautiful places with untold numbers of exquisitely gorgeous birds, birds that are silly-tame, it is far easier to create dramatic and powerful images. See, I told you that it was a simple revlelation 🙂 It does however explain my recent desire to travel to great places at the end of the earth before my days are done….
Laysan Albatross Images
| [Not a valid template] |
|
This image was created with the tripod-mounted Canon 800mm f/5.6L IS lens and the EOS-1D Mark IV. ISO 400. Evaluative metering +1/3 stop: 1/125 sec. at f/14. This image gives the viewer just a clue as to the nesting density of this prolific species.
|
Though the tsunami took more than 100,000 Laysan Albatross chicks and about 1,000 adult birds, there are still more than 920,000 adult Laysans and a shade under 400,000 fat and hungry chicks. Damage and loss on Sand Island, the only island of the three Midway islands now inhabited by humans, was minimal. Virtually all (15,000 albatross pairs with chicks) was lost on tiny Spit Island. And the loss on Eastern Island (about 1/4 of the total Midway nests of this species) was great.
| [Not a valid template] |
|
This image was created with the Canon 70-200mm f/2.8L IS II lens with the 1.4X III TC (hand held at 170mm) and the EOS-1D Mark IV. ISO 400. Evaluative metering +1 1/3 stops: 1/1250 sec. at f/7.1 set manually.
|
It is extremely difficult to create tight images of albatrosses feeding their young. Here I found a chick getting fed with a nice white sand background. Then I strove to get relatively parallel to the birds and to create an image with two good head angles and with the eyes of both the youngster and the adult visible. I opted for more action freezing shutter speed and less depth-of-field. Then I pressed the shutter button at the peak of the action.
| [Not a valid template] |
|
This image was created with the Canon 70-200mm f/2.8L IS II lens with the 1.4X III TC (hand held at 175mm) and the EOS-1D Mark IV. ISO 400. Evaluative metering +1 1/3 stops: 1/1250 sec. at f/7.1 set manually.
|
Creating pleasing images that depict various aspects of the intricate courtship dance of an albatross is a difficult assignment. The challenges are similar to those faced when trying to create good chick feeding images. Though it is not difficult to find dancing pairs finding them in a pleasing setting is rare. The next challenge is to have them relatively parallel to the imaging sensor–they usually dance around in circles. Here we found a pair dancing atop a sand ridge with the lovely blue lagoon incorporated in the background.
| [Not a valid template] |
|
This image was created with the Canon 70-200mm f/2.8L IS II lens with the 1.4X III TC (hand held at 250mm) and the EOS-1D Mark IV. ISO 400. Evaluative metering -1/3 stop: 1/800 sec. at f/7.1 in Av mode.
|
Going back lit is an obvious choice with the fuzzy chicks. Again, seeing and recognizing a good situation with a pleasing background is the key to success. Here I created a single test image at zero, noted the blinkies in the rim lit feathers, and subtracted 1/3 stop of light. Voila. This left the face a bit dark; I lightened it using Tim Grey dodge and burn as described in the recently updated Digital Basics. Paul Mckenzie, a skilled photographer making his 7th Midway visit, said to me that dodge and burn tip in the new update was “brilliant.”
| [Not a valid template] |
|
This image was created with the Canon 70-200mm f/2.8L IS II lens with the 2X III TC (hand held at 222mm) and the EOS-1D Mark IV. ISO 400. Evaluative metering +1 2/3 stops off the sky: 1/1000 sec. at f/5.6 set manually.
|
Situations with albatrosses landing with their feet dangling and clean backgrounds are hard to find. When the group tooled by a tsunami-exposed hill of sand I knew that it was just a matter of waiting for the right wind and the right light…. So we did.
| [Not a valid template] |
|
This image was created last night with the tripod-mounted Canon 800mm f/5.6L IS lens and the EOS-1D Mark IV. ISO 400. Evaluative metering +1 stop: 1/1000 sec. at f/5.6. I set the color temperature to 7000K to somewhat enhance the sunset colors.
|
Shopper’s Guide
Below is a list of the gear that I used to create the images above. Thanks a stack to all who have used the Shopper’s Guide links to purchase their gear as a thank you for all the free information that we bring you on the Blog and in the Bulletins. Before you purchase anything be sure to check out the advice in our Shopper’s Guide.
Canon 70-200mm f/2.8L IS II lens. Man, I am loving this lens on my shoulder with the 2X III teleconverter. I also use it a lot–depending on the situation–with the 1.4X III TC.
Canon EF 1.4X III TC. This new TC is designed to work best with the new Series II super-telephoto lenses.
Canon 800mm f/5.L IS lens. Right now this is my all time favorite super-telephoto lens.
2X III teleconverter. The new 2X III TC is sharper than the older 2X II version.
Canon EF 1.4X III TC. This new TC is designed to work best with the new Series II super-telephoto lenses.
Canon EOS-1D Mark IV professional digital camera body. The very best professional digital camera body that I have ever used.
And from the BAA On-line Store:
Gitzo GT3530LS Tripod. This one will last you a lifetime.
Mongoose M3.6 Tripod Head. Right now this is the best tripod head around for use with lenses that weigh less than 9 pounds. For heavier lenses, check out the Wimberley V2 head.
Double Bubble Leve.l You will find one in my camera’s hot shoe whenever I am on a tripod and not using flash.
Delkin 32gb e-Film Pro Compact Flash Card. These high capacity cards are fast and dependable.
I pack my 800 and tons of other gear in my ThinkTank Airport SecurityTM V2.0 rolling bag for all of my air travel and recommend the slightly smaller Airport InternationalTM V2.0 for most folks. These high capacity bags are well constructed and protect my gear when I have to gate check it on short-hops and puddle jumpers. Each will protect your gear just as well. By clicking on either link or the logo below, you will receive a free gear bag with each order over $50.
April 12th, 2011
Sometimes I Even Impress Myself…
Please take a few seconds to view the 3-frame animated GIF below.
I gotta admit, sometimes I even impress myself.
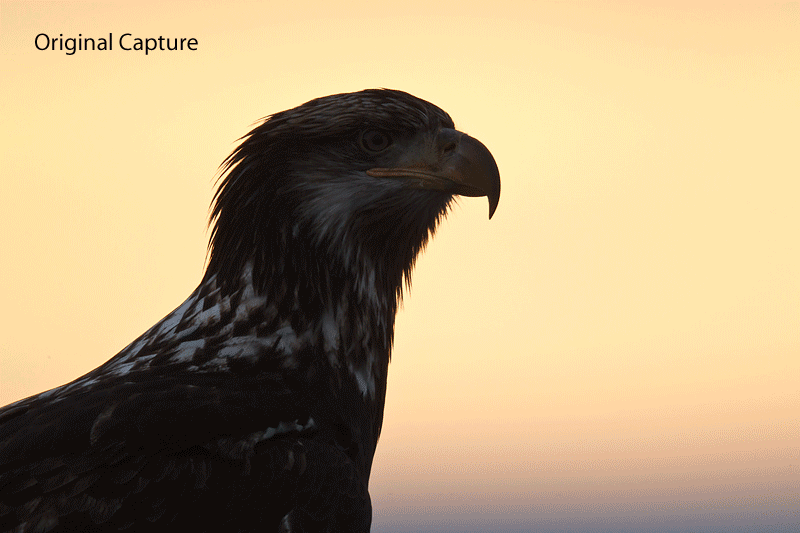
I created the original capture above near Homer, Alaska with the Canon 800mm f/5.6L IS lens, the 2X III TC, and the EOS-1D MIV. ISO 1600. Evaluative metering +2 stops: 1/640 sec. at f/11. I focused in Live View using Live Mode focus. I will cover this technique in detail in the next update of the Mark IV User’s Guide.
I have been through my Homer images many times and this one never impressed me much other than with it’s exceptional sharpness (considering that the equivalent focal length was 2080mm). This works out to an incredible 41.6X magnification! Until last night on the plane to Midway (see item 2 below) I did not realize the huge two-way potential of this image. First I optimized it as a straight shot to bring out the detail on the young eagle (even though the image was backlit at sunset). The key was to use yet another Robert O’Toole trick: in ACR I used Fill Light at about 60%. Then I dealt with the noise and processed the image normally. To create the silhouetted version I re-converted the image in ACR, this time moving the BLACK slider well to the right until extensive SHADOW clipping highlight warnings almost covered the bird. Then I moved the Exposure slider to the left to brighten the sky. Once the converted image was in Photoshop, I blackened the BLACKS by moving the shadow slider well to the right (as described in detail in Digital Basics).
Sometimes I even amaze myself 🙂
The basics of converting images properly are covered in detail in Digital Basics, a $20 PDF sent via e-mail. It covers my complete digital workflow and includes many dozens of great Photoshop tips. Most folks are amazed at how good my posted images look. All of my secrets are revealed and Digital Basics even includes details on how to create the action that I use to create the 800 wide JPEGs that I use in the Bulletins and on the blog.
| [Not a valid template] |
|
Here, for your viewing pleasure, is the silhouetted image alone. Note the exceptional sharpness at 41.6X magnification. I used the advanced sharpness techniques described in detail in The Art of Bird Photography II (916 pages on CD only).
|
Safe on Midway
The group flew to Midway last night in luxury on a gorgeous corporate-type jet, replete with the fixings for Subway sandwiches for dinner. We landed safely and made our way via golf cart to Charely Barracks. With the 7 hour time difference I am typing as 4:30 am. We have an orientation meeting this morning and we will begin photographing this afternoon. Everyone was thrilled as we made our way in the dark past thousands of Laysan Albatrosses and their chicks as hundreds of Bonin’s Petrel flew about above us.
Shopper’s Guide
Below is a list of the gear that I used to create the image above. Thanks a stack to all who have used the Shopper’s Guide links to purchase their gear as a thank you for all the free information that we bring you on the Blog and in the Bulletins. Before you purchase anything be sure to check out the advice in our Shopper’s Guide.
Canon 800mm f/5.L IS lens. Right now this is my all time favorite super-telephoto lens.
2X III teleconverter. The new 2X III TC is sharper than the older 2X II version.
Canon EOS-1D Mark IV professional digital camera body. The very best professional digital camera body that I have ever used.
And from the BAA On-line Store:
Gitzo GT3530LS Tripod. This one will last you a lifetime.
Mongoose M3.6 Tripod Head. Right now this is the best tripod head around for use with lenses that weigh less than 9 pounds. For heavier lenses, check out the Wimberley V2 head.
Double Bubble Leve.l You will find one in my camera’s hot shoe whenever I am on a tripod and not using flash.
Delkin 32gb e-Film Pro Compact Flash Card. These high capacity cards are fast and dependable.
I pack my 800 and tons of other gear in my ThinkTank Airport SecurityTM V2.0 rolling bag for all of my air travel and recommend the slightly smaller Airport InternationalTM V2.0 for most folks. These high capacity bags are well constructed and protect my gear when I have to gate check it on short-hops and puddle jumpers. Each will protect your gear just as well. By clicking on either link or the logo below, you will receive a free gear bag with each order over $50.
April 11th, 2011
| [Not a valid template] |
|
This intentional and pleasing (to me at least) image of a Glaucous-winged Gull was created with the Canon 70-200mm f/4L IS II and the 1.4X III TC (hand held at 280mm) with the EOS-1D Mark IV. ISO 50. Evaluative metering -1 stop as framed: 1/15 sec. at f/13. To see what the folks at BPN’s Out of the Box Forum thought of this one and to see how they helped me improve it, click here. The image itself was in part inspired by a student friend, Jan van der Greef. Learn more about Jan here.
|
Safe in Honolulu
I flew from Orlando to Chicago on Sunday and continued on to Honolulu arriving late afternoon thanks to the six hour time change. Am in a somewhat shabby (by Hawaii standards) hotel. The group flies to Midway by chartered jet today at 6:30pm. I did my best and stayed awake until 8pm (2am the next day in Florida), slept off and on and finally “awoke” at 3:23 am. I was unable to get on line from about 5am until 1pm. You gotta love it!
| [Not a valid template] |
|
This image was created near Homer, AK with the Canon 70-200mm f/2.8L IS II, the 2X III TC, and the EOS-1D MIV. Hand held at 300mm. ISO 400: 1/1600 at f/6.3. Exposure pushed to blinkies and then 1/3 darker. To see the original version that I posted on BPN and to learn of my confession, click here. What could I have done?
|
Gear Questions
Telephoto Lens-Related Questions/By e-mail from Kenneth Lui:
KL: How do you clean the front element of your 800 mm f/5.6L IS lens. I understand that it does not accept a filter, unlike the intermediate telephoto lenses where you can screw on a filter to protect the lens from dust and damage.
AM: First off, you should never have a “protective” filter on the front of any lens. Camera store salespersons are trained to bilk you out of every possible penny. UV filters and the like degrade image quality and slow autofocus. If you keep your lens hood on, you reduce almost any chance of damaging the front element. You should unscrew your UV filters and toss them in the nearest lake asap. I use Lens Clens and an old undershirt with Lens Clens to get the front elements of all of my lenses sparkling clean. And I use it to clean my computer screens as well as the outer surfaces of my camera bodies. All with the old undershirt. In a pinch in the field I use the t-shirt I am wearing and my breath. Just like most other pros. (To learn about Lens Clens, click here and see item 2).
KL: The 800 mm has a built in glass filter with the filter holder 52mm. Do you put any gelatin filter in it, like haze, or skyline filter?
AM: The filter holder needs something in it at all times so do not be tempted to remove it. For the most part I just leave the plain glass filter in place. When I need to reduce shutter speed drastically to do blurs on a sunny day, I use either the specially made polarizer or a 3-stop neutral density filter. If the latter,. it is best to simply purchase an extra filter holder, leave the 3-stop in place in the holder, and then simply swap out the whole assembly when you need to reduce your shutter speeds.
70-200 f/2.8L IS Question/By e-mail from Craig Mcarthur:
CM: I know you probably receive too many emails to answer directly but thought I would ask your advice in case you have time to reply..
AM: I try to answer every single one asap. In return we ask that folks purchase their accessories from BAA in part as a thank you for all the great free info that we provide almost daily on the blog and in our BAA Bulletins. And we try to price everything a penny less than B&H.
CM: I see you are a big fan of the Canon 70-200 f/2.8L IS II/2X III TC combo..
AM: Yes sir.
CM: Question…I currently own the older version 70-200 f/2.8 L IS ….
AM: Though I love the new version II that was and is a great lens.
CM: I’m Looking to break into bird photography as inexpensively as possible until I decide if this is going to be a serious endeavor or a passing fad….
AM: 28 years ago I thought that bird photography would likely be a passing fad for me….
CM: Do you think I could achieve satisfactory results with the older 70-200 and a TC before upgrading to either the version 11.
AM: 100% yes. With a 7D I would advise against using the 2X unless you plan to be on tripod more than 90% of the time. (For that we recommend the Gitzo 3530 LS CF for 99% of the folks along with a Mongoose m3.6.). Barring operator error, which is the cause of 99.9% of unsharp iamges, you should be able to create sharp photos with the older 70-200 IS and any 1.4X TC.
CM: Or maybe I should get a 100-400….
AM: No way Jose. I just sold my 100-400….
CM: Getting just the 2X III TC at a cost of $499 would be my least expensive route if this is a feasible opinion….
AM: Again, unless you plan to work on a tripod most of the time I would not recommend that you start with the 2X. With a 7D you start with a 1.6 crop factor so with a 1.4X TC that would give you an effective focal length of 448mm or just a shade under 9X. With the 2X III on a tripod that would work out to 640mm (or 12.8X magnification). With my pro body (Mark IV) and the 2X II I am at effective 520mm or 10.4X magnification.
Now here is the best news: with a 7D and the older 70-200 f/4L IS I would advise getting the older 2X II TC. You should be able to get a used one very cheaply right now. You should make great images with that combo. And is looks very much as the 1.4XII and the 1.4X III are optically the same, that is, about as sharp. Note: the new 2X III is noticeably sharper than the older 2XII. Do check out the post here.
CM: Thanks for your time…and such and excellent photography resource…..
AM: YAW. If you get do hooked feel free to get in touch for more advice. If you want to make your learning curve far less steep, do check out ABP, ABP II, and Digital Basics.
Lens Align MII Question/From Colin Smale via e-mail:
CS: I would like to ask wildlife photographers who really use their gear a lot, “How often do you need to calibrate your lenses?”
AM: I calibrate mine every two to three months, whenever I get a camera or lens back from Canon Repair, and certainly whenever I give my lens or camera body a good whack (usually too, too often).
To learn about the Lens Align Mark II and read my killer tutorial click here.
Shopper’s Guide
Below is a list of the gear (or the current replacement) that I used to create the images above. Thanks a stack to all who have used the Shopper’s Guide links to purchase their gear as a thank you for all the free information that we bring you on the Blog and in the Bulletins. Before you purchase anything be sure to check out the advice in our Shopper’s Guide.
Canon 70-200mm f/2.8L IS II lens. Man, I am loving this lens on my shoulder with the 2X III teleconverter. I also use it a lot–depending on the situation–with the 1.4X III TC.
Canon EF 1.4X III TC. This new TC is designed to work best with the new Series II super-telephoto lenses.
Canon EOS-1D Mark IV professional digital camera body. The very best professional digital camera body that I have ever used.
And from the BAA On-line Store:
Delkin 32gb e-Film Pro Compact Flash Card. These high capacity cards are fast and dependable.
I pack my 800 and tons of other gear in my ThinkTank Airport SecurityTM V2.0 rolling bag for all of my air travel and recommend the slightly smaller Airport InternationalTM V2.0 for most folks. These high capacity bags are well constructed and protect my gear when I have to gate check it on short-hops and puddle jumpers. Each will protect your gear just as well. By clicking on either link or the logo below, you will receive a free gear bag with each order over $50.
April 10th, 2011
| [Not a valid template] |
|
African Lion cubs at play. Nikon D3, 600mm f/4, and 1.7 converter. 1600 ISO. Matrix metering at zero in aperture priority: 1/400th sec. at f/6.7. Image copyright 2011: Todd Gustafson/Gustafson Photo Safari.
|
Photographic Risks and Rewards on Safari: A Guest Blog Post by Todd Gustafson
Let the Photo Come to You
By Todd Gustafson
Being a proactive nature photographer and letting the photo come to you need not be mutually exclusive concepts.
As a photo safari leader I see people caught up in the event of being in East Africa and missing the actual experience of making great photos. So many photographers (amateurs and veterans alike) own lots of high end photo equipment and have the energy and know-how to make crisp, well composed photographs. When they finish their safari they have a lovely portfolio of representative images of Africa. My goal as a leader and teacher is to teach them to move beyond those initial successes and put people in position to make not only beautiful portraits but to be able to capture the decisive moment and images that reflect the human condition.
The best way for me to do that is to teach folks to understand these elements of natural history and geometry:
1: What is my chosen subject capable of doing?
2: What is the subject most likely to do?
3 Where do I want the action to take place? Consider the background, the foreground, and the direction and quality of the light.
4 Where do I want and need to be at the decisive moment?
Some people move constantly (and sometimes thoughtlessly) while trying for a better angle on a subject while others stay rooted in one spot because they have a good view of the subject at the time. I prefer to photograph some of the action and get a feel for the subject’s behavior. If it’s a fluid situation, as with these lion cubs, I will move to the place with the best situation and the most open view and wait for the action to come my way. If I try to move when the peak moment arrives, I inevitably miss the shot.
This image of the lion cubs playing at first light (above) was captured because of a proactive move made well before the decisive moment. I had made lots of images of the young cats playing in a half-way decent situation, but what I didn’t like was the angle of view; we were looking down into a grassy creek bed six feet below us the safari van. A bit farther down the creek there was a flat, clear space with no brush and a green background that I thought would make an ideal setting for the same behavior. I opted to move to the better setting. Leaving the cubs playing in the creek bed was a difficult decision that was rewarded 3 minutes later (and right on cue) when the cubs climbed the bank and resumed playing, this time in a far better setting while bathed in soft early light . (Note: Todd often knows what the animals are going to do before the animals know….)
| [Not a valid template] |
|
African Lion cubs at play, blur. Nikon D3, 600mm f/4, and 1.7 converter. 800 ISO. Matrix metering -1/3 stop: 1/25 sec. at f/16. Image Copyright 2011: Todd Gustafson/Gustafson Photo Safari.
|
Having captured lots of great action in the perfect situation I was able to safely gamble on a higher risk set of shots. The cubs were practicing take-down and kill behaviors by chasing each other around the banks of the creek. Low light and fast moving subjects are the perfect recipe for creating pleasing and dramatic blurs. Note: Todd contributed several spectacular blurs to A Guide to Pleasing Blurs by Denise Ippolito and yours truly; each is accompanied by a short write-up. Note to Todd: it is best when creating pleasing blurs at slow shutter speeds to reduce the ISO to 100 or lower if possible. This will allow you to use a much wider aperture. As a result, dust bunnies (like those in the upper right corner here) will be either minimized or eliminated. As we suggest in the Blur Guide :).
| [Not a valid template] |
|
Leopard cub at play. Nikon D3. 200-400mm at 200mm. 640 ISO. Matrix metering at zero: 1/1000th sec. at f/4 in aperture priority. Image Copyright 2011: Todd Gustafson/Gustafson Photo Safari.
|
Chasing leopards can be frustrating. If they are intent on a destination their movements almost always have a certain momentum to them. They usually are not going to stop and strike a dramatic pose just for you. Chasing them rarely offers many good chances. Being proactive by moving away from the subjects along a hoped-for route can often give you enough working distance to execute a dramatic shot. In this case a mother leopard and her 3 week old baby were out for a stroll near a safari track. As is often the case, vehicles in the area congregated to see these beautiful and elusive cats. Rather than joining the traffic jam we positioned the vehicle 500 meters away adjacent to what we hoped would be their path. Five minutes later they did in fact walk past our vehicle 10 feet away. Shooting out of the lower window offered this eye level view of the cub. Who would have guessed she would have chosen that exact spot to stop and play with a grasshopper?
| [Not a valid template] |
|
Jackal with fur. Nikon D3. 600mm f/4 and 1.7 converter. 640 ISO. Matrix metering at zero: 1/800th sec. at f/6.7 in aperture priority. Image Copyright 2011: Todd Gustafson/Gustafson Photo Safari.
|
If you are seeing a theme of risk and reward here you are indeed correct. In the image of a silver-backed jackal above the principle of risk and reward again holds true. The “real action” was a team of hyenas that killed a wildebeest calf in the predawn. When the jackal made off with this scrap of wildebeest fur I saw an opportunity. As he reached a safe distance from the kill he carefully bundled the fur in his mouth and proudly trotted off. Anticipating a golden sunrise and taking advantage of the pause in the jackal’s movement, we had been able to move quickly into position so that all were able to capture this tiny slice of life.
| [Not a valid template] |
|
Zebra dance. Nikon D3. 200-400mm lens at 400mm. 500 ISO. Matrix metering at zero: 1/1250 sec. at f/4 in aperture priority. Image Copyright 2011: Todd Gustafson/Gustafson Photo Safari.
|
Single zebras are graphically beautiful subjects simply because of their stripes but a large herd of zebras can offer dramatic behaviors that can be a challenge to photographic well, yet these situations can deliver huge rewards if the photographer is able to capture the action. It is important to be proactive on a safari drive. Don’t expect your driver to spot all the action for you. Scan groups of animals for any signs of neat behavior that might occur. When a group of young zebra stallions starts nipping and kicking, have the driver stop the vehicle and see what develops. Here a group of zebras were sparring in the cool of the morning. It was impossible to guess which two stallions would go up on their hind legs and really go at it. The best bet was to move the vehicle to a spot with an unobstructed view of an open area. These two zebras ultimately chose that spot and jousted for a short three seconds. I opted for a 400mm shot that captured the dance-like quality of the interaction. Again, chasing the subjects would have resulted in many missed opportunities. Being proactive and then waiting for the photo to come to me was the key to success.
Thanks a stack Toddi for guest-blogging for me :). Todd is the author of A Photographer’s Guide to The Safari Experience. If you head to Africa for the purpose of photographing the animals there without having purchased and studied this great guide you are making a huge mistake. To learn more about Todd, to see more of his great images, or to explore the possibility of joining him on safari or elsewhere, visit his web site here.
TODD GUSTAFSON ON NATIONAL GEOGRAPHIC TELEVISION
Safari photographer Todd Gustafson is the on-screen expert in one of the three segments on episode 105 of Nat Geo’s “Wild Case Files”. The show features riveting narrative interviews, HD video footage, and stunning still photographs. Watch as Todd tells the story of the 2007 mass wildebeest drowning at the Mara River. A must-see for nature lovers and photographers. This episode will air on April 11, 2011 at 9:00pm eastern time on Nat Geo Wild. Synopsis: Investigating a mass squid invasion on the California coast; Australian mouse plague; mysterious wildebeest deaths in Africa.
You can see the promo here. I clicked on a few of the promos and all that I can say is that I will be TIVO-ing the series! I gotta find out about the Montauk Monster.
Shopper’s Guide
Below is a list of the gear that Todd uses regularly. Thanks a stack to all who have used the Shopper’s Guide links to purchase their gear as a thank you for all the free information that we bring you on the Blog and in the Bulletins. Before you purchase anything be sure to check out the advice in our Shopper’s Guide.
Nikkor 600mm f/4 VR II lens. There is no link for this product as for all practical purposes members of the general public are unable to purchase this lens.
Nikon AF-S NIKKOR 200-400mm f/4G ED VR II lens. This is a newer, sharper version of a very versatile lens.
Nikon D3 S Digital Camera Body. This professional body has replaced the D3.
And from the BAA On-line Store:
Gitzo GT3541XLS Tripod. This is the tall man’s tripod. At 6′ 8″ Todd loves his!
Wimberley V2 head. Todd uses the Wimberley head full time with his 600.
Delkin 32gb e-Film Pro Compact Flash Card. These high capacity cards are fast and dependable.
April 9th, 2011
Why Wide Open Works Well For Me
When I posted the image above in yesterday’s blog post, Why 32-gb Flash Cards? Why Delkin e-film Pro?, I commented: “Note that at f/8 I have brought up a pleasing amount of background detail, but nothing too sharply defined.” (Note: wide open for the 800mm L IS lens is a relatively slow f/5.6; thus f/8 is stopped down one full stop from wide open.) My first in many situations is to work wide open or stopped down only 1/3 stop. With a Brown Pelican sitting on the edge of a cliff at LaJolla the background will be about 100 yards from the subject, even farther away if you get low. So stopping down from f/5.6 to f/8 still yielded a pleasing, relatively out-of-focus background. (For more on my usually preferred style, see Tight or Wide? My Thoughts on Photographic Style and More.)
If you plan on visiting San Diego next winter to photograph, getting yourself a copy of our San Diego Site Guide now will give you lots of time to study and learn all the great spots that we describe in detail. You can check out all of our great Site & Set-up Guides by clicking here.
When the pelican in the opening image went to sleep, I figured that it would be a good time to create some educational images so I created a series of photographs at varying apertures. In the animated GIF above, the image with the very soft, out-of-focus background was created wide open at f/5.6. The image that shows the wavelets defined relatively sharply was created at f/22. Of the two, which background do you prefer? Does the bird look any sharper at f/22 than it does at f/5.6?
My very great preference in this and in similar situations is to work wide open or stopped down no more than one stop. Doing so will yield the pleasingly out of focus backgrounds that I love so dearly and that define the BIRDS AS ART style. It is important to realize that this does not mean that this style is best for you….
For more examples of images created at varying apertures and their effects on the background, check out James Shadle’s excellent thread, How Aperture Selection Affects DOF and Background, in the Educational Resources Forum at BPN. (Note: if you are within driving distance of Tampa Bay it would behoove you to get out on the Hooptie Deux with James for a day or two on the bay with the Roseate Spoonbills asap. Click here for info.)
Shopper’s Guide
Below is a list of the gear that I used to create the images above. Thanks a stack to all who have used the Shopper’s Guide links to purchase their gear as a thank you for all the free information that we bring you on the Blog and in the Bulletins. Before you purchase anything be sure to check out the advice in our Shopper’s Guide.
Canon 800mm f/5.L IS lens. Right now this is my all time favorite super-telephoto lens.
Canon EOS-1D Mark IV professional digital camera body. The very best professional digital camera body that I have ever used.
And from the BAA On-line Store:
I’l be packing my 800 and tons of other gear in my ThinkTank Airport SecurityTM V2.0 rolling bag this afternoon for my flights to Hawaii tomorrow. I recommend that bag or the slightly smaller Airport InternationalTM V2.0 for most folks to make their air travel easy. These high capacity bags are well constructed and protect my gear when I have to gate check it on short-hops and puddle jumpers. Each will protect your gear just as well. By clicking on either link you will receive a free gear bag with each order over $50.
Gitzo GT3530LS Tripod. This one will last you a lifetime.
Mongoose M3.6 Tripod Head. Right now this is the best tripod head around for use with lenses that weigh less than 9 pounds. For heavier lenses, check out the Wimberley V2 head.
Double Bubble Leve.l You will find one in my camera’s hot shoe whenever I am on a tripod and not using flash.
Delkin 32gb e-Film Pro Compact Flash Card. These high capacity cards are fast and dependable.
April 8th, 2011
Why 32-gb Flash Cards?
For years the argument against large cards has been as follows: “If you use a very large capacity card and it fails or you lose it, you lose everything. It is wise not to put all of your eggs in one basket.”
Why then do I head afield with one 32-gb Delkin e-film Pro compact flash card in the Mark IV on the 800 and another 32-gb Delkin e-film Pro compact flash card in the Mark IV on my shoulder along with the 70-200mm f/2.8L IS lens?
- In my nearly ten years of digital photography, I have never lost a single image to a failed card. I have had a few cards fail over the years (though none in the last four years knock on wood; I do not want to give myself a kinehora), but each time I was able to recover the images.
- As long as I remember to format the cards at the start of a session, I never have to change cards in the field. A 32-gb card is large enough so that I never fill a 32-gb card with Mark IV RAW files even though I routinely photograph at many of the worlds premier photographic locations. (The latter is just one of the many blessings that I enjoy.) Thus, I never miss any action because I am changing cards; I am effectively working with an endless roll of film in each camera body.
- If you use smaller cards, the odds of losing one of them or of having one of them fail increase greatly….. When photographing at locations where I bring my gear into the room each night, I simply leave my cards in the cameras until my two rigs are placed on my bed. Then I remove and re-charge each battery, remove each card, and place them on the desk next to my laptop. At some locations I opt to leave my gear in the trunk. When we get back to the motel I remove the batteries and the two cards, place the cards in my otherwise empty right hand pants pocket, get back to the room, and begin downloading. I always have a small tote bag with me so that I can conveniently transport small items to and from the room. The batteries go in the tote bag.
| [Not a valid template] |
|
This Brown Pelican image was created in La Jolla, CA with the Canon EF 800mm f/5.6L IS lens and the EOS-1D Mark IV. ISO 400. Evaluative metering at zero: 1/2000 sec. at f/8. Early morning (8:53am) light. Note that at f/8 I have brought up a pleasing amount of background detail, but nothing too sharply defined.
When I visit San Diego either for an IPT or for Photo Expo West I often wind up having dinner with Martin Wood and Alan Parry of Delkin.
|
Why Delkin e-film Pro?
At a NANPA Forum about a zillion years ago, probably in 2002 or so, I first met Alan Parry of Delkin Devices. In those days a 512 mb card was a big card and cost about $300! Delkin had a booth. In short order Alan offered to give me a few cards to test. (In those days I was too timid to ask. I have learned to ask and I almost always get what I ask for. Just another of the many great blessings in my life.) Anyway, I used the cards and loved them. I found them to be quite dependable, and though I never test anything, I found them to be fast. Soon we were up to 4gb cards, and then 8gb, and then 16 gb cards. Delkin always keeps up with the latest technology and the cards are always fast, especially with Canon cameras. I began using a variety of Delkin card readers with my various computers. All but one were very dependable. Right now I have the same Delkin Express Card 54 adapter (reader) in the PCMCIA slot of my laptop that I have used for about four years. On IPT, I am always the first one downloaded at lunch… The combination of Delkin UDMA 32 gb e-film Pro cards, the Express Card 54, and BreezeBrowser’s Downloader Pro is lighting fast. There have been times at Applebee’s when I have actually finished editing a good morning’s folder of images before the group has finished ordering!
At some point, probably about 2005 or so, I visited the Delkin plant in Poway, CA for a tour. It reminded me of being in the place where the shuttle is assembled–never been inside that of course but I have seen the images. There the cards are assembled from a good number of components and tested rigorously, all right here in the US of A. Part of the operation includes soldering tiny bits and pieces…. Amazing.
Over the years I had two 4-gb cards fail, and one 8-gb card fail. Each time I was able to grab the images using a recovery program and each time Delkin cheerfully replaced the card at no charge. No questions ask. We have been marketing the Delkin cards for about six years. On rare occasion folks have returned cards that failed to us. We send them a new the next day and Delkin replenishes our stock.
Now here’s the great news: I have used Delkin 16-gb e-film Pro cards for about three years, first the gray ones and then the 450X red, white and blue UDMA cards. Then about two years ago I graduated to the 32gb UDMA cards. I have never had either a 16gb or a 32 gb Delkin card fail. Does that mean that if you order at 32 gb card from us that it will never fail? No, of course not. Cards of all sizes from all manufacturers will fail on occasion; it’s those tiny soldering jobs that cause the rare problem. With Delkin cards you can be confident that you have the same dependable card in your camera that I use every day, and that if there is a problem that the card will be replaced promptly and without question even if the paint is worn off. Do know that if a card is going to fail it will most likely do so during the first few days of use–again, its those soldered connections. It is best therefore to use a new card for at least a week before taking it to Antarctica or the Galapagos….
That said I have had a Delkin card spend several hours in the garbage at a Chinese restaurant. When I finally got it back, it was lathered in grease. It worked perfectly for many years after a bit of clean-up. And on several occasions, I have put Delkin cards in the washing machine. All functioned perfectly after a session with a blow dryer. I use my 32-gb Delkin e-film Pro cards without ever giving them a second thought.
Delkin created the Sensor Scope that I use at least once a week to help me keep sensor dust under control. And in addition to the card readers they make a wide variety of photographic related products including replacement camera batteries, re-chargeable batteries and chargers, archival storage media, Fat Gecko Mounts, flash drives, and more than a few clever accessories. Though we only carry a few of them, we would be glad to have any Delkin items drop-shipped for you while you save a few bucks in the process.
You can visit the Delkin Devices web site here. I did this morning and learned of a variety of products including their new 625X waterproof, ruggedized Combat Flash cards designed for folks working in extreme conditions. Learn more about the Combat flash cards here. Delkin has just introduced the USB 3.0 Universal Memory Card Reader. We will have them in the store soon. Here is their blurb:
“Move video and image files from memory card to computer over ten times faster, with sustained transfer speeds up to 5Gbps. Transfer two hours of high definition 1080p video in 26 seconds, almost 10,000 images in less than a minute or 2000 MP3 files in less than 13 seconds. Complete backwards compatibility with USB2.0 and USB1.1 allows for seamless integration with portable and desktop computer systems, making this the ideal companion for your present and future data management needs.”
(Note from me: though this card reader will work with older USB, the fastest transfer speeds are available only with USB 3.0.)
Delkin is of course a BAA sponsor and I look forward to a long and continuing relationship with Martin and Alan and the rest of the gang at Delkin Devices. Again, we will be glad to save you a few bucks and have your order for any Delkin product drop-shipped to you same day. The new USB 3.0 Universal Memory Card Readers will be in stock and in the store in a day or two.
Shopper’s Guide
Below is a list of the gear (or the current replacement) that I used to create the images above. Thanks a stack to all who have used the Shopper’s Guide links to purchase their gear as a thank you for all the free information that we bring you on the Blog and in the Bulletins. Before you purchase anything be sure to check out the advice in our Shopper’s Guide.
Canon 70-200mm f/2.8L IS II lens. Man, I am loving this lens on my shoulder with the 2X III teleconverter. I also use it a lot–depending on the situation–with the 1.4X III TC.
Canon 800mm f/5.L IS lens. Right now this is my all time favorite super-telephoto lens.
Canon EF 1.4X III TC. This new TC is designed to work best with the new Series II super-telephoto lenses.
Canon EOS-1D Mark IV professional digital camera body. The very best professional digital camera body that I have ever used.
And from the BAA On-line Store:
I pack my 800 and tons of other gear in my ThinkTank Airport SecurityTM V2.0 rolling bag for all of my air travel and recommend the slightly smaller Airport InternationalTM V2.0 for most folks. These high capacity bags are well constructed and protect my gear when I have to gate check it on short-hops and puddle jumpers. Each will protect your gear just as well. By clicking on either link you will receive a free gear bag with each order over $50.
Gitzo GT3530LS Tripod. This one will last you a lifetime.
Mongoose M3.6 Tripod Head. Right now this is the best tripod head around for use with lenses that weigh less than 9 pounds. For heavier lenses, check out the Wimberley V2 head.
Double Bubble Leve.l You will find one in my camera’s hot shoe whenever I am on a tripod and not using flash.
Delkin 32gb e-Film Pro Compact Flash Card. These high capacity cards are fast and dependable.
April 6th, 2011
| [Not a valid template] |
|
This image was made near Homer, AK with the Canon EF 800mm f/5.6L IS lens with the 1.4X III TC and the EOS-1D Mark IV. ISO 400. Evaluative metering +1 stop: 1/320 sec. at f/8 in Manual mode. The key to a successful composition here was placing the bird high enough in the frame to include the lower breast and show off the bird’s full crop.
The Canon EF 800mm f/5.6L IS with or without the 1.4X III TC is obviously superb tool for nature and wildlife photographers, especially those who love birds. Read on to learn what the future may hold for this lens.
|
Will the EF 800mm f/5.6L Soon Become Obsolete?
When I first heard that Canon would be releasing an 800 f/5.6L IS lens I stated that it was a stupid lens. Then I borrowed one to try out at Bosque and purchased one the next week. It quickly became my everyday workhorse super-telephoto lens. I went nowhere without it. I use it about half the time with the 1.4X III TC and on occasion, with the 2X III TC using Live View to focus accurately. It is the sharpest super-telephoto lens that I have ever used and the new 4-stop Image Stabilizer system performs amazingly well; I have created sharp images at shutter speeds as low as 1/6 sec. Absurd!
The playing field, however, is about to change. On September 23, 2010 I posted news of the four new Series II Canon Super-telephotos and the two new Series III tele-converters along with my comments here. On February 3, 2011 I posted Series III 2X TC Gut Reaction. And on February 7 I followed that up with Worth the Weight? The Skinny on the Two New Canon Super-telephoto Lenses. It seems that in this last post that most folks failed to read between the lines…. (See my explanation below.)
About two months ago I pre-ordered both the Canon 500mm F/4L IS II and the Canon 600mm f/4L IS II lenses. I had been hoping to get my hands on a 500II in May and on the 600II sometime in June but with the recent natural disasters that struck Japan those hopes are in no way realistic. I have no clue as to when these lenses will be available but would not be surprised if they were delayed a full year.
| [Not a valid template] |
|
This image was created at Lake Kerkini, Greece with the Canon EF 800mm f/5.6L IS lens and the EOS-1D Mark IV. ISO 400. Evaluative metering +2 1/3 stops of the white sky: 1/800 sec. at f/6.3 in Manual mode. This somewhat serendipitous capture includes an adult Dalmatian Pelican and an immature Herring Gull (yellow-footed race).
The Canon EF 800mm f/5.6L IS is and always will be a superb flight lens. The new lens coating make it the fastest autofocusing telephoto lens that I have ever used. The new Series II super-telephotos should be even quicker….
|
Now lets get on to the question of the day, “Will the EF 800mm f/5.6L Soon Become Obsolete?” Well, one answer is that it if it ever becomes obsolete it will not be soon! Here, adapted from my February 7 comments, is where folks failed to read between the lines:
“The new 600 will weigh only 8.8 pounds. The 800mm f/5.6L IS lens weighs 9.9 pounds. The relatively new 800mm f/5.6 lens was the first to offer the amazingly revolutionary 4-stop Image Stabilization system. All four of the Series II super-telephoto lenses offer 4-stop IS. The new 600 IS II offers far greater versatility than the 800mm and offers a longer effective focal length with functioning central sensor-only autofocus (1200mm with the 2X for the 600 IS II as compared to 1120mm with the 1.4X for the 800). In addition, the new 600 weighs 1.1 pounds less than the 800. And it should be mentioned at this time that the Series III teleconverters will offer improved AI Servo tracking accuracy only with the Series II Super-telephoto lenses. The micro-chips in the Series III TCs cannot communicate with the older super-telephoto lenses. Do note however that early reports indicate that the EF 2X Extender III is noticeably sharper than the EF 2X Extender II.” (For more on the new TCs, check out Series III EF Teleconverter Misconceptions…
Expanding on my “greater versatility” comments: with the 800 you have only two useful focal lengths when using a pro body: 800 and 1120 (the 800 + the 1.4X TC). With a pro-sumer body like the 50D or the 7D, you have only one: 800mm. (An f/5.6 lens will not autofocus with the 1.4X TC). In either case, 800mm is often too long a focal length. An example would be at the St. Augustine Alligator Farm where many of the nests are this close. And there would be a huge gap between the minimum available focal length of 800mm (800mm) and the maximum available focal length of the rig on my shoulder, 400mm (the 70-200 f/2.8L IS II and the 2X III TC).
With the new 600 II and a pro-body you will have three useful focal lengths: 600mm, 840mm (the lens plus the 1.4X III TC), and 1200mm (the lens plus the 2X III TC). You will enjoy a considerably closer minimum focusing distance with the new 600. And the gap between the minimum available focal length of the prime lens alone (600) and the the maximum available focal length of the rig on my shoulder, 400mm (the 70-200 f/2.8L IS II and the 2X III TC), is greatly reduced.
And this greater versatility will be provided by a lens that weighs 1.1 pounds less than the 800…. For serious photographers with adequate budgets, the choice between the 800 and the 600 II seems to me to be an easy one.
So where does this leave me? As I was always able to make sharp images with my old 600 IS and the 2X II TC at shutter speeds as low as 1/60 sec., I will–with the 600 II’s 4-stop IS–have no problem at all doing that quite consistently with the new lens (when I get it) :). So the very great likelihood is that I will be selling the 800 f/5.6 at some point down the road.
So why did I also pre-order the 500 IS II? On some trips, say Antarctica, South Georgia, the Falklands, and the Galapagos, I will bring the 500 because the birds are tame, the 500 II will weigh nearly two full pounds less than the 600 II, and–with its smaller physical size, be easier to travel with. The 500 II will be imminently more hand holdable than the 600 II, great for photographing seabirds off of a large ship. And with the 500 II I will still have a nice maximum focal length of 1000 mm (with the 2X II TC). In addition, I will be able to rent either the 500 II or the 600 II to participants on (most) IPTs.
I am positive that the 800 will always be a great lens for bird photography, and that it will always be in high demand. The price of used 800s will surely come down a bit as some folks will switch from the 800 to the 600 II. So will the 800 f/5.6L IS lens become obsolete? Not in my lifetime!
Shopper’s Guide
Below is a list of the gear that I used to create the images above. Thanks a stack to all who have used the Shopper’s Guide links to purchase their gear as a thank you for all the free information that we bring you on the Blog and in the Bulletins. Before you purchase anything be sure to check out the advice in our Shopper’s Guide.
Canon 800mm f/5.L IS lens. Right now this is my all time favorite super-telephoto lens.
Canon 600mm f/4L IS II. This one will surely replace my 800 f/5.6L IS….
Canon 500mm f/4L IS II. I cannot wait for this lightweight beauty.
Canon EF 1.4X III TC. This new TC is designed to work best with the new Series II super-telephoto lenses.
Canon EF 2X III teleconverter. The 2X III is a bit sharper than the 2X II.
Canon EOS-1D Mark IV professional digital camera body. The very best professional digital camera body that I have ever used.
And from the BAA On-line Store:
Gitzo 3530 LS Tripod. This quality tripod will last you a lifetime.
Mongoose M3.6 Tripod Head. Right now this is the best tripod head around for use with lenses that weigh less than 9 pounds. For heavier lenses, check out the Wimberley V2 head.
Double Bubble Leve.l You will find one in my camera’s hot shoe whenever I am on a tripod and not using flash.
Delkin 32gb e-Film Pro Compact Flash Card. These high capacity cards are fast and dependable.
April 4th, 2011
| [Not a valid template] |
|
This image was made from the boat near Homer, AK with the Canon EF 70-200mm f/2.8L IS II lens with the 1.4X III TC (hand held at 185mm) and the EOS-1D Mark IV. ISO 400. 7:05 pm. Evaluative metering +1 stop off the blue sky: 1/1600 sec. at f/5 in Manual mode.
I am down to 1250 images from the Homer trip. After the next edit I should be well below 500. I probably created more than 7,000 images during my 12 days of photography. I found this one sort of by accident. I love the soft, low angled light. I love the sweeping wing positions and the way that the bird is angled towards us. There is one thing that I do not like about the image. Only one…. If you think you know what it is, do feel free to post a comment.
|
Apologies
Sorry about the mis-fire earlier today. I accidentally hit Publish instead of Preview and that mistake was followed by a comedy of errors :). All is now well with the world.
BIRDS AS ART Bulletin #368
BIRDS AS ART BULLETIN #368 is on line and can be viewed here.
FEATURES
- THE HOMER IPT REPORT
- ANNOUNCING THE OCT/NOV 2011 HOMER IPTs
- GALAPAGOS JULY 2011 OPENING
- ASSORTED BAA KUDOS
- THE BLOG IS THE BOMB!
- TODD GUSTAFSON ON NATIONAL GEOGRAPHIC TELEVISION
- USED CANON GEAR FOR SALE
- POSSE NEWS/ROBERT AMORUSO/ROBERT O’TOOLE
- POSSE NEWS/JIM NEIGER
- SHOPPER’S GUIDE
- IPT UPDATES
The great stuff, above, plus 13 really good images, eight of those mine with our legendary BAA educational captions. Be sure to see the news about the Homer IPTs and the single opening on this summer’s Galapagos Photo Cruise.
GEAR STUFF
I swear, I must answer 50 e-mails a week from folks asking questions about photographic gear, mostly about lenses. Below are two.
Here is an e-mail exchange with Nancy Bell:
AM: Howdy, re:
NB: I just want to say thank you and THANK YOU!!!
AM: YAW.
NB: I just purchased the Digital Basics PDF and the Mark IV users guide. Your teaching and writing skills have provided super-valuable information that NOBODY else provides. I have learned more from these two guides than I have from reading manuals that seem way too general and do not provide the nitty-gritty details for using either the camera in the field or Photoshop. Thank you for putting in your time and talent into producing these and your other great guides. You are a generous man and I am grateful to have spent time with you last year on the SW Florida IPT. I enjoy learning from your blogs and the abundant information provided by all on BPN.
AM: Thank you for your kind and supportive words.
NB: Now just a quick question.
AM: Ah, so you were just buttering me up 🙂
NB: I have the 400 DO lens and now the Mark IV (yeah!), as well as the older 70-200 f2.8 IS L lens and the old 1.4 II teleconverter. Could you recommend adding the new 2x III teleconverter to this setup? I have always heard that a 2X degrades the image substantially and of course, uses 2 stops of light. At $500 I only want to add a very useful piece of equipment.
AM: Have you seen the images on the blog made with the 70-200 and the 2X III TC? They are amazingly sharp. Do know that I have been using and making professionally sharp images with 2X teleconverters with my f/4 super-telephoto lenses for close to a decade. Yes, the images made with any TC are not as sharp as images made with the prime lenses alone but they are so sharp to start with that with good technique most folks should be able to create critically sharp images with either the 500 or 600 f/4L IS, the 2X II or III TC, and any pro body. Period. That said, the 2XIII is only marginally sharper than the 2X II. And the two 1.4X TCs are about the same as far as sharpness. As I have been saying for many months, the biggest advantages with the Series III TCs will likely be seen when they are used with the new Series II super-telephoto lenses. The availability of the new lens will surely be delayed substantially by the recent tragedy in Japan. I love my 70-200 f/2.8L IS II with the 2XIII so much that will be selling my 400 DO very soon. The only thing that I will miss is the 400 DO with the 1.4X TC…. See the mockingbird image and related comments here. It pays to subscribe to the blog and enjoy tons of great free info 🙂 later and love, artie
| [Not a valid template] |
|
This is another 2nd pick that I have come to like a lot. It was created from the boat near Homer, AK with the Canon EF 70-200mm f/2.8L IS II lens with the 1.4X III TC (hand held at 222mm) and the EOS-1D Mark IV. ISO 400. 7:05 pm. Evaluative metering +1 2/3 stops off the white sky: 1/1600 sec. at f/4 in Manual mode.
To soften the look of the snow covered mountain-side at the bottom of the frame I created a Quick Mask and applied about a 20 pixel Gaussian blur.
|
And another with Brenda:
AM: Hi Brenda, re:
B: I am a long time reader and occasional purchaser of items from your site. I really enjoy your blog and the Bulletins. I live in Galveston, Texas. My main photographic interest is birds. My current equipment consists of a canon 50D, a recently-ordered Canon 7D, a Canon 100-400mm, a 400mm/5.6, a 24-70L/2.8 and a Canon EF-S 15-85mm f/3.5-5.6 IS USM UD. The lens that stays on my camera the most is the 400/5.6. I have been reading the excellent reviews of the new Canon 70-200 and 2x teleconverter combo and was thinking of purchasing one and selling my 100-400mm.
AM: Given that you own the 400 f/5.6, the 70-200 f/2.8L IS II would be a great choice… Heck, with the 2X you could even think of selling the 400 f/5.6 though it is a bit lighter… And you would have IS.
B: I think that the IS would help. I do not currently own any teleconverters. If I purchase a TC should I buy the new version in case I buy a new 500mm in the future.
AM: Only if you can realistically afford the new Series II 500mm.
B: I love shooting birds in flight and I have great opportunities to photography migrating warblers. Much of the time the 400 f/5.6L Is too much lens for the breeding birds at the High Island rookery but is not long enough for the warblers. I am hoping that the 7D will allow me to make tighter crops. I have not used the 7D yet.
AM: In my opinion you would much be better off with a 500mm lens and a 1.4X TC for the warblers. As more pixels are stuffed onto a small sensor, image quality begins to suffer as the pixels are smaller (in this case 4.7 microns for the 50D as compared to 4.3 microns for the 7D). So you would not gain very much if anything by cropping 7D images….
B: I have an upcoming June trip to Alaska.
AM: Have a great trip. I hope that my comments helped a bit 🙂
My Comments
Though I liked both of the two squabbling eagle images here, I felt that the top image, the one with the right wing of the juvenile clipped in the middle of the primaries, was the stronger by far. I like that we have a clear view of the young bird’s face and I like the fact that the adult is looking at the young bird rather than at the fish they were fighting over. The final tally was 10-6 in favor of the top image, the one with the clipped wing. (I did not count Clear Ken’s vote as he posted that he was clearly confused :)) Do not that I am fine with the wing which has actually been cut rather than clipped. I often teach, “Cut don’t clip.” And that is just what I did with the top image. Had I zoomed wider the image would have lost a ton of its impact.
Note: the folks who liked the bottom image best were not “wrong.” Everyone did a fine job of making the case for the image that they chose. And there were lots of things about the bottom image that I liked. A lot.
Shopper’s Guide
Below is a list of the gear (or the current replacement) that I used to create the images above. Thanks a stack to all who have used the Shopper’s Guide links to purchase their gear as a thank you for all the free information that we bring you on the Blog and in the Bulletins. Before you purchase anything be sure to check out the advice in our Shopper’s Guide.
Canon 70-200mm f/2.8L IS II lens. Man, I am loving this lens on my shoulder with the 2X III teleconverter. I also use it a lot–depending on the situation–with the 1.4X III TC.
Canon 2X III teleconverter. I use this with both the 70-200 and with the 800 (the latter while focusing in Live View as described in our Mark IV User’s Guide).
Canon EOS-1D Mark IV professional digital camera body. The very best professional digital camera body that I have ever used.
And from the BAA On-line Store:
Delkin 32gb e-Film Pro Compact Flash Card. These high capacity cards are fast and dependable.
|
|