August 27th, 2011
Juvie Sanderling Capture Lessons
As regular readers know, wind against sun conditions on clear days make things very challenging for bird photographers. With the birds flying into the wind and away from the light flight photography opps are limited to banking birds and even when the birds land they will almost always face into the wind to avoid unnecessarily ruffling their feathers. Denise Ippolito and I were at Nickerson Beach, Long Island, NY on the morning of August 24th. It was clear right from the get go but with a stiff breeze from the west southwest photographing the skimming skimmers was simply a waste of time. With the tide dropping we noted decent sized flocks of Sanderling with a smattering of other species feeding on the wet sand left by receding waves. We lowered our tripods and sat along the edge of the surf. As Denise was working with the 500 and the 1.4X II TC while I enjoyed a much longer focal length we chose different locations on the beach.
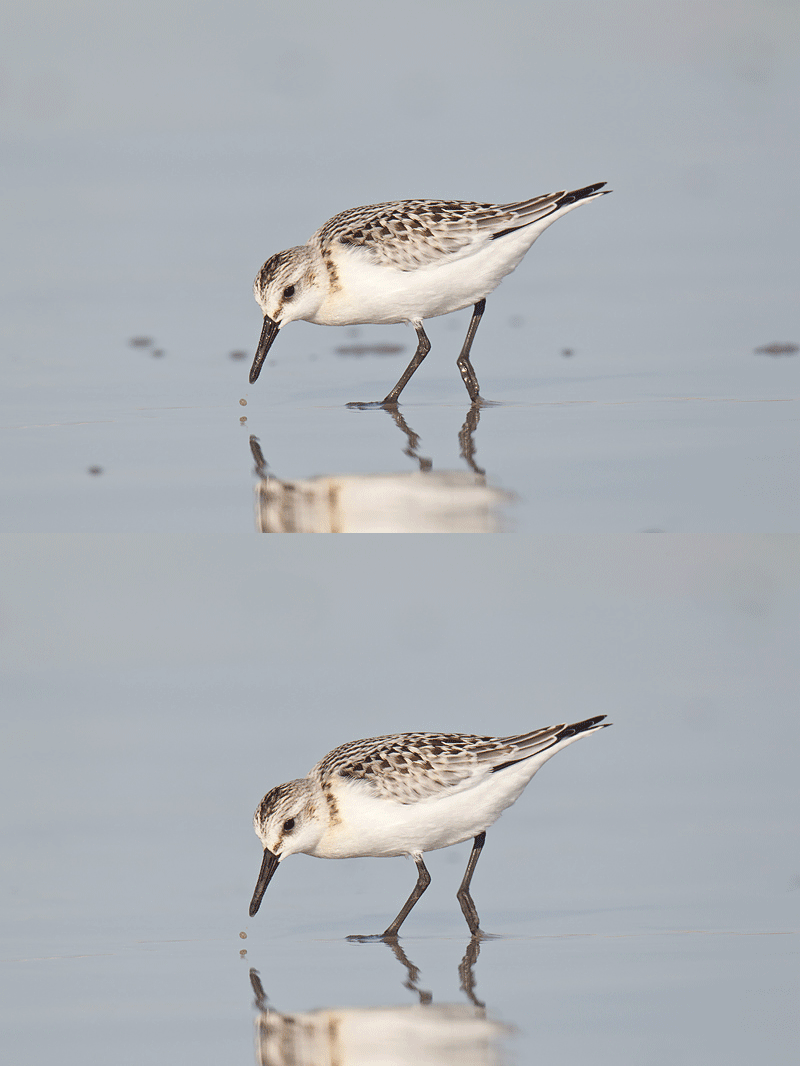
Feeding shorebirds are not affected much by the wind so we had lots of opportunities to photograph the foraging shorebirds. That’s the good news. The bad news was two-pronged. First, most of the Sanderlings were worn, molting adults; they did not make very attractive subjects. Second, feeding Sanderlings run up and down the beach rarely pausing even for an instant to grab a tiny invertebrate morsel. A bird landed among a group of about 15 feeding birds and immediately caught my attention: it was a Sanderling in fresh juvenal plumage looking sleek and bright. The feathers of the bird’s upperparts exhibited a consistent checkerboard pattern.
I love shorebirds. And I love juvenile shorebirds even more. And I love birds in fresh juvenal plumage most of all so I concentrated exclusively on the silver, black, and white gem. For the most part it was a frustrating endeavor. I wound up keeping seven of more than 120 images of the bird with only two that made me really happy. This was pretty much par for the course with fast feeding shorebirds.
If you would like to learn more about ageing and identifying North American shorebirds be sure to order a signed copy of my Shorebirds; Beautiful Beachcombers from the BAA On-Line Store.
Juvie Sanderling Clean-up Lessons
Clean-up of the glistening wet sand was rather straight-forward using the Patch Tool along with a bit of Spot-healing brush work. Bill clean-up was accomplished in similar fashion but I also used a 50% Clone Stamp Tool. All as described in detail in Digital Basics (a PDF sent via e-mail that includes my complete digital workflow and dozens of great Photoshop tips).
Is the cleaned-up image level? How would you crop it? (Not that in the original capture the bird is centered.)
| [Not a valid template] |
|
This screen capture of a BreezeBrowser main view page shows that the central sensor was active when the image was made. (When using rear focus the active sensor does not show when “Show Flashing Highlights” is checked.) Note also the perfect histogram. You can learn why I use BreezeBrowser every day for sorting, editing (selecting the keepers), and storing my images by clicking here.
|
Juvie Sanderling Cropping Lessons
In an ideal world I would have had the central sensor on the bird’s neck; this would have placed the point of focus on the same plane as the bird’s eye. With the active sensor on the bird’s side it is a good thing that I was at f/10; the bit of extra d-o-f from wide open rendered the bird’s eye plenty sharp. (Note that with the 800/1.4X TC combo that only the central sensor is active.) Despite the Bubble Level in my hot shoe the image needed a bit of CW rotation. To determine the exact amount I drew a line with the Ruler Tool from the edge of the water drop to the edge of the reflection of the water drop. It needed about .9 degrees of rotation. (Note; when working on a sloped beach in soft sand it it hard to keep everything level even when occasionally glancing at the Bubble Level.)
I cropped know that I would be moving the bird back in the frame. The key was leaving only the very top of the reflection as everything below the center of the head was too distorted to do the image any good.
After cropping I expanded canvas right and used an APTATS II technique to drag the upper layer (and the bird!) back in the frame. Then I used the Eraser Tool to smooth the seam. You can learn this and similar techniques in Robert O’Toole’s APTATS II. (APTATS stands for Advanced Photoshop Tips and Techniques.)
Shopper’s Guide
Below is a list of he gear used to make the three mages in this post. Thanks a stack to all who have used the Shopper’s Guide links to purchase their gear as a thank you for all the free information that we bring you on the Blog and in the Bulletins. Before you purchase anything be sure to check out the advice in our Shopper’s Guide.
Support both the Bulletins and the Blog by making all your B & H purchases here.
Remember: you can earn free contest entries with your B & H purchases. Eleven great categories, 34 winning and honored images, and prize pools valued in excess of $20,000. Click here for details.
Canon 800mm f/5.L IS lens. Right now this is my all time favorite super-telephoto lens.
Canon 1.4X III Teleconverter. The new 1.4X TC is designed to work best with the newer Series II super-telephoto lenses but it works just fine with the current lenses.
1.4X II Teleconverter. Most folks including me believe that the 1.4X II TC is as sharp as the 1.4X III TC.
Canon EOS-1D Mark IV professional digital camera body. My two Mark IVs are my workhorse digital camera bodies.
And from the BAA On-line Store:
LensCoats. I have a LensCoat on each of my big lenses to protect them from nicks and thus increase their re-sale value. All my big lens LensCoat stuff is in Hardwood Snow pattern.
LegCoat Tripod Leg Covers. I have four tripods active and each has a Hardwood Snow LegCoat on it to help prevent further damage to my tender shoulders 🙂
Gitzo GT3530LS Tripod. This one will last you a lifetime.
Mongoose M3.6 Tripod Head. Right now this is the best tripod head around for use with lenses that weigh less than 9 pounds. For heavier lenses, check out the Wimberley V2 head. (Note: Denise prefers the Wimberley head to the Mongoose.
CR-80 Replacement Foot for Canon 800. When using the 800 on a Mongoose as I do, replacing the lens foot with this accessory lets the lens sit like a dog whether pointed up or down and prevents wind-blown spinning of your lens on breezy days by centering the lens directly over the tripod.
Double Bubble Level. You will find one in my camera’s hot shoe whenever I am not using flash.
Be sure to check out our camera body User’s Guides here.
The Lens Align Mark II. I use the Lens Align Mark II pretty much religiously to micro-adjust all of my gear an average of once a month and always before a major trip. Enjoy our free comprehensive tutorial here.
BIRDS AS ART Camera Body User’s Guides. Why spend $2-5 grand on a camera and not learn to use it properly and efficiently?
August 25th, 2011
Size Does Matter; The Power of the Square of the Focal Length
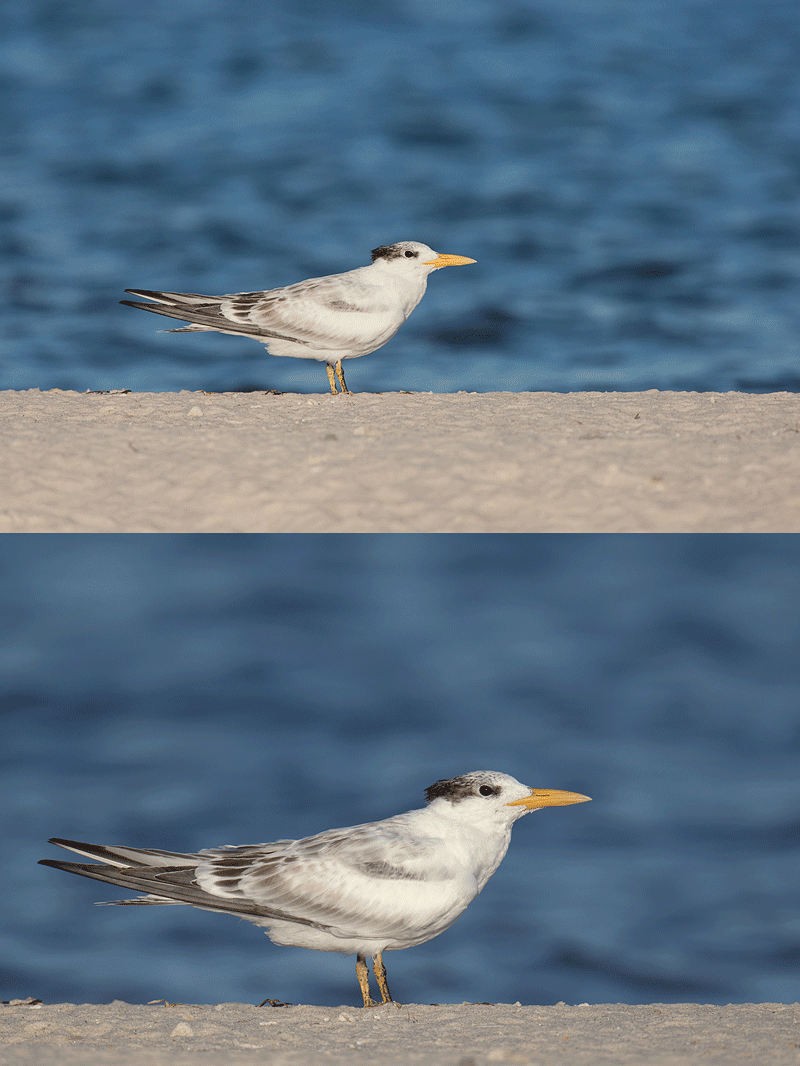
In the original “The Art of Bird Photography” I wrote something to this effect: the size of the bird in the frame is not a factor of the focal length but rather a factor of the square of the focal length. In other words, if you go from a 400mm lens to an 800 mm lens, the bird will be four times bigger in the frame (not twice as big). 500mm f/4 lenses are surely the most popular focal length for folks photographing birds. And most folks do quite well with the 500 and a 1.4X teleconverter.
Yesterday afternoon at Westhampton Beach, Long Island, NY, Denise Ippolito and I were photographing a young Royal Tern while standing next to each other. She was using the Canon 500mm f/4L IS lens with the 1.4X II teleconverter and the EOS-1D Mark III. I was using the Canon 800mm f/5.L IS lens, the Canon 1.4X III teleconverter, and the Canon EOS-1D Mark IV.. The animated GIF above shows the huge difference in magnification. In addition, note the smoother background in the image created by the 800 lens.
Both ISO 400. Denise: Evaluative metering at zero: 1/2000 sec. at f/7.1 in Manual Mode. Artie: Evaluative Metering at zero: 1/1000 sec. at f/10 in Av Mode. Coincidentally, each of us opted to stop down 2/3 stop from the wide open aperture. Each image was leveled using the Ruler Tool and cropped just a bit using the Straighten button.
Shopper’s Guide
Below is a list of he gear used to make the three mages in this post. Thanks a stack to all who have used the Shopper’s Guide links to purchase their gear as a thank you for all the free information that we bring you on the Blog and in the Bulletins. Before you purchase anything be sure to check out the advice in our Shopper’s Guide.
Support both the Bulletins and the Blog by making all your B & H purchases here.
Remember: you can earn free contest entries with your B & H purchases. Eleven great categories, 34 winning and honored images, and prize pools valued in excess of $20,000. Click here for details.
Canon 800mm f/5.L IS lens. Right now this is my all time favorite super-telephoto lens.
Canon 500mm f/4L IS lens. A fast, sharp, versatile super-telephoto lens. I owned and used two for close to a decade. I now own only one and will be selling that when the Series II lenses are available.
Canon 1.4X III Teleconverter. The new 1.4X TC is designed to work best with the newer Series II super-telephoto lenses but it works just fine with the current lenses.
1.4X II Teleconverter. Most folks including me believe that the 1.4X II TC is as sharp as the 1.4X III TC.
Canon EOS-1D Mark IV professional digital camera body. My two Mark IVs are my workhorse digital camera bodies.
And from the BAA On-line Store:
LensCoats. I have a LensCoat on each of my big lenses to protect them from nicks and thus increase their re-sale value. All my big lens LensCoat stuff is in Hardwood Snow pattern.
LegCoat Tripod Leg Covers. I have four tripods active and each has a Hardwood Snow LegCoat on it to help prevent further damage to my tender shoulders 🙂
Gitzo GT3530LS Tripod. This one will last you a lifetime.
Mongoose M3.6 Tripod Head. Right now this is the best tripod head around for use with lenses that weigh less than 9 pounds. For heavier lenses, check out the Wimberley V2 head. (Note: Denise prefers the Wimberley head to the Mongoose.
CR-80 Replacement Foot for Canon 800. When using the 800 on a Mongoose as I do, replacing the lens foot with this accessory lets the lens sit like a dog whether pointed up or down and prevents wind-blown spinning of your lens on breezy days by centering the lens directly over the tripod.
Double Bubble Level. You will find one in my camera’s hot shoe whenever I am not using flash.
Be sure to check out our camera body User’s Guides here.
The Lens Align Mark II. I use the Lens Align Mark II pretty much religiously to micro-adjust all of my gear an average of once a month and always before a major trip. Enjoy our free comprehensive tutorial here.
BIRDS AS ART Camera Body User’s Guides. Why spend $2-5 grand on a camera and not learn to use it properly and efficiently?
August 23rd, 2011
Bear Fur Fare
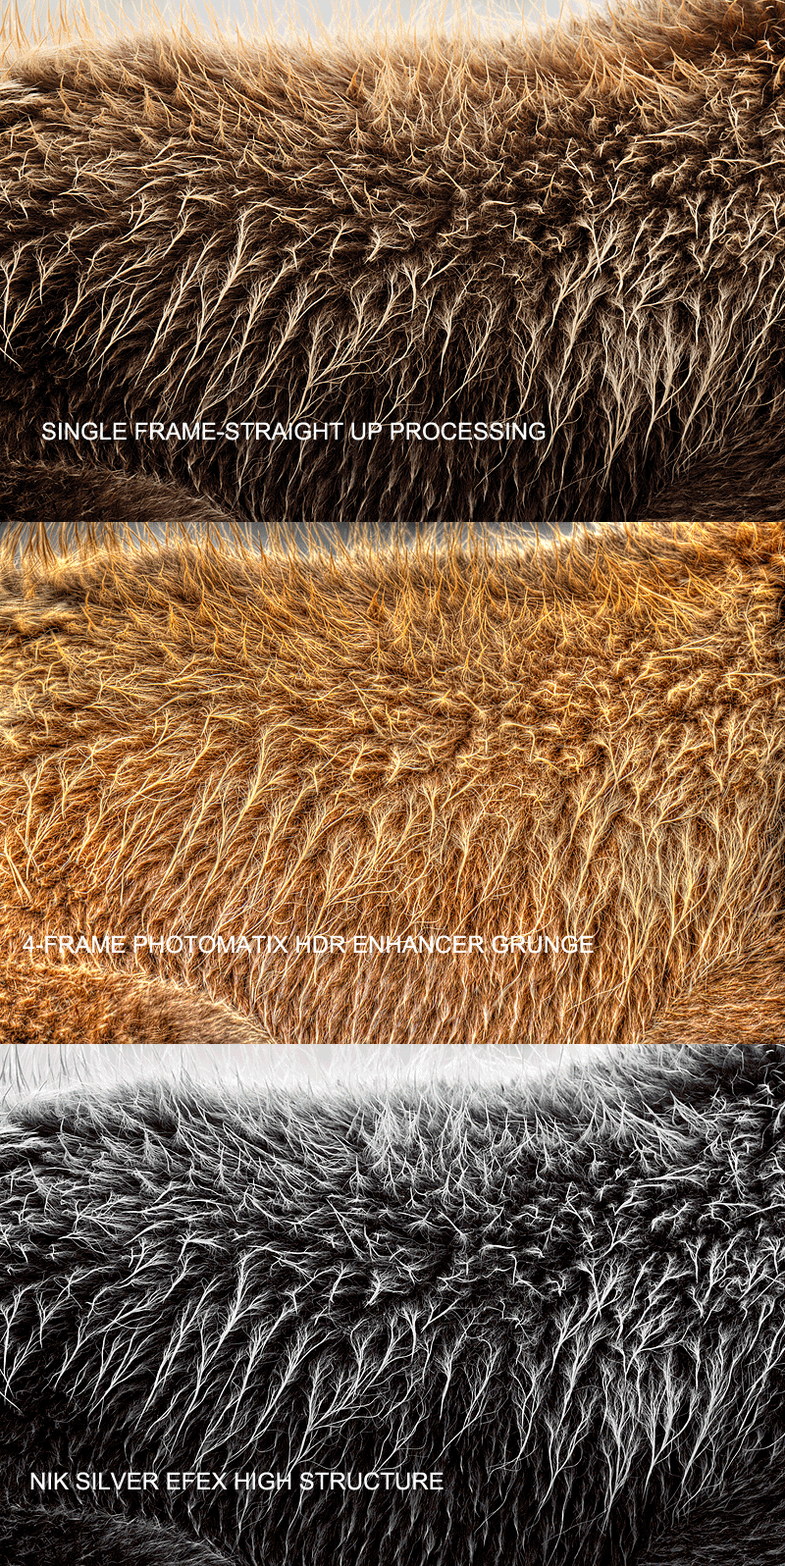
Take a moment to study the three frames in the animated GIF above. One was processed from a single frame using my usual workflow. The second version was created from a four-frame AEB sequence in Photomatix Pro 4.1.1 with the Enhancer Grunge preset. The settings were tweaked a bit before processing the HDR image and then I made additional small changes in Photoshop. The third version was made using the High Structure preset in NIK Silver EFEX Pro to convert the single frame image to black and white. High Structure and Wet Rocks are my two favorite SIlver EFEX Pro presets.
| [Not a valid template] |
|
This RAW file for the image above was converted with ACR and optimized in Photoshop CS-5 using the workflow described in detail in Digital Basics (a PDF sent via e-mail).
|
The funny thing is that I had had an image like this in mind for several days. One morning a beautiful bear sat near the group with its back to us for about an hour waiting for a fish to come by. When I finally decided to make some images of his back the bear decided to get up and walk down the stream. He who hesitates…. I passed right by the bear in the image above late one evening just as the group was getting into the skiff to head back to the boat for dinner and sleep. I turned around and, created a few images, and then made them wait a few minutes as I created the AEB sequence for the HDR image below.
| [Not a valid template] |
|
Denise Ippolito inspired me with her great HDR grunge images of museum and prison interiors and old cars and derelict buildings. On my Galapagos trip, I tried creating some HDR images of wildlife. Since then I continue to have a ton of fun trying and learning. We are currently collaborating on a Grunge Guide. I created a five frame AEB sequence +/1 one full stop around the base exposure: ISO 800. Evaluative Metering +2/3 stop: 1/250sec. at f/8. The lightest image in the series was discarded. The main requirement for creating AEB sequences like this one is that the animal be completely still. Being on a tripod even with shorter focal length lenses is always best but I have had some luck hand-holding. (It’s a case of do as I say not as I do…)
|
If you would like purchase Photomatix and save 15% click here and be sure to enter birdsasart as the coupon code. You can download and use a trial copy of Photomatix before you buy. (It is fully operational; the processed images will have a visible watermark on them.)
| [Not a valid template] |
|
NIK Silver EFEX Pro makes converting images to B&W a snap and offers a variety of interesting presets that produce dramatic results. For the image above I used the High Structure preset.
|
You can save 15% on all NIK products including Silver Efex Pro 2, HDR Efex Pro, Color Efex Pro 3.0, and Viveza 2 by clicking here and entering BAA in the Promo Code box at check-out. Then hit Apply to see your savings.
Thanks to Denise for her help in coming up with the title for this blog post.
Which Version Do You Like Best?
Please take a moment to let us know which version you like best and which you like least: straight up, HDR Grunge, or black and white. Do share your reasoning with us. Please take a moment to read what you have typed to make sure that it makes sense. Thanks. 🙂 And if you hate all images of bear fur there is no need to chime in here.
Shopper’s Guide
Below is a list of he gear used to make the three mages in this post. Thanks a stack to all who have used the Shopper’s Guide links to purchase their gear as a thank you for all the free information that we bring you on the Blog and in the Bulletins. Before you purchase anything be sure to check out the advice in our Shopper’s Guide.
Support both the Bulletins and the Blog by making all your B & H purchases here.
Remember: you can earn free contest entries with your B & H purchases. Eleven great categories, 34 winning and honored images, and prize pools valued in excess of $20,000. Click here for details.
Canon 800mm f/5.L IS lens. Right now this is my all time favorite super-telephoto lens.
Canon EOS-1D Mark IV professional digital camera body. My two Mark IVs are my workhorse digital camera bodies.
And from the BAA On-line Store:
LensCoats. I have a LensCoat on each of my big lenses to protect them from nicks and thus increase their re-sale value. All my big lens LensCoat stuff is in Hardwood Snow pattern.
LegCoat Tripod Leg Covers. I have four tripods active and each has a Hardwood Snow LegCoat on it to help prevent further damage to my tender shoulders 🙂
Gitzo GT3530LS Tripod. This one will last you a lifetime.
Mongoose M3.6 Tripod Head. Right now this is the best tripod head around for use with lenses that weigh less than 9 pounds. For heavier lenses, check out the Wimberley V2 head.
CR-80 Replacement Foot for Canon 800. When using the 800 on a Mongoose as I do, replacing the lens foot with this accessory lets the lens sit like a dog whether pointed up or down and prevents wind-blown spinning of your lens on breezy days by centering the lens directly over the tripod.
Double Bubble Level. You will find one in my camera’s hot shoe whenever I am not using flash.
Be sure to check out our camera body User’s Guides here.
The Lens Align Mark II. I use the Lens Align Mark II pretty much religiously to micro-adjust all of my gear an average of once a month and always before a major trip. Enjoy our free comprehensive tutorial here.
BIRDS AS ART Camera Body User’s Guides. Why spend $2-5 grand on a camera and not learn to use it properly and efficiently?
August 21st, 2011
| [Not a valid template] |
|
This image was created with the Canon 800mm f/5.6L IS lens and the EOS-1D Mark IV. ISO 400. Evaluative Metering -1/3 stop: 1/500 sec. at f/5.6.
Lens/Camera Body Micro-Adjustment: -4.
I selected the claws with Select/Color Range and ran a 35% Linear Burn on the Layer. I used some small Quick Masks, the Patch Tool, and the Clone Stamp Tool to cover the two small bright white areas. And I used the Spot Healing Brush to clean up some flecks on the bear’s fur. All as described in detail Digital Basics (a PDF sent via e-mail.)
|
My Big Mistake
In yesterday’s post, I asked “What was my big mistake?” Kevin Klasman, the first to comment, pretty much nailed my thoughts at 10:36am on August 20, 2011 when he typed: “On the bear photo, not getting the entire left rear foot? The right rear foot is partially hidden by foliage and is OK by me.” Others said the same thing or something close but not as accurately and succinctly as Keven. So kudos to Mr. Klasman.
When the bear walked around the tiny island and sat down 21 feet away and faced me I could not believe my good fortune as it is unusual to have such a clear view of the front claws. Those claws on the two front paws were all that I could see so I have no problem putting them right in the center of the frame. And sometimes you only get one chance. I made two frames and checked for blinkies and the bear walked off to listen for salmon…. At that moment, I was happy with the image.
As I said yesterday, when I saw the image on the laptop for the first time I was dismayed. I am fine with the depth of field as is and the exposure was perfect. But oh how I wished that I had re-composed by pointing the camera to my right so as to include the complete hind left paw as Kevin noted. With the right rear paw obstructed by the grasses that was clearly the best move. But I have been so focused on those front claws that I did not see it in the field.
When I optimized the image (see the lead photo above) I cropped a bit off the right side in an attempt to balance the composition. Re-constructing the missing stuff on the right side of the frame would be problematic at best so I did not want to go there. Click here to see the original image. Thanks all for playing and way to go Kevin for getting right inside my head.
BAA Bulletin #382
BAA Bulletin #382 is on line and can be accessed here right now.
Here are the featured items:
- THE 2011 BEAR BOAT PHOTO-CRUISE IPT REPORT
- THE 2012 BEAR BOAT PHOTO-CRUISE IPT
- IMPRESSIONS OF BOSQUE (e-book/PDF) by DENISE IPPOLITO
- GITZO CF TRIPOD REBATE
- FIRST CONTEST FAVORITE
- THE BLOG IS THE BOMB!
- IPT UPDATES
August 20th, 2011
What Was My Big Mistake?
When the Coastal Brown Bear in the image above sat down right in front of me facing forward on the edge of the stream bank I was tremendously excited. I visualized the image that I wanted to create in an instant. I was sure that I had it right. When I saw the image on my laptop, I was dismayed. What big mistake had I made?
The image was created at Geographic Harbor, Katmai National Park on the recently concluded Bear Boat Instructional Photo-Cruise. I used central sensor/rear focus with the buttons switched AF. The image above is a JPEG that represents the original capture. When you leave a comment, please take a moment to read what you wrote and to correct any obvious errors. Doing so makes visiting the blog a more pleasing experience for all involved. Thanks.
Another Follow-up
In Editing Practice II: Swallow-tailed Gull, I presented two images and asked, “Which of these images is best, Image 1 or Image 2? Be sure to let us know why.” When I do these Editing Practice posts I need to remember to point out that the images presented are created from the extracted JPEGs and thus represent the full frame original capture. Needed crops will be executed during the image optimization process. Your job is simply to select the best file. And to let us know why you chose it.
Most everyone correctly chose image #2 as best. Doug commented that he liked #1 best because #2 was too perfect. I suggested counseling 🙂 The optimized version of #2 is above. Thanks all for commenting and for doing such a good job!
Shopper’s Guide
Below is a list of he gear used to make the three mages in this post. Thanks a stack to all who have used the Shopper’s Guide links to purchase their gear as a thank you for all the free information that we bring you on the Blog and in the Bulletins. Before you purchase anything be sure to check out the advice in our Shopper’s Guide.
Support both the Bulletins and the Blog by making all your B & H purchases here.
Remember: you can earn free contest entries with your B & H purchases. Eleven great categories, 34 winning and honored images, and prize pools valued in excess of $20,000. Click here for details.
Canon 800mm f/5.L IS lens. Right now this is my all time favorite super-telephoto lens.
Canon 70-200mm f/2.8L IS II lens. Man, I am loving this lens on my shoulder with the 2X III teleconverter. I also use it a lot with the 1.4X III TC which is designed to work best with the new Series II super-telephoto lenses.
Canon EOS-1D Mark IV professional digital camera body. My two Mark IVs are my workhorse digital camera bodies.
And from the BAA On-line Store:
LensCoats. I have a LensCoat on each of my big lenses to protect them from nicks and thus increase their re-sale value. All my big lens LensCoat stuff is in Hardwood Snow pattern.
LegCoat Tripod Leg Covers. I have four tripods active and each has a Hardwood Snow LegCoat on it to help prevent further damage to my tender shoulders 🙂
Gitzo GT3530LS Tripod. This one will last you a lifetime.
Mongoose M3.6 Tripod Head. Right now this is the best tripod head around for use with lenses that weigh less than 9 pounds. For heavier lenses, check out the Wimberley V2 head.
CR-80 Replacement Foot for Canon 800. When using the 800 on a Mongoose as I do, replacing the lens foot with this accessory lets the lens sit like a dog whether pointed up or down and prevents wind-blown spinning of your lens on breezy days by centering the lens directly over the tripod.
Double Bubble Level. You will find one in my camera’s hot shoe whenever I am not using flash.
Be sure to check out our camera body User’s Guides here.
The Lens Align Mark II. I use the Lens Align Mark II pretty much religiously to micro-adjust all of my gear an average of once a month and always before a major trip. Enjoy our free comprehensive tutorial here.
BIRDS AS ART Camera Body User’s Guides. Why spend $2-5 grand on a camera and not learn to use it properly and efficiently?
August 19th, 2011
| [Not a valid template] |
|
I created the images for this Photomatix HDR creation with the tripod-mounted Canon 800mm f/5.6L IS lens and the EOS-1D Mark IV. ISO 100. The base exposure was Evaluative Metering +2/3 stop: 2.5 seconds at f/8. Four additional frames were created as follows using the Mark IV’s Auto Exposure Bracketing feature: +/- one-full stop (around the base exposure). Note: the longest exposure was 20 seconds at f/8.
|
Long Lens/Long Exposure Lesson Learned
For years I have never been able to make a sharp image with a long lens and extremely long shutter speeds (in the range of one-half second or slower) even when using mirror lock-up and the camera’s self timer. I was always puzzled by that as I have seen some great fill flash images of owls created with big glass and shutter speeds of from one to two seconds. When I mentioned that to Scott Vincent on the Weekhawken, NJ “New York City Skyline” workshop that he co-led with Denise Ippolito last Saturday night he immediately shot back” Turn of Image Stabilization and you will make razor sharp images.” So I did. And I did. I was astounded at the sharpness of the resulting images. Thanks Scott! (Note that the longest exposure was 20 seconds at f/8!) It seems that the IS does in fact shift the lens elements during long exposures and cause big problems. I will however continue to leave Image Stabilization on when working on a tripod for nearly all other applications including normal bird photography and situations where the danger of mirror slap is likely, that is, with shutter speeds of from 1/15 to 1/2 second. But heck, I will experiment even there.
The image above (Enhancer Default HDR) was the favorite of most of those who responded to the last post. Except for Mary Stamper who is always on the same page as me (and Adam Felde as well). The HDR Grunge was also my favorite 🙂
Follow-ups
| [Not a valid template] |
|
This pleasingly blurred image of a Coastal Brown Bear lunging forward to jump on a salmon was the unanimous choice of those who left comments. It was created with the Canon 70-200mm f/2.8L IS II lens with the the 1.4X III TC (handheld at 280mm) and the Canon EOS-1D Mark IV. ISO 50. Evaluative metering +1/3 stop: 1/15 sec. at f/11 in Tv mode.
Lens/TC/Camera Body Micro-Adjustment: -8. This was a big change from the previous +2 after my Mark IV was serviced by Canon.
|
In the Bear Blurs and More post, I liked them all but agree fully that the second bear image(above) was the strongest. I like the first image for its rule of thirds composition and the effect of the blur on the grasses. I was pretty much alone there 🙂 I’ll take the fireweed blur over the moving water blur but like that one too. That leaves the walking bear as my least favorite and agree that it looks a bit strange with the head so sharp…. Thanks all for commenting.
BTW, though this is a public forum and all are invited to comment there is no freedom of speech here. It is my blog and though I am a lover of what is and am fine with folks not liking an image and with occasional criticism (see the no “What no JPEGs in the contest?” comments here), I do have my limits. Comments from unhappy campers that over-step the bounds of civility will be deleted. I do realize that there are some folks out there who love taking shots at Mr. Famous Bird Photographer and I have been fairly tolerant of comments made in that vein. I look forward to your continued participation here.
In Editing Practice I: Nazca Boobies my somewhat surprising favorite was the image above, “Hey Honey.” I felt that the less than ideal head angle of the bird in the front was more than offset by the obvious connection between the two birds. I did in fact keep all three of the images plus about a dozen more from that encounter. Everyone backed up their choice with sound reasoning. The consensus of the group pretty much agreed with my choice of “Hey Honey” as best. For the first time Cheapo and I were on the very same page. 🙂 Lastly, several folks commented that they did not like “Over the Top” because the bird in the background was out of focus. I am fine with that. Do note, however that front subject sharp/rear subject o-o-f is a technique that I use often when creating images that feature pleasing juxtapositions.
Shopper’s Guide
Below is a list of he gear used to make the three mages in this post. Thanks a stack to all who have used the Shopper’s Guide links to purchase their gear as a thank you for all the free information that we bring you on the Blog and in the Bulletins. Before you purchase anything be sure to check out the advice in our Shopper’s Guide.
Support both the Bulletins and the Blog by making all your B & H purchases here.
Remember: you can earn free contest entries with your B & H purchases. Eleven great categories, 34 winning and honored images, and prize pools valued in excess of $20,000. Click here for details.
Canon 800mm f/5.L IS lens. Right now this is my all time favorite super-telephoto lens.
Canon 70-200mm f/2.8L IS II lens. Man, I am loving this lens on my shoulder with the 2X III teleconverter. I also use it a lot with the 1.4X III TC which is designed to work best with the new Series II super-telephoto lenses.
Canon EOS-1D Mark IV professional digital camera body. My two Mark IVs are my workhorse digital camera bodies.
And from the BAA On-line Store:
LensCoats. I have a LensCoat on each of my big lenses to protect them from nicks and thus increase their re-sale value. All my big lens LensCoat stuff is in Hardwood Snow pattern.
LegCoat Tripod Leg Covers. I have four tripods active and each has a Hardwood Snow LegCoat on it to help prevent further damage to my tender shoulders 🙂
Gitzo GT3530LS Tripod. This one will last you a lifetime.
Mongoose M3.6 Tripod Head. Right now this is the best tripod head around for use with lenses that weigh less than 9 pounds. For heavier lenses, check out the Wimberley V2 head.
CR-80 Replacement Foot for Canon 800. When using the 800 on a Mongoose as I do, replacing the lens foot with this accessory lets the lens sit like a dog whether pointed up or down and prevents wind-blown spinning of your lens on breezy days by centering the lens directly over the tripod.
Double Bubble Level. You will find one in my camera’s hot shoe whenever I am not using flash.
Be sure to check out our camera body User’s Guides here.
The Lens Align Mark II. I use the Lens Align Mark II pretty much religiously to micro-adjust all of my gear an average of once a month and always before a major trip. Enjoy our free comprehensive tutorial here.
A Guide to Pleasing Blurs. Everything that you wanted to know about creating pleasing blurs and more!
BIRDS AS ART Camera Body User’s Guides. Why spend $2-5 grand on a camera and not learn to use it properly and efficiently?
August 17th, 2011
Birds as Buildings? Buildings as Art? HDR Possibilities
On Saturday evening past I had the pleasure of joining Denise Ippolito and Scott Vincent on their Weehawken, NJ “NYC Skyline Creative Photography Workshop”. I had a ball, learned a ton, and made some great images. And so did everyone else. Check out Denise’s images from the workshop here and Scott’s here. With my super-telephoto way of seeing I could not resist breaking out the 800 while most folks were working with wide angle and short zoom lenses. For the tech specs on the five AEB images used to create the HDR stuff below and the two image that comprise the animated GIF above be sure to check out the follow-up blog post coming soon. Scott opened my eyes to a huge mistake that I had been making when using the 800 at very slow shutter speeds for years; I will also share that revelation with you in the next blog post.
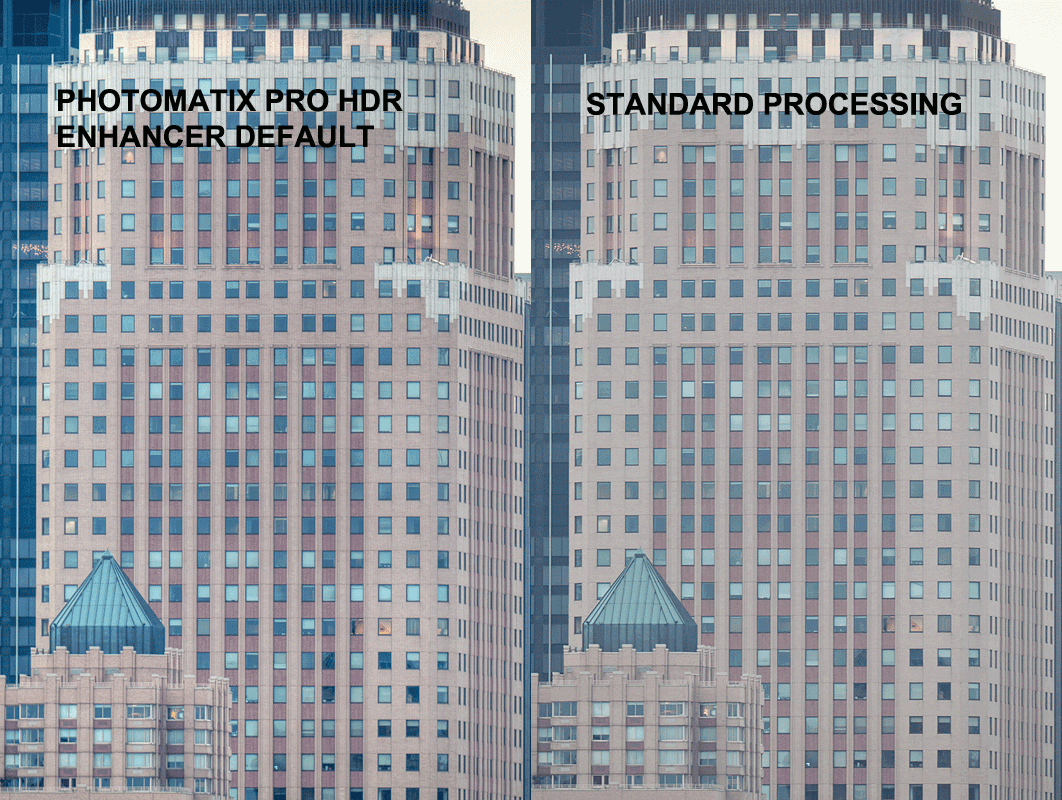
Give the opening animated GIF a few seconds to run and compare the flat, pretty boring image that I created from a single frame (i.e., business as usual) with the vibrant, pleasingly contrasty, high dynamic range image that was created from the five AEB captures. The HDR image is a no-brainer winner. It was created by processing the image in Photomatix Pro 4.1.1 with the Enhancer Default Preset. Enhancer Preset will give you a pretty much straight HDR image. (I will be sharing lots of HDR stuff with you here and in coming Bulletins.
Denise and I are currently working on an HDR Grunge guide and hope to have it available in about two weeks. In the meantime if you would like purchase Photomatix and save 15% click here and be sure to enter birdsasart as the coupon code. You can download and use a trial copy of Photomatix before you buy. (It is fully operational; the processed images will have a visible watermark on them.)
| [Not a valid template] |
|
I created the bracketed AEB images with the tripod-mounted Canon 800mm f/5.6L IS lens and the EOS-1D Mark IV. Exposure details will be revealed in the next blog post. Be sure to stay tuned 🙂
|
The image above was created with the Comrpressor Default preset in Photomatix Pro 4.1.1 (with a few tweaks).
| [Not a valid template] |
|
I created the bracketed AEB images with the tripod-mounted Canon 800mm f/5.6L IS lens and the EOS-1D Mark IV. Exposure details will be revealed in the next blog post. Be sure to stay tuned 🙂
|
And the final HDR image was created with the HDR Grunge fault in Photomatix Pro 4.1.1 (with a few tweaks).
Which One Do You Like Best?
Please take a moment to leave a comment and let us know which of the four images above you like best and why. If you hate all HDR images and/or you hate all images of buildings there is no need to chime in here 🙂
Shopper’s Guide
Below is a list of he gear used to make the three mages in this post. Thanks a stack to all who have used the Shopper’s Guide links to purchase their gear as a thank you for all the free information that we bring you on the Blog and in the Bulletins. Before you purchase anything be sure to check out the advice in our Shopper’s Guide.
Support both the Bulletins and the Blog by making all your B & H purchases here.
Remember: you can earn free contest entries with your B & H purchases. Eleven great categories, 34 winning and honored images, and prize pools valued in excess of $20,000. Click here for details.
Canon 800mm f/5.L IS lens. Right now this is my all time favorite super-telephoto lens.
Canon EOS-1D Mark IV professional digital camera body. My two Mark IVs are my workhorse digital camera bodies.
And from the BAA On-line Store:
LensCoats. I have a LensCoat on each of my big lenses to protect them from nicks and thus increase their re-sale value. All my big lens LensCoat stuff is in Hardwood Snow pattern.
LegCoat Tripod Leg Covers. I have four tripods active and each has a Hardwood Snow LegCoat on it to help prevent further damage to my tender shoulders 🙂
Gitzo GT3530LS Tripod. This one will last you a lifetime.
Mongoose M3.6 Tripod Head. Right now this is the best tripod head around for use with lenses that weigh less than 9 pounds. For heavier lenses, check out the Wimberley V2 head.
CR-80 Replacement Foot for Canon 800. When using the 800 on a Mongoose as I do, replacing the lens foot with this accessory lets the lens sit like a dog whether pointed up or down and prevents wind-blown spinning of your lens on breezy days by centering the lens directly over the tripod.
Double Bubble Level. You will find one in my camera’s hot shoe whenever I am not using flash.
Be sure to check out our camera body User’s Guides here.
The Lens Align Mark II. I use the Lens Align Mark II pretty much religiously to micro-adjust all of my gear an average of once a month and always before a major trip. Enjoy our free comprehensive tutorial here.
A Guide to Pleasing Blurs. Everything that you wanted to know about creating pleasing blurs and more!
BIRDS AS ART Camera Body User’s Guides. Why spend $2-5 grand on a camera and not learn to use it?
|