
Want Spoonbills?
We still have room for one more photographer on James Shadle’s customized pontoon boat, the Hooptie Deux on the mornings of March 8-10, Friday through Sunday. If you would like to explore the possibility of joining us for a morning on the Hooptie Deux please e-mail me asap.

|
|
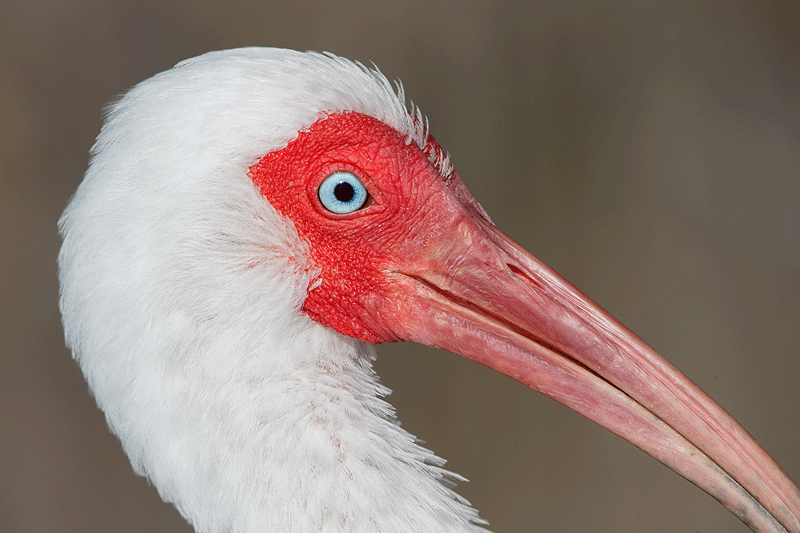
This tight face portrait of a pretty spiffy looking White Ibis was created on the first morning of the Fort DeSoto/Hooptie Deux/Roseate Spoonbill Short Notice IPT with the tripod-mounted Canon 500mm f/4L EF IS II lens, the Canon 2x EF Extender III (Teleconverter), and the Canon EOS-1D X. ISO 400. Evaluative metering at zero: 1/800 sec. at f/11 in Manual mode confirmed in via histogram check. This was 1/3 stop lighter than my standard bright white/ISO 400 exposure in full sun of 1/2000 sec. at f/8. Why? We had a very faint haze over the sun. Central sensor (by necessity)/AI Servo Expand/Rear Focus AF on the eye and recompose. Click here if you missed the Rear Focus Tutorial. Click on the image for a larger version. The 500 makes a great super-telephoto when you are working with relatively tame birds and wish to go light. |
Impossible Conditions?
Forty-eight degrees. Twenty-five mile per hour northwest winds. These were the pretty much impossible conditions that we faced at Fort Desoto on the first morning of the Fort DeSoto/Hooptie Deux/Roseate Spoonbill Short Notice IPT. At 7am we were blessed with some cloud cover but things did not look good. By 8am it was clear as a bell and with wind against sun conditions things were looking pretty dismal. We had photographed three sorry looking Laughing Gulls hunkered down on the edge of the Gulf surf while it was still cloudy and then did some Royal Terns and a hauled out Double-created Cormorant. I had suggested trying the only spot where the birds could find shelter from the wind. There was a fairly big group of White Ibis there right along the shoreline but even then things seemed impossible as they were tight against the mangroves and the backgrounds were horrific. The light was still nice and there was one hope.
I did not think that we had a chance to get five folks really close but the previously stifling wind became our ally; within a few minutes and after some careful coaching we have everyone tight to the birds and on sun angle. We needed to choose our perspectives carefully. I talked the group through the exposure and we had nearly an hour of great opportunities. Two of my favorites are featured in this blog post. A third will have a starring role star in the next BAA On-line Bulletin.
A surprisingly high 80% opacity layer of NIK Color Efex Pro’s Detail Extractor really brought out the detail in the whites. See more on that in the animated GIF below. In this image I also reduced the blue saturation in the whites with a Hue/Saturation adjustment (Control U) on the white layer. All as detailed in our Digital Basics file. Digital Basics includes my complete digital workflow, dozens of great Photoshop tips, Layer Masking for Dummies, Eye Doctor work, NIK Color Efex Pro basics, all of my Keyboard Shortcuts, and tons more. This PDF, sent via e-mail, will be the best $25 you’ll ever spent on your photography.

|
|
This White Ibis image was also created on the first morning of the Fort DeSoto/Hooptie Deux/Roseate Spoonbill Short Notice IPT with the tripod-mounted Canon 500mm f/4L EF IS II lens, the Canon 2x EF Extender III (Teleconverter), and the Canon EOS-1D X. ISO 400. Evaluative metering +1/3 stop as framed: 1/2000 sec. at f/8 in Manual mode. Note: this is my standard bright white/ISO 400 exposure in full sun. Central sensor (by necessity)/AI Servo Expand/Rear Focus AF on the eye and recompose. Click here if you missed the Rear Focus Tutorial. Click on the image for a larger version. Knowing that we would be working with relatively tame subjects and wanting to travel light I grabbed the 500II and left the 600II in the trunk of my vehicle. |
Neat Juxtaposition
While I was able to come up with a completely clean background in the opening image I originally saw the background bird here as a big problem. But by carefully choosing my perspective I was able to change a negative into a positive. In the first few frames the legs of the back bird merged with the breast of the front bird so I took a small step to my left to clean that up. I started working at f/16 but realized that by working wide open at f/8 the legs of the second bird would be more pleasingly blurred.
| [Not a valid template] |
The Lesson?
When things look bleak and making a good image seems an impossibility, put your thinking cap on and don’t give up. On IPTs we actually teach you how to consider the conditions and figure out the best option, just as I did yesterday morning.
Your Favorite?
Take a moment and leave a comment letting us know which of these two images you liked best. And why you prefer the one that you do.
|
Animated GIF
As the animated GIF plays note the increased detail in the white feathers, the punched up look of the face and bill, and the subtle but effective clean-up of the lores. As above, I used an 80% layer of Detail Extractor on the whites and a 15% layer of Tonal Contrast on the bill and face. Bill clean-up with the Patch Tool, Content Aware Fill–I have been using that more and more recently, and the Spot Healing Brush.
All of the above is detailed in our Digital Basics file. Digital Basics includes my complete digital workflow, dozens of great Photoshop tips, Layer Masking for Dummies, Eye Doctor work, NIK Color Efex Pro basics, all of my Keyboard Shortcuts, and tons more. This PDF, sent via e-mail, will be the best $25 you’ll ever spent on your photography.
| [Not a valid template] |
NIK 15% Discount
As regular readers know, Color Efex Pro has drastically changed my digital workflow and little by little I have begun using Viveza to solve more than a few sticky image optimization problems and Silver Efex Pro for fast, dramatic B&W conversions. You can save 15% on all NIK products (including Color Efex Pro, Silver Efex Pro, and Viveza) by clicking here and entering BAA in the Promo Code box at check-out. Then hit Apply to see your savings. You can download a trial copy that will work for 15 days and allow you to create full sized images.
Africa Photo Safari/Tanzania: August 2013
Serengeti Summer Migration Safari: 12 full and two half-days of photography: $12,999/person double occupancy. Limit: 12/Openings: 7.
Leaders: Todd Gustafson and Arthur Morris.
Leave the US AUG 3, 2013. Fly home from Arusha, Tanzania on the evening of August 18. Day 1 of the safari is August 5. Our last morning of photography is August 18. We will be visiting Tarangire National Park, Seronera Lodge–aka Leopard City!–twice, an exclusive mobile tented camp in the Serengeti, and at the end, the spectacular wildlife spectacle that is Ngorongoro Crater.
A deposit of $4,000 is due immediately. With four signed up, this trip is a go. Happy Campers only please.
Once we cash your check you will be strongly advised to purchase travel insurance. While we all assume that we will be fine, health and family emergencies do arrive unexpectedly. You may wish to consider using Travel Insurance Services. Do understand that most policies must be purchased within two weeks of our cashing your deposit check.
Payment in full is due no later than 15 April, 2013. Sign up with a friend or a spouse and apply a $300 per person discount.
This trip is a go. Guaranteed maximum no more than 12 photographers plus the three great leaders. 3 persons/van. You get a row of seats for yourself and your gear. In addition to rotating in-the-field instruction with each of the co-leaders, artie, Todd, and denise will be available for image sharing and review and informal Photoshop instruction during breaks and after meals. And–with apologies to Miss Manners–even during meals!
The lodging is all first class. Please e-mail
for a PDF with additional details, the complete itinerary, and a description of the unparalleled photographic opportunities that we will enjoy. Please e-mail or call me on my cell at 1-863-221-2372 with any questions. I hope that you can join us.
Bear Boat/Bears Catching Salmon IPT: September 2-9, 2013 from Kodiak, AK: $6699. Happy campers only! Maximum 6 + two leaders: Arthur Morris and Denise Ippolito. Openings: 1.
It is mandatory that you be in Kodiak no later than the late afternoon of September 1 to avoid missing the float plane(s) to the boat on the morning of September 2. With air travel in AK being what it is, with the chance of fog or other bad weather–being on Kodiak on August 31 is an even better plan). I will take the group out to dinner in Kodiak on the evening of September 1. Denise and I will plan on being on Kodiak on August 31 to avoid any potential disaster. We will take one or more float planes to the boat mid-morning on September 2. We will photograph bears that afternoon and every day for the next six days (weather permitting of course). We should have bears catching salmon every day. In addition, we will get some nice stuff on Mew Gull and Glaucous-winged Gulls dining on roe and the remains of predated salmon. we may–depending on where the concentrations of bears are–get to photograph Harbor seals and some hauled out Steller’s Sea Lions (an endangered species). Halibut fishing (license required) is optional. On September 9, our last morning on the boat, we will photograph in the early morning and then return to Kodiak via float plane. The eight days will consist of six full days (Sept 3, 4, 5, 6, 7, & 8) of photography featuring lots of Coastal Brown Bears catching salmon as above plus a variety of other natural history subjects plus some nice scenic photography that I forgot to mention above. Plus the first afternoon and the last morning.
What’s included? 8 DAYS/7 NIGHTS on the boat as above. All meals on the boat. (The food is quite excellent.) National Park fees. One night’s double occupancy lodging on Kodiak; arrive: Sept 1/depart: Sept 2. The thank-you-in-advance dinner on Sept 1. In-the-field photo tips, instruction, and guidance. An insight into the minds of two top professionals; we will constantly let you know what we are thinking, what we are doing, and why we are doing it. Small group image review, image sharing, and Photoshop instruction on the boat. Denise’s creativity will amaze you.
What’s not included: Your round trip airfare to and from Kodiak, AK (almost surely through Anchorage). All necessary lodging other than the cost of your double occupancy room on the night of August 31 should you opt to arrive early–we can arrange that in advance for you. We will let you know the cost of a single supplement if so desired. The cost of the round-trip float plane to the boat on September 2 and back to Kodiak on September 9. The cost of a round trip this year was $500. The suggested crew tip of $210.
Is this an expensive trip? Yes, of course. But with 6 full and two half days, a wealth of great subjects, and the fact that you will be walking with the bears it will be one of the great experiences of your life. (See the comments below.) Most folks who take part in a Bear Boat IPT wind up coming back for more. A $2,000 per person non-refundable deposit by check only made out to “Arthur Morris” is required to hold your spot. Please click here and then scroll down and read our cancellation policies. Then please print, read, and sign the necessary paperwork here and send it to us with your deposit check. Deposit due immediately. That leaves a balance of $4499. The first payment of $2499 is due January 15, 2013. The final payment of $2000 is due on April 15, 2013. This trip is a go. Note: most similar but cheaper trips are only 7 DAYS/6 NIGHTS. Please e-mail for photos.
Typos
On all blog posts, feel free to e-mail or leave a comment regarding any typos, wrong words, misspellings, omissions, or grammatical errors. Just be right. 🙂
Support the BAA Blog. Support the BAA Bulletins: Shop B&H here!
We want and need to keep providing you with the latest free information, photography and Photoshop lessons, and all manner of related information. Show your appreciation by making your purchases immediately after clicking on any of our B&H or Amazon Affiliate links in this blog post. Remember, B&H ain’t just photography!
Support the BAA Blog. Support the BAA Bulletins: Shop Amazon here!
And from the BAA On-line Store:
LensCoats. I have a LensCoat on each of my big lenses to protect them from nicks and thus increase their re-sales value. All my big lens LensCoat stuff is in Hardwood Snow pattern.
LegCoat Tripod Leg Covers. I have four tripods active and each has a Hardwood Snow LegCoat on it to help prevent further damage to my tender shoulders :) And you will love them in mega-cold weather....
Gitzo GT3532 LS CF Tripod. This one replaces the GT3530LS Tripod and will last you a lifetime. Learn more about this great tripod here.
Mongoose M3.6 Tripod Head. Right now this is the best tripod head around for use with lenses that weigh less than 9 pounds. For heavier lenses, check out the Wimberley V2 head.
Double Bubble Level. You will find one in my camera's hot shoe whenever I am not using flash.
The Lens Align Mark II. I use the Lens Align Mark II pretty much religiously to micro-adjust all of my gear an average of once a month and always before a major trip. Enjoy our free comprehensive tutorial here.
BreezeBrowser. I do not see how any digital photographer can exist without this program.
Delkin Flash Cards. I use and depend on Delkin compact Flash Cards and card readers most every day. Learn more about their great 700X and 1000X cards here or about my favorite Delkin card here.


Another stunning closeup! I really love the first one. The clarity of the eyes is just amazing…like the Stork.
It is amazing what Nik Color Efex can do. The amount of detail it recovers out of those whites is incredible.
My favorite is the 1st one. I really like the clean portrait with that striking blue eye surrounded by the crisp details of the red face/bill and white head/neck feathers. Doesn’t get much better than this for portraits! I really appreciate the animated GIF image & explanation.
The second one, head with BG legs is my favorite. As soon as I saw it I liked the way it brought in almost all parts of the bird. Didn’t you really move slightly to the LEFT though?
Thanks, and yes, a step to my left. Good catch. Got up to early….