

|
|
This Brown Pelican image was also created on the Hooptie Deux with the tripod-mounted Canon EF 600mm f/4L IS II USM lens and the Canon EOS-1D X Digital SLR camera. ISO 800. Evaluative metering +2 2/3 stops off the white sky: 1/1250 sec. at f/4 in Manual mode. I simply opened up 1/3 stop from the exposure that I was using at the time for the spoonbills. It is not uncommon to see a pelican landing at the nests with its bill pouch distended as seen in this image. I am unsure as to why they do that. I have never seen this behavior away from a breeding colony. Central sensor/AI Servo Surround/Rear Focus AF active at the moment of exposure. Click here if you missed the Rear Focus Tutorial. Click on the image to see a larger version. |
Image Optimization Revelations
In the March 12, 2013 blog post, How are Your Eagle Eyes?, I asked that folks let us know if they saw any evidence of Photoshop work, extensive or otherwise. As you can see by looking at the JPEG that represents the original capture below, the optimized image above is pretty much as it came out of the camera but for the crop and a bit of Levels, Contrast, and Color work. I did use NIK Color Efex Pro’s Detail Extractor to bring up the density on the pelican’s crown.

|
|
The unsharpened JPEG here represents the original RAW capture after being converted in DPP. |
The Mangroves in the Corner
Note that the mangroves in the lower right corner were not, as some folks surmised, messed with in any way.

|
|
This Roseate Spoonbill flight image was created on the Hooptie Deux with the tripod-mounted Canon EF 600mm f/4L IS II USM lens and the Canon EOS-1D X Digital SLR camera. ISO 800. Evaluative metering +2 1/3 stops off the white sky: 1/2000 sec. at f/4 in Manual mode. Exposure previously confirmed via histogram check. Central sensor/AI Servo Surround/Rear Focus AF active at the moment of exposure. Click here if you missed the Rear Focus Tutorial. Click on the image to see a larger version. |
The Spoonbill Image
There was, on the other hand, extensive work done on the original capture here. The optimized image that appeared in the original post is above. See more below.

|
|
The unsharpened, uncropped JPEG here represents is the original capture after being converted in DPP. |
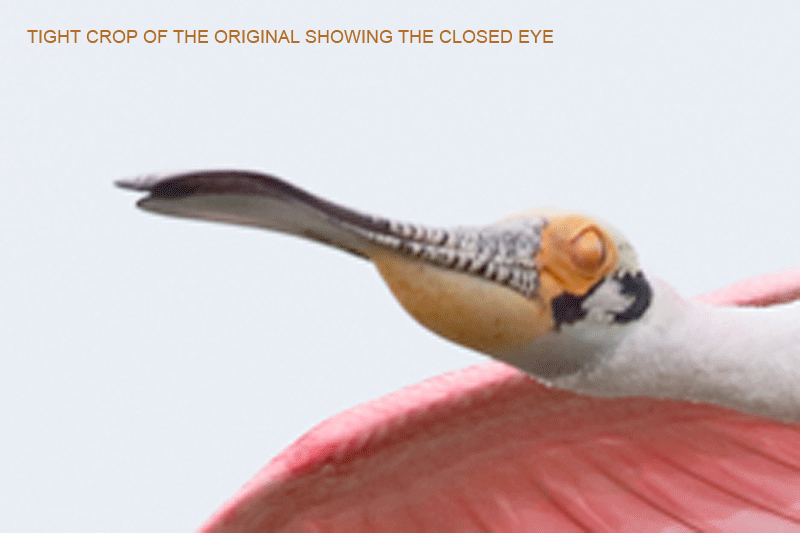
The Closed Eye
It is obvious here that the spoonbill’s eye was closed. This happens often with the best flight pose in a sequence.
|
The Solution
I painted a Quick Mask of the sharp eye and the base of the bill from the next frame in the sequence(see same below), used the Move Tool (V) to bring it into the original image, reduced the Opacity of the layer, and carefully position and transformed the eye using the Transform and Warp commands. The “good” eye had the pupil well back so I did some Eye Doctor work, first with the Clone Stamp Tool and then with a Quick Mask, to center it.

|
|
This is the next frame in the sequence. The cropped, sharpened JPEG above represents the the RAW capture after being converted in DPP. If you click on the image to see the larger version, you will note that though the eye is open the lid is partially closed and thus the pupil is centered in the back of the eye. Thus the need for the Eye Doctor work described above. |
Digital Basics, APTATS I, AND APTATS II
Digital Basics details Eye Doctor techniques, my complete Digital Workflow, all of my keyboard shortcuts, and dozens of great Photoshop tips. APTATS I covers advanced Quick Masking and APTATS II was responsible for me finally understanding how to use both Regular and Hide-all Layer Masks.
| [Not a valid template] |
NIK 15% Discount
NIK Color Efex Pro was used on each of the optimized images above. As regular readers know, it has drastically changed my digital workflow and little by little I have begun using Viveza to solve more than a few sticky image optimization problems and Silver Efex Pro for fast, dramatic B&W conversions. You can save 15% on all NIK products (including Color Efex Pro, Silver Efex Pro, and Viveza) by clicking here and entering BAA in the Promo Code box at check-out. Then hit Apply to see your savings. You can download a trial copy that will work for 15 days and allow you to create full sized images.
The Gull Wingstretch Image
The third image in the March 12, 2013 blog post, How are Your Eagle Eyes?, underwent the most radical post-processing of the three. The work done there along with a very important hand holding lesson will be featured in a blog post soon.
BAA Bulletin #434
BAA Bulletin #434 is on-line now. It can be accessed here.
- Fort Desoto/Hooptie Deux Short Notice IPT Report
- Announcing the Fort Desoto/Hooptie Deux–Roseate Spoonbill Short Notice IPT/April 3-7, 2013
- TPPA Convention Keynote
- Swan Island Dahlia Farm Instructional Photo-Tour
- Used Camera Gear Including Some New Items
- Posse News: Robert Amoruso
- Posse News: Jim Neiger
- IPT Info
Seriously Huge B&H Savings on Nikon and Canon Gear
Nikon
For the first time in many years NIKON is going to be deeply discounting many legacy pro lenses individually for the next 2 weeks only with discounts up to $350. There are also many amazing deals on NIKON Buy together and Save packages as well. Click here to save.
Nikon DSLRS Bundles with Lenses & Flash: Save up to $750. Click here to save. Make sure to add each item to your shopping cart to see the absolute lowest price.
Canon Lenses & Speedlites: Save Up to $300
Click here to save. Make sure to add each item to your shopping cart to see the absolute lowest price.
Canon Buy Together & Save: Save Up to $400
Click here to save.
Typos
On all blog posts, feel free to e-mail or leave a comment regarding any typos, wrong words, misspellings, omissions, or grammatical errors. Just be right. 🙂
Support the BAA Blog. Support the BAA Bulletins: Shop B&H here!
We want and need to keep providing you with the latest free information, photography and Photoshop lessons, and all manner of related information. Show your appreciation by making your purchases immediately after clicking on any of our B&H or Amazon Affiliate links in this blog post. Remember, B&H ain’t just photography!
Support the BAA Blog. Support the BAA Bulletins: Shop Amazon here!
And from the BAA On-line Store:
LensCoats. I have a LensCoat on each of my big lenses to protect them from nicks and thus increase their re-sales value. All my big lens LensCoat stuff is in Hardwood Snow pattern.
LegCoat Tripod Leg Covers. I have four tripods active and each has a Hardwood Snow LegCoat on it to help prevent further damage to my tender shoulders :) And you will love them in mega-cold weather....
Gitzo GT3532 LS CF Tripod. This one replaces the GT3530LS Tripod and will last you a lifetime. Learn more about this great tripod here.
Mongoose M3.6 Tripod Head. Right now this is the best tripod head around for use with lenses that weigh less than 9 pounds. For heavier lenses, check out the Wimberley V2 head.
Double Bubble Level. You will find one in my camera's hot shoe whenever I am not using flash.
The Lens Align Mark II. I use the Lens Align Mark II pretty much religiously to micro-adjust all of my gear an average of once a month and always before a major trip. Enjoy our free comprehensive tutorial here.
BreezeBrowser. I do not see how any digital photographer can exist without this program.
Delkin Flash Cards. I use and depend on Delkin compact Flash Cards and card readers most every day. Learn more about their great 700X and 1000X cards here or about my favorite Delkin card here.


Wow! What an absolute eye opener as far as what constitutes a critically sharp bird in flight image at 100%! All this time I have been throwing out similar sharpness images because they looked slightly blurred or oof at 100% viewing. I guess I was thinking if ever I need to print at the full res they would need to be much sharper, but now I know better! Thank-you so much!
-Jeff
Good pun on the “eye opener” comment! And thanks. artie
I agree with Charlie, your current “test & reveal” method of teaching is great, and covers all of the necessary breadth for digital photography. I’m learning a lot, and definitely learning a new way to think about how I shoot in the field. I love the work on the Spoonbill’s eye.
It seems like the lesson here is to keep a few different frames from the same action, just in case some body parts need to be replaced!
Thanks for moving into yet a new way of teaching Arthur. You are actually asking people to think instead of just enjoying the final image. The before and after images demonstrate what to expect from an unprocessed RAW file compared with post-processing, even with only slight work. No matter the cost or brand of gear, shooting on automatic and expecting a fine art image without any work just is not going to happen. Developing the “photographer’s eye” and “seeing” are no longer restricted to primarily composition and light and include the computer monitor as well in the digital age. Thanks again for thinking out of the box as usual.
Hey Charlie, Your comments are spot on. Good to see you here. artie