
Fort Desoto/Hooptie Deux–Roseate Spoonbill Short Notice IPT
The 2nd New Concept IPT: the Fort Desoto/Hooptie Deux–Roseate Spoonbill Short Notice IPT/April 3-7, 2013/5 DAYS: $2399. Strict limit: six photographers/ openings 5. Early April can be superb at Alafia Banks. Early April is almost always superb at Fort DeSoto. Click here for complete details.
With only a single registrant, this one is shaping up to be a practically private affair and represents an amazing opportunity for you to grow as a photographer.

|
|
This seemingly well-over-exposed image of a Great Blue Heron carrying nesting material was created at Alafia Banks on the recently concluded Fort Desoto/Hooptie Deux IPT with the tripod-mounted Canon EF 600mm f/4L IS II USM lens, the Canon 2x EF Extender III (Teleconverter), and the Canon EOS-1D X. ISO 3200. Evaluative metering +3+ stops: 1/200 sec. at f/8 in Manual mode. Central sensor (by necessity)/AI Servo Expand/Rear Focus AF active at the moment of exposure. Cick here if you missed the Rear Focus Tutorial. Click on the image for a larger version. |
Go Figure…
Sometimes, everything is wrong. I had been photographing some baby Double-crested Cormorants in the nest when I saw a Great Blue Heron flying in carrying nesting material. Not thinking too clearly, I raised the ISO to 3200, focused, and fired off a single frame. As I was in Manual mode this would not of course have given me any additional shutter speed. As I said, I was not thinking clearly.
Once you saw the image above on the back of the camera and note that the shutter speed was only 1/200 sec. would you have deleted it?
Here are some commonly accepted “truths:”
1-Flight photography with an f/4 super-telephoto and a 2X TC is impossible; this combo does not focus fast enough for flight photography.
2-At the very least, you need a shutter speed of at least 1/500 sec. to create a sharp flight image. Heck, when folks ask me what my minimum shutter speed for flight photography is, I always answer “1/500 sec.”
3-If the entire sky is flashing over-exposed–see the screen capture below, you will not be able to salvage the image. Heck, I have been preaching for years that you need to avoid having the entire sky flashing as well over-exposed…. (See the BreezeBrowser screen capture immediately below.)
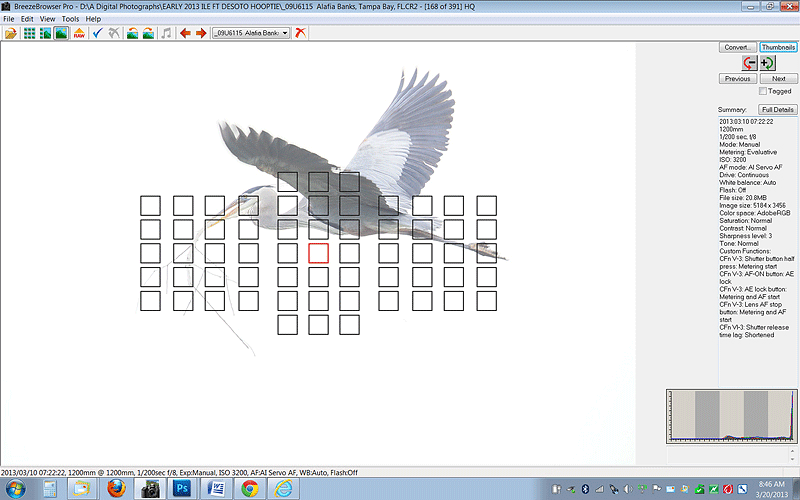
|
BreezeBrowser Main View Screen Capture
Above is an animated GIF that represents the BreezeBrowser Main View screen capture for the image. Note the flashing highlights. The illuminated red square shows that the central sensor was not even on the bird at the moment of exposure. That’s why we recommend AF Expand whenever you are using the 2X III TC. By choosing Expand as my AF Area Selection Mode four of the surrounding sensors are active. Here, the sensor just above the central sensor obviously saved the day. In Breezebrowser you need to make sure to check “Show Focus Points” under View to activate this feature. To see the focus points in DPP check “AF Point” under View or hit Alt L. Hit Alt M to see Highlight Alert.
Regular readers know that I use and depend on BreezeBrowser every day of the year. It allows me to sort my keepers and deletes the rejects faster than any other browsing program. We use it on the main computer in the home office to catalog our images file-drawer style. And the companion program, Downloader Pro allows me to download my images quickly and conveniently. It automatically adds my IPTC data and the shooting location. I have it set up to create a folder named by the Month/date/year. The Breezebrowser/Downloader Pro combo saves me many hours each week. To learn earn more or to purchase this great PC only program, click here.
To learn everything that I know about the great 1D X AF system check out our 1D X AF Guide here.

|
|
This is the optimized image. It was created at Alafia Banks on the recently concluded Fort Desoto/Hooptie Deux IPT with the tripod-mounted Canon EF 600mm f/4L IS II USM lens, the Canon 2x EF Extender III (Teleconverter), and the Canon EOS-1D X. ISO 3200. Evaluative metering +3+ stops: 1/200 sec. at f/8 in Manual mode. Central sensor (by necessity)/AI Servo Expand/Rear Focus AF active at the moment of exposure. Cick here if you missed the Rear Focus Tutorial. Click on the image for a larger version. We will get to photograph a great variety of breeding behaviors on the 2nd New Concept IPT: the Fort Desoto/Hooptie Deux–Roseate Spoonbill Short Notice IPT. See the brief notice at the top of this blog post or click here for details. |
The Optimized Image
Once I saw the image in BreezeBrowser I realized that it was actually sharp despite the 1/200 sec. shutter speed so I decided to convert it in DPP and play with it. I was quite surprised to come up with a decent, sale-able image. Go figure….
Sometimes when everything seems to be wrong, you can end up smelling like a rose. Especially with digital capture.
The Lesson
In ABP II I wrote something like this, “When unexpected action occurs; push the shutter button.” If you wait for everything including all of your settings to be perfect, you will never push the button. And therefore, you will never make any images. As we see here, when you push the shutter button, at least you have a chance even when it seems that everything has gone wrong.
Image Optimization
First I darkened the image during conversion in DPP. (See our DPP RAW Conversion Guide here.) Then it was some Curves and some Eye Doctor work in Photoshop followed by a layer of NIK Color Efex Pro/Tonal Contrast work. All as detailed in Digital Basics that includes my complete digital workflow, ACR conversion tips, all of my Keyboard shortcuts, dozens of great Photoshop tips, NIK Color Efex Pro tips, and free updates.
| [Not a valid template] |
NIK 15% Discount
NIK Color Efex Pro was used on each of the optimized images above. As regular readers know, it has drastically changed my digital workflow and little by little I have begun using Viveza to solve more than a few sticky image optimization problems and Silver Efex Pro for fast, dramatic B&W conversions. You can save 15% on all NIK products (including Color Efex Pro, Silver Efex Pro, and Viveza) by clicking here and entering BAA in the Promo Code box at check-out. Then hit Apply to see your savings. You can download a trial copy that will work for 15 days and allow you to create full sized images.
Typos
On all blog posts, feel free to e-mail or leave a comment regarding any typos, wrong words, misspellings, omissions, or grammatical errors. Just be right. 🙂
Support the BAA Blog. Support the BAA Bulletins: Shop B&H here!
We want and need to keep providing you with the latest free information, photography and Photoshop lessons, and all manner of related information. Show your appreciation by making your purchases immediately after clicking on any of our B&H or Amazon Affiliate links in this blog post. Remember, B&H ain’t just photography!
Support the BAA Blog. Support the BAA Bulletins: Shop Amazon here!
And from the BAA On-line Store:
LensCoats. I have a LensCoat on each of my big lenses to protect them from nicks and thus increase their re-sales value. All my big lens LensCoat stuff is in Hardwood Snow pattern.
LegCoat Tripod Leg Covers. I have four tripods active and each has a Hardwood Snow LegCoat on it to help prevent further damage to my tender shoulders :) And you will love them in mega-cold weather....
Gitzo GT3532 LS CF Tripod. This one replaces the GT3530LS Tripod and will last you a lifetime. Learn more about this great tripod here.
Mongoose M3.6 Tripod Head. Right now this is the best tripod head around for use with lenses that weigh less than 9 pounds. For heavier lenses, check out the Wimberley V2 head.
Double Bubble Level. You will find one in my camera's hot shoe whenever I am not using flash.
The Lens Align Mark II. I use the Lens Align Mark II pretty much religiously to micro-adjust all of my gear an average of once a month and always before a major trip. Enjoy our free comprehensive tutorial here.
BreezeBrowser. I do not see how any digital photographer can exist without this program.
Delkin Flash Cards. I use and depend on Delkin compact Flash Cards and card readers most every day. Learn more about their great 700X and 1000X cards here or about my favorite Delkin card here.


Artie,
You can see that the AF sensors are larger than the AF square in the Canon white papers for various cameras. But that does not tell the whole story. The phase detect sensors are working on the out of focus field, comparing light coming in form each side of the lens. Thus, the AF sensitive boundary is a little diffuse and varies with f/ratio of the lens. I discuss the issues here, as well as give links to the Canon white papers with page numbers:
http://www.clarkvision.com/articles/understanding.autofocus/
I also discuss how one can test your own camera.
Roger
Hi Artie,
Good point about the new 1DX. The Canon examples show the expansion rectangles also light up and in your image it appears that the expansion rectangles were not lit. Does the exif data indicate what AF points were actually in use? On my 1DV the expansion AF points show as red in the viewfinder and dpp.
In either case, people should be aware that the active AF area is larger than the visible AF rectangle.
Roger
As far as I know, the expanded points light up in the viewfinder but not in BrBr or DPP. With the 1D X or the 5D MIII the EXIF only shows the active points when you are in 61-point (and that only when you are in active AI Servo AF.
As for the AF sensors being larger than the visible rectangles I am not to what degree that is true. In my mind there are lots of other explanations as to why an image can be sharp when the sensor is nowhere near the subject.
Artie,
Your image shows another important aspect of the AF system. At f/8 only the center AF is active with no help from surrounding AF points (if you had expansion on). Yet the AF rectangle is not on the bird, and focus was spot on. The active AF area is larger than the AF rectangle, thus the AF system was able to lock on to the bird’s chest. Photographers need to be aware of that fact, especially for cases where the AF system could lock on to a foreground or background subject when those areas impinge into the active AF region, not simply the
red rectangle area. This is true for all the AF sensors.
Roger
Hi Roger, Actually, the latest firmware gives 1D X User’s Expand so in this case, there was an active sensor on the bird. artie
Hi, Artie! OK, call me slow if you want to. It appears that you are being at least partially sarcastic when you refer to the “commonly accepted truths” above. I am specifically referring to “Flight photography with an f/4 super-telephoto and a 2X TC is impossible; this combo does not focus fast enough for flight photography”.
I usually shoot birds in flight with a 1D Mark IV, the now discontinued 500mm f/4 IS L lens and a 2X TC III, on a sturdy Gitzo tripod and a Wimberley 2 head. Unless I use this combination, it’s almost impossible for me to fill the frame with the subject or at least have a crop acceptable to make a 16″ X 20″ print on my Epson Stylus Pro 4900. If I can’t make a good print that size, the image is unacceptable for my purposes.
I shoot in manual mode with evaluative metering as best as I was able learn from you in Bosque and reading your books and tutorials. I use rear focus as per your tutorial. Using the 2X limits me to the central focus point and it is very hard for me to pace the center focus point where I want to. I have a difficult time obtaining sharp exposure photographing eagles and ospreys in flight (my favorite subjects) at less than 1/1500 of a second.
Should I give up the 2X TC III for flight shots and go with the a 1.4X TC III as my “default configuration?” How much detail am I giving up by using the 2X VS the 1.4X? I find that if I nail the shot, I can usually get an image of comparable sharpness with the 2X as with the 1.4X. Am I just kidding myself? If I use the 1.4X, a lot of the birds are flying beyond reach. If I switch to the 1.4X on a regular basis, I’ll be giving up on a lot of shots, waiting for the birds to come close enough.
Any thoughts?
Thanks,
John Haedo
Hi John,
Thanks for the short note :).
A general guideline would be to go with the 2X for flight only when it is absolutely needed…. If some birds are flying by closer, go after them with the 1.4X. Doing so will help you acquire focus faster, produce overall sharper images, and allow you to use lower ISOs….
later and love, artie