

|
a9 iii E-mail Set-up and Info Guide |
a9 iii E-mail Set-up and Info Guide
For those who think that my comments on the a9 iii are pure hype, know that I sold the second of my three a1 bodies this morning. Lots more on the switch coming soon.
If you plan on purchasing a Sony a9 III Mirrorless Camera (or anything else for that matter), please remember to use or write for either my Bedfords discount code or my B&H affiliate link. Folks who use one of my two affiliate links to purchase the a9 III will receive my .DAT settings (the complete camera set-up) along with a Buttons and Dials Guide.
Supporting My Efforts Here
If you enjoy and learn from the blog, please consider using one of my affiliate links when purchasing new gear. It will never cost you a single penny. To support my effort here, please order from B&H by beginning your search here. Or, click here, to order from Bedfords and enter the discount code BIRDSASART at checkout to receive 3% cash back to your credit card and enjoy free Second-Day Air Fed-Ex shipping. It is always best to write for advice via e-mail.
In many cases, I can help you save some serious dollars.
Learn to be a Much Better Bird Photographer
Join a BIRDS AS ART Instructional Photo-Tour. Better yet, sign up for both Homer trips.
What’s Up?
Blog Post notifications stopped sending on 4 May. I have been working hard to restore the e-mail notifications with no success. I can log in to WordPress but when I use the same user name and password to log into the WordPress Help Forums I get the dreaded “wrong user name or password” notice. I did manage to get into Jetpack support yesterday but have not received an answer to my question. I opened another ticket with the server company, HomePage Universe, but my last two requests for help have fallen on deaf ears. I shall keep trying.
My plan is to publish a new post every other day. By bookmarking www.BIRDSASART-Blog.com you can continue to enjoy the new posts even though you are no longer receiving the e-mail notifications simply by clicking on the previous link.
Today is Monday 13 May 2024. I have a ton of work to do before I leave on Thursday for Little Rock. I have so much to do, that other than for my walks, I have not been down to the lake since I returned from DeSoto.
Please remember to use the B&H links that are found on most blog pages and to use the BIRDSASART discount code at checkout when purchasing your new gear from Bedfords to get 3% back on your credit card and enjoy free second-day air FedEx. Please, also, consider joining a BAA IPT. You will be amazed at how much you will learn!
If an item — a Delkin flash card, or a tripod head — for example, that is available from B&H and/or Bedfords, is also available in the BAA Online Store, it would be great, and greatly appreciated, if you would opt to purchase from us. We will match any price. Please remember also to use my B&H affiliate links or to earn 3% cash back at Bedfords by using the BIRDSASART discount code at checkout for your major gear purchases. Doing either often earns you free guides and/or discounts. And always earns my great appreciation.
Sony FE 400mm f/2.8 GM OSS Lens
Used Gear Page veteran Robert Hollyer is offering a Sony FE 400mm f/2.8 GM OSS lens in Like-New condition for a BAA record Low $9,998.00. The sale includes the front lens cap, the rear lens cap, the lens hood, the lens strap, that hard case & strap, the original product box, and insured ground shipping via major courier to lower-48 US addresses only. Your item will not ship until your check clears unless other arrangements are made.
Please contact Bob via e-mail or by phone at 1-206-359-0018 PST.
I purchased my Sony 400mm f/2.8 two years ago to complement my 600mm f/4. Robert is selling his because he rarely uses it, opting instead for the 600mm f/4! It is far easier for me to handhold the 4 ounces lighter, much smaller, and better balanced 400 f/2.8 than it is to handhold the 600mm f/4. The 400 is superb in extreme low light and for flight with or without the 1.4X teleconverter. This lens sells new right now for $11,998.00 at B&H and there are used copies going for $10998.00 as well. Act quickly to save a handsome $2,000.00 by grabbing Robert’s might-as-well-be-new 400mm GM lens. And you can’t beat the f/2.8 bokeh! artie

|
|
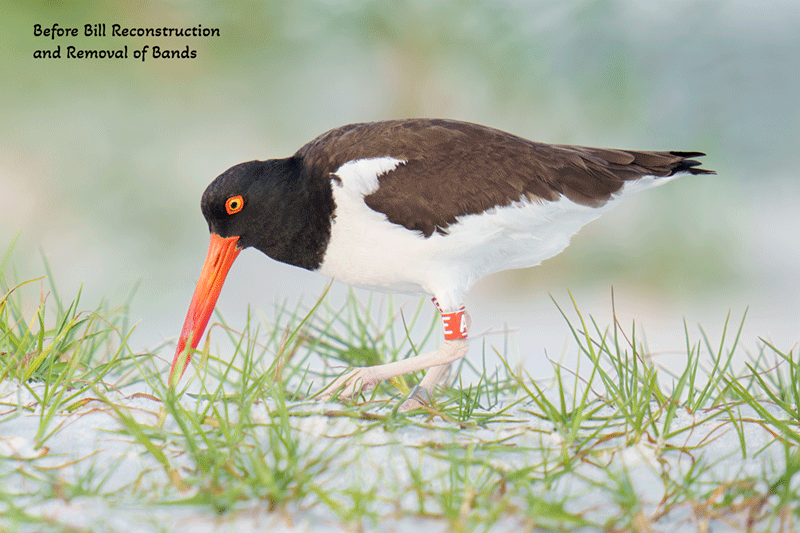
This image was created on 9 May 2024 on the second morning of the Spring DeSoto IPT. While seated on dry sand, I used the Robus RC-5558 Vantage Series 3 Carbon Fiber Tripod/Levered-Clamp FlexShooter Pro-mounted Sony FE 400mm f/2.8 GM OSS lens, the Sony FE 1.4x Teleconverter, and The One, the Sony Alpha 1 Mirrorless Digital Camera). The exposure was determined via Zebra technology with ISO on the Thumb Dial. ISO 800. 1/1000 sec. at f/4 (wide open) in Manual mode. When evaluated in RawDigger, the raw file exposure was determined to be perfect. AWB at 7:51:31am on a variably cloudy morning. Manual Focus. Be sure to click on the image to enjoy a larger, sharper high-res version. Image #1: American Oystercatcher taking over incubating duties. |
Your Call
Do you like this image? Why or Why Not?
DeSoto AMOY Nest
Thanks to multiple IPT veteran and good friend David Pugsley who alerted me to the presence of a roped off American Oystercatcher nest that was photographable only in the morning. Thursday last began mostly cloudy with a 20 mph wind from the S/SW. I had heard that there had been some spoonbills in Hidden Lagoon. Considering that possibility, the AMOY nest, and the low light, I went with the 400mm f/2.8 and an a-1, the latter as I was not expecting to do any flight or action.
As we arrived at the ropes and sat, we talked about choosing the best perspective. 560mm yielded the same in the frame look that I was after and allowed me to include the beach vegetation in the background along with a peek at the Gulf of Mexico. With everyone using Sony, I advised getting significant Zebras on the sky. With the wind hard from my left, I removed the lens hood and stored it on the sand. With all of the big, fast super-telephoto lenses, it is always best to remove the hoods when working in a cross wind; that keeps the hood from acting like a giant wind sail and destroying images sharpness.
Early on, one adult was on the nest and was sitting atop a small rise but well down on the nest. The grasses around the sitting bird’s head made it virtually impossible to use autofocus, even for those using one of the Spot S AF methods. I quickly went to Manual Focus with a (red) focus peaking and taught the two folks using the a1 how to use the focus magnification technique to ensure accurate manual focusing.
The other parent had been hanging around the nest so I told everyone that the best images might come if a nest change occurred. When that happened, the first bird walked away to the south and the second adult walked quickly to the nest. At this point I decided to trust my previously set manual focus distance. I got lucky as the second bird was on the same exact plane as the first bird had been.
I wanted to make an image before the bill of the new bird became obstructed by the grasses. I came close to doing that, but the tip of the bill wound up behind some grass. In addition, the end of the bird’s bill was badly stained with salt. Worst of all, I saw that the new bird had three bands, two orange/red EA bands on both lower leg bones and one metal, USFWS band (with the first two digits “11”) on the right tarsometatarsus. At first glance, I thought that the image clean-up would be too difficult. See the Animated GIF below.

|
Diagram #2: Comparison of human leg bones and bird leg bonesDiagram by Rebecca Hawkins here on Twitter (X). |
Rebecca Hawkins” Comments
Ever wonder why birds have backwards knees? That’s because those aren’t knees, they’re the equivalent of our ankles! Bird knees are further up their legs and often hidden by feathers.
@RebeccasBones’ diagram above and her explanation of the reality of a bird’s leg bones are the clearest and most understandable I have ever come across.
|
Band Removal and Bill Clean-Up and Reconstruction
With the IPT group huddled around the kitchen counter, I did not think that I could do it, but using my cadre of clean-up and repair tools, I was eventually successful. Everyone in the group, especially Geri, offered helpful comments and suggestions. In no particular order, I used the Remove Tool, the Patch Tool, the Clone Stamp Tool, and several Quick Masks that were refined by the addition of a regular layer mask. All as detailed in Digital Basis II and in the Digital Basics III Video Series.
The shared AirBnB experience on the DeSoto IPT worked out amazingly well. Unless I was sleeping, I was there to answer everyone’s questions. We saved a ton of money on meals — we shared the cost of the food — and we all got along great.

|
The BIRDS AS ART Current Workflow e-Guide (Digital Basics II).You can order your copy from the BAA Online Store here, by sending a PayPal for $40 here, or by calling Jim or Jennifer weekdays at 863-692-0906 with your credit card in hand. Be sure to specify Digital Basics II. |
The BIRDS AS ART Current Workflow e-Guide (Digital Basics II)
The techniques mentioned above and tons more great Photoshop tips and techniques — along with my complete digital workflow, Digital Eye Doctor Techniques, and all my personalized Keyboard Shortcuts — are covered in detail in the BIRDS AS ART Current Workflow e-Guide (Digital Basics II), an instructional PDF that is sent via e-mail. Note: folks working on a PC and/or those who do not want to miss anything Photoshop may wish to purchase the original Digital Basics along with DB II while saving $15 by clicking here to buy the DB Bundle.
Please note: the Divide and Conquer technique was inadvertently omitted from DB II. It is detailed in a free excerpt in the blog post here.
Folks who learn well by following along rather than by reading can check out the complete collection of MP 4 Photoshop Tutorial Videos by clicking here. Note: most of the videos are now priced at an amazingly low $5.00 each.
You can learn how and why I converted all of my Canon digital RAW files in DPP 4 in the DPP 4 RAW Conversion Guide here. More recently, I became proficient at converting my Nikon RAW (NEF) files in Adobe Camera Raw. About three years ago I began converting my Nikon and Sony RAW files in Capture One and did that for two years. You can learn more about Capture One in the Capture One Pro 12 Simplified MP4 Video here. The next step would be to get a copy of Arash Hazeghi’s “The Nikon Photographers’ Guide to Phase One Capture One Pro e-Guide” in the blog post here. Today, I convert my Sony raw files in Photoshop with Adobe Camera Raw.
You can learn advanced Quick Masking and advanced Layer Masking techniques in APTATS I & II. You can save $15 by purchasing the pair.

|
The Digital Basics III Video Series |
The Digital Basics III Video Series
I realized about a year ago that my digital workflow had changed significantly and was toying with the idea of writing a Digital Basics III. More recently, I learned and begun working with two great new Photoshop Tools, the Remove Tool and the Luminance Targeted Adjustment Tool. The former is like a smarter Spot Healing Brush Tool on steroids and the latter is a step up from the fabulous Color Mixer Tool. During that same time frame, I came up with a new and improved 2-step noise reduction technique. I still use Divide and Conquer, Quick Masks, Layer Masks, an expanded array of personalized keyboard shortcuts, and tons of other stuff from both versions of Digital Basics.
As soon as I realized that I did not want to take on another large writing project, I realized that by creating a series of videos I could much more easily share all the details of my current digital workflow and much more easily incorporate additional new tips, techniques, and tools as I went. And so, The Digital Basics III Video Series was born.
You can save $26 by ordering the first five videos in Volume I by clicking here. The videos will be most valuable for folks using the latest version of Photoshop (2024) or Lightroom along with Topaz DeNoise AI and Topaz Sharpen AI.
Typos
With all blog posts, feel free to e-mail or to leave a comment regarding any typos or errors.


I love a good birdscape. Glad the tip worked out!
Thanks again for your help!
a
AE the oystercatcher is the female of the pair. I photographed her in December and reported the bands. This is the information I was given about her banding:
Date banded: 05/22/2012
Banding Location: CEDAR CREEK SHELL RAKE, ST. CATHERINE’S SOUND, LIBERTY COUNTY, GEORGIA, USA
Age: WAS TOO YOUNG TO FLY WHEN BANDED IN 2012
Sex: UNKNOWN
I posted about this on a birding page somewhere (can’t remember where) and comments stated that she was first seen at De Soto in 2016.
Band number is: 1106-14723
Thanks, Ryan. Great stuff. Any clue as to how they determined the sex of this bird?
Interesting how the researchers on Long Island capture the large, non-flying chicks — they chase them around the beach with long-handled nets until they get so exhausted that they can be caught …
with love, artie
My first impression was that the Oystercatcher photo would work for a story, combined with closeups, action, etc. But after clicking to get more resolution (if only a 24″ screen), I liked it a lot more–could see it framed large in modernist beach home (saw a Tom Mangelsen print once on a tour of a $7 million home). Maybe birdscapes by their nature need to be shown big. I do think the ankle needs reworked–it draws attention because of the way right ankle protrudes behind the left, but above the ankle the left leg itself looks as thick and textured as the ankle, whereas in comparison photos the leg above the ankle is thinner and less textured, with maybe a vertical ligament showing under the skin.
Thanks, Cliff. I agree. It took me a while to realize that I was looking at the ankle on the rear (right) leg. If I started from scratch, I might be able to do a bit better. The big problem was/is that there is no source material for the lower leg bone … LMK check another photo.
with love, artie
ps: Both lower leg bones have large bands on them …