Please Note
The success of both Red Stevens and of Eugen Dolan is due in part to the fact that both decided to invest in an a-1 ii body. In addition, my guidance, coaching, and in-the-field instruction has helped a bit.
What’s Up?
Today is Wednesday 22 October 2025. Despite zero wind and few birds, Misha, Eugen, and I had a fine morning at Sebastian. Working with mid-range telephoto zoom lenses we created lots of wave blurs and cloudscapes. We shot the tame turnstones with what we brought to the dance and had some nice backlit chances on Reddish Egret and Great Blue Heron. On the way home we stopped at a small roadside park in Wabassa and worked a very tame Great Egret.
We will be headed out at about 4pm to my favorite afternoon spot now that the tide will be low enough for a productive visit. Whatever you choose to do, I hope that you too have a happy and productive day.
If you would like to join in the fun and learn an absolute ton, I have room at the AirBnB for you on the Sebastian Extended IPT any time from 24 October through and including 23 November. For complete details you can scroll down here, get in touch via e-mail, or try me on my cell at 863-221-2372. Please leave a message and shoot me a text if I do not pick up.
If an item — a Delkin flash card or reader, a Levered-clamp FlexShooter Pro, or a Wimberley lens plate or low foot — for example, that is available from B&H and/or Bedfords, is also available in the BAA Online Store, it would be great, and greatly appreciated, if you would opt to purchase from us. We will match or beat any price. Please remember also to use my B&H affiliate links or to earn 3% cash back at Bedford by using the BIRDSASART discount code at checkout for your major gear purchases. Doing either often earns you free guides and/or discounts. And always earns my great appreciation.
Gear Questions and Advice
Too many folks attending BAA IPTs and dozens of photographers whom I see in the field and on BirdPhotographer’s.Net, are — out of ignorance — using the wrong gear, especially when it comes to tripods and more especially, tripod heads. And the same is true in spades when ordering new camera bodies or lenses. My advice will often save you some serious money and may help you avoid making a seriously bad choice. Please know that I am always glad to answer your gear questions via e-mail. If you are desperate, you can try me on my cell at 863-221-2372. Please leave a message and shoot me a text if I do not pick up.
Don’t Just Shoot: Learn
If you are interested in changing your life and becoming a better photographer by joining me on the Extended IPT at Sebastian Inlet for Ospreys and more (OCT 25 to NOV 24, 2025), in San Diego for Pacific-race Brown Pelicans and more (JAN 6 to FEB 2, 2026), or for Roseate Spoonbills at Stick Marsh (March 2026), please e-mail for dates, rates, terms, and additional information. Or shoot me a text to 863-221-2372. Some offerings include options for shared AirBnB lodging and meals. Ground transportation during your stay is a possibility at times.
|
|
|
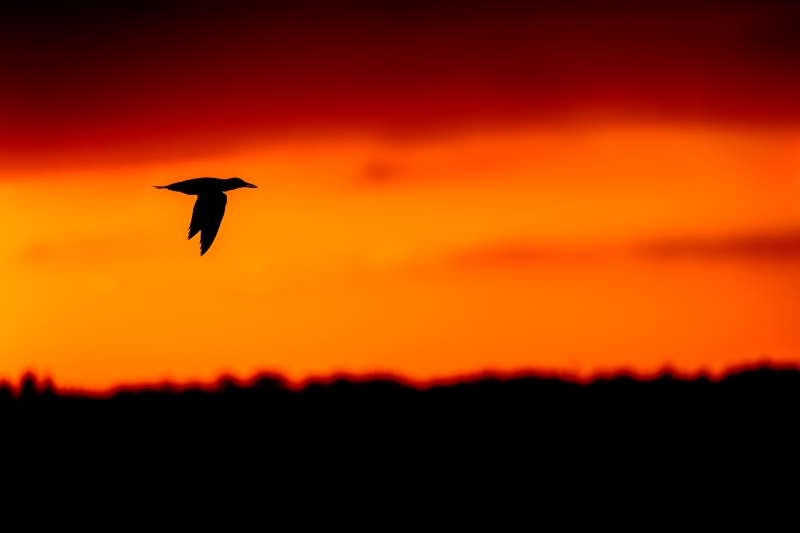
This image was created by yours truly on 16 October 2025 at Sebastian Inlet State Park while leading BIRDS AS ART Extended Instructional Photo-Tour. Standing at full height, I used Sony FE 200-600mm f/5.6-6.3 G OSS lens (at 600mm) and The Latest Greatest Flagship Body, the Sony a1 II Mirrorless Camera. The exposure was determined by Zebras with Exposure Compensation (EC) on the thumb wheel. Multi Metering +1.0 stops. AUTO ISO set ISO 500: 1/2500 second at f/6.3 (wide open) in Shutter Priority mode. RawDigger showed that the exposure was perfect. AWB at 6:47:10pm on a partly cloudy afternoon. Wide/AF-C with Bird-Eye/Face Detection performed perfectly. Click on the image to enjoy the larger, inexplicably sharper high-res version. Image #1: Royal Tern sunset silhouette bird/cloud-scape |
Note
The Point Color Supersaturated Colors Fix that is detailed only in Volume II of the Digital Basics IV Video Series was used to salvage the bright sky on the left frame edge as the very first step of the raw conversion for Image #1.
Silhouette Flight Recipe
Whether or not you have some color in the sky, this technique can work stunningly well with bright backlight conditions especially when the wind is blowing at the sun.
#1: Go to Shutter Priority mode with AUTO ISO and Exposure Compensation (EC) assigned to a convenient dial,
#2: Set a fast shutter speed. How fast depends on the situation:
a- With very bright backlight go with 1/3200, 1/4000, 1/5000, or even faster.
b- With less light, try a shutter speed of from 1/2500 sec. down to as slow as 1/1000 sec. (if you are desperate).
c- Set the Exposure Compensation to +1 stop and season to taste. With experience, you will learn to adjust the EC on the fly as the background tonality changes.
#3: In low light situations, this technique works equally well when the goal is to create pleasingly blurred images that imply motion.
#4:For sharp silhouettes, look for birds flying below the sun and above the earth. Unless the sun is well muted, including it in the frame will ruin the image.
|
|
|
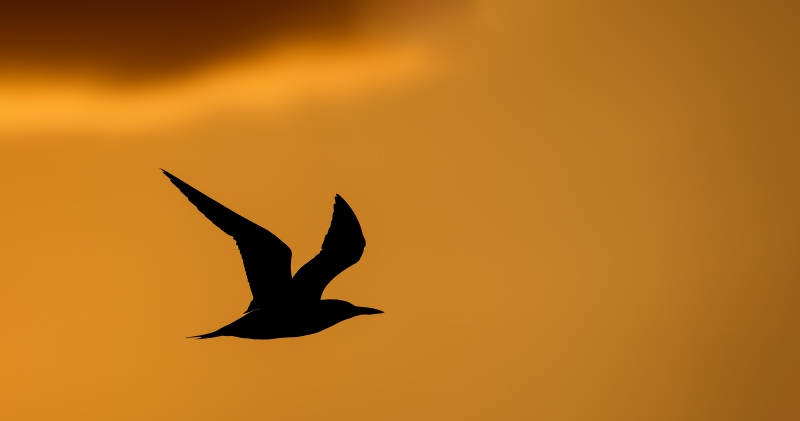
This image was created by Eugen Dolan on 16 October 2025 at Sebastian Inlet State Park on a BIRDS AS ART Extended Instructional Photo-Tour (IPT). Standing at full height, he used Sony FE 200-600mm f/5.6-6.3 G OSS lens (at 600mm) and The Latest Greatest Flagship Body, the Sony a1 II Mirrorless Camera. The exposure was determined by Zebras with Exposure Compensation (EC) on the thumb wheel. Multi Metering +1.0 stops. AUTO ISO set ISO 250: 1/4000 second at f/6.3 (wide open) in Shutter Priority mode. RawDigger showed that the exposure was perfect. AWB at 6:38:14pm on a partly cloudy afternoon. Tracking: Zone/AF-C with Bird-Eye/Face Detection performed perfectly. Click on the image to enjoy the larger, inexplicably sharper high-res version. Image #1: Royal Tern sunset silhouette |
Sony a-1 and a-1 ii Shutter Priority Feature
With the original Sony a-1, it was a royal pain to get into Shutter Priority mode with AUTO ISO and with Exposure Compensation (EC) on the thumb wheel. This problem was eliminated by a clever Firmware Update more than a year ago. Fortunately, the improved menu feature that allows for this was included on the a-1 ii. Huge thanks again to Bob Eastman for alerting me to this development. Detailed instructions are included my Info and Updates e-mails for both my a-1 and the a-1 ii groups.
|
|
|
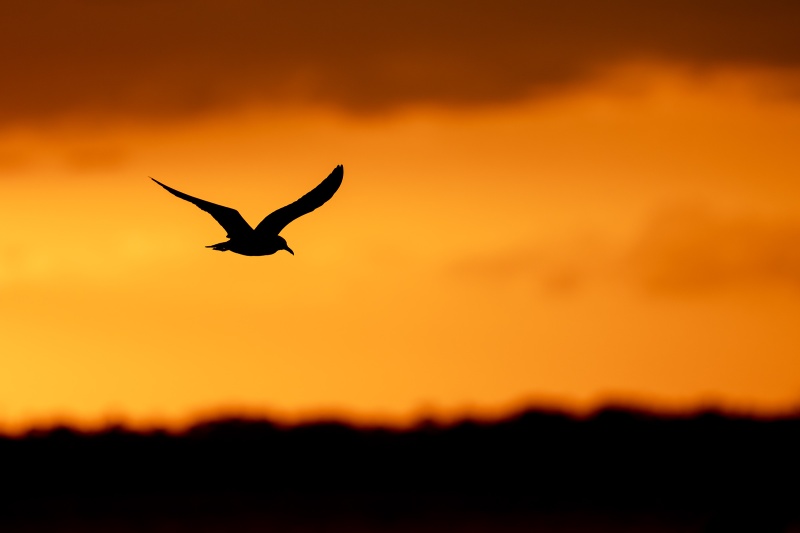
This image was created on 16 October 2025 by Alvin “Red” Stevens of Birmingham, AL on a Sebastian Inlet Ospreys and More Extended IPT. Standing at full height, he used the hand held Sony FE 300mm f/2.8 GM OSS Lens (Sony E) with the Sony FE 2x Teleconverter and the Latest Greatest Sony Flagship Body, the a1 II Mirrorless Camera. The exposure was determined by Zebras with Exposure Compensation (EC) on the thumb wheel. Multi Metering +1.0 stops. AUTO ISO set ISO 1250: 1/2500 second at f/5.6 (wide open) in Shutter Priority mode. RawDigger showed that the exposure was perfect: AWB at 6:45:10pm on a partly cloudy afternoon. Tracking: Zone/AF-C with Bird Eye/Face Detection enabled performed perfectly. Image #3: Laughing Gull — sunset silhouette |
On Saving a Bit of ISO
Note that with this image Red properly dropped his shutter speed from 1/4000 sec. to 1/2500 sec. to save two clicks of ISO. It is proper to do the exact same thing when working in manual mode and creating sharp images. Red’s ability to create sharp images from day one of his bird photography career was remarkable.
|
|
|
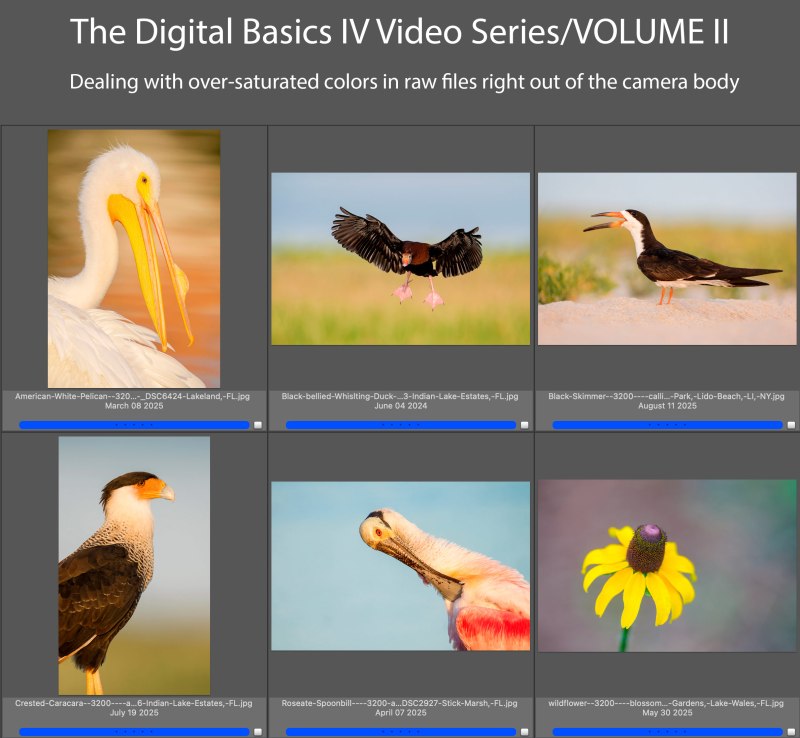
Learn to deal with oversaturated colors in your raw files (along with my complete digital workflow) in Volume II of the DB IV Video Series. Click on the screen capture to enlarge the composite and check out the often problematic colors clockwise from top left: yellow/orange; pink; orange; orange and yellow; carmine (a vivid red with a hint of purple); and bright yellow. The Digital Basics IV Video Series/Volume II by Arthur Morris/BIRDS AS ARTYou can purchase Volume II alone (59 minutes, 41 seconds) for $49.00 by clicking here. Or save $50.00 by purchasing the entire 5 volumes series by clicking here. |
Digital Basics IV Video Series/Volume II
The main thrust of Volume II of the Digital Basics IV Video Series explains in detail how to handle images where some bright colors like reds, oranges, and yellows, show as over-exposed as soon as you hold down the Alt or Option key and move the Whites slider to the right in Adobe Camera Raw. This is a commonly encountered problem for folks using Adobe Camera Raw either in Photoshop or Lightroom. The simple solution is to use the Point Color eyedropper the moment you encounter super-saturated colors in images right out of the camera. Raw files from all of the major dSLR and Mirrorless camera manufacturers will exhibit this problem. Depending on the system that you use, you may find that the certain colors are more problematic in one system than in another. Huge thanks to Anita North; working together, we came up with the Point Color Supersaturated Colors Fix.
Eat of the six image optimizations takes you through my complete basic workflow that remains much the same as is detailed in both DB II and in the DB III Video Series. The steps include:
1- Setting the Color Temperature (when and if needed).
2- Setting the White and Black Points and adjusting the Highlights and Shadows sliders.
3- Setting the Clarity and Dehaze sliders.
4- Fine-tuning color using the Hue/Saturation/Luminance Targeted Adjustment Tool, a huge step up from the Color Mixer Tool.
5- My 2-step noise reduction technique (now only with higher ISO images).
Once I have the .TIF file in Photoshop, I still use my usual cadre of clean-up tools and techniques including the Remove Tool, the Clone Stamp (only rarely), Divide and Conquer, Quick Masking, Layer Masking, Gaussian Blurs, an expanded array of personalized keyboard shortcuts, and tons of other image optimization strategies and methods adapted from previous versions of Digital Basics. I also demonstrate the selective use of Topaz Sharpen AI utilizing the masking feature. And last but not least, I share my JPEG creation methodology.
You can purchase Volume II alone (59 minutes, 41 seconds) for $49.00 by clicking here. Or save $50.00 by purchasing the entire 5 volumes series by clicking here.
Volume III will detail the use of the Masking Features in Adobe Camera Raw and touch on the new Super Resolution feature in Photoshop 2025 v26.20.0.
|
|
|
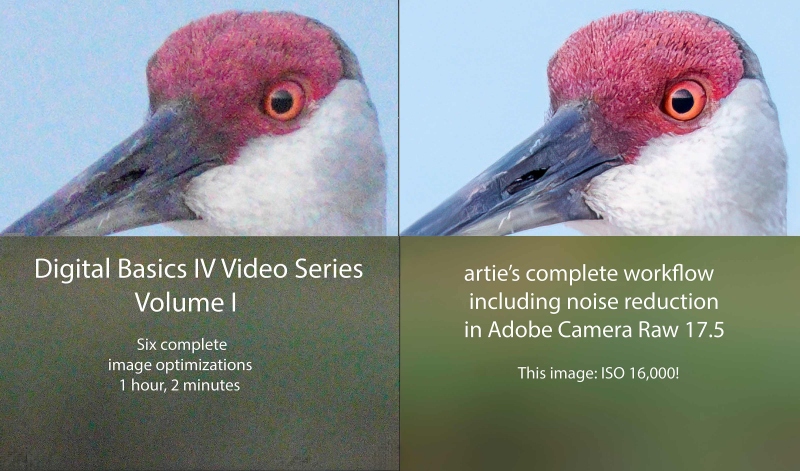
Click on the screen capture to enlarge and check out the amazing noise reduction with this ISO 16000 image. The Digital Basics IV Video Series/Volume I by Arthur Morris/Birds as ArtYou can purchase Volume I for $49.00 by clicking here. Or save $50.00 by purchasing the entire 5 volumes series by clicking here. |
Digital Basics IV Video Series/Volume I
Learn lots more about Volume I and check out the amazing high ISO images in the blog post here.
DB IV/Volume I eliminates the confusion that resulted from the changes to AI Noise Reduction (under the Details tab) in the latest update (17.5) to Adobe Camera Raw (in both Photoshop 2025 Release 26.10.0 and the latest version of Lightroom). As you will see below and in the Volume I video, the new interface represents a significant improvement on the results obtained with the Enhance dialogue box in previous versions of ACR. And, as mentioned here recently, I have some fabulous new image optimization tips, techniques, and tricks to share with you. As the Digital Basics III Video Series proved to be so popular, I have decided to run it back in the form of the Digital Basics IV Video Series (Those who have complete faith in the information that I provide may wish to use the preceding link to save $50.00 by ordering the whole series on a pre-publication basis; you will receive Volume I as soon as you order. The rest will follow upon publication.
My new workflow includes the use of the masking feature in Adobe Camera Raw (thanks to Anita North), the use of the Point Color eye dropper to tame super-saturated colors during raw conversions (discovered in tandem with Anita), a fabulous new Remove Tool trick that makes my favorite Photoshop Tool even more powerful than before -— that one discovered by me. In addition, I have recently begun doing some Curves work during my ACR raw conversions.
As noted above, my basic workflow remains much the same as is detailed in both DB II and in the DB III Video Series:
1- Setting the Color Temperature (when and if needed).
2- Setting the White and Black Points and adjusting the Highlights and Shadows sliders.
3- Setting the Clarity and Dehaze sliders.
4- Fine-tuning color using the Hue/Saturation/Luminance Targeted Adjustment Tool, a huge step up from the Color Mixer Tool.
5- My 2-step noise reduction technique (with most images).
Once I have the .TIF file in Photoshop, I still use my usual cadre of clean-up tools and techniques including the Remove Tool, the Clone Stamp (only rarely), Divide and Conquer, Quick Masking, Layer Masking, Gaussian Blurs, an expanded array of personalized keyboard shortcuts, and tons of other image optimization strategies and methods adapted from previous versions of Digital Basics. I also demonstrate the selective use of Topaz Sharpen AI utilizing the masking feature. And last but not least, I share my JPEG creation methodology.
Volume I of Digital Basics IV details the image optimizations of six images. Most everything above but for the use of the Point Color eye dropper to tame super-saturated colors during raw conversions is at least touched upon in Volume I. Most of it is covered in great detail.
You can purchase your copy of this 1 hour, two minute video for $49.00 here in the BAA Online Store. There will be five volumes in DB IV each featuring 5 or 6 complete image optimizations. If you purchase the first four volumes, you will receive the fifth volume for free.
Or, you can save $50.00 by purchasing all five volumes now for only $146.00 by clicking here. I will try to complete Volume III in November as I will have a few days off here and there next week.
Canon EF 500mm f/4L IS USM Super-Telephoto lens (the “old five”) with many Extras!
Price reduced $300.00 on 21 October 2025
Avian audio recording expert Lang Elliott is offering a used Canon 500mm f/4L IS USM super-telephoto lens (the “old five”) in very good plus condition plus a ton of extras for a ridiculously low $1699.00 (was $1999.00). Included are a 1.4X III TC in near-excellent condition, a 2X II TC in near-excellent condition, the front leather lens cover, the lens trunk — sorry, no key), the rear lens cap, the original drop-in clear filter, a drop-in circular polarizing filter, a drop-in screw filter (with three ND lenses to choose from), and insured ground shipping via major courier to lower 48 US addresses only. Your items will not ship until your check clears unless other arrangements are made.
Please contact Lang via e-mail.
I owned, used, and traveled with “the old five” for many years back when I was a Canon Explorer of Light, one of the original 55. It was and is much lighter than all but the most recent versions of theCanon 600mm f/4IS lenses (and a lot smaller as well) and thus is a lot easier to travel with. It is a sharp lens and does just fine with either TC. With so many extras, Lang’s lens is an absolute steal. It does quite well with any of the high end Canon mirrorless camera bodies (with one of the RF to EF adapters). artie
|
|
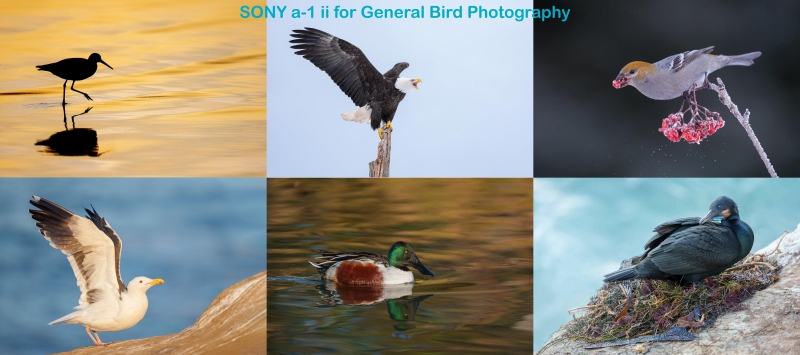
Composite #1: All with the a-1 ii Mirrorless Camera body.
|
The a-1 ii for General Bird Photography
I have found that eye-tracking for general bird photography with the a-1 ii is far, far better than with the original Sony a-1. It grabs the eye and tracks it faster and far more consistently and focus is rarely lost, even with backgrounds other than sky.
|
|
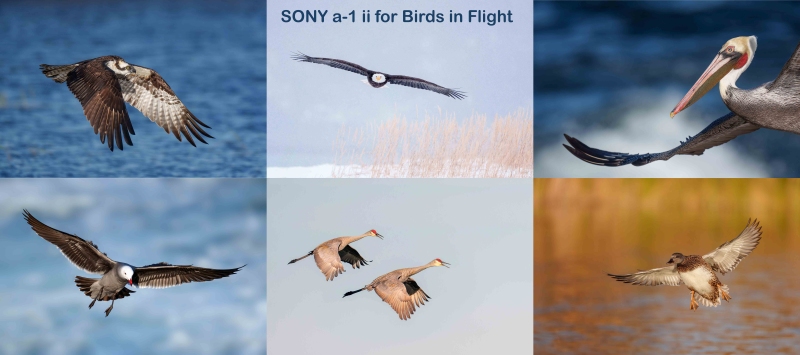
Composite #2: All with the a-1 ii Mirrorless Camera body.
|
The a-1 ii for Birds in Flight
For birds in flight, the a-1 ii Mirrorless Camera body has no equal. As Arash Hazeghi says, “It is better than the a-1.” When I am late getting on a bird in flight, I have consistently been amazed at how often the AF system of the a-1 ii finds and tracks the bird’s eye.
|
|
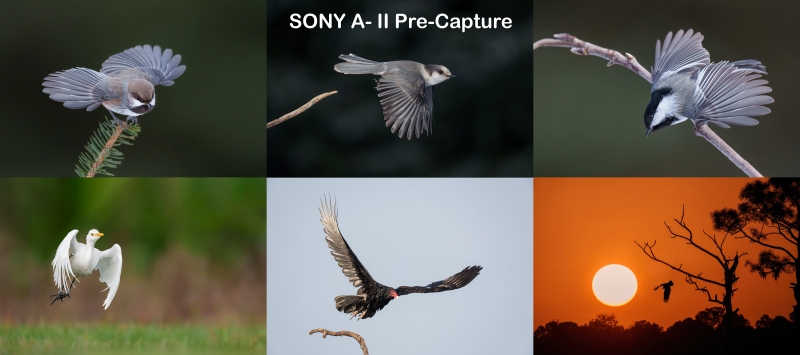
Composite #3: All the result of using Pre-Capture with the a-1 ii Mirrorless Camera body.
|
Pre-Capture with the Sony a-1 ii
When it comes to Pre-Capture with the a-1 ii Mirrorless Camera body, Arash and I agree 100%. And with my slower reflexes, Pre-Capture is more important for me than it is for Arash. Understand that in each of the images in Composite #3, I did not push the shutter button until after the bird took flight!
|
|
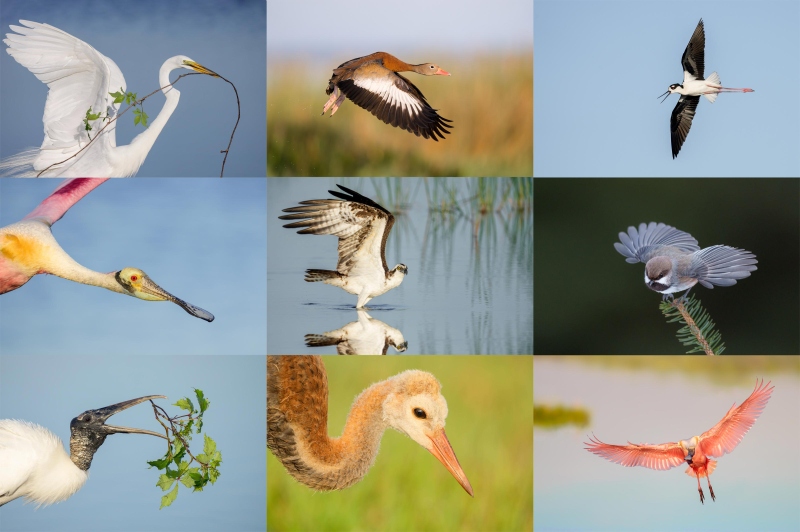
All with the a-1 ii Mirrorless Camera body.
|
Purchasing or Upgrading to a Sony a-1 ii
The Sony a-1 ii e-Mail Set-up and Info Guide
I now own and use two Sony a-1 ii bodies. Every day that I use them, the more I am amazed by speed and accuracy of the Bird Face-Eye tracking in AF-C and the overall performance of the camera.
Aside from the improved ergonomics as compared to the a-1, other nice features include the fact that the rear screen tilts both ways — the lack of a tilting rear screen on the original a-1 always ticked me off. Pre-capture has proven to be a huge plus almost exclusively for take-off flight images. In my opinion, the Speed Boost feature is a total waste for bird photography because you should always be utilizing the maximum frame rate. In addition, the resolution on the rear monitor has been improved dramatically. I must mention again that Bird Face-Eye tracking on the a-1 ii is vastly improved as compared to both the a-1 and the a9 iii and that the 51MP files are to die for.
So, the big question is, is the a-1 ii “worth” a gear upgrade. Remembering that I can never know whether or not something is worth it to you, I can say that I was not floored when first using my a-1 ii. The differences between the a-1 ii and the original a-1, seemed to be neither huge nor eye-opening. But over time, I have come to realize that I was 100% wrong. The huge difference between the new camera body and the a9 iii is, of course, the 51MP a-1 raw files (as compared to the 24MP files rendered by the a9 iii).
The price of a new a-1 is $5,898.00. The price of a new a-1 ii is $1,100.00 more: $6,998.00. As the a-1 ii is clearly far superior for bird photography to the original a-1, the choice for folks new to Sony or for those upgrading from lesser Sony camera bodies is an easy one. Prices for used a-1 bodies has not dropped drastically as I anticipated. At this point, a-1 folks who like showing flight and action and can afford an a-1 ii, are advised to purchase an a-1 ii. Please remember that life is short; we only get one ride on the merry-go-round.
If you do purchase an a-1 ii, be sure to use one of my two affiliate links so that you will receive my a-1 ii settings (in the form of a CAMSEa1ii.DAT file), the Buttons and Dials Guide, and an Info Sheet for free. Using my links will never cost you one penny and may actually save you some money. Folks who do not purchase their new a-i using my B&H link or from Bedfords here and entering the BIRDSASART discount code at checkout will be able to purchase the a-1 ii guide for $244.93. If you are at all confused and do not want to screw up your order, please get in touch via e-mail. If you would like to chat about upgrading, shoot me a text to 863-221-2372 and LMK a good time to call you.
Typos
With all blog posts, feel free to e-mail or to leave a comment regarding any typos or errors.



Leave a Reply