Which of today’s two featured peashooter images do you think is the stronger photo? Please leave a comment letting us know why you made your choice.
What’s Up?
I was beyond thrilled yesterday to fill five slots on the 2024 Homer Bald Eagle IPTs. There is now only one spot left on each IPT. Click here and scroll down for INFO on the Homer IPTs. I am still offering a $500 discount on a single IPT, $1500 off if you do both.
I was glad to learn recently of the following Used Gear Page sales:
Good friend and many multiple IPT veteran Indranil Sircar sold his Canon EOS 5D Mark IV in excellent plus condition with several extras for a very low $999.00 soon after is was listed in mid-November 2023.
Multiple IPT veteran Martin Mikulas sold his Sony a9 II body in near-mint condition for a BAA Record-low $2197.00 right after it was listed in early 2023.
Stan Gorlitsky sold his Nikon NIKKOR Z 800mm f/6.3 VR S lens in mint condition for a very low $5400.00 (was listed for $5,496.95) soon after it was listed in early November 2023.
Today is Tuesday 28 November 2023. With the north and NW morning winds, I have not spent much time down by the lake. I will likely take a Vitamin D/health walk this morning with the peashooter rig despite the poor wind direction (NW).
Jim will be sending out the Digital Basics III, Volume I/#2 to the subscriber group this afternoon. See the next blog post for details on Volume I/#2.
Wherever you are a whatever you are doing, I hope that you too have a great day.
Please remember to use the B&H and Amazon links that are found on most blog pages and to use the BIRDSASART discount code at checkout when purchasing your new gear from Bedfords to get 3% back on your credit card and enjoy free second-day air FedEx. Please, also, consider joining a BAA IPT. You will be amazed at how much you will learn!
You can find some great photo accessories (and necessities, like surf booties!) on Amazon by clicking on the Stuff tab on the orange/yellow menu bar above. On a related note, it would be extremely helpful if blog-folks who, like me, spend too much money on Amazon, would get in the habit of clicking on the Amazon logo link on the right side of each blog post when they shop online. As you might expect, doing so will not cost you a single penny, but would be appreciated tremendously by yours truly. And doing so works seamlessly with your Amazon Prime account.
If an item — a Delkin flash card, or a tripod head — for example, that is available from B&H and/or Bedfords, is also available in the BAA Online Store, it would be great, and greatly appreciated, if you would opt to purchase from us. We will match any price. Please remember also to use my B&H affiliate links or to earn 3% cash back at Bedfords by using the BIRDSASART discount code at checkout for your major gear purchases. Doing either often earns you free guides and/or discounts. And always earns my great appreciation.
Used Gear Page Price Drops
Sony FE 135mm f/1.8 GM (Grand Master) Lens
Price reduced $200.00 on 7 March 2023 Price reduced $200.00 on 27 November 2023
Anthony Ardito is offering a Sony FE 135mm f/1.8 GM lens (USA warranty) in like-new condition for a ridiculously low $1298.00 (was $1,698.00). The sale includes the original product box and everything that came in it including the ALC-F82S 82mm front lens cap, the ALC-R1EM rear lens cap, the ALC-SH156 lens hood, the lens case, all factory accessories and manuals, and insured ground shipping via major courier to lower 48 US addresses only. Your item will not ship until your check clears unless other arrangements are made.
Prized for its ability to isolate focus, the FE 135mm f/1.8 GM from Sony is a medium telephoto prime characterized by a bright and sophisticated design. It is perfect for portraiture and also excels at close-range sports shooting and as a unique focal length for landscapes. Its Grand Master design prioritizes both sharpness and bokeh quality and the lens also offers fast autofocus AF capabilities and durable build quality. It is designed to achieve notably high resolution and sharpness through the correction of a wide variety of spherical and chromatic aberrations and its bright f/1.8 maximum aperture benefits working in difficult lighting conditions. The rounded 11-blade diaphragm contributes to a pleasing bokeh quality when employing selective focus techniques. Sony & B&H
This superb, high-end medium telephoto lens sells new for $2,098.00. It is the dream lens for all serious portrait photographers. If you have been hoping to find a reasonably-priced copy this lens, grab Anthony’s pretty much new one right now and put $400.00 in savings into your pocket. artie
Canon EOS-1DX Mark II Digital SLR Camera with Extras!
BAA Record-low Price! Price reduced $200.00 on 25 November 2023
John Nelson is offering a Canon EOS-1DX Mark II dSLR camera in excellent condition for a BIRDS AS ART record low $1399.00 (was $1599.00). The sale includes the original box, one battery, the charger, the front body cap, four (4) 128 128GB CFast memory cards, cfast cards, and insured ground shipping via major courier to lower-48 US addresses only. Your item will not ship until your check clears unless other arrangements are made.
The 1DX Mark II is a rugged, fast Canon professional digital camera body. It features an excellent AF system and high quality image files with great dynamic range. When he used Canon, it was the first choice of Arash Hazeghi, the world’s premier photographer of birds in flight.Two iDX II served as my workhorse bodies for several years. And I loved them. artie
Nikon D500 DSLR Camera Body
BAA Record-low Price! Price reduced $50.00 on 27 November 2023
Larry Peavler is offering a like-new Nikon D500 DSLR Camera Body with only 2,408 actuations for a BIRDS AS ART Record-Low $699.00 (was $749.00). The sale includes one battery, the charger, the cable, the front body cap, the strap, the original product box, and insured ground shipping via a major carrier to the lower 48.
The D500 is Nikon’s top-of-the-line crop factor body. It multiplies your focal length by 1.5X. Joe Przybyla and Dan Kearl, both excellent photographers on Bird Photographer’s.Net, use the D500 as their workhorse camera bodies. Joe, the co-author of The BAA Middle of Florida Photographic Site Guide, was after this old dog for a long time to try a D500 when I used Nikon. artie
This image was created on 26 November 2023 on the pier at Indian Lake Estates. While standing at full height, I used the handheld Sony FE 70-200mm f/2.8 GM OSS II lens with the Sony FE 2x teleconverter (zoomed out to 324mm), and The One, the Sony Alpha 1 Mirrorless Digital Camera.. The exposure was determined via Zebras with Exposure Compensation on the Thumb Dial. Multi-metering +1.7 stops in Shutter Priority mode. AUTO ISO set ISO 4000: 1/3200 sec. at f/5.6 (wide open). AWB at 9:06:21am on a variably cloudy morning.
Tracking: Zone/AF-C with Bird-Eye/Face Detection performed perfectly. Click on the image to enjoy a high-res version.
Image #1: Mottled Ducks — five taking off
The Peashooter Rig
Over the years I have often carried the 200-600 when taking health or vitamin D walks down by the lake. I love having 600mm at my disposal, but with the a-1, the rig weighs 6 pounds, 10.2 ounces (with a battery and a card) and is 18 1/8 inches in length (with the hood in place). On a 1 1/2 mile walk, lugging the 2-6 around is a real chore. Three days ago, I decided to walk with the 70-200 II, the 2X TC, and an a-1. That turned out to be a good move as the rig weighs only 4 pounds, 9.8 ounces (again, with a battery and a card) and is 18 1/8 inches in length (again, with the hood in place).
Though the smaller rig is only 2 pounds, .4 ounces lighter than the 2-6, that represents slightly more than a 30% drop in weight. Additionally, the length of the 70-200mm rig is almost 25% shorter than the bare 200-600. Comparing the bulk of the two set-ups, the smaller and lighter 70-200 rig seems like a feather when compared to the 200-600.
All of the above assuming that my measurements and my math are correct.
Though I will miss the 600mm maximum focal length of the 200-600 at times, the lighter more versatile, more easily carried, and easier-to-handhold 70-200/2X TC/a-1 combo will be with me whenever I take a walk down by the lake. 400mm is not chicken-feed.
The Sony 70-200mm f/2.8 II GM Lens
Regular readers know that I fell in love with the Sony FE 70-200mm f/2.8 GM OSS II lens from the first moment I used it. I had never seen such a huge improvement in a version II of a lens. Everything about it is better, including and especially AF performance and the ease of zooming in or out. When used with either TC, it completely renders the the Sony 100-400 GM lens obsolete and worthless for those who photograph birds or animals in action. Learn lots more about this great lens here, here, here, and here.
Why Not Manual Exposure Mode?
Yes, competent nature photographers work in Manual (exposure) mode more than 95% of the time on average. When I take my walks with a lens, however, I always work in Shutter Priority mode with AUTO ISO. The key is to assign Exposure Compensation (EC) to the Thumb Dial (rather than ISO as my camera is usually set up). Doing that with a Sony a-1 is of course detailed in the SONY Alpha a1 Set-up and Info Group e-mails. I use that same set-up often — but not always, when creating sunrise and sunset silhouettes against bright colored skies and when creating pleasing blurs in situations where the background is uniformly light-toned. The San Diego IPT is a great place to learn when and how to use this technique. (Click here and scroll down for INFO on the San Diego IPT.) The best news is that it is easy to set this method up with other camera systems, most notably on this side of the pond, that means Canon and Nikon.
The question remains, “Why? go to Shutter Priority Mode with EC and AUTO ISO.” When you are facing a succession of unexpected situations — who knows what I might stumble upon while walking in nature?, this set-up makes much more sense to me than Manual mode. The catch is that you need to be able to quickly analyze each scene, subject and background, so that you can properly set the EC.
As I began my walk onto the pier, it was white-sky-cloudy, so I set the EC to +2.3 stops and the shutter speed to 1/3200, wanting to be ready should something decent fly by. When I saw the five Mottled Ducks getting nervous as I approached them, I raised the lens and acquired focus. As the lake with some scattered marsh grasses was darker overall than the sky, I quickly turned the Thumb Dial two clicks counter-clockwise to reduce the EC from +2.3 stops to +1.7 stops. That turned out to be a brilliant move as the exposure was perfect with only some small areas of water showing as over-exposed.
While the arrangement of the five ducks is not quite perfect, it is pretty sweet. In addition, I love the painterly look and feel of the image. And there are some pretty neat wing positions as well along with lots of flying water droplets. Not bad for a grab shot.
Click on the image to better see the green eye-AF boxes in action.
Sony Alpha 1 Flight Photography AF Points!
The SONY Alpha a1 Set-up Guide and Info Group: $150.00 (or Free)
The SONY Alpha a1 Set-up Guide and Info Group is going great guns as more and more folks chime in with thoughtful questions and experience-based answers. As the a1 is becoming more readily available, more and more folks are getting their hands on this amazing body. By June 1, 2022, the group was up to an astounding 124 lucky and blessed folks. (More than a few folks own two or more a1 bodies! Early on, we discussed the myriad AF options. I gave my opinion as to the best one for flight and general bird photography. The best news is that everyone in the group receives an e-mail that includes a .DAT file with my a1 settings on it, and explicit directions on how to load my settings onto your a1; talk about convenience! I am now offering a .DAT file compatible with firmware update 1.20. Your entry into the group includes a consolidated Sony a1 CAMSETA2 INFO & GUIDE. New a1 folks will now receive six e-mails instead of the previous 28! You will receive new e-mails as they are published. Simply put, this e-mail guide is an incredible resource for anyone with an a1.
All who purchased their Alpha 1 bodies via a BAA affiliate link — B&H or Bedfords — will receive a free Sony Alpha a1 Set-Up Guide and free entry into the Info Updates group after shooting me their receipts via e-mail. (Note: it may take me several days to confirm B&H orders.). Others can purchase their guide here in the BAA Online Store.
This image was also created on 26 November 2023 on the pier at Indian Lake Estates. Again, while standing at full height, I used the handheld Sony FE 70-200mm f/2.8 GM OSS II lens with the Sony FE 2x teleconverter (zoomed out to 240mm for this one), and The One, the Sony Alpha 1 Mirrorless Digital Camera.. The exposure was determined via Zebras with Exposure Compensation on the Thumb Dial. Multi-metering +2.0 stops in Shutter Priority mode. AUTO ISO set ISO 3200: 1/3200 sec. at f/5.6 (wide open). AWB at 9:07:25am on a variably cloudy morning.
Tracking: Zone/AF-C with Bird-Eye/Face Detection performed perfectly. Click on the image to enjoy a high-res version.
Image #2: Boat-tailed Grackle — dorsal view of female in flight
The Crapshoot
There are almost always Boat-tailed Grackles on the pier railings. Naturally, as you walk by, they take flight. By evaluating the wind and sky conditions, and noting the pattern of take-offs, it is rarely possible to come up with a good flight chance or two. The smaller, lighter peashooter rig gives me a much better chance of succeeding in this situation than the larger, heavier 200-600.
When this female boat-tailed took flight toward the shore, I got the lens on the bird, acquired focus, panned quickly and erratically, and fired off about 15 frames. I managed to get the whole bird in the frame in only two images. I had one spectacular dorsal flight pose, but that image was not as sharp as today’s Image #2. That surely because I was unable to keep the bird anywhere near the middle of the frame.
When I was shooting Canon and Nikon dSLRs, I could never have envisioned even attempting flight shots of medium sized songbirds. With today’s incredible mirrorless cameras, pretty much anything is possible.
Click on the composite to view a larger version and be even more impressed.
First of all, if you use Nikon or Canon (or Olympus or Fuji) gear, do not be put off by the title. While a portion of the guide deals with the Sony α-1, there is a ton of priceless information, tips, and techniques that can help you become a better flight photographer. No matter what system you are using. If you do not use an α-1, be sure to read down to the bottom to save a few bucks.
Arash Hazeghi and Arthur Morris have created the definitive and most comprehensive ever treatise on photographing birds in flight. With more than sixty years of experience photographing birds, they know what you need to know but have not figured out yet! You will be astounded by the depth of their knowledge and the tips they have to offer. More than six months in the making, the guide contains 229 pages, 24,321 words,97 exceptional and inspirational flight images — each with a legendary, enlightening BIRDS AS ART caption, and 22 screen captures. The guide contains a wealth of useful, practical, and for the most part — never-before-available information.
We will teach you the basic concepts that you need to master to become a great flight photographer along with the techniques used by the world’s best flight photographers.
You will learn that most any telephoto lens can be perfect for flight photography in a given situation; focal lengths for the images in the book range from 200mm to 1200mm and everywhere in between.
We discuss the merits of various lenses in depth, including and especially comparing the 400mm f/2.8 lenses with the 600mm f/4s.
We guide you in getting your hands on the flight photography lens that will best meet your needs. We offer a variety of handholding and rest position tips and include tips on working with a big lens on a tripod when working with a flight lens that is otherwise too heavy for you.
Both authors offer their thoughts on getting the right exposure when photographing birds in flight. You will learn to get the right exposure on foggy days and even when photographing black birds in white sky conditions.
You will learn the tremendous importance of pre-focusing, of finding the bird in the viewfinder quickly, acquiring focus almost instantly (with tips on doing all three).
You will learn the role of image stabilization in flight photography and the best settings.
Both authors share their thoughts on using the focus range limiter switch. In the same vein, you will learn to use Direct Manual Focus to make your flight photography life easier.
All will learn about the best wing positions and the importance of the background with images of birds in flight. With lots of examples.
You will learn about the best shutter speeds (and the best aperture) to use when photographing flying birds.
You will learn to photograph flight while seated and the many advantages of doing so.
You will learn the best methods of controlling high ISO noise.
All will learn to format their flash cards properly and safely.
You will learn what to do when your AF system is temporarily blinded.
All will learn the huge effect that wind strength and direction has on flight photography and to evaluate the quality and direction of the light on both sunny and cloudy days.
You will learn why it is vitally important to shoot aggressively when photographing birds in flight.
You will learn to carefully observe and evaluate a variety of bird behaviors that may shine light on some excellent opportunities for photographing birds in flight. And about getting into the best position from which to photograph.
You will learn to be a much better flight photographer.
What Sony Folks Will Learn
Exactly how Artie uses Zebras to come up with perfect exposure after perfect exposure.
The fine points and recommended settings for Optical Steady Shot (OSS).
The concept of Auto-Focus (AF) tracking in the α-1.
Everything there is to know about the complex Sony autofocus system.
About all the AF patterns, how to quickly switch them, and about those favored by each author. And why.
The Tracking and Non-tracking AF patterns. When and why Arash uses Non-Tracking Zone. And why Artie uses only two AF patterns.
How to set and use Bird Face-Eye detection for flight photography.
How and why to assign various custom functions to the various programmable buttons on the α-1 body.
The perfect settings for the many, many Menu items that are vitally related to flight photography.
How and why the Sony α-1 uses both contrast and phase detection AF to determine focus (and the benefits thereof).
Which are the best memory cards for the Sony α-1.
To quickly access frequently used menu items.
Non-Sony α-1 Discount
Using the honor system, folks who do not use a Sony α-1 body are invited to click here to save $25.00 on the purchase price of the guide.
Typos
With all blog posts, feel free to e-mail or to leave a comment regarding any typos or errors.
In mid-August of this year, I discovered that I could not remove the drop-in filter on my Sony 600mm f/4. It needs to be cleaned every few weeks. So, with some trepidation, I sent the lens to Sony repair in LA in late August. Other than the stuck filter, the lens had been working perfectly. I was pleased to note that Sony picked up the round-trip, overnight Fed Ex shipping charges as part of my Sony Pro Support membership ($100.00/year).
In early September they told me that the filter was stuck because “of sand getting into the unit.” Understandable. They stated that they had cleaned the entire lens as it was “full of sand.” Again understandable. Two weeks later I received another e-mail: they had discovered a problem with the AF system and needed a part that was out of stock. Several weeks after that, they told me that the part had come in, but when they began the repair, they discovered that they needed another part that was of course out of stock. At that point I decided to grab a loaner. While I love the 400mm f/2.8, there are times when I need and depend on the 600, especially at Sebastian Inlet.
On October 23, I got an e-mail stating that the lens would be returned to me in perfect working condition. The first time that I attached an a-1 to the lens it was obvious that the lens was inoperable. The camera could not read the lens; all I saw in the EVF was “f-” instead of the aperture. Unfortunately, I had returned the loaner before checking the lens.
I returned the lens to Sony and grabbed another loaner. I immediately got an e-mail asking if I had taken the lens to the beach as it was again “full of sand.” I wrote back stating that I had not taken the lens into the field and that sand they had found must have been leftover from the first “cleaning.”
The next e-mail said that the unit needed a new motherboard that was, of course, out of stock. On November 22, just about three months to the day that I sent it in, I got my lens back.
The first thing that I did when when testing the lens was shoot it with the 2X. Checking out today’s featured images you will see that the sharpness at 1200mm is spot on; I am very happy with the repairs.
Used Gear Updates
Canon EOS 7D Mark II with Extras
Good friend and many multiple IPT veteran Indranil Sircar is offering a Canon EOS 7D Mark II in excellent plus condition with several extras for a very low $449.00. The shutter count is 31001. The sale includes the Canon Battery Grip BG-E16 (a roughly $69.00 value), two Canon batteries, the original box, the cables and software and manuals, the battery charger, the front body cap, Canon Remote Release RS-80N3 (a roughly $50.00 value) and insured ground shipping via UPS to lower-48 US addresses only.
If you are looking to get started with a Canon dSLR, Indranil’s 7DII is perfect for you. Both Patrick Sparkman and I used and loved the 7D Mark II bodies until about ten years ago when we both committed to using full-frame Canon bodies. We both made some truly great images with it. Two of my three 2016 Nature’s Best honored entries were created with the 7D II, one still, and one video. The 7D Mark II remains one of the greatest-ever values in a digital camera body. artie
Canon EOS 5D Mark IV with Extras
Good friend and many multiple IPT veteran Indranil Sircar is offering a Canon EOS 5D Mark IV in excellent plus condition with several extras for a very low $999.00. The sale includes the Canon Battery Grip BG-E20 (a roughly $229.00 value), two Canon batteries, the original box, the cables and software and manuals, the battery charger, the front body cap, and insured ground shipping via UPS to lower-48 US addresses only.
What can I say? The 5D IV was my favorite-ever Canon digital dSLR. I owned and used three of them while my 1DX II and a 1DX III sat on the shelf in my garage. A new 5D Mark IV, with its 30.4MP full-frame CMOS sensor, sells new for $$2,699. If you have been dreaming of a 5D IV, grab Indranil’s 5D IV right now and save an astounding $1,700.00. artie
Canon EF 135mm f/2.0L USM Autofocus Telephoto Lens
BAA Record-low Price!
John Nelson is offering a Canon EF 135mm f/2.0L USM autofocus telephoto lens in excellent condition for a BIRDS AS ART record-low $599.00. The sale includes the soft pouch, the hood, the front and rear lens caps, and insured ground shipping via major courier to lower-48 US addresses only. Your item will not ship until your check clears unless other arrangements are made.
Ideal for portraiture, the EF 135mm f/2L USM is a medium telephoto prime and a member of Canon’s L-series of lenses. The long focal length coupled with the f/2 maximum aperture afford a great deal of control over depth of field for isolating subject matter and using selective focus, and the bright aperture also benefits shooting handheld in low-light conditions. In regard to the optical design, the lens uses two ultra-low dispersion elements to control chromatic aberrations and color fringing for high clarity, and a Super Spectra coating has also been applied to suppress flare and ghosting for increased contrast and color accuracy. Complementing the imaging attributes, a ring-type USM is employed to deliver quick and quiet autofocus performance along with full-time manual focus. It is compatible with both the EF 1.4X and EF 2X teleconverters. B&H and Canon.
Canon EOS-1DX Mark II Digital SLR Camera with Extras!
BAA Record-low Price! Price reduced $200.00 on 25 November 2023
John Nelson is offering a Canon EOS-1DX Mark II dSLR camera in excellent condition for a BIRDS AS ART record low $1399.00 (was $1599.00). The sale includes the original box, one battery, the charger, the front body cap, four (4) 128 128GB CFast memory cards, cfast cards, and insured ground shipping via major courier to lower-48 US addresses only. Your item will not ship until your check clears unless other arrangements are made.
The 1DX Mark II is a rugged, fast Canon professional digital camera body. It features an excellent AF system and high quality image files with great dynamic range. When he used Canon, it was the first choice of Arash Hazeghi, the world’s premier photographer of birds in flight.Two iDX II served as my workhorse bodies for several years. And I loved them. artie
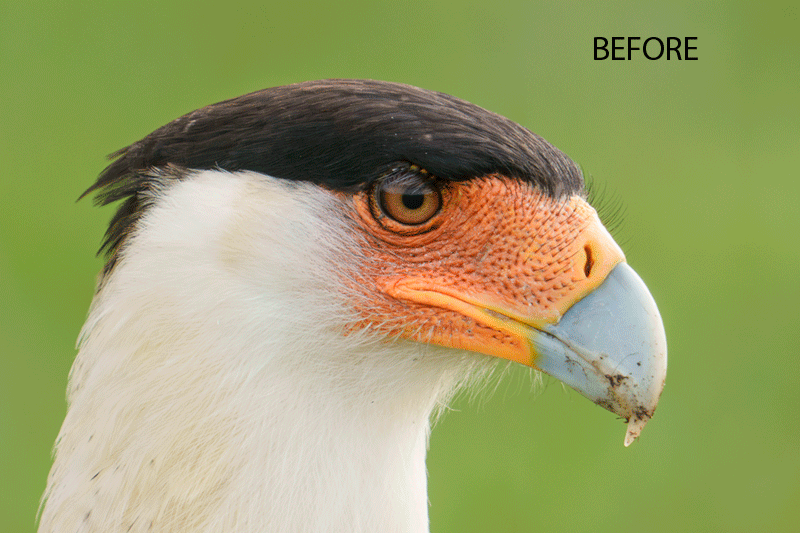
This image was created on 24 November 2023 down by the lake near my home at Indian Lake Estates, FL. Working from the driver’s seat of my SUV, I used the BLUBB-supported Sony FE 600mm f/4 GM OSS lens, the Sony FE 2.0x Teleconverter, and The One, the Sony Alpha 1 Mirrorless Digital Camera). The exposure was determined via Zebra technology with ISO on the thumb dial. ISO 2000. 1/500 sec. at f/8 (wide open) in Manual mode. When evaluated in RawDigger, the raw file exposure was determined to be dead-solid perfect. AWB at 8:31:59am in the shade, gently backlit on a sunny morning.
Tracking: Expand Spot/AF-C with Bird Face/Eye detection enabled performed perfectly even at 1200mm. Be sure to click on the image to enjoy a high-res version.
Image #1: Crested Caracara adult head and neck portrait
The ILE Caracara Situation
A pair of Crested Caracaras is building a nest in the same tree that they used last year. For the past few mornings, the pair has been feeding on the lawn in front of a home on Palmetto Drive along with a dozen or so Cattle Egrets.
Remember that if your super-telephoto lens has a Direct Manual Focus (DMF) switch, you need to set it to Off when you are working on a beanbag so that you do not inadvertently throw off the focus when framing or re-composing. Then you need to remember to turn it back on when you go back to normal use.
The Color Work and the Bill Clean-up
Using the new Luminance Targeted Adjustment Tool (L-TAT) makes it child’s play to adjust the Luminance and Saturation of the colors in each and every image. For the extensive bill clean-up, I used a variety of Photoshop tools, but the new Remove Tool was the most valuable. I will include this image in a future Volume I video. The Volume 1/#2 video will be distributed this coming Tuesday.
Be sure also to check out the Eye Doctor work.
The Digital Basics III Video Series
The Digital Basics III Video Series
I realized about a year ago that my digital workflow had changed significantly and was toying with the idea of writing a Digital Basics III. More recently, I have learned and begun working with two great new Photoshop Tools, the Remove Tool and the Luminance Targeted Adjustment Tool (L-TAT). The former is like a smarter Spot Healing Brush Tool on steroids and the latter is a huge step up from the fabulous Color Mixer Tool. During that same time frame, I came up with a new and improved 2-step noise reduction technique. I still use Divide and Conquer, Quick Masks, Layer Masks, an expanded array of personalized keyboard shortcuts, and tons of other stuff from both versions of Digital Basics.
As soon as I realized that I did not want to take on another large writing project, I realized that by creating a series of videos I could much more easily share all the details of my current digital workflow and much more easily incorporate additional new tips, techniques, and tools as I went. And so, The Digital Basics III Video Series was born. You can check out Volume I/#1 here or at the bottom of this blog post.
You might opt to purchase single videos or to subscribe to Volume I and save $26 by ordering the first five videos in one fell swoop. You can purchase the five videos in Volume I by clicking here. If you are a new subscriber to the series you will receive Volume I/#1 no later than tomorrow and Volume I/#2 on Tuesday.
The videos will be most valuable for folks using the latest version of Photoshop (2024) or Lightroom along with Topaz DeNoise AI and Topaz Sharpen AI.
This image was created on 9 November 2023 down by the lake near my home at Indian Lake Estates, FL. Working from the driver’s seat of my SUV, I used the BLUBB-supported Sony FE 600mm f/4 GM OSS lens, the Sony FE 2.0x Teleconverter, and The One, the Sony Alpha 1 Mirrorless Digital Camera). The exposure was determined via Zebra technology with ISO on the thumb dial. ISO 1000. 1/500 sec. at f/9 (stopped down 1/3-stop) in Manual mode. When evaluated in RawDigger, the raw file exposure was determined to be dead-solid perfect. AWB at 8:56:14am on bright sunny morning.
Tracking: Expand Spot/AF-C with Bird Face/Eye detection enabled performed perfectly even at 1200mm. Be sure to click on the image to enjoy a high-res version.
Image #2: Black Vulture adult portrait
Looking Quite Regal
This handsome adult Black Vulture posed for a 1200mm head portrait against the white sand of the Indian Lake Estates Beach. The “beach” is actually a sand pit to the left of the pier. Though it cost a pretty penny to build, the birds are the only creatures I have seen using it.
The New Remove Tool
There were about a zillion specks of whitewash on this handsome vulture’s face and several more on its feathers. For the extensive clean-up, I used a special technique with new Remove Tool. I will be including that technique in a future Volume I video. The Volume 1/#2 video will be distributed this coming Tuesday.
This image was created on 24 November 2023 down by the lake near my home at Indian Lake Estates, FL. Working from the driver’s seat of my SUV, I used the BLUBB-supported Sony FE 600mm f/4 GM OSS lens, the Sony FE 2.0x Teleconverter, and The One, the Sony Alpha 1 Mirrorless Digital Camera). The exposure was determined via Zebra technology with ISO on the thumb dial. ISO 1000. 1/1250 sec. at f/8 (wide open) in Manual mode. When evaluated in RawDigger, the raw file exposure was determined to be perfect. AWB at 8:51:12am on sunny morning.
Tracking: Expand Spot/AF-C with Bird Face/Eye detection enabled performed perfectly even at 1200mm. Be sure to click on the image to enjoy a high-res version.
Image #3: Turkey Vulture adult and Black Vulture juvenile head portrait juxtaposition
A Comparative Juxtaposition
Tight head shots of both species of vultures when working at 1200mm at ILE are easy peasy. When I saw a TV and a BV perfectly aligned atop a small rise adjacent to the parking circle near the pier, I placed the lens on the BLUBBbefore I began my approach. Then I slowly and carefully drove my vehicle into just the right spot.
The birds remained nicely juxtaposed for about two minutes. I created about two dozen images, kept two slightly different ones, and optimized just the one above.
Car-As-Blind Technique Question
When working from a vehicle, why do you need to place the lens on the BLUBBbefore making a close approach?
Typos
With all blog posts, feel free to e-mail or to leave a comment regarding any typos or errors.
Thanks for the many interesting and insightful comments at yesterday’s blog post.
All images from Homer or Kachemak Bay, AK
2024 Homer/Kachemak Bay Bald Eagle IPTs
IPT #1: WED 21 FEB 2024 through the full day on SUN 25 FEB 2024. Five full days/20 hours on the boat: $5500.00. Limit 5 photographers/Openings: 1.
IPT #2: MON 26 FEB 2024 through the full day on FRI 1 MAR 2024. Five full days/20 hours on the boat: $5500.00. Limit 5 photographers. Limit 5 photographers/Openings: 1.
Register for both trips to maximize your travel dollars and enjoy a $1000 discount while you are at it.
This trip features non-stop flight photography as well as many opportunities to create both environmental and point-blank portraits and head shots of one of North America’s most sought-after avian subjects: Bald Eagle (Haliaeetus leucocephalus). Other reliable subjects will include Sea Otter, Glaucous-winged and Short-billed (formerly Mew) Gulls.
In addition, we should see (and possibly get to photograph) Common Murre, Pigeon Guillemot, Pelagic Cormorant, two or three species of loons, and a smattering of ducks including two species of merganser, all three scoters, Common and Barrow’s Goldeneyes, Bufflehead, Harlequin, and Long-tailed Ducks. Close-range photographic chances for these species will require some luck. Some of these species, especially when in flocks, can, however, often be used effectively when pleasing creating bird-scapes. In most years we have chances for Short-eared and Great Grey Owl, Grey-crowned Rosy Finch, and Moose in and around Homer.
You will enjoy working with the best and most creative boat captain in Homer on his sturdy, photography-spacious, seaworthy, open-deck watercraft.
There will be only five photographers (not the usual six), plus the leader on these trips.
Almost endless small group Photoshop, Image Review, and Image Critiquing sessions.
If we need to be out early, we will be the first boat out. If the conditions are great, we will stay out. And when there is a chance for sunset silhouettes, we will be in the right spot at the right time. And ad we will be traveling through gorgeous wilderness country, landscape and scenic opportunities abound.
Also featured is a professional leader, often referred to as the world’s most knowledgeable bird photography trip leader and instructor. He is conversant in Canon, Nikon, and Sony. You will learn practical and creative solutions to everyday photographic problems. You will learn to see the shot, to create dynamic images by fine-tuning your compositions, to best utilize your camera’s AF system, and how to analyze the wind, the sky conditions, and the direction and quality of the light. This is one of the very few trips Homer trips available where you will not be simply put on the birds and told to have fun. You will learn to be a better photographer.
Homer 2022 Bald Eagle Highlights and Handholding Compositional Tips by Arthur Morris/BIRDS AS ART
Enjoy and be inspired by just a few Homer Bald Eagle highlight images. Hand holding intermediate telephoto lens will always yield slightly different compositions. Learn more about that topic in this short (3:14) video.
All images from Kachemak Bay in 2022!
What You Will Learn
You will learn practical and creative solutions to everyday photographic problems. You will learn to see the shot, to create dynamic images by fine-tuning your compositions, to best utilize your camera’s AF system, and how to analyze the wind, the sky conditions, and the direction and quality of the light. This is one of the very few trips Homer trips available where you will not be simply put on the birds and told to have fun. You will learn to be a better photographer. But only if that is what you want.
You will learn to get the right exposure when it is sunny, when it cloudy-bright, when it is cloudy, when it is cloudy-dark, or when it is foggy. Not to mention getting the right exposure when creating silhouettes. You will learn to make pleasing blurs and to create silhouettes working in Shutter Priority mode when the situation is right. Most importantly you will learn to pick your best flight images from tens of thousands of images.
All images from Homer or Kachemak Bay, AK
What’s Included
One four hour or two two-hour boat trips every day (weather permitting), all boat fees and boat-related expenses (excluding tips), ground transportation to and from the dock and back to the hotel each day, in-the-field instruction and guidance, pre-trip gear advice, small group post-processing and image review sessions, and a thank you dinner.
What’s Not Included
Your airfare to and from Homer, AK (via Anchorage), the cost of your room at Land’s End Resort, all personal items, all meals and beverages, and a tip for the boat captain.
Please Note
On great days, the group may wish to photograph for more than four hours. If the total time on the boat exceeds 20 hours for the five-day trips the group will share the additional expense at a rate of $225/hour. The leader will pay for the bait.
Some folks may wish to rent their own vehicle to take advantage of local photographic opportunities around Homer. In 2023 those included Moose, Great Grey, and Short-eared Owls.
Deposit Information
A $3000 non-refundable deposit/trip is required. You may pay your deposit with credit card or by personal check (the latter made out to BIRDS AS ART) and sent via US mail only to Arthur Morris. PO Box 7245. Indian Lake Estates, FL 33855. Your balance, due 60 days before the date of departure, is payable only by check (as above).
In Closing
I have been going to Homer off and on for close to two decades. Every trip has been nothing short of fantastic. Many folks go in mid-March. The earlier you go, the better the chances for snow. The only way to assure that you are on the best of these two trips is to sign up for both of them. Can you keep up with me? If you have any questions, or are good to go for one, or two of these great trips, please let me know via e-mail or give me a call on my cell phone at 863-221-2372.
Via Comment by Bob Eastman
Happy Thanksgiving Sir. Anyone looking for an amazing time, get to Homer with artie. There is so much to see. Not to mention hundreds and hundreds of Bald Eagles so close. To see them up close and personal is truly something to behold; portraits and flight are a given and you name, and it is there.
Always with love b
This image was created on 27 February 2023 on an Instructional Photo-Tour at Kachemak Bay, Homer, AK. I used the handheld Sony FE 70-200mm f/2.8 GM OSS II lens with the Sony FE 1.4x Teleconverter (at 223mm) and The One, the Sony Alpha 1 Mirrorless Digital Camera.. The exposure was determined via Zebras with ISO on the rear dial. ISO 500: 1/3200 sec. at f/4 (wide open) in Manual mode. AWB at 3:55:18pm on a sunny afternoon.
Tracking: Zone/AF-C with Bird-Eye/Face Detection performed well enough. Click on the image to enjoy a high-res version.
Image #1: Bald Eagle starting dive
Headless Birds?
Can an image of a bird be successful if you cannot see its head and its eye (or eyes)? Do you like this one or would it be an insta-delete for you?
Image #2: The Photo Mechanic screen capture for the Glaucous-wing Gull flying in front of the reflection muted sun image
2,961,500 Over-exposed Pixels
Would you delete this one? Why? Or is it possible to successfully optimize an image with nearly 3 million over-exposed pixels (albeit out of 51 million)?
Bright Sun Image Capture Difficulties
Unless the sun is very well muted, including it (or its reflection) in the frame will almost always result in millions of over-exposed pixels. The problem is unavoidable. If you expose so as to avoid over-exposing the sun (or its reflection), everything else — be it sky or water, will be rendered black. No matter how you meter or how you set your exposure, the case is closed.
This image was created on 22 February 2022 on an Instructional Photo-Tour at Kachemak Bay, Homer, AK. I used the handheld Sony FE 200-600mm f/5.6-6.3 G OSS lens (at 559mm) and The One, the Sony Alpha 1 Mirrorless digital camera. ) The exposure (for images with red sky backgrounds) was determined using Zebra technology with Exposure Compensation on the Thumb Dial. Shutter Priority +1.7 stops. AUTO ISO set ISO 320: 1/2000 second at f/6.3 (wide-open) in Manual Mode. AWB at 6:44:29pm on a mostly sunny afternoon. RawDigger showed the exposure to be perfect.
Tracking: Zone/AF-C with Bird Face/Eye Detection performed perfectly. Be sure to click on the image to enjoy a high-res version.
Image #2A: Glaucous-wing Gull flying in front of the reflection of a somewhat muted sun
Thanks to Ryan Sanderson for correcting my mis-identification
The Optimized Image
Even with the Exposure slider pulled down 2/3 stop, the White slider at -100, and the Highlight Slider set to -100, the reflection of the sun in the water was massively over-exposed. What to do? Replace the over-exposed pixels by any means. The big key was trying Content-Aware Fill. I was shocked at how successful that approach was. After that, it was a matter of using the Clone Stamp Tool, the new Remove Tool, and then smoothing everything with a Layer of Gaussian Blur painted in as needed after the addition of a Hide-all (Black, or Inverse) Layer Mask.
Your Call?
Like it or hate it?
Typos
With all blog posts, feel free to e-mail or to leave a comment regarding any typos or errors.
I got the reference to the song, one of my favorites, immediately. Well done. Making photographic images is increasingly manipulating computers. I still like the physical, mechanical aspects of photography, and miss some of them. I tried to photograph Jupiter last night with my new Canon R7 but I couldn’t find it in the EVF, so I had to use my 7D2 with its beautiful bright OVF.
Arthur Morris/BIRDS AS ART. November 22, 2023 at 6:27am:
Hi David,
Thanks for enjoying my reference to “Don’t It Make My Brown Eyes Blue.” Not sure about your problems finding Jupiter other than to say that the brightness of EVFs is controlled by the exposure settings.
re:
“Making photographic images is increasingly about {sic} manipulating computers.”
With digital, the photographer get to control how his or her images look. With film, that was the job of the lab. I far prefer the former, in fact, for me, processing images is one of the great joys of digital photography.
with love, artie
Furthermore …
I see the raw files that I create simply as digital negatives, to be developed and enhanced as I see fit. With the Turkey Vulture white sky image featured in the previous blog post, by properly exposing far to the right, the blue in the sky was in the raw file, waiting to be enhanced.
As for me, I wish that I had never heard the word “film.”
Your Call?
If you used film and switched to digital as many of us did, which do you prefer, and why?
What’s Up?
After checking the weather for Vero Beach on Monday evening, I got excited. The forecast was calling for 15-20mph winds from the southeast, perfect for Sebastian Inlet. Jim and I woke early and arrived at the State Park at 6:40am. The wind and sun were aligned perfectly. There were dozens of Ospreys in the air fishing. There were two problems. The only birds catching anything were south of the south jetty, backlit and flying away. Crossing the bridge, I found that the birds hunting above the Northwest Pool were fishing but not diving and thus not catching. Though almost everyone photographing at Sebastian has eyes only for Osprey, there are many other birds to photograph. I had a great morning doing flight and action (flapping after bathing) photography; subjects included Royal and Caspian Tern, an adult Lesser Black-backed Gull, juvenile Herring Gull, first winter Laughing Gull, Brown Pelican, Great Egret, Snowy Egret, Wood Stork, Willet, and Ruddy Turnstone. I considered returning on Wednesday morning but slept in once I saw the forecast for a strong SW wind. Winds from the east and/or the south have been rarer than hen’s teeth on both central Florida coasts this fall.
Today is Thursday 23 November 2023. Enjoy the football and the food and try not to eat too, too much. Though the forecast is calling for partly cloudy skies with a light NW breeze (far less than ideal), I will head down to the lake for a bit.
Wherever you are a whatever you are doing, I hope that you too have a great day.
Please remember to use the B&H and Amazon links that are found on most blog pages and to use the BIRDSASART discount code at checkout when purchasing your new gear from Bedfords to get 3% back on your credit card and enjoy free second-day air FedEx. Please, also, consider joining a BAA IPT. You will be amazed at how much you will learn!
You can find some great photo accessories (and necessities, like surf booties!) on Amazon by clicking on the Stuff tab on the orange/yellow menu bar above. On a related note, it would be extremely helpful if blog-folks who, like me, spend too much money on Amazon, would get in the habit of clicking on the Amazon logo link on the right side of each blog post when they shop online. As you might expect, doing so will not cost you a single penny, but would be appreciated tremendously by yours truly. And doing so works seamlessly with your Amazon Prime account.
If an item — a Delkin flash card, or a tripod head — for example, that is available from B&H and/or Bedfords, is also available in the BAA Online Store, it would be great, and greatly appreciated, if you would opt to purchase from us. We will match any price. Please remember also to use my B&H affiliate links or to earn 3% cash back at Bedfords by using the BIRDSASART discount code at checkout for your major gear purchases. Doing either often earns you free guides and/or discounts. And always earns my great appreciation.
Image #1: Ring-billed Gull image by Dave Goldberg
The Photo Mechanic screen capture for today’s featured image
The Raw File
I came across Dave Goldberg’s Ring-billed Gull image in the Avian Forum at Bird Photographers.Net.
You can see Dave’s original post, several excellent comments, and several reposts in the thread here.
Everyone agreed that the image was processed too dark and that that the white balance was off. I asked, and Dave kindly sent me the raw file. The Photo Mechanic histogram above shows significant underexposure. Evaluating the raw file in RawDigger, however, revealed that the exposure was perfect, only 1/3-stop from dead solid prefect.
The BIRDS AS ART Current Workflow e-Guide (Digital Basics II).
You can order your copy from the BAA Online Store here, by sending a PayPal for $40 here, or by calling Jim or Jennifer weekdays at 863-692-0906 with your credit card in hand. Be sure to specify Digital Basics II.
The BIRDS AS ART Current Workflow e-Guide (Digital Basics II)
The techniques mentioned above and tons more great Photoshop tips and techniques — along with my complete digital workflow, Digital Eye Doctor Techniques, and all my personalized Keyboard Shortcuts — are covered in detail in the BIRDS AS ART Current Workflow e-Guide (Digital Basics II), an instructional PDF that is sent via e-mail. Note: folks working on a PC and/or those who do not want to miss anything Photoshop may wish to purchase the original Digital Basics along with DB II while saving $15 by clicking here to buy the DB Bundle.
Please note: the Divide and Conquer technique was inadvertently omitted from DB II. It is detailed in a free excerpt in the blog post here.
Folks who learn well by following along rather than by reading can check out the complete collection of MP 4 Photoshop Tutorial Videos by clicking here. Note: most of the videos are now priced at an amazingly low $5.00 each.
You can learn how and why I converted all of my Canon digital RAW files in DPP 4 in the DPP 4 RAW Conversion Guide here. More recently, I became proficient at converting my Nikon RAW (NEF) files in Adobe Camera Raw. About three years ago I began converting my Nikon and Sony RAW files in Capture One and did that for two years. You can learn more about Capture One in the Capture One Pro 12 Simplified MP4 Video here. The next step would be to get a copy of Arash Hazeghi’s “The Nikon Photographers’ Guide to Phase One Capture One Pro e-Guide” in the blog post here. Today, I convert my Sony raw files in Photoshop with Adobe Camera Raw.
You can learn advanced Quick Masking and advanced Layer Masking techniques in APTATS I & II. You can save $15 by purchasing the pair.
Image #2: Ring-billed Gull on post. Image courtesy of and copyright 2023: Dave Goldberg.
Image optimization by BIRDS AS ART
Optimizing the Image
I used click White Balance and went to work. I set the sliders in the Colors, Light, and Effect panels as per my DB III workflow. I used my recently developed two-step noise reduction technique and the new Remove Tool for a bit of image clean-up mainly on the wooden post and the bird’s bill. The Luminance Targeted Adjustment Tool (L-TAT) did a great job of brightening the background and the gull’s bill. The most difficult part of the image optimization for me was getting rid of the water. I used a series of Quick Masks refined by regular Layer Masks, the Patch Tool, and the Clone Stamp. The background was smoothed with a layer of Gaussian Blur refined by a Hide-All (Inverse or Black) Layer Mask.
Finally, I used Content-Aware crop to level the image and add room above and left.
The Digital Basics III Video Series
The Digital Basics III Video Series
I realized about a year ago that my digital workflow had changed significantly and was toying with the idea of writing a Digital Basics III. More recently, I have learned and begun working with two great new Photoshop Tools, the Remove Tool and the Luminance Targeted Adjustment Tool. The former is like a smarter Spot Healing Brush Tool on steroids and the latter is a huge step up from the fabulous Color Mixer Tool. During that same time frame, I came up with a new and improved 2-step noise reduction technique. I still use Divide and Conquer, Quick Masks, Layer Masks, an expanded array of personalized keyboard shortcuts, and tons of other stuff from both versions of Digital Basics.
As soon as I realized that I did not want to take on another large writing project, I realized that by creating a series of videos I could much more easily share all the details of my current digital workflow and much more easily incorporate additional new tips, techniques, and tools as I went. And so, The Digital Basics III Video Series was born. You can check out Volume I/#1 here.
You might opt to purchase single videos or to subscribe to Volume I and save $26 by ordering the first five videos in one fell swoop. You can purchase the five videos in Volume I by clicking here. The videos will be most valuable for folks using the latest version of Photoshop (2024) or Lightroom along with Topaz DeNoise AI and Topaz Sharpen AI.
Typos
With all blog posts, feel free to e-mail or to leave a comment regarding any typos or errors.
I realized about a year ago that my digital workflow had changed significantly and was toying with the idea of writing a Digital Basics III. More recently, I have learned and begun working with two great new Photoshop Tools, the Remove Tool and the Luminance Targeted Adjustment Tool. The former is like a smarter Spot Healing Brush Tool on steroids and the latter is a huge step up from the fabulous Color Mixer Tool. During that same time frame, I came up with a new and improved 2-step noise reduction technique. I still use Divide and Conquer, Quick Masks, Layer Masks, an expanded array of personalized keyboard shortcuts, and tons of other stuff from both versions of Digital Basics.
As soon as I realized that I did not want to take on another large writing project, I realized that by creating a series of videos I could much more easily share all the details of my current digital workflow and much more easily incorporate additional new tips, techniques, and tools as I went. And so, The Digital Basics III Video Series was born. You can check out Volume I/#1 here.
You might opt to purchase single videos or to subscribe to Volume I and save $26 by ordering the first five videos in one fell swoop. You can purchase the five videos in Volume I by clicking here. The videos will be most valuable for folks using the latest version of Photoshop (2024) or Lightroom along with Topaz DeNoise AI and Topaz Sharpen AI.
My Call
In the Colors of San Diego in Winter blog post here, my two top favorite images were the Pelagic Cormorant pan blur (for the sharpness, the degree of blurring, and the wonderful colors), and the Brown Pelicans on cliff in predawn pink/blue (for the soft pastel colors, the image design, and the incredible sharpness). The alert drake Wood Duck was a close third.
What’s Up?
I headed down to the lake on Sunday morning but things were pretty dead; I never even raised a lens. I’ve been swimming my half mile every day along with my 1 1/2 mile vitamin D walk.
Today is Monday 20 November 2023. I will be heading down to the lake again as soon as I publish this. Wherever you are a whatever you are doing, I hope that you too have a great day.
Please remember to use the B&H and Amazon links that are found on most blog pages and to use the BIRDSASART discount code at checkout when purchasing your new gear from Bedfords to get 3% back on your credit card and enjoy free second-day air FedEx. Please, also, consider joining a BAA IPT. You will be amazed at how much you will learn!
You can find some great photo accessories (and necessities, like surf booties!) on Amazon by clicking on the Stuff tab on the orange/yellow menu bar above. On a related note, it would be extremely helpful if blog-folks who, like me, spend too much money on Amazon, would get in the habit of clicking on the Amazon logo link on the right side of each blog post when they shop online. As you might expect, doing so will not cost you a single penny, but would be appreciated tremendously by yours truly. And doing so works seamlessly with your Amazon Prime account.
If an item — a Delkin flash card, or a tripod head — for example, that is available from B&H and/or Bedfords, is also available in the BAA Online Store, it would be great, and greatly appreciated, if you would opt to purchase from us. We will match any price. Please remember also to use my B&H affiliate links or to earn 3% cash back at Bedfords by using the BIRDSASART discount code at checkout for your major gear purchases. Doing either often earns you free guides and/or discounts. And always earns my great appreciation.
Image #1: The Photo Mechanic screen capture for today’s featured image
Mega Exposing-to-the-Right in Low Light Conditions
When photographing birds in flight (especially this with some dark feathers) in low light on white sky days, you need to ever-expose the sky by at least three stops in order to come up with a good exposure for the subject. The whole sky was (properly) covered with Zebras. The trick with Sony is to turn Zebras Off once you are confident of a good exposure. If you do not do that, you will not be able to see the subject for the Zebras. Details on toggling Zebras On and Off can be found in the Sony Info and Updates Group e-mails.
Note the mega exposed-to-the-right Photo Mechanic histogram.
Simply put, Photo Mechanic is by far the world’s fastest and best image browsing program. If you have been thinking about purchasing a Photo Mechanic license, you are advised to purchase yours here very soon as there may be some changes coming at Camera Bits. Use this link and then shoot me an e-mail with proof of purchase and request a free Getting Started with Photo Mechanic e-mail guide.
Image #2: The RawDigger screen capture for today’s featured image
Why 12 Million, 2 Thousand Over-Exposed Pixels?
What can I say? The combination of Zebras live in the viewfinder (with your camera set up properly) and post-capture study of the raw files in RawDigger makes it pretty much child’s play to come up with perfect exposure after perfect exposure, even in very difficult situations. It would be impossible to overstate how much I have learned by studying RawDigger and how much better my exposures have become since I started with the program almost three years ago. With the G channel climbing well up the 16000 line, the raw file brightness for today’s featured image is exactly what I wanted — well over-exposed for the sky. As a general rule, most folks are under-exposing their images by one to two stops on average in low light conditions when working with overall light-toned backgrounds.
RawDigger — not for the faint of heart …
Nothing has ever helped me learn to create perfect exposures to the degree that RawDigger has. I think that many folks are reluctant to learn that most of their images are underexposed by one or more full stops and that the highlight warnings in Photoshop, Lightroom, Capture One, and the in-camera histograms are bogus as they are based on the embedded JPEGs. Only your raw files tell the truth all the time. Heck, I resisted RawDigger for several years … Once you get over that feeling, RawDigger can become your very best exposure friend no matter what system you are using. On the recent IPTs and In-the-Field sessions, we have demonstrated that fact over and over again. Convincingly.
The RawDigger Adapted (pink) Histogram
In the RawDigger e-Guide, you will learn exactly how to set up the Adapted “pink” RawDigger Histogram and how to use it to quickly and easily evaluate the exposure or raw file brightness of images from all digital cameras currently in use.
RawDigger e-Guide with Two Videos
The RawDigger e-Guide with Two Videos
by Arthur Morris with Patrick Sparkman
The RawDigger e-Guide was created only for serious photographers who wish to get the absolute most out of their raw files.
Patrick and I began work on the guide in July 2020. At first, we struggled. We asked questions. We learned about Max-G values. We puzzled as to why the Max G values for different cameras were different. IPT veteran Bart Deamer asked lots of questions that we could not answer. We got help from RawDigger creator Iliah Borg. We learned. In December, Patrick came up with an Adapted Histogram that allows us to evaluate the exposures and raw file brightness for all images created with all digital camera bodies from the last two decades. What we learned each time prompted three complete beginning to end re-writes.
The point of the guide is to teach you to truly expose to the mega-Expose-to-the-Right so that you will minimize noise, maximize image quality, best utilize your camera’s dynamic range, and attain the highest possible level of shadow detail in your RAW files in every situation. In addition, your properly exposed RAW files will contain more tonal information and feature the smoothest possible transitions between tones. And your optimized images will feature rich, accurate color.
We teach you why the GREEN channel is almost always the first to over-expose. We save you money by advising you which version of RawDigger you need. We teach you how to interpret the Max G values for your Canon, Nikon, and SONY camera bodies. It is very likely that the Shock-your-World section will shock you. And lastly — thanks to the technical and practical brilliance of Patrick Sparkman — we teach you a simple way to evaluate your exposures and the raw file brightness quickly and easily the Adapted RawDigger histogram.
The flower video takes you through a session where artie edits a folder of images in Capture One while checking the exposures and Max-G values in RawDigger. The Adapted Histogram video examines a series of recent images with the pink histograms and covers lots of fine points including and especially how to deal with specular highlights. The directions for setting up the Adapted Histogram are in the text.
If we priced this guide based on how much effort we put into it, it would sell it for $999.00. But as this guide will be purchased only by a limited number of serious photographers, we have priced it at $51.00. You can order yours here in the BAA Online Store.
This image was also created on 3 November 2022, the wonderful fourth morning of the third DeSoto IPT. While seated on a hard-sand path, I used the shortened Robus RCM-439 4-Section Carbon Fiber Monopod, 65″/Wimberley MonoGimbal Head-supported Sony FE 400mm f/2.8 GM OSS lens
the Sony FE 1.4x Teleconverter, and The One, the Sony Alpha 1 Mirrorless Digital Camera). The exposure was determined via Zebra technology with Exposure compensation on the Thumb Dial. Shutter Priority +1.7-stops. AUTO ISO set ISO 800. 1/40 sec. at f/4 (wide open) in Manual mode. When evaluated in RawDigger, the raw file brightness was determined to be about 1/6-stop too dark. AWB at 8:02:58am as the sun broke through the early morning clouds.
Tracking: Zone/AF-C with Bird Face/Eye detection enabled performed to perfection. Be sure to click on the image to enjoy a high-res version.
Image #3: Turkey Vulture soaring flight
The Amazing New Luminance Targeted Adjustment Tool
I absolutely love cloudy days both for general bird photography and for flight. No shadows and revealing underwing detail come with the clouds. As we saw in Image #1, exposing properly to the right rendered the sky a featureless white. Learn to use the amazing new Luminance Targeted Adjustment Tool (L-TAT) in the Digital Basics III Video Series. Not only will it enable you to bring your white skies to life, L-TAT will also help you to adjust the Saturation and Luminance of all colors and thus bring your images to life. Note that I rarely do anything with the Hue slider.
Exposure reminder: properly exposed raw files should look dull and washed out, especially those made on cloudy days. Properly exposed-to-the-right raw files are larger in size than under-exposed raw files and contain far more valuable color and detail information.
The complete image optimization of today’s image will be one of three featured in the next DB III video, Volume I #2, coming later this week. L-TAT is available only in the latest versions of Photoshop and Lightroom. Scroll down for details.
Won’t You Make My White Skies Blue?
Apologies to songwriter Richard Leigh and American country music singer Crystal Gayle for crudely paraphrasing the title of their big hit, Don’t It Make My Brown Eyes Blue.
Click on the composite to view a larger version and be even more impressed.
First of all, if you use Nikon or Canon (or Olympus or Fuji) gear, do not be put off by the title. While a portion of the guide deals with the Sony α-1, there is a ton of priceless information, tips, and techniques that can help you become a better flight photographer. No matter what system you are using. If you do not use an α-1, be sure to read down to the bottom to save a few bucks.
Arash Hazeghi and Arthur Morris have created the definitive and most comprehensive ever treatise on photographing birds in flight. With more than sixty years of experience photographing birds, they know what you need to know but have not figured out yet! You will be astounded by the depth of their knowledge and the tips they have to offer. More than six months in the making, the guide contains 229 pages, 24,321 words,97 exceptional and inspirational flight images — each with a legendary, enlightening BIRDS AS ART caption, and 22 screen captures. The guide contains a wealth of useful, practical, and for the most part — never-before-available information.
We will teach you the basic concepts that you need to master to become a great flight photographer along with the techniques used by the world’s best flight photographers.
You will learn that most any telephoto lens can be perfect for flight photography in a given situation; focal lengths for the images in the book range from 200mm to 1200mm and everywhere in between.
We discuss the merits of various lenses in depth, including and especially comparing the 400mm f/2.8 lenses with the 600mm f/4s.
We guide you in getting your hands on the flight photography lens that will best meet your needs. We offer a variety of handholding and rest position tips and include tips on working with a big lens on a tripod when working with a flight lens that is otherwise too heavy for you.
Both authors offer their thoughts on getting the right exposure when photographing birds in flight. You will learn to get the right exposure on foggy days and even when photographing black birds in white sky conditions.
You will learn the tremendous importance of pre-focusing, of finding the bird in the viewfinder quickly, acquiring focus almost instantly (with tips on doing all three).
You will learn the role of image stabilization in flight photography and the best settings.
Both authors share their thoughts on using the focus range limiter switch. In the same vein, you will learn to use Direct Manual Focus to make your flight photography life easier.
All will learn about the best wing positions and the importance of the background with images of birds in flight. With lots of examples.
You will learn about the best shutter speeds (and the best aperture) to use when photographing flying birds.
You will learn to photograph flight while seated and the many advantages of doing so.
You will learn the best methods of controlling high ISO noise.
All will learn to format their flash cards properly and safely.
You will learn what to do when your AF system is temporarily blinded.
All will learn the huge effect that wind strength and direction has on flight photography and to evaluate the quality and direction of the light on both sunny and cloudy days.
You will learn why it is vitally important to shoot aggressively when photographing birds in flight.
You will learn to carefully observe and evaluate a variety of bird behaviors that may shine light on some excellent opportunities for photographing birds in flight. And about getting into the best position from which to photograph.
You will learn to be a much better flight photographer.
What Sony Folks Will Learn
Exactly how Artie uses Zebras to come up with perfect exposure after perfect exposure.
The fine points and recommended settings for Optical Steady Shot (OSS).
The concept of Auto-Focus (AF) tracking in the α-1.
Everything there is to know about the complex Sony autofocus system.
About all the AF patterns, how to quickly switch them, and about those favored by each author. And why.
The Tracking and Non-tracking AF patterns. When and why Arash uses Non-Tracking Zone. And why Artie uses only two AF patterns.
How to set and use Bird Face-Eye detection for flight photography.
How and why to assign various custom functions to the various programmable buttons on the α-1 body.
The perfect settings for the many, many Menu items that are vitally related to flight photography.
How and why the Sony α-1 uses both contrast and phase detection AF to determine focus (and the benefits thereof).
Which are the best memory cards for the Sony α-1.
To quickly access frequently used menu items.
Non-Sony α-1 Discount
Using the honor system, folks who do not use a Sony α-1 body are invited to click here to save $25.00 on the purchase price of the guide.
Typos
With all blog posts, feel free to e-mail or to leave a comment regarding any typos or errors.
We saw the sun on the Fall DeSoto IPT for a total of perhaps five minutes. We did not get to photograph American White Pelican. We did not see a single Roseate Spoonbill. And it rained the first two afternoons. What seemed on the surface to be an absolute disaster, turned out, however, to be a huge success. After suggesting that John Dupps switch from rear button to shutter button focus, rely on the in-viewfinder histogram to expose to the right, and check the JPEGs for blinkies, he began making consistently good images with his Nikon Z8 Mirrorless camera body and the Nikon NIKKOR Z 180-600mm f/5.6-6.3 VR lens. It took me a while to get first timer Paul Marbourg to realize that he could easily get closer to the very tame birds at DeSoto, that he need to use only Multi Metering with his a-1, and that he needed to expose to the right by raising the ISO for each and every image. I am proud to say that he got those messages and implemented them successfully. It did, however, take some tough love.
Alan Goodwin showed up with his first ever super telephoto lens, a brand new Sony 600mm f/4 GM, and his brand new Sony a-1. We shared an AirBnB. He added a pre-IPT day on Monday. On Sunday night, sitting on the couch at our place, I loaded my settings on his a1 and then taught him AF and exposure my way. The next morning, he began making some very good images right off the bat. I will be sharing many of the fine images he created on the IPT in a video here soon, along with the rest of the amazing tale of his early bird photography success. When I asked him at the end of the IPT how difficult it was to use the a-1, he replied, “It was easy.”
On Tuesday and Wednesday mornings, with afternoon rain in the forecast, our photo sessions ran four or five hours. After getting cleaned up, we met at the fabulous Neptune Grill in Gulfport, had a great lunch, and then enjoyed a four hour educational session. We shared images and got everyone set up with Photo Mechanic and more. The forecast for Thursday was rain all day. It never rained. We had a great morning session and then met at my (and Alan’s) AirBnb where I prepared a great brunch that was enjoyed by all but Alan who does his own thing eating all organic. Then we created the image optimization screen capture video detailed below. When the skies cleared, we met at East Beach for a short photo session before heading to Pia’s Veranda for an incredible thank you dinner. Everyone loved their meals. My Bone-in Veal Schnitzel with melted gruyere cheese, spaetzel, and braised cabbage with apples and onions was a top-five-ever meal for me. I did, however, finish the whole thing with the expected effect on my blood sugar. My bad, but it sure was good.
Today is Saturday 18 November. With only north and NW winds forecast for the next few days here at ILE, the photography outlook is looking rather bleak for at least a while. Wherever you are a whatever you are doing, I hope that you too have a great day.
Please remember to use the B&H and Amazon links that are found on most blog pages and to use the BIRDSASART discount code at checkout when purchasing your new gear from Bedfords to get 3% back on your credit card and enjoy free second-day air FedEx. Please, also, consider joining a BAA IPT. You will be amazed at how much you will learn!
You can find some great photo accessories (and necessities, like surf booties!) on Amazon by clicking on the Stuff tab on the orange/yellow menu bar above. On a related note, it would be extremely helpful if blog-folks who, like me, spend too much money on Amazon, would get in the habit of clicking on the Amazon logo link on the right side of each blog post when they shop online. As you might expect, doing so will not cost you a single penny, but would be appreciated tremendously by yours truly. And doing so works seamlessly with your Amazon Prime account.
If an item — a Delkin flash card, or a tripod head — for example, that is available from B&H and/or Bedfords, is also available in the BAA Online Store, it would be great, and greatly appreciated, if you would opt to purchase from us. We will match any price. Please remember also to use my B&H affiliate links or to earn 3% cash back at Bedfords by using the BIRDSASART discount code at checkout for your major gear purchases. Doing either often earns you free guides and/or discounts. And always earns my great appreciation.
B&H Simplified
To ensure that I get credit for your B&H purchases, you can always click here. The tracking is invisible but greatly appreciated. And, you can use your PayBoo card. You must use the website to order. B&H will reopen on Fri April 14. Thanking me for the past 4000 educational blog posts could not be any easier and will not cost you one penny. Please shoot me your B&H receipt for major purchases.
Bedfords Simplified
Click here to start your search. Choose standard shipping, and when you get to the payment page, enter BIRDSASART in the discount code box and hit apply. You will be upgraded to free second day air Fed-Ex and receive 3% cash back on your credit card once your stuff ships. Either is greatly appreciated by yours truly.
B&H
Many folks have written recently stating that they purchased a Sony a1 from B&H and would like their free membership in the Sony 1 Info and Updates Group, a $150.00 value. When I check my affiliate account, their orders have not been there. When I let them know that they get credit for B&H purchases only if they use one of the many B&H affiliate links on the blog or begin their searches with this link, they are always disappointed. If in doubt, please contact me via e-mail and request a BH link. I am always glad to help and to guide you to the right gear.
Bedfords Amazing BAA Discount Policy
Folks who have fallen in love with Bedfords can now use the BIRDSASART coupon code at checkout to enjoy a post-purchase, 3% off-statement credit (excluding taxes and shipping charges) on orders paid with a credit card. The 3% credit will be refunded to the card you used for your purchase. Be sure, also, to check the box for free shipping to enjoy free Second Day Air Fed-Ex. This offer does not apply to purchases of Classes, Gift Cards, prior purchases.
Visit the Bedfords website here, shoot Steve Elkins an e-mail, or text him on his cell phone at (479) 381-2592.
Important Note
As an Amazon Associate, I earn a small percentage when you purchase from Amazon after using any of the Amazon links on the blog (including the logo-link on the right side of each blog post page). My affiliate link works fine with Amazon Prime and using it will not cost you a single cent. Huge thanks, BTW 🙂
Gear Questions and Advice
Too many folks attending BAA IPTs and dozens of photographers whom I see in the field and on BPN, are — out of ignorance — using the wrong gear, especially when it comes to tripods and more especially, tripod heads. And the same is true in spades when ordering new camera bodies or lenses. My advice will often save you some serious money and may help you avoid making a seriously bad choice. Please know that I am always glad to answer your gear questions via e-mail. If you are desperate, you can try me on my cell at 863-221-2372. Please leave a message and shoot me a text if I do not pick up.
This image was created on 14 November on Fall Fort DeSoto IPT #4 by participant Alan Goodwin. Standing at full height he used the no-longer available Induro GIT 304L tripod/Levered-Clamp FlexShooter Pro-mounted Sony FE 600mm f/4 GM OSS lens with the Sony FE 1.4x Teleconverter, and The One, the Sony Alpha 1 Mirrorless Digital Camera.. ISO 2000. The exposure was determined by Zebras with ISO on the rear wheel: 1/2000 second at f/5.6 (wide open) in Manual mode. RawDigger showed that the raw file brightness was dead solid perfect. AWB at 12:31:32pm on a cloudy early afternoon.
Tracking: Zone/AF-C with Bird-Eye/Face Detection performed just fine in a difficult situation. Click on the image to enjoy the high-res version.
Image courtesy of and copyright 2023: Alan Goodwin
Image #1: White Ibis non-breeding smacked by a wave while feeding in surf
Image processing by BIRDS AS ART
My Oft Scoffed At Belief Justified
For the past few years, whenever the talk has turned to bird photography, I have stated often that in flight and action situations, total beginners using one of day’s amazing mirrorless camera bodies with their cameras set up correctly and a modicum of instruction, are capable of creating images equal to or better than images made by experience professionals.
The reaction has consistently been “No way.” Or astonishment.
After I saw Alan photographing this bird, I joined him and created more than 200 images. I deleted every one of them. Alan Goodwin, with a grand total of 1 1/2 days of experience with the Sony a-1 and a super telephoto lens, created a family jewel while I came up empty. With 481 over-exposed pixels in the specular highlights of the breaking wave (out of 51 million pixels), he had created a sharp image with a dead-solid perfect exposure.
QED (quod erat demonstrandum); my overall argument has just been proven. Thanks, Alan!
Image Optimization Sessions
Near the end of every IPT, I grab at least one image from each participant and get them on my Apple 16″ MacBook Pro (M2 Max, Silver), add one of mine, convert each raw file, and optimize each image from soup to nuts. I create a Camtasia screen recording, send a link to the video to the group, and suggest that they purchase the DB III Video Series 🙂
With Alan’s fine ibis image, we cropped it to a square, ran my new two-step noise reduction technique, cooled it down by reducing the color temperature, brightened it, improved the color with the new Luminance Targeted Adjustment Tool, and used the new Remove Tool to clean up the bill.
The Digital Basics III Video Series YouTube Promo
The Digital Basics and Digital Basics II PDFs have taught more than 8000 nature photographers to process their raw files optimally, to make them look great. In the new DB III Video Series, I will be doing three image optimizations/video. Each will include the three raw conversions. Keep reading to learn more.
The Digital Basics III Video Series
The Digital Basics III Video Series
I realized about a year ago that my digital workflow had changed significantly and was toying with the idea of writing a Digital Basics III. More recently, I have learned and begun working with two great new Photoshop Tools, the Remove Tool and the Luminance Targeted Adjustment Tool. The former is like a smarter Spot Healing Brush Tool on steroids and the latter is a huge step up from the fabulous Color Mixer Tool. During that same time frame, I came up with a new and improved 2-step noise reduction technique. I still use Divide and Conquer, Quick Masks, Layer Masks, an expanded array of personalized keyboard shortcuts, and tons of other stuff from both versions of Digital Basics.
As soon as I realized that I did not want to take on another large writing project, I realized that by creating a series of videos I could much more easily share all the details of my current digital workflow and much more easily incorporate additional new tips, techniques, and tools as I went. And so, The Digital Basics III Video Series was born. Keep reading to learn about Digital Basics III Volume I/#1. As below, you might opt to purchase single videos or to subscribe to Volume I and save $26 by ordering the first five videos in one fell swoop. You can purchase the five videos in Volume I by clicking here.
For folks using the latest version of Photoshop (2024) or Lightroom. Topaz DeNoise AI and Topaz Sharpen AI are a plus.
Digital Basics III Volume I/#1
Digital Basics III Volume I/#1
Nearly an hour in length, DB III/VOL I/#1 has you sitting by my side at my Apple 16″ MacBook Pro (M2 Max, Silver) as I optimize the three images above. You will see that I use and recommend only Photo Mechanic (for both MACs and PCs) for picking my keepers and browsing and that I do my raw conversions using Camera Raw (Version 16.0.0.1677) in Adobe Photoshop 2024 (25.0.0 Release). Note that Camera Raw is identical in Lightroom.
Right off the bat you will learn to customize the panels (sometimes called tabs) and put them in the order you wish to use them. For me, those include Color, Light, Detail, and Color Mixer. Then, for each image, I take you through all the raw conversion sliders including the Color Temperature (White Balance), setting the White and Black points, adjusting the Highlight and Shadow sliders, and rarely, setting the Exposure and Contrast sliders. You will learn to use the new Remove Tool, the new Luminance Targeted Adjustment Tool, and my two-step noise reduction strategy. I use all three of those on virtually every image that I process. The second image, the Short-eared Owl, was created at ISO 12800. You will learn why and how I used Topaz Sharpen AI on various images.
After the master .TIF files are saved, you will learn how I size and sharpen the stunning JPEGs that you see on the blog every day.
You can purchase DB III/Volume I/#1 for $25.00 by clicking here in the BAA Online Store. Or, you can opt to purchase the Volume I series, videos #1 to 5, for the bargain rate of $99.00 for the first five videos (as noted above). The plan is to publish about 1 video/week. If the project is well received, there will be future volumes. I have already picked the images for DB III, Volume I/#2!
Typos
With all blog posts, feel free to e-mail or to leave a comment regarding any typos or errors.
Best of love to my dear friend and health and spiritual advisor, Renaissance man and brilliant doctor, Cliff Oliver (HÇQ). He is undergoing nasty skin cancer surgery this morning in San Diego. If you are the praying type, please say a prayer for Cliff. All are asked to shoot him some healing love and energy. Tanks!
Light
Understanding the direction and qualities of light is one of the great keys to being a successful nature photographer. The next step is to study and grasp the relationship between sky conditions and the strength and direction of the wind. A San Diego IPT is a great place to learn about light and wind direction and how it affects bird photography.
What’s Up?
Alan Goodwin and I spent a great long morning together on Monday at Fort DeSoto. He showed up with his brand new Sony 600mm f/4GM lens and his brand new Sony a-1. He had never used a super telephoto lens before. He had never used an a-1 body before. After ten minutes of instruction, he began making great images. I will share some of those with you here in a future blog post.
On Tuesday John Dupps and Paul Marbourg joined us for the first day of the IPT. It was a huge learning experience for everyone. Alan was having a problem hitting buttons on the a1 that were screwing him up so we fixed three troublesome menu items and now he is as happy as a clam. The day began mostly cloudy with a NE wind (good) and brightened up a bit. With the afternoon forecast calling for east winds with rain we photographed until 12:30pm, headed back to our places for a quick shower, met at 1:30 for a great lunch as usual at Neptune Grill in Gulfport, and then review images until 4:15pm!
Today is Wednesday 15 November, 2023. We likely be doing another long, single, morning session as the forecast is the same as it was on Tuesday. Wherever you are a whatever you are doing, I hope that you too have a great day.
Please remember to use the B&H and Amazon links that are found on most blog pages and to use the BIRDSASART discount code at checkout when purchasing your new gear from Bedfords to get 3% back on your credit card and enjoy free second-day air FedEx. Please, also, consider joining a BAA IPT. You will be amazed at how much you will learn!
You can find some great photo accessories (and necessities, like surf booties!) on Amazon by clicking on the Stuff tab on the orange/yellow menu bar above. On a related note, it would be extremely helpful if blog-folks who, like me, spend too much money on Amazon, would get in the habit of clicking on the Amazon logo link on the right side of each blog post when they shop online. As you might expect, doing so will not cost you a single penny, but would be appreciated tremendously by yours truly. And doing so works seamlessly with your Amazon Prime account.
If an item — a Delkin flash card, or a tripod head — for example, that is available from B&H and/or Bedfords, is also available in the BAA Online Store, it would be great, and greatly appreciated, if you would opt to purchase from us. We will match any price. Please remember also to use my B&H affiliate links or to earn 3% cash back at Bedfords by using the BIRDSASART discount code at checkout for your major gear purchases. Doing either often earns you free guides and/or discounts. And always earns my great appreciation.
Clockwise from the upper left back around to center: Osprey gaining altitude after missed strike; school of mullet under attack from below; Wood Stork with Southern Whiting; Osprey with Menhaden; Wood Stork with small lobster; Royal Tern with large baitfish; Osprey with Menhaden; juvenile Osprey directly overhead “t-shot”; Osprey taking flight with freshly caught Mullet.
Sebastian Inlet In-the-Field Sessions
Join me for 3 hours of morning In-the-Field Instruction at Sebastian Inlet for only $300.00/session. The main target will be Ospreys fishing for a variety of migrating saltwater fish that visit the inlet each fall. Back-up subjects include fishing gulls, terns, and Brown Pelicans, Wood Stork, a variety of herons and egrets, sunrise cloud-scapes, and the occasional sea turtle or manatee.
November Dates: 20-25, 2023.
Please get in touch via e-mail to book one or more sessions.
The 2024 San Diego Brown Pelicans (and more!) IPTs
San Diego IPT #1: 4 1/2 DAYS: TUES 23 JAN thru the morning session on SAT 27 JAN 2024: $2699.00. Deposit: $699.00. Limit: 6/Openings 5.
San Diego IPT #2: 3 1/2 DAYS: WED 31 JAN thru the morning session on SAT 3 FEB, 2024: $2149.00. Limit: 6 photographers
Please e-mail for information on personalized pre- and post-IPT morning sessions.
Join me in San Diego to photograph the spectacular breeding plumage Brown Pelicans with their fire-engine red and olive green bill pouches; Brandt’s (nesting) and Double-crested Cormorants; breeding plumage Wood and Ring-necked Ducks; other duck species possible including Lesser Scaup, Redhead, Northern Shoveler and Surf Scoter; a variety of gulls including Western, California, and the gorgeous Heermann’s, all in full breeding plumage; shorebirds including Marbled Godwit, Willet, Sanderling and Black-bellied Plover; many others are possible including Least, Western, and Spotted Sandpiper, Whimbrel, Black and Ruddy Turnstone, Semipalmated Plover, and Surfbird; Harbor Seals and California Sea Lions (both depending on the current regulations and restrictions). And as you can see by studying the IPT cards, there are some nice bird-scape and landscape opportunities as well. Not to mention a ton of excellent flight photography opportunities and instruction.
I discovered some really neat new spots on my 2022/23 visit. As a result, the first and second IPTs may include an afternoon or two of landscape photography.
Please note: where permitted and on occasion, ducks and gulls may be attracted (or re-located) with offerings of grains or healthy bread.
San Diego offers a wealth of very attractive natural history subjects, including and especially the Pacific race of California Brown Pelican. With annual visits spanning more than four decades, I have lots of photographic experience there … Click on the composite to enjoy a larger version.
Learning Exposure, Whether You Like It Or Not
Whether you like it or not, we will be beating the subject of exposure like a dead horse. In every new situation, you will hear my thoughts on exposure along with my thoughts on both Nikon and Canon histograms and SONY Zebras. Whether you like it or not, you will learn to work in manual mode so that you can get the right exposure every time (as long as a bird gives you ten seconds with the light constant). Or two seconds with SONY zebras … And you will learn what to do when the light is changing constantly. What you learn about exposure will be one of the great takeaways on every IPT.
Though the pelicans will be the stars of the show on this IPT, there will be many other handsome and captivating subjects in wonderful settings. Click on the composite to enjoy a larger version.
It Ain’t Just Pelicans
With gorgeous subjects just sitting there waiting to have their pictures taken, photographing the pelicans on the cliffs is about as easy as nature photography gets. With the winds from the east almost every morning, there is usually some excellent flight photography, at times with 70-200mm lenses! And the pelicans are almost always doing something interesting: preening, scratching, bill pouch cleaning, or squabbling. And then there are those crazy head throws that are thought to be a form of intra-flock communication. You will be guided as to how to make the best of those opportunities. Depending on the weather, the local conditions, and the tides, there are a variety of other fabulous photo chances available in and around San Diego. Each IPT will include one or two duck sessions.
Did I mention that there are lots of great birds and natural history subjects in San Diego in winter? Click on the composite to enjoy a larger version.
The San Diego Details
These IPTs will include four or five 3-hour morning photo sessions, three or four 1 1/2-hour afternoon photo sessions, and three or four working brunches that will include image review and Photoshop sessions. On rare cloudy days, we may — at the leader’s discretion, stay out in the morning for a long session and skip that afternoon shoot. To ensure early starts, breakfasts will be your responsibility. And so that we can get some sleep, dinners will be on your own as well. In the extremely unlikely event that Goldfish Point is closed due to local ordinance (or whimsy) — that has never happened in the past fifty years, I will of course do my very best to maximize our photographic opportunities.
Deposit Info
A $699 deposit is required to hold your slot for one of the 2024 San Diego IPT. You can send a check (made out to “BIRDS AS ART”) to us here: BIRDS AS ART, PO Box 7245, Indian Lake Estates, FL, 33855, or call Jim or Jennifer at the office with a credit card at 863-692-0906. Your balance, payable only by check, is due three months before the trip.
Variety is surely the spice of life in San Diego. Click on the composite to enjoy a larger version.
Getting Up Early and Staying Out Late
On all BIRDS AS ART IPTS including and especially the San Diego IPT, we get into the field early to take advantage of unique and often spectacular lighting conditions and we stay out late to maximize the chances of killer light and glorious sunset silhouette situations. We often arrive at the cliffs a full hour before anyone else shows up to check out the landscape and seascape opportunities.
B&H Simplified
To ensure that I get credit for your B&H purchases, you can always click here. The tracking is invisible but greatly appreciated. And, you can use your PayBoo card. You must use the website to order. B&H will reopen on Fri April 14. Thanking me for the past 4000 educational blog posts could not be any easier and will not cost you one penny. Please shoot me your B&H receipt for major purchases.
Bedfords Simplified
Click here to start your search. Choose standard shipping, and when you get to the payment page, enter BIRDSASART in the discount code box and hit apply. You will be upgraded to free second day air Fed-Ex and receive 3% cash back on your credit card once your stuff ships. Either is greatly appreciated by yours truly.
B&H
Many folks have written recently stating that they purchased a Sony a1 from B&H and would like their free membership in the Sony 1 Info and Updates Group, a $150.00 value. When I check my affiliate account, their orders have not been there. When I let them know that they get credit for B&H purchases only if they use one of the many B&H affiliate links on the blog or begin their searches with this link, they are always disappointed. If in doubt, please contact me via e-mail and request a BH link. I am always glad to help and to guide you to the right gear.
Bedfords Amazing BAA Discount Policy
Folks who have fallen in love with Bedfords can now use the BIRDSASART coupon code at checkout to enjoy a post-purchase, 3% off-statement credit (excluding taxes and shipping charges) on orders paid with a credit card. The 3% credit will be refunded to the card you used for your purchase. Be sure, also, to check the box for free shipping to enjoy free Second Day Air Fed-Ex. This offer does not apply to purchases of Classes, Gift Cards, prior purchases.
Visit the Bedfords website here, shoot Steve Elkins an e-mail, or text him on his cell phone at (479) 381-2592.
Important Note
As an Amazon Associate, I earn a small percentage when you purchase from Amazon after using any of the Amazon links on the blog (including the logo-link on the right side of each blog post page). My affiliate link works fine with Amazon Prime and using it will not cost you a single cent. Huge thanks, BTW 🙂
Gear Questions and Advice
Too many folks attending BAA IPTs and dozens of photographers whom I see in the field and on BPN, are — out of ignorance — using the wrong gear, especially when it comes to tripods and more especially, tripod heads. And the same is true in spades when ordering new camera bodies or lenses. My advice will often save you some serious money and may help you avoid making a seriously bad choice. Please know that I am always glad to answer your gear questions via e-mail. If you are desperate, you can try me on my cell at 863-221-2372. Please leave a message and shoot me a text if I do not pick up.
This image was created on 22 December 2022 at La Jolla, CA. Standing at full height, I used the handheld Sony FE 200-600mm f/5.6-6.3 G OSS lens (at 600mm) and The One, the Sony Alpha 1 Mirrorless digital camera. ) The exposure was determined using Zebra technology with Exposure Compensation on the Thumb Dial. Multi-metering +1.7 stops in Shutter Priority: 1/40 second at f/6.3 (wide open). AUTO ISO set ISO 1600. AWB at 6:32:33am long before the sun came over the big hill in La Jolla. RawDigger showed the raw file brightness to be 1/3-stop short of perfect.
Tracking: Zone/AF-C with Bird Face/Eye Detection performed perfectly. Be sure to click on the image to enjoy a high-res version.
Image #1: Pelagic Cormorant pre-dawn flight blur
Pre-dawn Blurs
Most mornings at La Jolla many hundreds of cormorants head out to sea long before the sun comes up. And on most mornings, the Pacific Ocean shows some sweet colors to those who look to the east. There are very few Pelagic Cormorants in San Diego. I identified this one by it small, sharp bill. The choice of 1/40 second shutter speed and smooth panning resulted in a sharp head and hill and pleasingly blurred wings. The sunrise color was enhanced using the fabulous, new Luminance Targeted Adjustment Tool. Note that the relatively small maximum aperture of the Sony 200-600 is not problematic when you are doing intentional blurs.
Tracking: Expand Spot/AF-C with Bird Face/Eye detection enabled performed perfectly. Be sure to click on the image to enjoy a high-res version.
Image #2. Northern Shovelers/group feeding circle
Northern Shoveler Circle of Confusion Feeding
Northern Shovelers employ a crazy group feeding strategy where a dozen to a hundred birds swim slowly in a tight circular formation feeding on whatever ducks feed on. To me, a slow shutter speed seemed the best way to get across what was going on.
Tracking: Expand Spot/AC-C with Bird-Eye/Face Detection performed perfectly. Click on the image to enjoy a high-res version.
Image #3: Brown Pelicans on cliff in predawn pink/blue.
Pink/Blue Pre-dawn Skies
On crystal clear mornings, the sky opposite the sunrise will often become bright pink with a layer of blue just above the water. The blue is a result of earth shadow, the portion of the sky that is shaded from the sun by the earth itself. Shorter focal lengths provided by the 70-200mm f/2.8 lenses are often the tickets to success.
This image was created on 21 January 2023 at Santee Lakes, CA. I used the ankle-pod technique with the handheld Sony FE 200-600mm f/5.6-6.3 G OSS lens (at 600mm) and The One, the Sony Alpha 1 Mirrorless digital camera. ) The exposure was determined using Zebra technology with ISO on the Thumb Dial. ISO 1250: 1/4000 sec; at f/6.3 (wide open). AWB at 3:40:13pm on a sunny afternoon.
RawDigger showed the raw file brightness to be dead-solid perfect.
Tracking: Zone/AF-C with Bird Face/Eye Detection performed perfectly. Be sure to click on the image to enjoy a high-res version.
Image #4: Drake Wood Duck excited about something.
Drake Wood Ducks — Beautiful or Ugly?
The late Thomas H. Davis Jr., all 6 feet nine inches, 145 pounds of him, used to say that male Wood Ducks were the ugliest ducks on the planet. Most folks, including me, would disagree vehemently. Wood Duck photography is usually quite easy on a San Diego IPT.
It was Tom who taught me to identify and age the shorebirds at Jamaica Bay Wildlife Refuge in Queens, NY, and got me interested in bird photography. He used a huge Novaflex lens with pistol grip focus.
Your Call?
Which two of today’s four, colorful, featured images do you like best. Please leave a comment letting us know why you made your choices.
The Digital Basics III Video Series YouTube Promo
The Digital Basics and Digital Basics II PDFs have taught more than 8000 nature photographers to process their raw files optimally, to make them look great. In the new DB III Video Series, I will be doing three image optimizations/video. Each will include the three raw conversions. Keep reading to learn more.
The Digital Basics III Video Series
The Digital Basics III Video Series
I realized about a year ago that my digital workflow had changed significantly and was toying with the idea of writing a Digital Basics III. More recently, I have learned and begun working with two great new Photoshop Tools, the Remove Tool and the Luminance Targeted Adjustment Tool. The former is like a smarter Spot Healing Brush Tool on steroids and the latter is a huge step up from the fabulous Color Mixer Tool. During that same time frame, I came up with a new and improved 2-step noise reduction technique. I still use Divide and Conquer, Quick Masks, Layer Masks, an expanded array of personalized keyboard shortcuts, and tons of other stuff from both versions of Digital Basics.
As soon as I realized that I did not want to take on another large writing project, I realized that by creating a series of videos I could much more easily share all the details of my current digital workflow and much more easily incorporate additional new tips, techniques, and tools as I went. And so, The Digital Basics III Video Series was born. Keep reading to learn about Digital Basics III Volume I/#1. As below, you might opt to purchase single videos or to subscribe to Volume I and save $26 by ordering the first five videos in one fell swoop. You can purchase the five videos in Volume I by clicking here.
For folks using the latest version of Photoshop (2024) or Lightroom. Topaz DeNoise AI and Topaz Sharpen AI are a plus.
Digital Basics III Volume I/#1
Digital Basics III Volume I/#1
Nearly an hour in length, DB III/VOL I/#1 has you sitting by my side at my Apple 16″ MacBook Pro (M2 Max, Silver) as I optimize the three images above. You will see that I use and recommend only Photo Mechanic (for both MACs and PCs) for picking my keepers and browsing and that I do my raw conversions using Camera Raw (Version 16.0.0.1677) in Adobe Photoshop 2024 (25.0.0 Release). Note that Camera Raw is identical in Lightroom.
Right off the bat you will learn to customize the panels (sometimes called tabs) and put them in the order you wish to use them. For me, those include Color, Light, Detail, and Color Mixer. Then, for each image, I take you through all the raw conversion sliders including the Color Temperature (White Balance), setting the White and Black points, adjusting the Highlight and Shadow sliders, and rarely, setting the Exposure and Contrast sliders. You will learn to use the new Remove Tool, the new Luminance Targeted Adjustment Tool, and my two-step noise reduction strategy. I use all three of those on virtually every image that I process. The second image, the Short-eared Owl, was created at ISO 12800. You will learn why and how I used Topaz Sharpen AI on various images.
After the master .TIF files are saved, you will learn how I size and sharpen the stunning JPEGs that you see on the blog every day.
You can purchase DB III/Volume I/#1 for $25.00 by clicking here in the BAA Online Store. Or, you can opt to purchase the Volume I series, videos #1 to 5, for the bargain rate of $99.00 for the first five videos (as noted above). The plan is to publish about 1 video/week. If the project is well received, there will be future volumes. I have already picked the images for DB III, Volume I/#2!
Typos
With all blog posts, feel free to e-mail or to leave a comment regarding any typos or errors.
I left ILE at 4:32am on Saturday and arrived at Sebastian Inlet State Park at 5:59am, just as Maps predicted. There was no wind, zero. There were no-see-ums. And there were very few Ospreys — I saw only four in more than two hours. There was a decent sunrise. I kept only eight images, including one that I liked of a Sanderling in flight against orange/gold sunrise-lit water. That with the 70-200 II at 1/60 second.
On Sunday morning, I headed down to the lake early with a defrosted road-killed raccoon to put out for the vultures. I tried a new spot but wound up not liking it as much as my regular spot. Next was the drive over to Gulfport to meet newbie Alan Goodwin. Alan came a day early for his first IPT and hired me for an extra day of getting started instruction; he is pretty much starting at ground zero. He recently purchased his first super telephoto lens, the Sony 600mm f/4 and an a-1. He used one of my affiliate links (thank you very much) and earned free entry in the SONY Alpha a1 Set-up and Info Notes Group. On Sunday evening I copied my settings to his a-1 and taught him to use the camera while we both sat on a couch for ten minutes. The a-1 is that simple.
Today is Monday 13 November 2023. Alan and I are heading to DeSoto early to do some bird photography! The morning forecast is for strong NE winds with cloudy skies. Pretty good. At 1pm, newbie Paul Marbourg (who flew from Portland, OR on Saturday) and many multiple IPT veteran John Dupps will be meeting Alan and me for Photo Mechanic lessons. I hope that you too have a great day.
As an aside, if you have been thinking about purchasing a Photo Mechanic license, you are advised to purchase yours here very soon as there may be some changes coming at Camera Bits. Use my link and then shoot me an e-mail with proof of purchase and request a free Getting Started with Photo Mechanic e-mail guide.
Please remember to use the B&H and Amazon links that are found on most blog pages and to use the BIRDSASART discount code at checkout when purchasing your new gear from Bedfords to get 3% back on your credit card and enjoy free second-day air FedEx. Please, also, consider joining a BAA IPT. You will be amazed at how much you will learn!
You can find some great photo accessories (and necessities, like surf booties!) on Amazon by clicking on the Stuff tab on the orange/yellow menu bar above. On a related note, it would be extremely helpful if blog-folks who, like me, spend too much money on Amazon, would get in the habit of clicking on the Amazon logo link on the right side of each blog post when they shop online. As you might expect, doing so will not cost you a single penny, but would be appreciated tremendously by yours truly. And doing so works seamlessly with your Amazon Prime account.
If an item — a Delkin flash card, or a tripod head — for example, that is available from B&H and/or Bedfords, is also available in the BAA Online Store, it would be great, and greatly appreciated, if you would opt to purchase from us. We will match any price. Please remember also to use my B&H affiliate links or to earn 3% cash back at Bedfords by using the BIRDSASART discount.
Unexpected Successes (???) are Rarities
Bird photography can be strange. I often know exactly when I make a great image. Once in a great while I will be shocked when I spot a serious problem with an image that I had been sure was a family jewel when viewing it on the rear monitor. But it does happen.
Every once in a while, I press the shutter button knowing that the image or images will be deleted. Sometimes I am trying to learn something, usually about exposure, and sometimes I press the button for no reason at all. In those situations, it is extremely rare to create an image that I actually like. On the morning of 2 November 2023 I made two such images that I liked a lot. Both came as a big surprise. You can learn about how each image came to be below the images.
This image was created on 2 November 2023 at Fort DeSoto Park. I used the handheld Sony FE 200-600mm f/5.6-6.3 G OSS lens (at 600mm) and The One, the Sony Alpha 1 Mirrorless digital camera. ) The exposure was determined using Zebra technology with ISO on the Thumb Dial. ISO 800. 1/15 second at f/6.3 (wide-open) in Manual Mode. AWB at 7:33:42am well before sunrise. RawDigger showed the exposure to be perfect.
Tracking: Spot S AF-C with Bird Face/Eye Detection performed perfectly. Be sure to click on the image to enjoy a high-res version.
Image #1: Brown Pelicans and distant buildings
Getting Distracted
When Bosque was good 20+ years ago (thanks to then-refuge manager Phil Norton), I said often, “You need to be ready; the best blastoff blurs are created in the first 2-3 seconds.” I had walked far to the north to get on a large mixed flock of gulls, tern, and shorebirds (including 500+ Red Knots) roosting on a sandbar. Anticipating a blastoff, I was working in Manual mode at 1/15 second. Once I was in position I waited and waited and waited in vain. When I spotted a group of pelicans on the shore of Outback Key with a distant line of buildings far in the distance, I decided to make a few images of the scene. I wanted to stay in blur mode so I figured, “What the heck?”
A Striving-for-Sharp Blurs
You might classify images like #1 accidental blurs. Striving-for-sharp blurs are not, however, mentioned in A Guide to Pleasing Blurs. So, when I framed the image and pressed the shutter button, I was half-heartedly trying to create a sharp image. But at 600mm handheld at 1/15 second you are not gonna make a whole lot of sharp frames. When I came to the short series of images, I loved the photo for the look of the green Gulf waves and the somewhat painterly, somewhat grungy look.
After making a few frames, I glanced back to my left and noted that I had missed the blastoff by ten seconds. As my late Mom used to say, “Oh well.”
Tracking: Zone/AF-C with Bird Eye/Face Detection enabled performed perfectly.
Image #2: Laughing Gull in flight at sunrise/pano crop image
Another Happy Accident
There was only one other bird photographer that morning. When our paths crossed, I asked him if he had gotten the blastoff and he answered “No.” I explained to him that with the north wind he had been in the wrong spot, that most of the time in bird photography it pays to have the winds at your back. He was using a tripod-mounted super telephoto, I forget if it was Nikon or Canon. He asked me about Sony. I had been set-up for blurs in Shutter Priority mode so I simply raised the shutter speed to 1/2500 sec. With the brightly colored sky I set +1.7 stops. With Tracking Zone set, I held the camera away from my eye so that we could both see the rear monitor. Looking for anything flying near the sunrise, I was happy to spot the gull, acquire focus instantly, and then move the bird to the right side of the frame as I panned and fired off a short series. All I was trying to do was demonstrate Sony AF; I had not been planning on making even a halfway decent image so I was quite surprised when I came across Image #2.
Your Calls?
Do you like one or both of today’s happy accidents? If yes, why? If not, why?
The vultures out-smarted me this morning. There were more than 50 sitting on my spot when I drove down with a load of rotten, smelly fish skins and carcasses. Thus, they walked to breakfast. A few did fly in but there was almost no wind at all.
Today is Saturday 11 November. I will be up very early and driving the 90 minutes to Sebastian Inlet in hopes of a spectacular sunrise. The wind direction and sky conditions are looking good. Will the Ospreys be diving? Who knows. Wherever you are a whatever you are doing, I hope that you too have a great day.
Please remember to use the B&H and Amazon links that are found on most blog pages and to use the BIRDSASART discount code at checkout when purchasing your new gear from Bedfords to get 3% back on your credit card and enjoy free second-day air FedEx. Please, also, consider joining a BAA IPT. You will be amazed at how much you will learn!
You can find some great photo accessories (and necessities, like surf booties!) on Amazon by clicking on the Stuff tab on the orange/yellow menu bar above. On a related note, it would be extremely helpful if blog-folks who, like me, spend too much money on Amazon, would get in the habit of clicking on the Amazon logo link on the right side of each blog post when they shop online. As you might expect, doing so will not cost you a single penny, but would be appreciated tremendously by yours truly. And doing so works seamlessly with your Amazon Prime account.
If an item — a Delkin flash card, or a tripod head — for example, that is available from B&H and/or Bedfords, is also available in the BAA Online Store, it would be great, and greatly appreciated, if you would opt to purchase from us. We will match any price. Please remember also to use my B&H affiliate links or to earn 3% cash back at Bedfords by using the BIRDSASART discount code at checkout for your major gear purchases. Doing either often earns you free guides and/or discounts. And always earns my great appreciation.
B&H Simplified
To ensure that I get credit for your B&H purchases, you can always click here. The tracking is invisible but greatly appreciated. And, you can use your PayBoo card. You must use the website to order. B&H will reopen on Fri April 14. Thanking me for the past 4000 educational blog posts could not be any easier and will not cost you one penny. Please shoot me your B&H receipt for major purchases.
Bedfords Simplified
Click here to start your search. Choose standard shipping, and when you get to the payment page, enter BIRDSASART in the discount code box and hit apply. You will be upgraded to free second day air Fed-Ex and receive 3% cash back on your credit card once your stuff ships. Either is greatly appreciated by yours truly.
B&H
Many folks have written recently stating that they purchased a Sony a1 from B&H and would like their free membership in the Sony 1 Info and Updates Group, a $150.00 value. When I check my affiliate account, their orders have not been there. When I let them know that they get credit for B&H purchases only if they use one of the many B&H affiliate links on the blog or begin their searches with this link, they are always disappointed. If in doubt, please contact me via e-mail and request a BH link. I am always glad to help and to guide you to the right gear.
Bedfords Amazing BAA Discount Policy
Folks who have fallen in love with Bedfords can now use the BIRDSASART coupon code at checkout to enjoy a post-purchase, 3% off-statement credit (excluding taxes and shipping charges) on orders paid with a credit card. The 3% credit will be refunded to the card you used for your purchase. Be sure, also, to check the box for free shipping to enjoy free Second Day Air Fed-Ex. This offer does not apply to purchases of Classes, Gift Cards, prior purchases.
Visit the Bedfords website here, shoot Steve Elkins an e-mail, or text him on his cell phone at (479) 381-2592.
Important Note
As an Amazon Associate, I earn a small percentage when you purchase from Amazon after using any of the Amazon links on the blog (including the logo-link on the right side of each blog post page). My affiliate link works fine with Amazon Prime and using it will not cost you a single cent. Huge thanks, BTW 🙂
Gear Questions and Advice
Too many folks attending BAA IPTs and dozens of photographers whom I see in the field and on BPN, are — out of ignorance — using the wrong gear, especially when it comes to tripods and more especially, tripod heads. And the same is true in spades when ordering new camera bodies or lenses. My advice will often save you some serious money and may help you avoid making a seriously bad choice. Please know that I am always glad to answer your gear questions via e-mail. If you are desperate, you can try me on my cell at 863-221-2372. Please leave a message and shoot me a text if I do not pick up.
I-Phone 11+ snap
Stand of Blazing Star blossoms — most past peak
A Picture is Worth a Thousand Words. And a Tip
In the New Approach to Blazing Star Blossom Photography blog post here, I described the situation as below but figured that a picture would be worth a thousand words. From the morning of 9 November.
I stood on Toronaja Drive facing NW. The drainage canal is out of sight in the center of the frame. Most of the blossoms were well past peak bloom. That with the exception of the flower in the lower left/center. On the 5th, I worked with the 400mm f/2.8 on a tripod well to the left of my vantage point for the I-Phone shot above.
In similar situations, you can handhold your lens and move around, changing your perspective while looking for a shot. We call this “composing through the viewfinder.” Once you see something that catches your eye, set up the lens on the tripod and fine-tune the image design. Working in shaded situations as I was makes it much easier to find the shot as you are not restricted by sun angle.
Note that the yellow tones in each image below were the result of the sun hitting vegetation in the background. After reading the text that follows each image below, be sure to scroll down to read the wildly varying comments.
Tracking: Expand Spot/AF-C performed to perfection. Be sure to click on the image to enjoy a high-res version.
Image #1: Blazing Star blossom
The Situation
Just about a block from my house, a stand of Blazing Star blooms every year in November where one of the many run-off canals in the neighborhood meets the road, in this case, Toronto Drive. I have photographed the flowers in previous years with my Canon 180mm macro lens, the Metabones adapter, and an a7R IV or more recently, an a-1. As I never came up with anything interesting, I tried a new approach on Sunday morning by working with the tripod-mounted 400mm f/2.8 lens. The super-fast aperture worked perfect for the shaded conditions — there are fairly dense pine woods on both sides of the road. The trees also acted as a windbreak protecting the flowers from the 15mph breeze down by the lake.
The Same-Old Depth-of-Field Question in a Different Form
Why did the wide open f/2.8 aperture provide more than enough d-o-f to render the entire blossom sharp?
Tracking: Expand Spot/AF-C performed to perfection. Be sure to click on the image to enjoy a high-res version.
Image #2: Blazing Star blossom (and more)
The Comments
Guido Bee — November 8, 2023 at 9:31pm
As to depth of field, the 20 foot distance helps. A 400mm lens on a full frame at 2.8 will never have much dof, but subject to lens distance is key
Arthur Morris/BIRDS AS ART — November 10, 2023 at 8:34pm
That is correct, sir. a
John Storjohann; November 8, 2023 at 1:35pm
Good morning, Artie;
I like the first image more (see a) but there are qualities I like about both images:
a) In the second image, as others have mentioned, the green foliage in the lower left is too bright/too well defined and draws my eye to it.
b) To my eye, it looks like you were in a slightly different position for the second image; I like how it moves diagonally through the frame and I like how it intersects the yellow background colors near the top of the frame.
c) It looks like in the second image there was a slight change in light as well; the colors in the background seem brighter, with better contrast.
All the best. John
Arthur Morris/BIRDS AS ART — November 10, 2023 at 8:37pm
Hi John,
a- That o-o-f foliage is a huge plus for me! Different strokes …
b- Yes. I moved around a lot as there was no sun on the flowers.
c- A different angle with some light on the background.
thanks for commenting, with love,
a
Keith Solberg — November 8, 2023 at 2:34am
Hi Artie,
I prefer the 1st image over the 2nd. I like the angle of the 2nd and the yellow, but the plant in the lower left is too much of a distraction for me. The 1st flower looks like it’s closer to its peak, there are more flowers and the small green leaves near the flowers are not yellowing like on the 2nd. It’s similar to a wildflower up here in the Pacific Northwest and on those plants the flowers die off from the bottom upward. I suspect that your flowers are similar. You can always monitor it if you have the time. I’m not going to wade into the DOF question. I’ll read and learn if what I think is correct or not.
Arthur Morris/BIRDS AS ART — November 8, 2023 at 6:40am
Thanks, Keith. As for the d-o-f question, reading my replies to others here would shed some light on the situation.
with love, artie
Dane Johnson — November 7, 2023 at 3:11pm
Hi Artie. Both are great images. Image 2 holds the edge for me due to the angle of the stalk, which creates more interest and the balancing of the yellow background in the upper left and the out-of-focus plant and flowers in the lower left. The dof is a combination of aligning the flower stalk parallel to the sensor and the distance from the flower. This lens has a minimum focusing distance of just less than 9ft. The dof at 9 ft. at f/2.8 is 9/32 in. The dof at 12 ft. increases to 1/2 in. This lens can make some incredible close up images from a “not so close” distance.
Arthur Morris/BIRDS AS ART — November 7, 2023 at 8:55pm
Thanks, Dane!
You wrote, “The dof is a combination of aligning the flower stalk parallel to the sensor and the distance from the flower.”
Of those two, which is the vastly more important factor?
And BTW, the two focus distances were 7.08m for Image #1, and 6.27m for the second photo. Those convert to 22.3 feet and 20.57 feet respectively. In other words, I was a good distance away from relatively large blossoms; each is more than a foot in length. The total d-o-f at 21 feet at f/2.8 is 0.13 feet, or about 1 1/2 inches. As the flowers are no more than an inch in diameter, the d-o-f at a distance is more than enough to cover each blossom.
with love, artie
ps: Yes, a “not so close distance.”
Elinor Osborn — November 7, 2023 at 2:25pm
Why did the wide open f/2.8 aperture provide more than enough d-o-f? the camera was square to the whole stalk.
I like #1 better because pf the softer background colors being mostly horizontal against the vertical stalk, the oof purple showing on the left, and the arc of leaves at the base of the plant. In #2 the diagonal line of the stalk is good. The starburst of leaves and spot of oof purple balance the stem well. Just am not keen on the strong yellow.
Arthur Morris/BIRDS AS ART — November 7, 2023 at 8:42pm
Thanks for the comments, Elinor. As for the d-o-f question, there is a more important factor involved …
a
Larry Master — November 7, 2023 at 11:17am
Hi Artie – Nice shots of a beautiful flower, Dense Blazing Star (Liatris spicata). I like both images but perhaps the second image more, likely because of the diagonal leading one’s eye up the stalk to the top with a beautiful yellow background. The plants in the lower left I think add compositional balance to the image.
Arthur Morris/BIRDS AS ART — November 7, 2023 at 8:40pm
Thanks for the species ID Larry. And for your comments.
Do you know which flower is farther advanced in terms of bloom?
with love, a
Kevin Hice — November 7, 2023 at 10:49am.
Good morning Artie. Both fine images for me the best one is the first although I am a sucker for the yellows in the second image. All is sharp at 2.8 because the flower is all on the same plane. I might have gone with the second image but the plant anchored in the lower left is distracting. It pulls my eye away from the main subject as it looks like it is coming out to grab you. Not familiar with the plant it seems like the second image is at full development looking closely at the pistils. I need to do more flowers.
Arthur Morris/BIRDS AS ART — November 7, 2023 at 8:38pm
Thanks, Kevin. I find flowers a pleasant change and a challenge. As for the d-o-f question, there is a more important factor than the one you mentioned.
with love, a
Dave Goldberg — November 7, 2023 at 8:31am
Hi Artie,
1) I believe image #2 has fuller blossoms at mid length down the bloom
2) Personally, I’d go with image #2 because the blossom is fuller, the angle is more interesting to me, and the plant in the bottom RHS is better placed and less distracting than #1
My guess is that you have better DoF with the 400mm because you were standing positioned further away when you took that shot, so the increased distance more than offset the wide open aperture.
Arthur Morris/BIRDS AS ART — November 11, 2023 at 2:35pm
Thanks, Dave.
While #2 is my favorite by far, it seems to that the blossom in the first image is fuller and more complete. No need to guess — the biggest factor in play is the distance to the subject; the greater the focus distance, the deeper the d-o-f.
My Answers, Calls, and a final comment
1- Which image features the more complete, more perfect blossom?
For me, it seemed obvious that the blossom in Image #1 was more complete and way more beautiful than the blossom in Image #2.
2- Which image is the stronger, more interesting photograph. Why?
Despite the fact that the first image featured a more beautiful blossom, I felt that Image #2 was far stronger because of the diagonal line of the blossom and because of the additional yellow and purple tones.
My Final Comment
I was glad to see so many different opinions on the two featured images. Funny how the yellow tones in the 2nd image were a negative to some folks and a positive to others. Funny how the defocused blossom in the lower left corner of Image #2 was a negative to some folks and a positive to others.
Remember that judging photographs is 100% subjective — there is no right or wrong. But playing the game will always help you to be in a better position to evaluate your own work.
Typos
With all blog posts, feel free to e-mail or to leave a comment regarding any typos or errors.
Yesterday, curious as always, I ordered the new Sony a-9 III and the new Sony 300mm f/2.8 GM lens from Bedfords. I will be sharing my findings with you here as soon as I get my hands on the new gear. If you pre-order one or both of these items from Bedfords, please use the BIRDSASART discount code at check-out to receive 3% back on your credit card and free, second-day air Fed-Ex. Both of these items will be very hard to get. The waiting lists at Bedfords will be a lot shorter than those at B&H.
Not Too Late
For late registration discount info on the 4th Fall DeSoto IPT, or to explore the possibility of sharing an AirBnB with Alan Goodwin and me — we have an extra bedroom (cheap when shared by three), please get in touch via e-mail ASAP. Scroll to the bottom for details.
Your Call/My Call
I will share my thoughts on the two Blazing Star images and on the many and widely varied and well-thought-out comments in the next blog post. Different strokes for different folks.
Canon EOS 7D Mark II with Extras
Good friend and many multiple IPT veteran Indranil Sircar is offering a Canon EOS 7D Mark II in excellent plus condition with several extras for a very low $449.00. The shutter count is 31001. The sale includes the Canon Battery Grip BG-E16 (a roughly $69.00 value), two Canon batteries, the original box, the cables and software and manuals, the battery charger, the front body cap, Canon Remote Release RS-80N3 (a roughly $50.00 value) and insured ground shipping via UPS to lower-48 US addresses only.
If you are looking to get started with a Canon dSLR, Indranil’s 7DII is perfect for you. Both Patrick Sparkman and I used and loved the 7D Mark II bodies until about ten years ago when we both committed to using full-frame Canon bodies. We both made some truly great images with it. Two of my three 2016 Nature’s Best honored entries were created with the 7D II, one still, and one video. The 7D Mark II remains one of the greatest-ever values in a digital camera body. artie
Canon EOS 5D Mark IV with Extras
Good friend and many multiple IPT veteran Indranil Sircar is offering a Canon EOS 5D Mark IV in excellent plus condition with several extras for a very low $999.00. The sale includes the Canon Battery Grip BG-E20 (a roughly $229.00 value), two Canon batteries, the original box, the cables and software and manuals, the battery charger, the front body cap, and insured ground shipping via UPS to lower-48 US addresses only.
What can I say? The 5D IV was my favorite-ever Canon digital dSLR. I owned and used three of them while my 1DX II and a 1DX III sat on the shelf in my garage. A new 5D Mark IV, with its 30.4MP full-frame CMOS sensor, sells new for $$2,699. If you have been dreaming of a 5D IV, grab Indranil’s 5D IV right now and save an astounding $1,700.00. artie
What’s Up?
Now that I have been home for a while, I’ve been swimming a half-mile every day and recently added a 1.5 mile health/vitamin D walk with my shirt off. On my walk on Tuesday afternoon, I saw my first-ever anywhere Black Vulture taking a bath. It was in the lake and was flopping around in what must have been eight inches or so of water; the bird looked quite ungainly and strangely, It sort of reminded me of the spoonbills bathing in the afternoons at Stick Marsh.
Photography at Indian Lake Estates has been getting better every day. The cranes are pairing up and are beginning to fool around. I had two straight great mornings with the Black Vultures at the smelly-old-fish feeder that I set up on the South Peninsula. The eagle pair has been trying to decide where to nest this year. They have been splitting their time between the beautiful, previously twice successful, easy-to-photograph nest that they used for the last two years and a cluttered, almost completely hidden ugly old Osprey nest in a dead tree a bit farther to the south. I know which one I am rooting for.
Today is Thursday 9 November 2023. My tentative plan is to head down to the lake early, feed the vultures, and then keep an eye on the weather at Sebastian. I will likely go to the coast very early on Friday and possibly stay for Saturday morning. Wherever you are a whatever you are doing, I hope that you too have a great day.
Please remember to use the B&H and Amazon links that are found on most blog pages and to use the BIRDSASART discount code at checkout when purchasing your new gear from Bedfords to get 3% back on your credit card and enjoy free second-day air FedEx. Please, also, consider joining a BAA IPT. You will be amazed at how much you will learn!
You can find some great photo accessories (and necessities, like surf booties!) on Amazon by clicking on the Stuff tab on the orange/yellow menu bar above. On a related note, it would be extremely helpful if blog-folks who, like me, spend too much money on Amazon, would get in the habit of clicking on the Amazon logo link on the right side of each blog post when they shop online. As you might expect, doing so will not cost you a single penny, but would be appreciated tremendously by yours truly. And doing so works seamlessly with your Amazon Prime account.
If an item — a Delkin flash card, or a tripod head — for example, that is available from B&H and/or Bedfords, is also available in the BAA Online Store, it would be great, and greatly appreciated, if you would opt to purchase from us. We will match any price. Please remember also to use my B&H affiliate links or to earn 3% cash back at Bedfords by using the BIRDSASART discount code at checkout for your major gear purchases. Doing either often earns you free guides and/or discounts. And always earns my great appreciation.
Clockwise from the upper left back around to center: Osprey gaining altitude after missed strike; school of mullet under attack from below; Wood Stork with Southern Whiting; Osprey with Menhaden; Wood Stork with small lobster; Royal Tern with large baitfish; Osprey with Menhaden; juvenile Osprey directly overhead “t-shot”; Osprey taking flight with freshly caught Mullet.
Sebastian Inlet In-the-Field Sessions
Join me for 3 hours of morning In-the-Field Instruction at Sebastian Inlet for only $300.00/session. The main target will be Ospreys fishing for a variety of migrating saltwater fish that visit the inlet each fall. Back-up subjects include fishing gulls, terns, and Brown Pelicans, Wood Stork, a variety of herons, egrets, and sometimes shorebirds, sunrise cloud-scapes, and the occasional sea turtle or manatee.
November Dates: 10-11 & 20-25, 2023.
The weather is looking excellent for Friday and Saturday. If you would like to explore the possibility of doing both days (with or without and afternoon session), please get in touch via e-mail ASAP.
You can order your copy from the BAA Online Store here, by sending a PayPal for $40 here, or by calling Jim or Jennifer weekdays at 863-692-0906 with your credit card in hand. Be sure to specify Digital Basics II.
The Digital Basics Backstory
The original Digital Basics PDF sold for $10.00 when it was released about two decades ago. Before it was published, I got a single e-mail complaining that the price was too high. Soon after, the guide had expanded considerably and the price was doubled to $20.00. The premise was that folks were creating very good images with their new digital camera bodies and then ruining them in Photoshop. And the same is still true today in spades with today’s great mirrorless camera bodies.
Amazingly, in 2011, the proceeds from the original DB were used to pay for my $67,000 lap pool in full. You can read the whole story and see the photos here. The original Digital Basics was a real eye-opener as it showed that serious folks were willing to spend good money on relevant information presented in digital form.
After several updates, “The BIRDS AS ART Current Workflow e-Guide (Digital Basics II)” was published in June, 2017. It was priced at $40.00 and there has not been a price increase. Sales of DB II have exceeded $80,000.00. To be honest, I cannot remember ever receiving anything but praise for either the original DB or for DB II.
You can purchase “The BIRDS AS ART Current Workflow e-Guide (Digital Basics II)” here.
Folks who do not want to miss anything and those who need the BreezeBrowser Pro/Downloader Pro information may wish to save $15 by ordering the Digital Basics/Digital Basics II Bundle for only $50.00 here. The bundle contains both the original Digital Basics and DB III. Both PDFs will be sent via e-mail.
The Digital Basics III Video Series YouTube Promo
The Digital Basics and Digital Basics II PDFs have taught more than 8000 nature photographers to process their raw files optimally, to make them look great. In the new DB III Video Series, I will be doing three image optimizations/video. Each will include the three raw conversions. Keep reading to learn more.
The Digital Basics III Video Series
The Digital Basics III Video Series
I realized about a year ago that my digital workflow had changed significantly and was toying with the idea of writing a Digital Basics III. More recently, I have learned and begun working with two great new Photoshop Tools, the Remove Tool and the Luminance Targeted Adjustment Tool. The former is like a smarter Spot Healing Brush Tool on steroids and the latter is a huge step up from the fabulous Color Mixer Tool. During that same time frame, I came up with a new and improved 2-step noise reduction technique. I still use Divide and Conquer, Quick Masks, Layer Masks, an expanded array of personalized keyboard shortcuts, and tons of other stuff from both versions of Digital Basics.
As soon as I realized that I did not want to take on another large writing project, I realized that by creating a series of videos I could much more easily share all the details of my current digital workflow and much more easily incorporate additional new tips, techniques, and tools as I went. And so, The Digital Basics III Video Series was born. Keep reading to learn about Digital Basics III Volume I/#1. As below, you might opt to purchase single videos or to subscribe to Volume I and save $26 by ordering the first five videos in one fell swoop. You can purchase the five videos in Volume I by clicking here.
For folks using the latest version of Photoshop (2024) or Lightroom. Topaz DeNoise AI and Topaz Sharpen AI are a plus.
Digital Basics III Volume I/#1
Digital Basics III Volume I/#1
Nearly an hour in length, DB III/VOL I/#1 has you sitting by my side at my Apple 16″ MacBook Pro (M2 Max, Silver) as I optimize the three images above. You will see that I use and recommend only Photo Mechanic (for both MACs and PCs) for picking my keepers and browsing and that I do my raw conversions using Camera Raw (Version 16.0.0.1677) in Adobe Photoshop 2024 (25.0.0 Release). Note that Camera Raw is identical in Lightroom.
Right off the bat you will learn to customize the panels (sometimes called tabs) and put them in the order you wish to use them. For me, those include Color, Light, Detail, and Color Mixer. Then, for each image, I take you through all the raw conversion sliders including the Color Temperature (White Balance), setting the White and Black points, adjusting the Highlight and Shadow sliders, and rarely, setting the Exposure and Contrast sliders. You will learn to use the new Remove Tool, the new Luminance Targeted Adjustment Tool, and my two-step noise reduction strategy. I use all three of those on virtually every image that I process. The second image, the Short-eared Owl, was created at ISO 12800. You will learn why and how I used Topaz Sharpen AI on various images.
After the master .TIF files are saved, you will learn how I size and sharpen the stunning JPEGs that you see on the blog every day.
You can purchase DB III/Volume I/#1 for $25.00 by clicking here in the BAA Online Store. Or, you can opt to purchase the Volume I series, videos #1 to 5, for the bargain rate of $99.00 for the first five videos (as noted above). The plan is to publish about 1 video/week. If the project is well received, there will be future volumes. I have already picked the images for DB III, Volume I/#2!
All images from SEPT/OCT/NOV at Fort DeSoto.
Click on the image to enjoy a larger, sharper high-resolution version.
Clockwise from upper left to center: Piping Plover flapping after bath, juvenile Laughing Gull with feather, American Oystercatcher with sea urchins, Willet foraging in surf, American White Pelican juvenile swimming, skimmer/tern/shorebird blast-off blur, American White Pelican in flight, Black-bellied Plover stealing lugworm from Marbled Godwit, Roseate Spoonbill staring.
Fall 2023 Fort DeSoto Instructional Photo-Tour #4
3 1/2 Days: Tuesday 14 November through the morning session on Friday 17 November 2023. $1899.00 includes three working lunches. Limit six photographers/Openings: three.
Fall Bird Photography at Fort DeSoto
Fort DeSoto, located just south of St. Petersburg, FL, is a mecca for migrant shorebirds, terns, and gulls in fall. There they join hundreds of egrets, herons, and night-herons that winter on the T-shaped peninsula. With any luck at all, we should get to photograph one of Florida’s most desirable shorebird species: Marbled Godwit. Black-bellied Plover and Willet are easy, American Oystercatcher is pretty much guaranteed. Great Egret, Snowy Egret, Great Blue Heron, Tricolored Heron, and White Ibis are easy as well and we will almost surely come up with a tame Yellow-crowned Night-Heron or two. And there should be some quality Brown Pelican flight photography. In addition, Royal, Sandwich, Forster’s, and Caspian Terns will likely provide us with some good flight opportunities as well. Though not guaranteed, Roseate Spoonbill and Wood Stork might well be expected. And we will be on the lookout for a migrant passerine fallout in the event of a thunderstorm or two.
On this IPT, all will learn the basics and fine points of digital exposure. Nikon and Canon folks will learn to get the right exposure every time after making a single test exposure, and SONY folks will learn to use Zebras so that they can be sure of making excellent exposures before pressing the shutter button. Everyone will learn how to approach free and wild birds without disturbing them, to understand and predict bird behavior, to identify many species of shorebirds, to spot the good situations, to choose the best perspective, to see and understand the light, and to design pleasing images by mastering your camera’s AF system. Most importantly, you will surely learn to evaluate wind and sky conditions and understand how they affect bird photography. And you will learn how and why to work in Manual mode (even if you’re scared of it). The best news is that you will be able to take everything you learn home with you so that you will be a better photographer wherever and whenever you photograph.
Clockwise from upper left to center: Long-billed Curlew, juvenile Tricolored Heron, Marbled Godwits, Great Blue Heron, juvenile Pectoral Sandpiper, Wood Stork, smiling Sea Scallop, Ruddy Turnstone scavenging needlefish, Great Blue Heron sunset silhouette at my secret spot, and southbound migrant tern flock blur.
The Details
There will be a Photoshop/image review session during or after lunch (included) each full day. That will be followed by Instructor Nap Time.
These IPTs will run with only a single registrant (though that is not guaranteed). The best airport is Tampa (TPA). Once you register, you will receive an e-mail with Gulfport AirBnB/VRBO information. If you register soon and would like to share an AirBnB with me, shoot me an e-mail. Other possibilities including taking a cab to and from the airport to our AirBnB and riding with me for $50/day. This saves you both gas and the cost of a rental car.
A $600 deposit is due when you sign up and is payable by credit card. Balances must be paid by check one month before the trip. Your deposit is non-refundable unless the IPT sells out with six folks, so please check your plans carefully before committing. You can register by calling Jim during weekday business hours at 863-692-0906 with a credit card in hand, or by sending a check as follows: make the check out to: BIRDS AS ART and send it via US mail here: BIRDS AS ART, PO BOX 7245, Indian Lake Estates, FL 33855. You will receive a confirmation e-mail with detailed instructions, clothing, and gear advice. Please shoot me an e-mail if you plan to register or if you have any questions on lodging.
Up Early, Stay Out Late!
Obviously, folks attending an IPT will be out in the field early and stay late to take advantage of the sweetest light and sunrise and sunset colors (when possible). The good news is that the days are relatively short in early fall. I really love it when I am leaving the beach on a sunny morning after a great session just as a carful or two of well-rested photographers are arriving. On cloudy days, we may — at the leader’s discretion, stay out in the morning for a long session and skip the afternoon session. To ensure early starts, breakfasts will be your responsibility. And so that we can get some sleep, dinners will sometimes be on your own as well.
Typos
With all blog posts, feel free to e-mail or to leave a comment regarding any typos or errors.
Yesterday I created the first three-image optimization BAA Digital Basics III Video. It will be in the store and offered for sale here on Thursday. Speaking of Thursday, the forecast for the end of this week has changed a bit. The wind and sky conditions are looking good for Thursday morning and even better for Friday morning. See the next item if you would like to join me for a morning or two and learn the ropes at this great fall location.
Today is Tuesday 7 November 2023. I have not yet decided if I will head down to the lake for a bit as the forecast is for a gentle NE wind. At this time of year, with the sun rising in the east/southeast, a northeast wind is OK early on but gets worse each minute as the sun makes its way to the south. Wherever you are a whatever you are doing, I hope that you too have a great day.
Please remember to use the B&H and Amazon links that are found on most blog pages and to use the BIRDSASART discount code at checkout when purchasing your new gear from Bedfords to get 3% back on your credit card and enjoy free second-day air FedEx. Please, also, consider joining a BAA IPT. You will be amazed at how much you will learn!
You can find some great photo accessories (and necessities, like surf booties!) on Amazon by clicking on the Stuff tab on the orange/yellow menu bar above. On a related note, it would be extremely helpful if blog-folks who, like me, spend too much money on Amazon, would get in the habit of clicking on the Amazon logo link on the right side of each blog post when they shop online. As you might expect, doing so will not cost you a single penny, but would be appreciated tremendously by yours truly. And doing so works seamlessly with your Amazon Prime account.
If an item — a Delkin flash card, or a tripod head — for example, that is available from B&H and/or Bedfords, is also available in the BAA Online Store, it would be great, and greatly appreciated, if you would opt to purchase from us. We will match any price. Please remember also to use my B&H affiliate links or to earn 3% cash back at Bedfords by using the BIRDSASART discount code at checkout for your major gear purchases. Doing either often earns you free guides and/or discounts. And always earns my great appreciation.
Clockwise from the upper left back around to center: Osprey gaining altitude after missed strike; school of mullet under attack from below; Wood Stork with Southern Whiting; Osprey with Menhaden; Wood Stork with small lobster; Royal Tern with large baitfish; Osprey with Menhaden; juvenile Osprey directly overhead “t-shot”; Osprey taking flight with freshly caught Mullet.
Sebastian Inlet In-the-Field Sessions
Join me for 3 hours of morning In-the-Field Instruction at Sebastian Inlet for only $300.00/session. The main target will be Ospreys fishing for a variety of migrating saltwater fish that visit the inlet each fall. Back-up subjects include fishing gulls, terns, and Brown Pelicans, Wood Stork, a variety of herons and egrets, sunrise cloud-scapes, and the occasional sea turtle or manatee.
November Dates: 9-11 & 20-25, 2023.
Please get in touch via e-mail to book one or more sessions.
B&H Simplified
To ensure that I get credit for your B&H purchases, you can always click here. The tracking is invisible but greatly appreciated. And, you can use your PayBoo card. You must use the website to order. B&H will reopen on Fri April 14. Thanking me for the past 4000 educational blog posts could not be any easier and will not cost you one penny. Please shoot me your B&H receipt for major purchases.
Bedfords Simplified
Click here to start your search. Choose standard shipping, and when you get to the payment page, enter BIRDSASART in the discount code box and hit apply. You will be upgraded to free second day air Fed-Ex and receive 3% cash back on your credit card once your stuff ships. Either is greatly appreciated by yours truly.
B&H
Many folks have written recently stating that they purchased a Sony a1 from B&H and would like their free membership in the Sony 1 Info and Updates Group, a $150.00 value. When I check my affiliate account, their orders have not been there. When I let them know that they get credit for B&H purchases only if they use one of the many B&H affiliate links on the blog or begin their searches with this link, they are always disappointed. If in doubt, please contact me via e-mail and request a BH link. I am always glad to help and to guide you to the right gear.
Bedfords Amazing BAA Discount Policy
Folks who have fallen in love with Bedfords can now use the BIRDSASART coupon code at checkout to enjoy a post-purchase, 3% off-statement credit (excluding taxes and shipping charges) on orders paid with a credit card. The 3% credit will be refunded to the card you used for your purchase. Be sure, also, to check the box for free shipping to enjoy free Second Day Air Fed-Ex. This offer does not apply to purchases of Classes, Gift Cards, prior purchases.
Visit the Bedfords website here, shoot Steve Elkins an e-mail, or text him on his cell phone at (479) 381-2592.
Important Note
As an Amazon Associate, I earn a small percentage when you purchase from Amazon after using any of the Amazon links on the blog (including the logo-link on the right side of each blog post page). My affiliate link works fine with Amazon Prime and using it will not cost you a single cent. Huge thanks, BTW 🙂
Gear Questions and Advice
Too many folks attending BAA IPTs and dozens of photographers whom I see in the field and on BPN, are — out of ignorance — using the wrong gear, especially when it comes to tripods and more especially, tripod heads. And the same is true in spades when ordering new camera bodies or lenses. My advice will often save you some serious money and may help you avoid making a seriously bad choice. Please know that I am always glad to answer your gear questions via e-mail. If you are desperate, you can try me on my cell at 863-221-2372. Please leave a message and shoot me a text if I do not pick up.
Tracking: Expand Spot/AF-C performed to perfection. Be sure to click on the image to enjoy a high-res version.
Image #1: Blazing Star blossom
The Situation
Just about a block from my house, a stand of Blazing Star blooms every year in November where one of the many run-off canals in the neighborhood meets the road, in this case, Toronto Drive. I have photographed the flowers in previous years with my Canon 180mm macro lens, the Metabones adapter, and an a7R IV or more recently, an a-1. As I never came up with anything interesting, I tried a new approach on Sunday morning by working with the tripod-mounted 400mm f/2.8 lens. The super-fast aperture worked perfect for the shaded conditions — there are fairly dense pine woods on both sides of the road. The trees also acted as a windbreak protecting the flowers from the 15mph breeze down by the lake.
The Same-Old Depth-of-Field Question in a Different Form
Why did the wide open f/2.8 aperture provide more than enough d-o-f to render the entire blossom sharp?
When a Short-billed Dowitcher came to alert posture for just a second or two, I held the shutter button down until the bird turned away. Learn lots more below.
Did You Remember …
to set your clocks and watches back one hour?
Canon EF 400mm F/5.6L USM Lens (the “toy” lens)
Marty Paige is offering a well-used Canon EF 400mm F/5.6L USM lens in good condition for a silly low $399.00. The front glass is clean and the lens functions perfectly. The sale includes the front and rear lens caps, the lens case with strap, the original product box, the user guide, and insured ground shipping via major courier to lower-48 US addresses. Photos are available upon request. Your item will not ship until your check clears unless other arrangements are made.
Please contact Marty via e-mail at e-mail or by phone at 1-423-458-8990 (Eastern time zone).
The old 400mm f/5.6 L lens was my first Canon autofocus lens. It was light and sharp and still is. It quickly become my favorite flight lens and I referred to it often as my “toy” lens. I pretty much put it on the map for bird photography. With an adapter, it is a great starter lens for anyone wishing to get into bird photography without breaking the bank. There is a used copy of this lens at B&H for $809.95. artie
Clockwise from the upper left back around to center: Osprey gaining altitude after missed strike; school of mullet under attack from below; Wood Stork with Southern Whiting; Osprey with Menhaden; Wood Stork with small lobster; Royal Tern with large baitfish; Osprey with Menhaden; juvenile Osprey directly overhead “t-shot”; Osprey taking flight with freshly caught Mullet.
Sebastian Inlet In-the-Field Sessions
Join me for 3 hours of morning In-the-Field Instruction at Sebastian Inlet for only $300.00/session. The main target will be Ospreys fishing for a variety of migrating saltwater fish that visit the inlet each fall. Back-up subjects include fishing gulls, terns, and Brown Pelicans, Wood Stork, a variety of herons and egrets, sunrise cloud-scapes, and the occasional sea turtle or manatee.
Current November Dates: 7-10, 2023. The very best weather is looking like Thursday/Friday.
Please get in touch via e-mail to book one or more sessions.
What’s Up?
My smelly defrosted fish skins (courtesy of Mike’s Fish Market, Lake Wales, FL), attracted about three dozen Black Vultures less than ten minutes after I set them out on the South Peninsula. I had a few good chances before the wind picked up and switched from north by slightly east (pretty good!) to north by west (bad!). When the wind has a westerly component, the birds will almost always be landing away from you.
Today is Sunday 5 November 2023. I may head down to the lake very early despite the weather forecast: clear skies with a breeze from the northwest (bad in the morning). Wherever you are an whatever you are doing, I hope that you too have a great day.
Please remember to use the B&H and Amazon links that are found on most blog pages and to use the BIRDSASART discount code at checkout when purchasing your new gear from Bedfords to get 3% back on your credit card and enjoy free second-day air FedEx. Please, also, consider joining a BAA IPT. You will be amazed at how much you will learn!
You can find some great photo accessories (and necessities, like surf booties!) on Amazon by clicking on the Stuff tab on the orange/yellow menu bar above. On a related note, it would be extremely helpful if blog-folks who, like me, spend too much money on Amazon, would get in the habit of clicking on the Amazon logo link on the right side of each blog post when they shop online. As you might expect, doing so will not cost you a single penny, but would be appreciated tremendously by yours truly. And doing so works seamlessly with your Amazon Prime account.
If an item — a Delkin flash card, or a tripod head — for example, that is available from B&H and/or Bedfords, is also available in the BAA Online Store, it would be great, and greatly appreciated, if you would opt to purchase from us. We will match any price. Please remember also to use my B&H affiliate links or to earn 3% cash back at Bedfords by using the BIRDSASART discount code at checkout for your major gear purchases. Doing either often earns you free guides and/or discounts. And always earns my great appreciation.
B&H Simplified
To ensure that I get credit for your B&H purchases, you can always click here. The tracking is invisible but greatly appreciated. And, you can use your PayBoo card. You must use the website to order. B&H will reopen on Fri April 14. Thanking me for the past 4000 educational blog posts could not be any easier and will not cost you one penny. Please shoot me your B&H receipt for major purchases.
Bedfords Simplified
Click here to start your search. Choose standard shipping, and when you get to the payment page, enter BIRDSASART in the discount code box and hit apply. You will be upgraded to free second day air Fed-Ex and receive 3% cash back on your credit card once your stuff ships. Either is greatly appreciated by yours truly.
B&H
Many folks have written recently stating that they purchased a Sony a1 from B&H and would like their free membership in the Sony 1 Info and Updates Group, a $150.00 value. When I check my affiliate account, their orders have not been there. When I let them know that they get credit for B&H purchases only if they use one of the many B&H affiliate links on the blog or begin their searches with this link, they are always disappointed. If in doubt, please contact me via e-mail and request a BH link. I am always glad to help and to guide you to the right gear.
Bedfords Amazing BAA Discount Policy
Folks who have fallen in love with Bedfords can now use the BIRDSASART coupon code at checkout to enjoy a post-purchase, 3% off-statement credit (excluding taxes and shipping charges) on orders paid with a credit card. The 3% credit will be refunded to the card you used for your purchase. Be sure, also, to check the box for free shipping to enjoy free Second Day Air Fed-Ex. This offer does not apply to purchases of Classes, Gift Cards, prior purchases.
Visit the Bedfords website here, shoot Steve Elkins an e-mail, or text him on his cell phone at (479) 381-2592.
Important Note
As an Amazon Associate, I earn a small percentage when you purchase from Amazon after using any of the Amazon links on the blog (including the logo-link on the right side of each blog post page). My affiliate link works fine with Amazon Prime and using it will not cost you a single cent. Huge thanks, BTW 🙂
Gear Questions and Advice
Too many folks attending BAA IPTs and dozens of photographers whom I see in the field and on BPN, are — out of ignorance — using the wrong gear, especially when it comes to tripods and more especially, tripod heads. And the same is true in spades when ordering new camera bodies or lenses. My advice will often save you some serious money and may help you avoid making a seriously bad choice. Please know that I am always glad to answer your gear questions via e-mail. If you are desperate, you can try me on my cell at 863-221-2372. Please leave a message and shoot me a text if I do not pick up.
i-Phone 11+ image
Image #1: Sony 200-600mm G lens with 1.4XTC and a-1 on the sand with a Short-billed Dowitcher in the distance
The Foot Pod Technique with the Sony 200-600mm G lens with 1.4XTC and a-1
I made this photo with my I-Phone 11+ to give folks an idea of the set-up when using the foot-pod technique. In actuality, my left hand would be under the left/bottom of the camera body and my right index finger on the shutter button. I would have my reading glasses on, have the level activated, and attempt to keep the camera square to the world as I pan with a foraging shorebird.
You pretty much have to trust your camera’s AF system when using this technique. That said, Tracking: Zone/AF-C with Bird Eye/Face Detection enabled performed superbly with today’s two featured images. Join me on DeSoto IPT #4 to learn a ton more about low perspective photography with telephoto lenses.
Note the small stream (to the left of the blue line) that is emptying into the lagoon. There were, perhaps, a dozen shorebirds feeding on about an acre of shallow flats. Those included Short-billed Dowitcher, Dunlin, Black-bellied Plover, Piping Plover, and Greater Yellowlegs (2). Knowing that most of the birds would eventually make their way to the mouth of the small creek (rich in invertebrates), I positioned myself to be in position to get some good photographs when they came to me somewhat down sun angle. With my shadow pointed just to the left of the subject, the dowitcher in Image #3 was less than ten degrees off sun angle.
When the wind is “wrong” (north/northwest in the morning in this case), know that feeding shorebirds are not effected as much as roosting birds as they pursue their invertebrate snacks.
Tracking: Zone/AF-C with Bird Eye/Face Detection enabled performed perfectly.
Image #2: Dunlin — first winter plumage feeding image
Gorgeous on All Counts
The 840mm reach of my set-up and the super-low perspective provided by the foot-pod technique combined to create a pretty-much-perfect image of a young dunlin feeding. AF nailed the eye and resulted in the crispy eye-skins that I love. The bird is nearly parallel to the sensor, the head angle is perfect and the image, as it came out of the camera, was square to the world. Even with the electronic level activated it is not easy to get them all level. Note also that I went with a high shutter speed (1/2500 second) to freeze the sewing-machine-feeding-action. This, of course, resulted in a relatively high ISO (1600) for a sunny day. But my new, two-step noise reduction rendered an image that rivaled ISO 400 images in terms of noise (or the lack thereof).
The Sony 200-600 G Lens
As you see here often, and again today, the relatively lightweight, relatively inexpensive Sony 200-600 G lens, in the right hands, is both versatile and many-faceted. The lazier I get, the more fabulous images I create with the 200-600 G lens! Why is that?
Feeding shorebirds are challenging subjects as it seems that they are always moving, jabbing the mud, turning this way and that, and/or constantly switching direction. At times, often in response to something unseen by humans, the may come to alert posture and freeze for anywhere from less than a second to perhaps five to ten seconds or more. When they do freeze and the head angle is perfect as it is in Image #3, I always panic, hoping that I can attain accurate focus before the moment is gone. With this series, I made about ten perfect images and several with the bird’s head turned away. With the far leg raised and most of the foot visible, this was the clear winner.
First-winter Plumage
Both of today’s featured images show young shorebirds in first winter plumage. Note that some of the wing covert feathers retain traces of the whitish fringes of the juvenile feathers, but others are freshly molted winter feathers, plain gray with a darker shaft. Learn lots more in my Shorebirds; Beautiful Beachcombershere.
All images from SEPT/OCT/NOV at Fort DeSoto.
Click on the image to enjoy a larger, sharper high-resolution version.
Clockwise from upper left to center: Piping Plover flapping after bath, juvenile Laughing Gull with feather, American Oystercatcher with sea urchins, Willet foraging in surf, American White Pelican juvenile swimming, skimmer/tern/shorebird blast-off blur, American White Pelican in flight, Black-bellied Plover stealing lugworm from Marbled Godwit, Roseate Spoonbill staring.
Fall 2023 Fort DeSoto Instructional Photo-Tour #4
3 1/2 Days: Tuesday 14 November through the morning session on Friday 17 November 2023. $1899.00 includes three working lunches. Limit six photographers/Openings: three.
Fall Bird Photography at Fort DeSoto
Fort DeSoto, located just south of St. Petersburg, FL, is a mecca for migrant shorebirds, terns, and gulls in fall. There they join hundreds of egrets, herons, and night-herons that winter on the T-shaped peninsula. With any luck at all, we should get to photograph one of Florida’s most desirable shorebird species: Marbled Godwit. Black-bellied Plover and Willet are easy, American Oystercatcher is pretty much guaranteed. Great Egret, Snowy Egret, Great Blue Heron, Tricolored Heron, and White Ibis are easy as well and we will almost surely come up with a tame Yellow-crowned Night-Heron or two. And there should be some quality Brown Pelican flight photography. In addition, Royal, Sandwich, Forster’s, and Caspian Terns will likely provide us with some good flight opportunities as well. Though not guaranteed, Roseate Spoonbill and Wood Stork might well be expected. And we will be on the lookout for a migrant passerine fallout in the event of a thunderstorm or two.
On this IPT, all will learn the basics and fine points of digital exposure. Nikon and Canon folks will learn to get the right exposure every time after making a single test exposure, and SONY folks will learn to use Zebras so that they can be sure of making excellent exposures before pressing the shutter button. Everyone will learn how to approach free and wild birds without disturbing them, to understand and predict bird behavior, to identify many species of shorebirds, to spot the good situations, to choose the best perspective, to see and understand the light, and to design pleasing images by mastering your camera’s AF system. Most importantly, you will surely learn to evaluate wind and sky conditions and understand how they affect bird photography. And you will learn how and why to work in Manual mode (even if you’re scared of it). The best news is that you will be able to take everything you learn home with you so that you will be a better photographer wherever and whenever you photograph.
Clockwise from upper left to center: Long-billed Curlew, juvenile Tricolored Heron, Marbled Godwits, Great Blue Heron, juvenile Pectoral Sandpiper, Wood Stork, smiling Sea Scallop, Ruddy Turnstone scavenging needlefish, Great Blue Heron sunset silhouette at my secret spot, and southbound migrant tern flock blur.
The Details
There will be a Photoshop/image review session during or after lunch (included) each full day. That will be followed by Instructor Nap Time.
These IPTs will run with only a single registrant (though that is not guaranteed). The best airport is Tampa (TPA). Once you register, you will receive an e-mail with Gulfport AirBnB/VRBO information. If you register soon and would like to share an AirBnB with me, shoot me an e-mail. Other possibilities including taking a cab to and from the airport to our AirBnB and riding with me for $50/day. This saves you both gas and the cost of a rental car.
A $600 deposit is due when you sign up and is payable by credit card. Balances must be paid by check one month before the trip. Your deposit is non-refundable unless the IPT sells out with six folks, so please check your plans carefully before committing. You can register by calling Jim during weekday business hours at 863-692-0906 with a credit card in hand, or by sending a check as follows: make the check out to: BIRDS AS ART and send it via US mail here: BIRDS AS ART, PO BOX 7245, Indian Lake Estates, FL 33855. You will receive a confirmation e-mail with detailed instructions, clothing, and gear advice. Please shoot me an e-mail if you plan to register or if you have any questions on lodging.
Up Early, Stay Out Late!
Obviously, folks attending an IPT will be out in the field early and stay late to take advantage of the sweetest light and sunrise and sunset colors (when possible). The good news is that the days are relatively short in early fall. I really love it when I am leaving the beach on a sunny morning after a great session just as a carful or two of well-rested photographers are arriving. On cloudy days, we may — at the leader’s discretion, stay out in the morning for a long session and skip the afternoon session. To ensure early starts, breakfasts will be your responsibility. And so that we can get some sleep, dinners will sometimes be on your own as well.
Typos
With all blog posts, feel free to e-mail or to leave a comment regarding any typos or errors.
Marty Paige is offering a well-used Canon EF 400mm F/5.6L USM lens in good condition for a silly low $399.00. The front glass is clean and the lens functions perfectly. The sale includes the front and rear lens caps, the lens case with strap, the original product box, the user guide, and insured ground shipping via major courier to lower-48 US addresses. Photos are available upon request. Your item will not ship until your check clears unless other arrangements are made.
Please contact Marty via e-mail at e-mail or by phone at 1-423-458-8990 (Eastern time zone).
The old 400mm f/5.6 L lens was my first Canon autofocus lens. It was light and sharp and still is. It quickly become my favorite flight lens and I referred to it often as my “toy” lens. I pretty much put it on the map for bird photography. With an adapter, it is a great starter lens for anyone wishing to get into bird photography without breaking the bank. There is a used copy of this lens at B&H for $809.95. artie
Clockwise from the upper left back around to center: Osprey gaining altitude after missed strike; school of mullet under attack from below; Wood Stork with Southern Whiting; Osprey with Menhaden; Wood Stork with small lobster; Royal Tern with large baitfish; Osprey with Menhaden; juvenile Osprey directly overhead “t-shot”; Osprey taking flight with freshly caught Mullet.
Sebastian Inlet In-the-Field Sessions
Join me for 3 hours of morning In-the-Field Instruction at Sebastian Inlet for only $300.00/session. The main target will be Ospreys fishing for a variety of migrating saltwater fish that visit the inlet each fall. Back-up subjects include fishing gulls, terns, and Brown Pelicans, Wood Stork, a variety of herons and egrets, sunrise cloud-scapes, and the occasional sea turtle or manatee.
November Dates: 6-10, 2023.
Please get in touch via e-mail to book one or more sessions.
My Call I
Speaking of Ospreys, my very favorite Osprey image in the “Lots on Exposure. Hovering Versus Kiting. Sebastian Inlet Spectacular on Friday. Handholding versus Tripod for 840mm Flight Photography. And More On Flight Poses” blog post here was Image #2, Osprey beginning dive because of the spectacular flight pose, the spread tail, and the dark blue-gray sky. That said, it barely edged out Image #4, Osprey flying off with Menhaden (mossbunker) for the perfect fish, the wings raised flight pose, the sharpness, the sweet early light, and the blue water.
My Call II
In the “What was Chris Doing Right and Wrong” blog post here, those who commented were pretty much on target.
The best thing that Chris was doing was getting low for an intimate perspective. And getting wet 🙂
The worst thing he was doing IMHO was supporting the lens from below by the foot. By first rotating the lens foot to the top of the lens and then placing his left hand farther out on the lens barrel, he would be better able to hold the lens steady. Holding a lens by the foot remind is too much of a teeter-totter set-up for my tastes.
The second thing he was doing wrong was using Canon gear rather than Sony (he said somewhat tongue-in-cheek). Remember that good photographers make good images with whatever gear they have in their hands. It’s just easier for me with Sony.
What’s Up?
Though conditions have been on the tough side I have been making great images every session. Wednesday morning featured clear skies and a north by slightly west wind — death for most bird photography. Keep reading below to see how I succeeded where everyone else pretty much failed.
I was thrilled to learn on Tuesday that Stan Gorlitsky sold his Nikon NIKKOR Z 800mm f/6.3 VR S lens in mint condition right after it was listed on the Used Gear Page for a very low $5400.00 (was $5,496.95). As is always the plan, both the seller and the buyer were happy.
Today is Thursday 2 November 2023. Can you believe that it is already November? I will be headed to the park early again hoping that there is, as predicted, some east in the north wind. Wherever you are an whatever you are doing, I hope that you too have a great day.
Please remember to use the B&H and Amazon links that are found on most blog pages and to use the BIRDSASART discount code at checkout when purchasing your new gear from Bedfords to get 3% back on your credit card and enjoy free second-day air FedEx. Please, also, consider joining a BAA IPT. You will be amazed at how much you will learn!
You can find some great photo accessories (and necessities, like surf booties!) on Amazon by clicking on the Stuff tab on the orange/yellow menu bar above. On a related note, it would be extremely helpful if blog-folks who, like me, spend too much money on Amazon, would get in the habit of clicking on the Amazon logo link on the right side of each blog post when they shop online. As you might expect, doing so will not cost you a single penny, but would be appreciated tremendously by yours truly. And doing so works seamlessly with your Amazon Prime account.
If an item — a Delkin flash card, or a tripod head — for example, that is available from B&H and/or Bedfords, is also available in the BAA Online Store, it would be great, and greatly appreciated, if you would opt to purchase from us. We will match any price. Please remember also to use my B&H affiliate links or to earn 3% cash back at Bedfords by using the BIRDSASART discount code at checkout for your major gear purchases. Doing either often earns you free guides and/or discounts. And always earns my great appreciation.
B&H Simplified
To ensure that I get credit for your B&H purchases, you can always click here. The tracking is invisible but greatly appreciated. And, you can use your PayBoo card. You must use the website to order. B&H will reopen on Fri April 14. Thanking me for the past 4000 educational blog posts could not be any easier and will not cost you one penny. Please shoot me your B&H receipt for major purchases.
Bedfords Simplified
Click here to start your search. Choose standard shipping, and when you get to the payment page, enter BIRDSASART in the discount code box and hit apply. You will be upgraded to free second day air Fed-Ex and receive 3% cash back on your credit card once your stuff ships. Either is greatly appreciated by yours truly.
B&H
Many folks have written recently stating that they purchased a Sony a1 from B&H and would like their free membership in the Sony 1 Info and Updates Group, a $150.00 value. When I check my affiliate account, their orders have not been there. When I let them know that they get credit for B&H purchases only if they use one of the many B&H affiliate links on the blog or begin their searches with this link, they are always disappointed. If in doubt, please contact me via e-mail and request a BH link. I am always glad to help and to guide you to the right gear.
Bedfords Amazing BAA Discount Policy
Folks who have fallen in love with Bedfords can now use the BIRDSASART coupon code at checkout to enjoy a post-purchase, 3% off-statement credit (excluding taxes and shipping charges) on orders paid with a credit card. The 3% credit will be refunded to the card you used for your purchase. Be sure, also, to check the box for free shipping to enjoy free Second Day Air Fed-Ex. This offer does not apply to purchases of Classes, Gift Cards, prior purchases.
Visit the Bedfords website here, shoot Steve Elkins an e-mail, or text him on his cell phone at (479) 381-2592.
Important Note
As an Amazon Associate, I earn a small percentage when you purchase from Amazon after using any of the Amazon links on the blog (including the logo-link on the right side of each blog post page). My affiliate link works fine with Amazon Prime and using it will not cost you a single cent. Huge thanks, BTW 🙂
Gear Questions and Advice
Too many folks attending BAA IPTs and dozens of photographers whom I see in the field and on BPN, are — out of ignorance — using the wrong gear, especially when it comes to tripods and more especially, tripod heads. And the same is true in spades when ordering new camera bodies or lenses. My advice will often save you some serious money and may help you avoid making a seriously bad choice. Please know that I am always glad to answer your gear questions via e-mail. If you are desperate, you can try me on my cell at 863-221-2372. Please leave a message and shoot me a text if I do not pick up.
Tracking: Zone/AF-C with Bird Eye/Face Detection enabled performed perfectly.
Be sure to click on the image to see a larger, sharper high-res version.
Image #1: Greater Yellowlegs with tiny fish
Not Something That You See Everyday!
I have seen a few shorebirds over the past 47 years. I cannot remember ever seeing a yellowlegs capture a fish; I did not see this tiny fish until I was culling the images in Photo Mechanic. Their normal diet consists of a variety of tiny invertebrates, many barely visible to the human eye.
Falling More Deeply in Love with the Sony 200-600
On Tuesday morning, I headed out with the 400mm f/2.8 and a small tripod. I got a few hundred yards from the parking lot when I realized that I left my fanny pack with my teleconverters in it in my SUV. It was still dark, and I did not realize that I had stopped on a gentle slope of slick black mud. Crash! I fell hard on my right side with one corner of the camera and my right wrist taking the brunt of my weight. The camera and lens were fine; my wrist is still a bit tender. On Monday and Tuesday afternoons and Wednesday morning I headed out with only the lightweight, incredibly versatile, but slow (at f/6.3) 200-600. On a cloudy afternoon I got some nice flight images at ISOs ranging from 3200 to 8000. It is a wonderful pleasure to work with a lightweight handheld lens. Adding the 1.4X TC on sunny days increases the versatility of this relatively inexpensive but deadly lens.
On Wednesday morning with wind-against-sun conditions, I followed my own advice: find some shorebirds feeding in a spot that is somewhat out of the wind. Foraging shorebirds are not affected by wind direction as much as the terns, gulls, and pelicans are. By crouching when working near 840mm, your angle of inclination is not very steep. As the Greater Yellowlegs were feeding on the move I did not want to get down on the ground so that I could more easily stay on sun angle. With a bum right shoulder (and now a sore right wrist), getting down and then up has become somewhat of a challenge. But I am adapting.
As noted above, using the 1.4X TC with the 200-600 and an a1 on sunny days is a viable option. Once I got on the ground and used the foot-pod technique I got some really good images of both first-winter Short-billed Dowitcher and Dunlin. When I got back to the parking lot there were about 200 beautiful Nanday (or Black-hooded) Parakeets feeding on the ground, perching in the trees, and flying around. Like the similar Monk Parakeets, Nanday Parakeet is an invasive species that has become well established in various Florida locations. I will be sharing lots more from this challenging but rewarding morning in additional blog posts soon.
Tracking: Zone/AF-C with Bird Eye/Face Detection enabled performed perfectly.
Image #2: Greater Yellowlegs with tiny fish/tight vertical crop
A Better Look at the Tiny Fish
From where I sit, sharpness with the 1.4X TC and the 200-600 is quite remarkable.
All images from SEPT/OCT/NOV at Fort DeSoto.
Click on the image to enjoy a larger, sharper high-resolution version.
Clockwise from upper left to center: Piping Plover flapping after bath, juvenile Laughing Gull with feather, American Oystercatcher with sea urchins, Willet foraging in surf, American White Pelican juvenile swimming, skimmer/tern/shorebird blast-off blur, American White Pelican in flight, Black-bellied Plover stealing lugworm from Marbled Godwit, Roseate Spoonbill staring.
Fall 2023 Fort DeSoto Instructional Photo-Tour #4
3 1/2 Days: Tuesday 14 November through the morning session on Friday 17 November 2023. $1899.00 includes three working lunches. Limit six photographers/Openings: three.
Fall Bird Photography at Fort DeSoto
Fort DeSoto, located just south of St. Petersburg, FL, is a mecca for migrant shorebirds, terns, and gulls in fall. There they join hundreds of egrets, herons, and night-herons that winter on the T-shaped peninsula. With any luck at all, we should get to photograph one of Florida’s most desirable shorebird species: Marbled Godwit. Black-bellied Plover and Willet are easy, American Oystercatcher is pretty much guaranteed. Great Egret, Snowy Egret, Great Blue Heron, Tricolored Heron, and White Ibis are easy as well and we will almost surely come up with a tame Yellow-crowned Night-Heron or two. And there should be some quality Brown Pelican flight photography. In addition, Royal, Sandwich, Forster’s, and Caspian Terns will likely provide us with some good flight opportunities as well. Though not guaranteed, Roseate Spoonbill and Wood Stork might well be expected. And we will be on the lookout for a migrant passerine fallout in the event of a thunderstorm or two.
On this IPT, all will learn the basics and fine points of digital exposure. Nikon and Canon folks will learn to get the right exposure every time after making a single test exposure, and SONY folks will learn to use Zebras so that they can be sure of making excellent exposures before pressing the shutter button. Everyone will learn how to approach free and wild birds without disturbing them, to understand and predict bird behavior, to identify many species of shorebirds, to spot the good situations, to choose the best perspective, to see and understand the light, and to design pleasing images by mastering your camera’s AF system. Most importantly, you will surely learn to evaluate wind and sky conditions and understand how they affect bird photography. And you will learn how and why to work in Manual mode (even if you’re scared of it). The best news is that you will be able to take everything you learn home with you so that you will be a better photographer wherever and whenever you photograph.
Clockwise from upper left to center: Long-billed Curlew, juvenile Tricolored Heron, Marbled Godwits, Great Blue Heron, juvenile Pectoral Sandpiper, Wood Stork, smiling Sea Scallop, Ruddy Turnstone scavenging needlefish, Great Blue Heron sunset silhouette at my secret spot, and southbound migrant tern flock blur.
The Details
There will be a Photoshop/image review session during or after lunch (included) each full day. That will be followed by Instructor Nap Time.
These IPTs will run with only a single registrant (though that is not guaranteed). The best airport is Tampa (TPA). Once you register, you will receive an e-mail with Gulfport AirBnB/VRBO information. If you register soon and would like to share an AirBnB with me, shoot me an e-mail. Other possibilities including taking a cab to and from the airport to our AirBnB and riding with me for $50/day. This saves you both gas and the cost of a rental car.
A $600 deposit is due when you sign up and is payable by credit card. Balances must be paid by check one month before the trip. Your deposit is non-refundable unless the IPT sells out with six folks, so please check your plans carefully before committing. You can register by calling Jim during weekday business hours at 863-692-0906 with a credit card in hand, or by sending a check as follows: make the check out to: BIRDS AS ART and send it via US mail here: BIRDS AS ART, PO BOX 7245, Indian Lake Estates, FL 33855. You will receive a confirmation e-mail with detailed instructions, clothing, and gear advice. Please shoot me an e-mail if you plan to register or if you have any questions on lodging.
Up Early, Stay Out Late!
Obviously, folks attending an IPT will be out in the field early and stay late to take advantage of the sweetest light and sunrise and sunset colors (when possible). The good news is that the days are relatively short in early fall. I really love it when I am leaving the beach on a sunny morning after a great session just as a carful or two of well-rested photographers are arriving. On cloudy days, we may — at the leader’s discretion, stay out in the morning for a long session and skip the afternoon session. To ensure early starts, breakfasts will be your responsibility. And so that we can get some sleep, dinners will sometimes be on your own as well.
Typos
With all blog posts, feel free to e-mail or to leave a comment regarding any typos or errors.
My chiropractor was late as usual, so I did not get to DeSoto until 5:20pm. I took a scouting walk with the 200-600 despite the mostly cloudy skies. I met a nice lady in a beach chair and later, a guy, who turned out to be her husband, Chris Vickerson. They live in Hamilton, Ontario, Canada and are immensely enjoying Florida’s tame birds.
As I headed north, the wind was from the north with a touch of west. There was a flock of about 500 American White Pelicans. And two wind surfers. I knew that I needed to get past the flock so that when they took off they would be flying at me for a bit, at least until they turned to the east to get where they were going. Anyhoo, I didn’t make it. The wind surfers scared off the entire flock while I was far out of position.
Later on, Chris and I worked a mixed flock of terns, shorebirds, gulls, and a single young Roseate Spoonbill. He was thrilled with the spoonie, I was thrilled with the half dozen or so Caspian Terns. Last was a glorious sunset.
Today is Tuesday 31 October 2023. I will be headed to the DeSoto early. Wherever you are an whatever you are doing, I hope that you too have a great day.
Please remember to use the B&H and Amazon links that are found on most blog pages and to use the BIRDSASART discount code at checkout when purchasing your new gear from Bedfords to get 3% back on your credit card and enjoy free second-day air FedEx. Please, also, consider joining a BAA IPT. You will be amazed at how much you will learn!
You can find some great photo accessories (and necessities, like surf booties!) on Amazon by clicking on the Stuff tab on the orange/yellow menu bar above. On a related note, it would be extremely helpful if blog-folks who, like me, spend too much money on Amazon, would get in the habit of clicking on the Amazon logo link on the right side of each blog post when they shop online. As you might expect, doing so will not cost you a single penny, but would be appreciated tremendously by yours truly. And doing so works seamlessly with your Amazon Prime account.
If an item — a Delkin flash card, or a tripod head — for example, that is available from B&H and/or Bedfords, is also available in the BAA Online Store, it would be great, and greatly appreciated, if you would opt to purchase from us. We will match any price. Please remember also to use my B&H affiliate links or to earn 3% cash back at Bedfords by using the BIRDSASART discount code at checkout for your major gear purchases. Doing either often earns you free guides and/or discounts. And always earns my great appreciation.
This image was created on 30 October 2023 at Fort DeSoto Park IPT. I used the handheld Sony FE 200-600mm f/5.6-6.3 G OSS lens (at 338mm) and The One, the Sony Alpha 1 Mirrorless digital camera. ) The exposure was determined using Zebra technology with ISO on the Thumb Dial. ISO 8000: 1/500 second at f/6.3 (wide open). RawDigger showed the exposure to be perfect. AWB at 6:37:28pm just after the sun disappeared behind a large cloud bank on the western horizon.
Tracking: Expand Spot AF-C with Human Face/Eye Detection performed perfectly. Be sure to click on the image to enjoy a larger, sharper, high-res version.
Image #1: Chris Vickerson down and dirty with his Canon 600mm f/4 and an R5.
What was Chris Doing Right and Wrong?
What was Chris doing right? I am thinking on one very obvious thing.
What was Chris doing wrong? I am thinking of two things.
The BIRDS AS ART Digital Basics III Video Series
Coming Soon!
Note that when you are being lazy and working with a relatively slow lens (f/6.3), you need to use very high ISO settings. I will be covering my new 2-step noise reduction techniques in the upcoming Digital Basics III Video Series.
Over the past few months, I have added lots of great new stuff to my digital workflow: Color Mixer basics and the more sophisticated Saturation Targeted Adjustment Tool, 2-Step Noise Reduction, and the Remove Tool. With these changes and other improvements, I had been considering creating a Digital Basics III PDF. But recently, I realized that creating a series of videos would be a lot simpler and would make learning a lot simpler for most folks. In addition, videos will allow me to delve more deeply into the fine points of using the new (and previously used) Photoshop Tools. Each video will include two complete image optimizations, from soups to nuts. I am hoping to get the first two videos done this coming weekend. Thus, details on the BIRDS AS ART Digital Basics III Video Series should be available in early November.
Typos
With all blog posts, feel free to e-mail or to leave a comment regarding any typos or errors.
Which of todays’ five featured flight images is the strongest image? Why?
My Call
At the previous blog post, blog regular David Policansky left this comment:
Weakest: Image 3. Distracting OOF birds and weak composition. Strongest: Image 1. Beautiful bird in beautiful light doing something interesting.
As always, different strokes for different folks. I feel that Image #1 is the weakest in part because the godwit’s head is turned slightly away. And I liked the o-o-f juxtapositions in Image #3.
BPN Avian Moderator Dan Cadieux correctly identified the three shorebirds in Image #3 when he wrote:
Willet, Semipalmated Plover, and Least Sandpiper. I love the incoming plovers; they are placed perfectly!
As for my favorite image, I agree with Dan on #4, the three incoming Wilson’s Plovers.
What’s Up?
Friday morning at Sebastian Inlet was fabulous with lots of fishing and catching Ospreys and terns. The wind was from the east (pretty good) with a touch of north at times (not great), and rarely a touch of south (very good). I quit at 10:30, checked out of my AirBnB at 11, and was home at 12:30. When I looked at my images I was stoked — I had done much better than I thought. I was so excited that I woke at 3:30am on Saturday and decided to drive the 90 minutes back to the inlet. The tide was just a bit later than it had been on Friday and the wind and sky conditions were pretty much identical. And there were no birds. None, zero, nada.
That’s nature photography in a nutshell.
Today is Sunday 29 October 2023. My plan is to head down to the lake for a bit this morning. Wherever you are a whatever you are doing, I hope that you too have a great day.
Please remember to use the B&H and Amazon links that are found on most blog pages and to use the BIRDSASART discount code at checkout when purchasing your new gear from Bedfords to get 3% back on your credit card and enjoy free second-day air FedEx. Please, also, consider joining a BAA IPT. You will be amazed at how much you will learn!
You can find some great photo accessories (and necessities, like surf booties!) on Amazon by clicking on the Stuff tab on the orange/yellow menu bar above. On a related note, it would be extremely helpful if blog-folks who, like me, spend too much money on Amazon, would get in the habit of clicking on the Amazon logo link on the right side of each blog post when they shop online. As you might expect, doing so will not cost you a single penny, but would be appreciated tremendously by yours truly. And doing so works seamlessly with your Amazon Prime account.
If an item — a Delkin flash card, or a tripod head — for example, that is available from B&H and/or Bedfords, is also available in the BAA Online Store, it would be great, and greatly appreciated, if you would opt to purchase from us. We will match any price. Please remember also to use my B&H affiliate links or to earn 3% cash back at Bedfords by using the BIRDSASART discount code at checkout for your major gear purchases. Doing either often earns you free guides and/or discounts. And always earns my great appreciation.
Clockwise from the upper left back around to center: Osprey gaining altitude after missed strike; school of mullet under attack from below; Wood Stork with Southern Whiting; Osprey with Menhaden; Wood Stork with small lobster; Royal Tern with large baitfish; Osprey with Menhaden; juvenile Osprey directly overhead “t-shot”; Osprey taking flight with freshly caught Mullet.
Sebastian Inlet In-the-Field Sessions
Join me for 3 hours of morning In-the-Field Instruction at Sebastian Inlet for only $300.00/session. The main target will be Ospreys fishing for a variety of migrating saltwater fish that visit the inlet each fall. Back-up subjects include fishing gulls, terns, and Brown Pelicans, Wood Stork, a variety of herons and egrets, sunrise cloud-scapes, and the occasional sea turtle or manatee.
November Dates: 6-11 & 20-25, 2023.
Please get in touch via e-mail to book one or more sessions.
Tracking: Zone/AF-C with Bird-Eye/Face Detection performed perfectly. Click on the image to enjoy a larger, sharper high-res version.
Image #1: Royal Tern, worn juvenile with shrimp
Early Exposures
Noting the relatively high ISO, you realize that when the sun is first breaking through the clouds early in the morning, the light levels are but a fraction of what they will be in an hour or two providing that the sky continues to clear.
Remember also that white birds need less light to be properly exposed than middle toned birds. Lastly, remember that most young terns are grayer, not as white, as the adult of the same species.
Yes, Sony’s Zebra technology makes duck soup of complex exposure situations involving changing and early light and subject of varying tonalities. With your camera set up properly, simply dial up the ISO (conveniently assigned to the Thumb Dial) until you see faint Zebras on the highlights.
Tracking: Zone/AF-C with Bird-Eye/Face Detection performed perfectly. Click on the image to enjoy a larger, sharper high-res version.
Image #2: Osprey beginning dive
Looking for Different Flight Poses
When the Ospreys at Sebastian are fishing, they spend lots of time flapping their wings and either remaining relatively in place or moving slightly forward into the wind. This behavior is usually (but incorrectly, I believe) called hovering. Hovering, in the strictest sense, is when a bird flaps in place and maintains its position when there is no wind. Most raptors, especially the larger species, can remain in place only on windy days; this behavior is more properly termed kiting. Larger birds are not capable of hovering because the energy expenditure would be too great.
There are some interesting comments, several by career biologists and ornithologists, in an old Bird Photographer’s.Net thread here.
Anyhoo, when Ospreys are kiting, that is, flapping into the wind while hunting, it is difficult to create dramatic images. Recently, I have been trying to create pleasingly blurred images of this behavior, but have not come up with anything spectacular. Yet.
The trick is to get on and stay on a kiting Osprey until it begins to drop or dive and then hammering the shutter button while striving to keep the bird in the middle of the frame. Photos depicting different and often spectacular flight poses are often the result. Other neat poses can be captured by staying on an Osprey that dives, misses, and then turns back into the wind.
Tracking: Zone/AF-C with Bird-Eye/Face Detection performed perfectly. Click on the image to enjoy a larger, sharper high-res version.
Image #3: Osprey diving — dorsal view
Tripod versus Handholding
It is much easier to track a diving raptor or tern when handholding than it is when on a tripod. But when I need additional focal length, the 600mm f/4 with the 1.4X TC is often the only way to go. While some can handhold a 600mm f/4, I simply cannot. So the best option for me is to work on the tripod with the Levered-Clamp FlexShooter Pro.
After you have picked your spot based on the sky conditions, light, and wind direction, the great beauty of the Levered-Clamp FlexShooter Pro is that once you take a moment to level the head, you can point your lens in any direction and have the camera remain square to the world.
That said, I was barely able to keep up with this bird as it dove. Ospreys often attain speeds of 50mph as they rocket down toward an unsuspecting fish. Though the bird in Image #3 was not clipped, it was very close to the bottom frame edge. So, I needed to add canvas and crop the image to come up with something pleasing.
Tracking: Zone/AF-C with Bird-Eye/Face Detection performed perfectly. Click on the image to enjoy a larger, sharper high-res version.
Image #4: Osprey flying off with Menhaden (mossbunker)
Why Underexpose?
It pays to get into the habit of underexposing kiting and diving Ospreys so that if they do come up with a bright silver fish, you do not toast (severely overexpose) the Osprey’s prey.
Head Angle Question
Which of today’s five featured images features a bird with a poor head angle?
Tracking: Zone/AF-C with Bird-Eye/Face Detection performed perfectly. Click on the image to enjoy a larger, sharper high-res version.
Image #5: Snowy Egret in flight
Bright Whites
Knowing that the whites on a Snowy Egret are much brighter than the whites of an Osprey, I lowered the ISO two clicks when I saw it flying to sun angle. The result? A dead solid perfect exposure.
Click on the composite to view a larger version and be even more impressed.
First of all, if you use Nikon or Canon (or Olympus or Fuji) gear, do not be put off by the title. While a portion of the guide deals with the Sony α-1, there is a ton of priceless information, tips, and techniques that can help you become a better flight photographer. No matter what system you are using. If you do not use an α-1, be sure to read down to the bottom to save a few bucks.
Arash Hazeghi and Arthur Morris have created the definitive and most comprehensive ever treatise on photographing birds in flight. With more than sixty years of experience photographing birds, they know what you need to know but have not figured out yet! You will be astounded by the depth of their knowledge and the tips they have to offer. More than six months in the making, the guide contains 229 pages, 24,321 words,97 exceptional and inspirational flight images — each with a legendary, enlightening BIRDS AS ART caption, and 22 screen captures. The guide contains a wealth of useful, practical, and for the most part — never-before-available information.
We will teach you the basic concepts that you need to master to become a great flight photographer along with the techniques used by the world’s best flight photographers.
You will learn that most any telephoto lens can be perfect for flight photography in a given situation; focal lengths for the images in the book range from 200mm to 1200mm and everywhere in between.
We discuss the merits of various lenses in depth, including and especially comparing the 400mm f/2.8 lenses with the 600mm f/4s.
We guide you in getting your hands on the flight photography lens that will best meet your needs. We offer a variety of handholding and rest position tips and include tips on working with a big lens on a tripod when working with a flight lens that is otherwise too heavy for you.
Both authors offer their thoughts on getting the right exposure when photographing birds in flight. You will learn to get the right exposure on foggy days and even when photographing black birds in white sky conditions.
You will learn the tremendous importance of pre-focusing, of finding the bird in the viewfinder quickly, acquiring focus almost instantly (with tips on doing all three).
You will learn the role of image stabilization in flight photography and the best settings.
Both authors share their thoughts on using the focus range limiter switch. In the same vein, you will learn to use Direct Manual Focus to make your flight photography life easier.
All will learn about the best wing positions and the importance of the background with images of birds in flight. With lots of examples.
You will learn about the best shutter speeds (and the best aperture) to use when photographing flying birds.
You will learn to photograph flight while seated and the many advantages of doing so.
You will learn the best methods of controlling high ISO noise.
All will learn to format their flash cards properly and safely.
You will learn what to do when your AF system is temporarily blinded.
All will learn the huge effect that wind strength and direction has on flight photography and to evaluate the quality and direction of the light on both sunny and cloudy days.
You will learn why it is vitally important to shoot aggressively when photographing birds in flight.
You will learn to carefully observe and evaluate a variety of bird behaviors that may shine light on some excellent opportunities for photographing birds in flight. And about getting into the best position from which to photograph.
You will learn to be a much better flight photographer.
What Sony Folks Will Learn
Exactly how Artie uses Zebras to come up with perfect exposure after perfect exposure.
The fine points and recommended settings for Optical Steady Shot (OSS).
The concept of Auto-Focus (AF) tracking in the α-1.
Everything there is to know about the complex Sony autofocus system.
About all the AF patterns, how to quickly switch them, and about those favored by each author. And why.
The Tracking and Non-tracking AF patterns. When and why Arash uses Non-Tracking Zone. And why Artie uses only two AF patterns.
How to set and use Bird Face-Eye detection for flight photography.
How and why to assign various custom functions to the various programmable buttons on the α-1 body.
The perfect settings for the many, many Menu items that are vitally related to flight photography.
How and why the Sony α-1 uses both contrast and phase detection AF to determine focus (and the benefits thereof).
Which are the best memory cards for the Sony α-1.
To quickly access frequently used menu items.
Non-Sony α-1 Discount
Using the honor system, folks who do not use a Sony α-1 body are invited to click here to save $25.00 on the purchase price of the guide.
Typos
With all blog posts, feel free to e-mail or to leave a comment regarding any typos or errors.
I will be heading back to DeSoto next Monday afternoon and returning after my Friday morning photo session. Nobody has signed up for the IPT. If you would like to join me for all or for some of it, or receive discount info, please get in touch e-mail or try me on my cell at 863-221-2372. Please leave a message and shoot me a text if I do not pick up.
Your Call?
Which is the weakest of today’s four featured images? Why? I have a clear choice.
Which is the strongest image? Why?
What’s Up?
Sebastian Inlet has been beautiful, different, and amazing every morning. On Wednesday, the cove was packed with huge schools of mullet being pursued from below by predatory fish that surely included jacks and Snook. On Thursday, there were 40 Ospreys fishing the inlet at 8am. That said, I did not come up with a single family jewels-type Osprey action image. In part because there was lots of fishing but not much catching.
Today is Friday 27 October 2023. I will have another shot at the Ospreys this morning and then drive back to ILE around midday. Wherever you are an whatever you are doing, I hope that you too have a great day.
Please remember to use the B&H and Amazon links that are found on most blog pages and to use the BIRDSASART discount code at checkout when purchasing your new gear from Bedfords to get 3% back on your credit card and enjoy free second-day air FedEx. Please, also, consider joining a BAA IPT. You will be amazed at how much you will learn!
You can find some great photo accessories (and necessities, like surf booties!) on Amazon by clicking on the Stuff tab on the orange/yellow menu bar above. On a related note, it would be extremely helpful if blog-folks who, like me, spend too much money on Amazon, would get in the habit of clicking on the Amazon logo link on the right side of each blog post when they shop online. As you might expect, doing so will not cost you a single penny, but would be appreciated tremendously by yours truly. And doing so works seamlessly with your Amazon Prime account.
If an item — a Delkin flash card, or a tripod head — for example, that is available from B&H and/or Bedfords, is also available in the BAA Online Store, it would be great, and greatly appreciated, if you would opt to purchase from us. We will match any price. Please remember also to use my B&H affiliate links or to earn 3% cash back at Bedfords by using the BIRDSASART discount code at checkout for your major gear purchases. Doing either often earns you free guides and/or discounts. And always earns my great appreciation.
Tracking: Zone AF-C with Bird Face/Eye detection enabled performed perfectly even at 1200mm. Be sure to click on the image to enjoy a high-res version.
Image #1: Marbled Godwit with invertebrate tidbit in bill
Sexing Godwits
In general, the bills of adult male godwits are shorter than the bills of adult female godwits. While the bill lengths of some adult godwits overlap, birds with unusually short or unusually long bills can be accurately sexed. The bird in Image #1 is clearly a female.
Note — the bills of juvenile godwits may not be fully grown on their first southbound migration.
Tracking: Upper Center Zone/AF-C with Bird-Eye/Face Detection performed perfectly. Click on the image to enjoy a larger, sharper high-res version.
Image #2: Willet — non-breeding adult
Yellow Light — Yellow/Green Water
Images 2, 3, and 4 were among the strangest I have ever optimized. When I brought the Willet image into Adobe Camera Raw, it was obvious that the bird had a strong yellow cast. I removed that easily in Color Mixer. But when I tried to make the water bluer, I was in for a surprise — the color of the water was actually somewhere between yellow and green.
I used a 40% layer of Image > Auto Tone to blue it up a bit.
Tracking: Center Zone/AF-C with Bird-Eye/Face Detection performed perfectly. Click on the image to enjoy a larger, sharper high-res version.
Image #4: Wilson’s Plovers inbound flight
100% Flight Miracle
You cannot win the lottery unless you buy a ticket. And you cannot create an image unless you press the shutter button, no matter how impossible the situation.
I had a nice flock of shorebirds in front of me when the all took flight suddenly and flew out over the bay. Doing flight photography while working off the rear screen is beyond difficult because you cannot get your eye to the viewfinder to acquire focus and frame the shot.
I tried but failed to get focus on a large group that was flying low. As a last ditch effort, I pointed the lens at a small group of plovers flying right at me. I fired off three frames. Amazingly, Tracking Zone acquired focus on the bird on our left and tracked it accurately. The image design was perfect but only one had the subject sharp. Bingo!
Typos
With all blog posts, feel free to e-mail or to leave a comment regarding any typos or errors.
In the last blog post, my favorite image was the Wood Stork sunrise silhouette because of the spectacular sky colors and the impeccable image design. I crouched to include the perfect proportion of both inlet and sky.
Your Call?
Which of today’s four featured DeSoto images impresses you the most? Leave a comment and let us know why you made your choice.
Fort DeSoto #3 Late Registration Discount Info
I am offering a $500/person late registration discount for the third DeSoto Fall IPT. David Pugsley sent me a text yesterday letting me know that DeSoto has gotten hot again recently.
All images from SEPT/OCT/NOV at Fort DeSoto.
Click on the image to enjoy a larger, sharper high-resolution version.
Clockwise from upper left to center: Piping Plover flapping after bath, juvenile Laughing Gull with feather, American Oystercatcher with sea urchins, Willet foraging in surf, American White Pelican juvenile swimming, skimmer/tern/shorebird blast-off blur, American White Pelican in flight, Black-bellied Plover stealing lugworm from Marbled Godwit, Roseate Spoonbill staring.
The Fall 2023 Fort DeSoto Instructional Photo-Tours
Fall 2023 Fort DeSoto Instructional Photo-Tour #3
3 1/2 Days: Tuesday 31 October through the morning session on Friday 3 November 2023. $1399.00 (was $1899.00) — includes three working lunches. Limit six photographers.
Fall 2023 Fort DeSoto Instructional Photo-Tour #4
3 1/2 Days: Tuesday 14 November through the morning session on Friday 17 November 2023. $1899.00 includes three working lunches. Limit six photographers/Openings: three.
Fall Bird Photography at Fort DeSoto
Fort DeSoto, located just south of St. Petersburg, FL, is a mecca for migrant shorebirds, terns, and gulls in fall. There they join hundreds of egrets, herons, and night-herons that winter on the T-shaped peninsula. With any luck at all, we should get to photograph one of Florida’s most desirable shorebird species: Marbled Godwit. Black-bellied Plover and Willet are easy, American Oystercatcher is pretty much guaranteed. Great Egret, Snowy Egret, Great Blue Heron, Tricolored Heron, and White Ibis are easy as well and we will almost surely come up with a tame Yellow-crowned Night-Heron or two. And there should be some quality Brown Pelican flight photography. In addition, Royal, Sandwich, Forster’s, and Caspian Terns will likely provide us with some good flight opportunities as well. Though not guaranteed, Roseate Spoonbill and Wood Stork might well be expected. And we will be on the lookout for a migrant passerine fallout in the event of a thunderstorm or two.
On this IPT, all will learn the basics and fine points of digital exposure. Nikon and Canon folks will learn to get the right exposure every time after making a single test exposure, and SONY folks will learn to use Zebras so that they can be sure of making excellent exposures before pressing the shutter button. Everyone will learn how to approach free and wild birds without disturbing them, to understand and predict bird behavior, to identify many species of shorebirds, to spot the good situations, to choose the best perspective, to see and understand the light, and to design pleasing images by mastering your camera’s AF system. Most importantly, you will surely learn to evaluate wind and sky conditions and understand how they affect bird photography. And you will learn how and why to work in Manual mode (even if you’re scared of it). The best news is that you will be able to take everything you learn home with you so that you will be a better photographer wherever and whenever you photograph.
Clockwise from upper left to center: Long-billed Curlew, juvenile Tricolored Heron, Marbled Godwits, Great Blue Heron, juvenile Pectoral Sandpiper, Wood Stork, smiling Sea Scallop, Ruddy Turnstone scavenging needlefish, Great Blue Heron sunset silhouette at my secret spot, and southbound migrant tern flock blur.
The Details
There will be a Photoshop/image review session during or after lunch (included) each full day. That will be followed by Instructor Nap Time.
These IPTs will run with only a single registrant (though that is not guaranteed). The best airport is Tampa (TPA). Once you register, you will receive an e-mail with Gulfport AirBnB/VRBO information. If you register soon and would like to share an AirBnB with me, shoot me an e-mail. Other possibilities including taking a cab to and from the airport to our AirBnB and riding with me for $50/day. This saves you both gas and the cost of a rental car.
A $600 deposit is due when you sign up and is payable by credit card. Balances must be paid by check one month before the trip. Your deposit is non-refundable unless the IPT sells out with six folks, so please check your plans carefully before committing. You can register by calling Jim during weekday business hours at 863-692-0906 with a credit card in hand, or by sending a check as follows: make the check out to: BIRDS AS ART and send it via US mail here: BIRDS AS ART, PO BOX 7245, Indian Lake Estates, FL 33855. You will receive a confirmation e-mail with detailed instructions, clothing, and gear advice. Please shoot me an e-mail if you plan to register or if you have any questions on lodging.
Up Early, Stay Out Late!
Obviously, folks attending an IPT will be out in the field early and stay late to take advantage of the sweetest light and sunrise and sunset colors (when possible). The good news is that the days are relatively short in early fall. I really love it when I am leaving the beach on a sunny morning after a great session just as a carful or two of well-rested photographers are arriving. On cloudy days, we may — at the leader’s discretion, stay out in the morning for a long session and skip the afternoon session. To ensure early starts, breakfasts will be your responsibility. And so that we can get some sleep, dinners will sometimes be on your own as well.
What’s Up?
The pre-dawn Osprey action at Sebastian has continued. On Tuesday morning, it continued for a while after the sun came up. Though the wind had switched to east/northeast (good!), and more than a few dove and came up with a decent sized fish, I did not create any family-jewels type images. Maybe this morning. The good news is that there have been a great variety of back-up subjects.
Today is Wednesday 25 October 2023. I will be headed to the inlet early again. Wherever you are an whatever you are doing, I hope that you too have a great day.
Please remember to use the B&H and Amazon links that are found on most blog pages and to use the BIRDSASART discount code at checkout when purchasing your new gear from Bedfords to get 3% back on your credit card and enjoy free second-day air FedEx. Please, also, consider joining a BAA IPT. You will be amazed at how much you will learn!
You can find some great photo accessories (and necessities, like surf booties!) on Amazon by clicking on the Stuff tab on the orange/yellow menu bar above. On a related note, it would be extremely helpful if blog-folks who, like me, spend too much money on Amazon, would get in the habit of clicking on the Amazon logo link on the right side of each blog post when they shop online. As you might expect, doing so will not cost you a single penny, but would be appreciated tremendously by yours truly. And doing so works seamlessly with your Amazon Prime account.
If an item — a Delkin flash card, or a tripod head — for example, that is available from B&H and/or Bedfords, is also available in the BAA Online Store, it would be great, and greatly appreciated, if you would opt to purchase from us. We will match any price. Please remember also to use my B&H affiliate links or to earn 3% cash back at Bedfords by using the BIRDSASART discount code at checkout for your major gear purchases. Doing either often earns you free guides and/or discounts. And always earns my great appreciation.
B&H Simplified
To ensure that I get credit for your B&H purchases, you can always click here. The tracking is invisible but greatly appreciated. And, you can use your PayBoo card. You must use the website to order. B&H will reopen on Fri April 14. Thanking me for the past 4000 educational blog posts could not be any easier and will not cost you one penny. Please shoot me your B&H receipt for major purchases.
Bedfords Simplified
Click here to start your search. Choose standard shipping, and when you get to the payment page, enter BIRDSASART in the discount code box and hit apply. You will be upgraded to free second day air Fed-Ex and receive 3% cash back on your credit card once your stuff ships. Either is greatly appreciated by yours truly.
B&H
Many folks have written recently stating that they purchased a Sony a1 from B&H and would like their free membership in the Sony 1 Info and Updates Group, a $150.00 value. When I check my affiliate account, their orders have not been there. When I let them know that they get credit for B&H purchases only if they use one of the many B&H affiliate links on the blog or begin their searches with this link, they are always disappointed. If in doubt, please contact me via e-mail and request a BH link. I am always glad to help and to guide you to the right gear.
Bedfords Amazing BAA Discount Policy
Folks who have fallen in love with Bedfords can now use the BIRDSASART coupon code at checkout to enjoy a post-purchase, 3% off-statement credit (excluding taxes and shipping charges) on orders paid with a credit card. The 3% credit will be refunded to the card you used for your purchase. Be sure, also, to check the box for free shipping to enjoy free Second Day Air Fed-Ex. This offer does not apply to purchases of Classes, Gift Cards, prior purchases.
Visit the Bedfords website here, shoot Steve Elkins an e-mail, or text him on his cell phone at (479) 381-2592.
Important Note
As an Amazon Associate, I earn a small percentage when you purchase from Amazon after using any of the Amazon links on the blog (including the logo-link on the right side of each blog post page). My affiliate link works fine with Amazon Prime and using it will not cost you a single cent. Huge thanks, BTW 🙂
Gear Questions and Advice
Too many folks attending BAA IPTs and dozens of photographers whom I see in the field and on BPN, are — out of ignorance — using the wrong gear, especially when it comes to tripods and more especially, tripod heads. And the same is true in spades when ordering new camera bodies or lenses. My advice will often save you some serious money and may help you avoid making a seriously bad choice. Please know that I am always glad to answer your gear questions via e-mail. If you are desperate, you can try me on my cell at 863-221-2372. Please leave a message and shoot me a text if I do not pick up.
Success on a Lazy 200-600 Morning at Fort DeSoto
Sometimes when I do not feel like carrying one of the big guns, the 600mm f/4 or the 400mm f/2.8, I will leave both of those in the trunk and head out with the relatively slow (at f/6.3) but amazingly sharp and versatile Sony FE 200-600mm f/5.6-6.3 G OSS lens. I am often amazed at how well I do with this relatively inexpensive super-telephoto zoom lens. If you purchase this lens and a Sony a1, you earn free entry into the SONY Alpha a1 Set-up Guide and Info Group. I can change your life.
Click on the image to better see the green eye-AF boxes in action.
Sony Alpha 1 Flight Photography AF Points!
The SONY Alpha a1 Set-up Guide and Info Group: $150.00 (or Free)
The SONY Alpha a1 Set-up Guide and Info Group is going great guns as more and more folks chime in with thoughtful questions and experience-based answers. As the a1 is becoming more readily available, more and more folks are getting their hands on this amazing body. By June 1, 2022, the group was up to an astounding 124 lucky and blessed folks. (More than a few folks own two or more a1 bodies! Early on, we discussed the myriad AF options. I gave my opinion as to the best one for flight and general bird photography. The best news is that everyone in the group receives an e-mail that includes a .DAT file with my a1 settings on it, and explicit directions on how to load my settings onto your a1; talk about convenience! I am now offering a .DAT file compatible with firmware update 1.20. Your entry into the group includes a consolidated Sony a1 CAMSETA2 INFO & GUIDE. New a1 folks will now receive six e-mails instead of the previous 28! You will receive new e-mails as they are published. Simply put, this e-mail guide is an incredible resource for anyone with an a1.
All who purchased their Alpha 1 bodies via a BAA affiliate link — B&H or Bedfords — will receive a free Sony Alpha a1 Set-Up Guide and free entry into the Info Updates group after shooting me their receipts via e-mail. (Note: it may take me several days to confirm B&H orders.). Others can purchase their guide here in the BAA Online Store.
This image was created on 19 October 2023 at Fort DeSoto Park IPT. I used the handheld Sony FE 200-600mm f/5.6-6.3 G OSS lens (at 600mm) and The One, the Sony Alpha 1 Mirrorless digital camera. ) The exposure was determined using Zebra technology with Exposure Compensation on the Thumb Dial. Shutter Priority +1.7 stops: 1/60 sec at f/6.3 (wide open). AUTO ISO set ISO 800. RawDigger showed the exposure to be perfect. AWB at 7:22:31am, ten minutes before sunrise on a partly cloudy morning.
Tracking: Zone/AF-C with Bird Face/Eye Detection performed perfectly. Be sure to click on the image to enjoy a larger, sharper, high-res version.
Image #1: Reddish Egret taking flight/blur
Shutter Priority with Exposure Compensation (EC) and AUTO ISO
Many skilled photographers firmly believe that if you are not working in Manual mode, you are a clown. When you are creating only sharp images, I agree 100%. However, as long as the tonality of the backgrounds are relatively consistent, I find that working in Shutter Priority mode with exposure compensation and AUTO ISO is often the best exposure mode. It allows you to go from creating blurs to creating sharp images while changing only two parameters: the shutter speed and the EC. In manual mode, you would need to change all three parameters: shutter speed, EC, and the ISO. And changing the ISO can often require many, many clicks. Again, the key is that the tonality of the backgrounds is relatively consistent so that a given EC will work in that situation.
If I had been working in Manual mode for Images #1 and #2, how many 1/3-stop clicks would be required to get from ISO 800 to ISO 12,800?
The chosen shutter speed of 1/60 second is what I call a compromise shutter speed — if the bird is static, you can create a sharp image, and if it takes flight as it did in Image #1, you can come up with a pleasingly blurred image.
This image was also created on 19 October 2023 at Fort DeSoto Park IPT. Again, I used the handheld Sony FE 200-600mm f/5.6-6.3 G OSS lens (at 600mm) and The One, the Sony Alpha 1 Mirrorless digital camera. ) The exposure was determined using Zebra technology with Exposure Compensation on the Thumb Dial. Shutter Priority +2.3 stops: 1/1000 sec at f/6.3 (wide open). AUTO ISO set ISO 12,800. RawDigger showed the raw file brightness to be perfect. AWB at 7:39:03am, seven minutes after the time of sunrise with heavy clouds on the eastern horizon.
Tracking: Zone/AF-C with Bird Face/Eye Detection performed perfectly. Be sure to click on the image to enjoy a larger, sharper, high-res version.
Image #2: Greater Yellowlegs posing on sandbar
Two-step Noise Reduction
Whoever thought that working at ISOs of 12,000 and higher could be used to create relatively clean, detailed images? Not me for one. Yes, a good deal of credit goes to the amazingly improved sensors of the mirrorless camera bodies, but new and improved methods of noise reduction have pushed the upper limits even farther. I have been experimenting with a new, two-step noise reduction workflow; the results, as seen in Image #2, have been spectacular.
The BIRDS AS ART Digital Basics III Video Series
Coming Soon!
Over the past few months, I have added lots of great new stuff to my digital workflow: Color Mixer basics and the more sophisticated Saturation Targeted Adjustment Tool, 2-Step Noise Reduction, and the Remove Tool. With these changes and other improvements, I had been considering creating a Digital Basics III PDF. But recently, I realized that creating a series of videos would be a lot simpler and would make learning a lot simpler for most folks. In addition, videos will allow me to delve more deeply into the fine points of using the new (and previously used) Photoshop Tools. Each video will include two complete image optimizations, from soups to nuts. I am hoping to get the first two videos done this coming weekend. Thus, details on the BIRDS AS ART Digital Basics III Video Series should be available in early November.
This image was also created on 19 October 2023 at Fort DeSoto Park IPT. Again, this time seated on damp sand, I used the handheld Sony FE 200-600mm f/5.6-6.3 G OSS lens (at 506mm) and The One, the Sony Alpha 1 Mirrorless digital camera. ) The exposure was determined using Zebra technology with ISO on the Thumb Dial. ISO 1000. 1/2000 second at f/6.3 (wide-open) in Manual Mode. AWB at 8:10:55am after the sun broke through. RawDigger showed the exposure to be perfect.
Tracking: Zone/AF-C with Bird Face/Eye Detection performed perfectly. Be sure to click on the image to enjoy a larger, sharper, high-res version.
Image #3: Reddish Egret one-year old landing with crest raised
I Could’ve Been Famous!
While I was seated on the damp sand trying to photograph some scampering Sanderlings, an adult Reddish Egret flew toward me but landed well to my right. I made a few images as it fished its way to the south and wound up well past sun angle. I turned my head back to the right and to my horror, saw that a young reddish was in the process of braking to land with its crest raised. I got on the bird just as it landed, but knew that I had missed an amazing sequence. Had I turned my head to the right one or two seconds sooner, I might have been famous.
What Don’t I Like?
There are several things that bother me about this image. What bothers you? What do you like?
This image was also created on 19 October 2023 at Fort DeSoto Park IPT. I used the foot-pod technique with the handheld Sony FE 200-600mm f/5.6-6.3 G OSS lens (at 500mm) and The One, the Sony Alpha 1 Mirrorless digital camera. ) The exposure was determined using Zebra technology with ISO on the Thumb Dial. ISO 640. 1/4000 second at f/6.3 (wide-open) in Manual Mode. AWB at 8:20:59am after the sun came out. RawDigger showed the exposure to be perfect.
Tracking: Expand Spot/AF-C with Bird Face/Eye Detection performed perfectly. Be sure to click on the image to enjoy a larger, sharper, high-res version.
Image #4: Flock of birds on sandbar
Sandbar Bird-scape
As I continued north, I saw a flock of terns and pelicans on a small sandbar just offshore. When I got on sun angle, I sat down and placed the lens between my feet. I zoomed out from 600mm to get the framing I wanted, set the exposure, acquired focus, and, with my reading glasses on and the level activated, I squared the shot to the world and made a few images.
Depth-of-Field Question
Despite the huge depth of field when working at a distance, the incoming Sandwich Tern is not in sharp focus. Why?
Species?
Enlarge Image #4 and leave a comment letting us know the different species that are discernible in the photo.
Typos
With all blog posts, feel free to e-mail or to leave a comment regarding any typos or errors.
At 7pm eastern time today, Monday 23 October 2023, I will be presenting a free online webinar for the Delaware Photographic Society. It is free to all with a good connection. At 6:59pm, click here and then click on the Free Webinar photo/icon and you should be able to figure out how to get in. No registration is needed.
Nikon NIKKOR Z 800mm f/6.3 VR S Lens
Stan Gorlitsky is offering a Nikon NIKKOR Z 800mm f/6.3 VR S lens in mint condition for a very low $5,496.95. The sale includes a ROLANPRO Waterproof Lens Camouflage Coat for Nikon Z 800mm f6.3 VR S (a $110.00 value), the original box, the front and rear lens caps, the lens case, 3 1/2 years on the transferable New Leaf warranty, and insured ground shipping via major courier.
Please contact Stan via e-mail or by phone at 843-224-1367 (Eastern time zone).
All the Reach, Half the Weight
When I used Canon gear, I always loved the 800mm focal length for birds. At 5.25 pounds, this lens weighs more than a pound less than the Sony 600mm f/4 GM. I am impressed. I ran into two folks at Sebastian this morning using the 800 Z; they both love it. This lens sells new right now for $6,496.95. Grab Stan’s as-good-as-new copy and save $1000.00.”
Huge focal length, compact and lightweight design. The NIKKOR Z 800mm f/6.3 VR S, from Nikon, is a super-telephoto prime distinguished by the unique combination of one of the longest focal lengths available in a surprisingly portable package. This distinct design is made possible by the inclusion of a Phase Fresnel element, which cuts the overall weight by 50% and the length by 16% compared to the former F-mount 800mm f/5.6 lens. B&H
Clockwise from the upper left back around to center: Osprey gaining altitude after missed strike; school of mullet under attack from below; Wood Stork with Southern Whiting; Osprey with Menhaden; Wood Stork with small lobster; Royal Tern with large baitfish; Osprey with Menhaden; juvenile Osprey directly overhead “t-shot”; Osprey taking flight with freshly caught Mullet.
Sebastian Inlet In-the-Field Sessions
Act Now!
Share a great AirBnB 10 minutes from Sebastian Inlet with me this week only!
Join me for 3 hours of morning In-the-Field Instruction at Sebastian Inlet for only $300.00/session. The main target will be Ospreys fishing for a variety of migrating saltwater fish that visit the inlet each fall. Back-up subjects include fishing gulls, terns, and Brown Pelicans, Wood Stork, a variety of herons and egrets, shorebirds in the afternoon, sunrise cloud-scapes, and the occasional sea turtle or manatee.
October Dates: 24-29, 2023.
November Dates: 6-10, 2023.
Please get in touch via e-mail to book one or more sessions.
Your Call?
Which of today’s Wood Stork images do you like best? Why?
My Call
My favorite images from the last blog post were #2 — I love the arrangement of the eight birds, the soft light, and the breaking wave, #3, for the soft light, the wings up flight pose, and the greenish water, and #4 with the lovely breeding plumage full adult and the wings slightly down flight pose.
As for the d-o-f question with #1, yes, the bird was flying low against the water and that brought up too much background detail for me. What everyone missed was that I was zoomed out to 347mm; with the subject the same size in the frame, shorter focal lengths will always result in more d-o-f than you would get with a longer focal length. The bird, of course, would need to be farther away.
In #2, all of the birds were rendered relatively sharp on the face even though they were not on the exact same plane because of the relatively great focusing distance. As the distance increase, d-of increases dramatically. Note: when working at 840mm at minimum focusing distance, d-o-f is measured in small fractions of an inch, or about 1cm. At the actual focusing distance, 454 meters, d-o-f works out to be more than 100 meters!
What’s Up?
Before the sun came up on Friday and Saturday morning at Sebastian Inlet, there were about 3 dozen Ospreys diving for fish in a small cove. The bad news is that there was a kiss of death wind from the NW. But with the low tide, there were dozens of Wood Storks, herons and egrets, pelicans, cormorants, and several species of shorebirds. I got some fabulous stuff on Wood Stork including some superb flight shots and my four best Reddish Egret action photos. The best news: the wind is shifting to the east/northeast for the rest of the week.
Today is Monday 23 October 2023. I will be doing lots of relaxing and getting ready for tonight’s webinar. I hope to see you there, at least virtually.
Wherever you are an whatever you are doing, I hope that you too have a great day.
Please remember to use the B&H and Amazon links that are found on most blog pages and to use the BIRDSASART discount code at checkout when purchasing your new gear from Bedfords to get 3% back on your credit card and enjoy free second-day air FedEx. Please, also, consider joining a BAA IPT. You will be amazed at how much you will learn!
You can find some great photo accessories (and necessities, like surf booties!) on Amazon by clicking on the Stuff tab on the orange/yellow menu bar above. On a related note, it would be extremely helpful if blog-folks who, like me, spend too much money on Amazon, would get in the habit of clicking on the Amazon logo link on the right side of each blog post when they shop online. As you might expect, doing so will not cost you a single penny, but would be appreciated tremendously by yours truly. And doing so works seamlessly with your Amazon Prime account.
If an item — a Delkin flash card, or a tripod head — for example, that is available from B&H and/or Bedfords, is also available in the BAA Online Store, it would be great, and greatly appreciated, if you would opt to purchase from us. We will match any price. Please remember also to use my B&H affiliate links or to earn 3% cash back at Bedfords by using the BIRDSASART discount code at checkout for your major gear purchases. Doing either often earns you free guides and/or discounts. And always earns my great appreciation.
B&H Simplified
To ensure that I get credit for your B&H purchases, you can always click here. The tracking is invisible but greatly appreciated. And, you can use your PayBoo card. You must use the website to order. B&H will reopen on Fri April 14. Thanking me for the past 4000 educational blog posts could not be any easier and will not cost you one penny. Please shoot me your B&H receipt for major purchases.
Bedfords Simplified
Click here to start your search. Choose standard shipping, and when you get to the payment page, enter BIRDSASART in the discount code box and hit apply. You will be upgraded to free second day air Fed-Ex and receive 3% cash back on your credit card once your stuff ships. Either is greatly appreciated by yours truly.
B&H
Many folks have written recently stating that they purchased a Sony a1 from B&H and would like their free membership in the Sony 1 Info and Updates Group, a $150.00 value. When I check my affiliate account, their orders have not been there. When I let them know that they get credit for B&H purchases only if they use one of the many B&H affiliate links on the blog or begin their searches with this link, they are always disappointed. If in doubt, please contact me via e-mail and request a BH link. I am always glad to help and to guide you to the right gear.
Bedfords Amazing BAA Discount Policy
Folks who have fallen in love with Bedfords can now use the BIRDSASART coupon code at checkout to enjoy a post-purchase, 3% off-statement credit (excluding taxes and shipping charges) on orders paid with a credit card. The 3% credit will be refunded to the card you used for your purchase. Be sure, also, to check the box for free shipping to enjoy free Second Day Air Fed-Ex. This offer does not apply to purchases of Classes, Gift Cards, prior purchases.
Visit the Bedfords website here, shoot Steve Elkins an e-mail, or text him on his cell phone at (479) 381-2592.
Important Note
As an Amazon Associate, I earn a small percentage when you purchase from Amazon after using any of the Amazon links on the blog (including the logo-link on the right side of each blog post page). My affiliate link works fine with Amazon Prime and using it will not cost you a single cent. Huge thanks, BTW 🙂
Gear Questions and Advice
Too many folks attending BAA IPTs and dozens of photographers whom I see in the field and on BPN, are — out of ignorance — using the wrong gear, especially when it comes to tripods and more especially, tripod heads. And the same is true in spades when ordering new camera bodies or lenses. My advice will often save you some serious money and may help you avoid making a seriously bad choice. Please know that I am always glad to answer your gear questions via e-mail. If you are desperate, you can try me on my cell at 863-221-2372. Please leave a message and shoot me a text if I do not pick up.
This image was created on 21 October at Sebastian Inlet State Park 18 miles north of Vero Beach, FL. Crouching quite a bit, I used the handheld Sony FE 400mm f/2.8 GM OSS lens and The One, the Sony Alpha 1 Mirrorless Digital Camera). The exposure was determined via Zebra technology with ISO on the Thumb Dial. ISO 500. 1/2500 sec. at f/2.8 (wide open) in Manual mode. When evaluated in RawDigger, the raw file brightness was determined to be dead-solid perfect (ho hum). AWB at 7:32:36am , six minutes after sunrise.
Tracking: Expand Spot/AF-C with Bird Face/Eye detection enabled performed to perfection. Be sure to click on the image to enjoy a larger, sharper high-res version.
Image #1: Wood Stork sunrise silhouette
Right Place; Right Time. Seeing the Shot
On Friday morning, I was delayed about ten minutes while getting my annual Florida State Park pass. I thought that the birds filling the sky were gulls, but when I checked them out more carefully, saw that they were Ospreys! So, I headed over the bridge, parked, and walked down to the beach with the 400mm f/2.8. Looking back to the east, I saw a low line of clouds on the horizon. “Could be nice,” I thought. With wind against sun conditions, always think silhouettes. As the sun brushed the top of the clouds, all I needed was a bird in the right spot. At just the right moment, a Wood Stork landed on the perfect rock. It only stayed for a few seconds but after setting a good exposure, I was a very happy man.
There were as many photographers on the beach as there were Ospreys in the sky, yet nobody saw the winning shot but me. What else is new.
Learn to see the shot by joining any IPT.
Why Crouching?
Why was crouching vitally important to the artistic success of Image #1?
This image was also created on 21 October at Sebastian Inlet State Park 18 miles north of Vero Beach, FL. Seated on damp mud, I used the knee-pod technique with the handheld Sony FE 400mm f/2.8 GM OSS lens and The One, the Sony Alpha 1 Mirrorless Digital Camera). The exposure was determined via Zebra technology with ISO on the Thumb Dial. ISO 2500. 1/2000 sec. at f/4 (stopped down 21-stop) in Manual mode. When evaluated in RawDigger, the raw file brightness was determined to be dead-solid perfect (ho hum). AWB at 7:44:48am on clear sunny morning.
Tracking: Spot S AF-C with Bird Face/Eye detection enabled performed to perfection. Be sure to click on the image to enjoy a high-res version.
Image #2: Wood Storks allo-preening with fly-by Ruddy Turnstone
Right Place; Right Time. Seeing the Shot, Again
After the early morning Osprey feeding spree, I concentrated on the Wood Storks in the sweet, gorgeous butter light. I was lucky when two Wood Storks began preening each other right in front of me and right down sun angle. Most of the 20-odd photographers did not show much if any interest in the storks. The guy next to me did make a few frames before moving on to something else. I was thrilled to get a clean shot at photographing this not very common behavior. I do have a very few frames of allopreening Black Vultures, but nothing to write home about.
As there would be two bird heads in the frame, I stopped down one stop. When there are two subjects, I almost always want to focus on the closest bird. I was using Tracking; Zone and for the most part, the AF tracked the eye of the nearest bird, the stork on my right. But at the penultimate moment, it grabbed the eye of the left-hand bird 🙁 Actually, this was 100% operator error; I should have switched to Tracking: Expand Spot and turned off Eye Priority AF. With my set-up, that can be done in about one second by pressing two specific buttons. That would have kept focus on the eye of the right hand (also the “right”) bird.
As expected in this situation, the face and head of the right hand bird was not in sharp focus as it was in front of the plane of focus. Topaz Sharpen AI did a decent job that wound up being fine for web presentation. But it surely would not stand up to close scrutiny on a pill level. For Arash Hazeghi, it would have been an insta-delete. How does it look to you?
Getting Lucky
When I saw the out of focus, vertical banking Ruddy Turnstone in just the right spot in the frame, I thought, “I couldn’t have painted that bird in any better!”
Allopreening
Adapted from the Wikipedia article on preening here.
Although preening (feather maintenance) is primarily an individual behavior, some bird species indulge in allopreening where one individual preens another. It is not common in most bird species, but birds from at least 43 families are known to engage in this mutual activity. Most allopreening activity concentrates on the head and neck area, a lesser amount being directed towards the breast and mantle and an even smaller percentage applied to the flanks. A few species are known to allopreen other areas, including the rump, tail, belly and underwing.
Several hypotheses have been advanced to explain the behavior: that it assists in effective grooming, that it assists in recognition of individuals (mates or potential sexual partners), and that it assists in social communication, reducing or redirecting potential aggressive tendencies. These functions are not mutually exclusive. Evidence suggests that different species may participate for different reasons, and that those reasons may change depending on the season and the individuals involved. In most cases, allopreening involves members of the same species, although some cases of interspecific allopreening are known; the vast majority of these involve icterids, though at least one instance of mutual grooming between a free and wild Black Vulture and a free and wild Crested Caracara has been documented.
Typos
With all blog posts, feel free to e-mail or to leave a comment regarding any typos or errors.
In Thursday’s blog post my favorite image was #3, the preening Sandwich Tern because of the low perspective, the sweet light, the beautiful bird, and the perfect preening pose. As for which image had the best low perspective/background combination, I’d go with #4, the young Royal Tern images that was made with the lens hood resting on the sand.
Your Call?
Which of today’s five flight images is the strongest. Please leave a comment letting us know any you made your choice. New folks are always welcome so don’t be shy.
San Diego offers a wealth of very attractive natural history subjects, including and especially the Pacific race of California Brown Pelican. With annual visits spanning more than four decades, I have lots of photographic experience there … Click on the composite to enjoy a larger version.
The 2023/2024 San Diego Brown Pelicans (and more!) IPTs
IPT #2: 3 1/2 DAYS: WED 31 JAN thru the morning session on SAT 3 FEB, 2024: $2149.00. Limit: 6 photographers
San Diego IPT: 4 1/2 DAYS: TUES 23 JAN thru the morning session on SAT 27 JAN 2024: $2699.00. Deposit: $699.00. Limit: 6 photographers/Openings: 4.
Please e-mail for information on personalized pre- and post-IPT sessions.
Join me in San Diego to photograph the spectacular breeding plumage Brown Pelicans with their fire-engine red and olive green bill pouches; Brandt’s (nesting) and Double-crested Cormorants; breeding plumage Wood and Ring-necked Ducks; other duck species possible including Lesser Scaup, Redhead, Northern Shoveler and Surf Scoter; a variety of gulls including Western, California, and the gorgeous Heermann’s, all in full breeding plumage; shorebirds including Marbled Godwit, Willet, Sanderling and Black-bellied Plover; many others are possible including Least, Western, and Spotted Sandpiper, Whimbrel, Black and Ruddy Turnstone, Semipalmated Plover, and Surfbird; Harbor Seals and California Sea Lions (both depending on the current regulations and restrictions). And as you can see by studying the IPT cards, there are some nice bird-scape and landscape opportunities as well. Not to mention a ton of excellent flight photography opportunities and instruction.
I discovered some really neat new spots on my 2022/23 visit. As a result, the first and second IPTs may include an afternoon or two of landscape photography.
Please note: where permitted and on occasion, ducks and gulls may be attracted (or re-located) with offerings of grains or healthy bread.
San Diego offers a wealth of very attractive natural history subjects, including and especially the Pacific race of California Brown Pelican. With annual visits spanning more than four decades, I have lots of photographic experience there … Click on the composite to enjoy a larger version.
Learning Exposure, Whether You Like It Or Not
Whether you like it or not, we will be beating the subject of exposure like a dead horse. In every new situation, you will hear my thoughts on exposure along with my thoughts on both Nikon and Canon histograms and SONY Zebras. Whether you like it or not, you will learn to work in manual mode so that you can get the right exposure every time (as long as a bird gives you ten seconds with the light constant). Or two seconds with SONY zebras … And you will learn what to do when the light is changing constantly. What you learn about exposure will be one of the great takeaways on every IPT.
Though the pelicans will be the stars of the show on this IPT, there will be many other handsome and captivating subjects in wonderful settings. Click on the composite to enjoy a larger version.
It Ain’t Just Pelicans
With gorgeous subjects just sitting there waiting to have their pictures taken, photographing the pelicans on the cliffs is about as easy as nature photography gets. With the winds from the east almost every morning, there is usually some excellent flight photography, at times with 70-200mm lenses! And the pelicans are almost always doing something interesting: preening, scratching, bill pouch cleaning, or squabbling. And then there are those crazy head throws that are thought to be a form of intra-flock communication. You will be guided as to how to make the best of those opportunities. Depending on the weather, the local conditions, and the tides, there are a variety of other fabulous photo chances available in and around San Diego. Each IPT will include one or two duck sessions.
Did I mention that there are lots of great birds and natural history subjects in San Diego in winter? Click on the composite to enjoy a larger version.
The San Diego Details
These IPTs will include four or five 3-hour morning photo sessions, three or four 1 1/2-hour afternoon photo sessions, and three or four working brunches that will include image review and Photoshop sessions. On rare cloudy days, we may — at the leader’s discretion, stay out in the morning for a long session and skip that afternoon shoot. To ensure early starts, breakfasts will be your responsibility. And so that we can get some sleep, dinners will be on your own as well. In the extremely unlikely event that Goldfish Point is closed due to local ordinance (or whimsy) — that has never happened in the past fifty years, I will of course do my very best to maximize our photographic opportunities.
Deposit Info
A $699 deposit is required to hold your slot for one of the 2024 San Diego IPT. You can send a check (made out to “BIRDS AS ART”) to us here: BIRDS AS ART, PO Box 7245, Indian Lake Estates, FL, 33855, or call Jim or Jennifer at the office with a credit card at 863-692-0906. Your balance, payable only by check, is due three months before the trip.
Variety is surely the spice of life in San Diego. Click on the composite to enjoy a larger version.
Getting Up Early and Staying Out Late
On all BIRDS AS ART IPTS including and especially the San Diego IPT, we get into the field early to take advantage of unique and often spectacular lighting conditions and we stay out late to maximize the chances of killer light and glorious sunset silhouette situations. We often arrive at the cliffs a full hour before anyone else shows up to check out the landscape and seascape opportunities.
What’s Up?
Wednesday afternoon at DeSoto was excellent if you knew where to be. I was in the right spot when the forecast strong northeast wind (bad) switched to a gentle and variable breeze from the northwest (perfect). Thursday morning was decent with the highlight for me being a very tame first winter Greater Yellowlegs before sunrise. My drive home in the afternoon was a piece of cake and I got in a late 30-length swim in the 74.3° pool. Chilly, for sure. I spent Friday catching up and headed over to Sebastian Inlet in the afternoon.
Today is Saturday 21 October 2023. Wherever you are an whatever you are doing, I hope that you too have a great day.
Please remember to use the B&H and Amazon links that are found on most blog pages and to use the BIRDSASART discount code at checkout when purchasing your new gear from Bedfords to get 3% back on your credit card and enjoy free second-day air FedEx. Please, also, consider joining a BAA IPT. You will be amazed at how much you will learn!
You can find some great photo accessories (and necessities, like surf booties!) on Amazon by clicking on the Stuff tab on the orange/yellow menu bar above. On a related note, it would be extremely helpful if blog-folks who, like me, spend too much money on Amazon, would get in the habit of clicking on the Amazon logo link on the right side of each blog post when they shop online. As you might expect, doing so will not cost you a single penny, but would be appreciated tremendously by yours truly. And doing so works seamlessly with your Amazon Prime account.
If an item — a Delkin flash card, or a tripod head — for example, that is available from B&H and/or Bedfords, is also available in the BAA Online Store, it would be great, and greatly appreciated, if you would opt to purchase from us. We will match any price. Please remember also to use my B&H affiliate links or to earn 3% cash back at Bedfords by using the BIRDSASART discount code at checkout for your major gear purchases. Doing either often earns you free guides and/or discounts. And always earns my great appreciation.
This image was created on 25 December 2022 at La Jolla, CA. Standing at full height, I used the handheld Sony FE 200-600mm f/5.6-6.3 G OSS lens (at 347mm) and The One, the Sony Alpha 1 Mirrorless digital camera. ) The exposure was determined using Zebra technology with ISO on the Thumb Dial. ISO 1250. 1/3200 second at f/6.3 (wide-open) in Manual Mode. AWB at 7:48:15am on a sunny morning. RawDigger showed the raw file brightness to be dead solid perfect.
Tracking: Zone/AF-C with Bird Face/Eye Detection performed perfectly. Be sure to click on the image to enjoy a larger, sharper, high-res version.
Image #1: Pacific-race Brown Pelican, juvenile braking to land
THE Best Lens for Pelican Flight Photography In La Jolla
If you own only a single lens, then it is obviously THE best lens for flight photography for you. If you own more than one super-telephoto, telephoto, or telephoto zoom lens, then THE best lens can be determined only after evaluating the situation, the sky conditions and the light, the wind speed and direction, and the flight patterns of the birds. Note that each of today’s five featured images was created with a different rig with focal lengths ranging from 180 to 840mm.
To learn to evaluate a variety of flight photography situations live and in person, consider joining me on one of the two San Diego IPTs listed above.
Depth of Field Question #1
Why is there more background detail in the ocean Image #1 than in Images #3 and 4?
The Sony 200-600
On sunny days, the 200-600, with its relatively light weight, incredible versatility, and its 600mm each (when needed), can be an ideal for flight at La Jolla. It is also quite useful for photographing perched birds and all sorts of pelican behaviors.
Tracking: Zone/AF-C was active at the moment of exposure and performed perfectly. Be sure to click on the image to enjoy the larger version.
Image #2: Pacific-race Brown Pelican, flock of six in flight over a breaking wave
A Realization
After five decades of visiting La Jolla, I realized that one of my favorite mid-morning spots for gulls, terns, and shorebirds would be great for photographing the pelicans soaring over the tops of breaking waves. A super-telephoto lens with or without the 1.4X TC is perfect as the birds are not usually flying by at close range.
Aging Pelicans
Aging a bird refers to identifying the plumage. In this image, there are four young birds, two in breeding plumage, and one sub-adult. Can you locate each of those?
Depth of Field Question #2
Even though the subjects are not on the exact same plane, they are all relatively sharp on the face?
Tracking Zone/AF-C with Bird Face/Eye detection enabled performed perfectly. Be sure to click on the image to enjoy the larger, sharper, high-res version.
Image #3: Pacific-race Brown Pelican, sub-adult in flight
A New Spot
In 2022/23, I discovered a new spot that was great for flight photography, mostly for pelicans and Royal Terns with occasional fly-by Brandt’s Cormorants. A variety of focal lengths can be excellent at this location as the birds sometimes fly right by at close range and sometimes are rather distant.
This image was created on 4 January 2023 at La Jolla, CA. Standing at full height, I used the handheld Sony FE 400mm f/2.8 GM OSS lens and The One, the Sony Alpha 1 Mirrorless Digital Camera). The exposure was determined via Zebra technology with ISO on the Thumb Dial. ISO 400. 1/4000 sec. at f/3.5 (stopped down 1/3-stop) in Manual mode. When evaluated in RawDigger, the raw file exposure was determined to be dead-solid perfect (ho hum). AWB at 9:33:28am on clear sunny morning.
Tracking: Zone/AF-C with Bird Face/Eye detection enabled performed to perfection. Be sure to click on the image to enjoy the larger, sharper, high-res version.
Despite the fact that the Sony 400 f/2.8 GM lens is only 4 ounces lighter than the 600mm f/4 GM, I will use the 600mm f/4 on a tripod 99% of the time while almost always handholding the 400mm f/2.8. Why? The super-fast 400mm is physically smaller (shorter) than the 600 and is far better balanced with the bulk of the weight towards the rear of the lens.
The 400mm f/2.8 was especially perfect for flight on my 20223/2023 San Diego visit as the usually perfect weather was on the iffy side with more cloudy, foggy, drizzly weather than I have ever experienced in usually sunny California. The super-wide aperture is a big plus in low light conditions. But is does well on sunny days too. And the focal length is often spot on for the pelicans flying in to land.
This image was created on 5 January 2023 at La Jolla, CA. Standing at full height, I used the handheld I used the Sony FE 70-200mm f/2.8 GM OSS II lens (at 180mm) and The One, the Sony Alpha 1 Mirrorless Digital Camera.. The exposure was determined via Zebras with Exposure Compensation on the thumb dial. ISO 1600: 1/2500 sec. at f/2.8 (wide open) in Manual mode. AWB at 9:08:09 am in the shade on a cloudy morning.
Tracking: Zone AF/C with Bird-Eye/Face Detection performed perfectly. Click on the image to enjoy a high-res version.
Image #5: Brown Pelican, Pacific-race breeding plumage adult in flight in cove
The Right Lens for the Situation
The lens choice here best illustrates the horses for courses theme of today’s post. The birds were flying by at close range and it was dark so the 70-200mm GM II lens without a TC was the obvious best choice.
Horses for courses means that what is suitable for one situation might be unsuitable for another.
If you are blessed like me an own several big lenses, you need to learn to evaluate different flight photography situations so that you have the right lens in your hands at the right moment. With experience, you can learn to make the right choice before you leave your vehicle! The best way to learn this stuff is, of course, to join an IPT with San Diego or Homer leading the league in flight photography.
Click on the composite to view a larger version and be even more impressed.
First of all, if you use Nikon or Canon (or Olympus or Fuji) gear, do not be put off by the title. While a portion of the guide deals with the Sony α-1, there is a ton of priceless information, tips, and techniques that can help you become a better flight photographer. No matter what system you are using. If you do not use an α-1, be sure to read down to the bottom to save a few bucks.
Arash Hazeghi and Arthur Morris have created the definitive and most comprehensive ever treatise on photographing birds in flight. With more than sixty years of experience photographing birds, they know what you need to know but have not figured out yet! You will be astounded by the depth of their knowledge and the tips they have to offer. More than six months in the making, the guide contains 229 pages, 24,321 words,97 exceptional and inspirational flight images — each with a legendary, enlightening BIRDS AS ART caption, and 22 screen captures. The guide contains a wealth of useful, practical, and for the most part — never-before-available information.
We will teach you the basic concepts that you need to master to become a great flight photographer along with the techniques used by the world’s best flight photographers.
You will learn that most any telephoto lens can be perfect for flight photography in a given situation; focal lengths for the images in the book range from 200mm to 1200mm and everywhere in between.
We discuss the merits of various lenses in depth, including and especially comparing the 400mm f/2.8 lenses with the 600mm f/4s.
We guide you in getting your hands on the flight photography lens that will best meet your needs. We offer a variety of handholding and rest position tips and include tips on working with a big lens on a tripod when working with a flight lens that is otherwise too heavy for you.
Both authors offer their thoughts on getting the right exposure when photographing birds in flight. You will learn to get the right exposure on foggy days and even when photographing black birds in white sky conditions.
You will learn the tremendous importance of pre-focusing, of finding the bird in the viewfinder quickly, acquiring focus almost instantly (with tips on doing all three).
You will learn the role of image stabilization in flight photography and the best settings.
Both authors share their thoughts on using the focus range limiter switch. In the same vein, you will learn to use Direct Manual Focus to make your flight photography life easier.
All will learn about the best wing positions and the importance of the background with images of birds in flight. With lots of examples.
You will learn about the best shutter speeds (and the best aperture) to use when photographing flying birds.
You will learn to photograph flight while seated and the many advantages of doing so.
You will learn the best methods of controlling high ISO noise.
All will learn to format their flash cards properly and safely.
You will learn what to do when your AF system is temporarily blinded.
All will learn the huge effect that wind strength and direction has on flight photography and to evaluate the quality and direction of the light on both sunny and cloudy days.
You will learn why it is vitally important to shoot aggressively when photographing birds in flight.
You will learn to carefully observe and evaluate a variety of bird behaviors that may shine light on some excellent opportunities for photographing birds in flight. And about getting into the best position from which to photograph.
You will learn to be a much better flight photographer.
What Sony Folks Will Learn
Exactly how Artie uses Zebras to come up with perfect exposure after perfect exposure.
The fine points and recommended settings for Optical Steady Shot (OSS).
The concept of Auto-Focus (AF) tracking in the α-1.
Everything there is to know about the complex Sony autofocus system.
About all the AF patterns, how to quickly switch them, and about those favored by each author. And why.
The Tracking and Non-tracking AF patterns. When and why Arash uses Non-Tracking Zone. And why Artie uses only two AF patterns.
How to set and use Bird Face-Eye detection for flight photography.
How and why to assign various custom functions to the various programmable buttons on the α-1 body.
The perfect settings for the many, many Menu items that are vitally related to flight photography.
How and why the Sony α-1 uses both contrast and phase detection AF to determine focus (and the benefits thereof).
Which are the best memory cards for the Sony α-1.
To quickly access frequently used menu items.
Non-Sony α-1 Discount
Using the honor system, folks who do not use a Sony α-1 body are invited to click here to save $25.00 on the purchase price of the guide.
Typos
With all blog posts, feel free to e-mail or to leave a comment regarding any typos or errors.
Which of today’s five featured images do you like best? Why?
Which of image has the best low perspective/background combination?
My Call and the Depth of Field Explanation
In the last blog post, I could not pick a favorite caracara image; I loved the adult for its striking plumage and I loved the juvie head portrait as it exemplifies the BIRDS AS ART style — clean, tight, and graphic.
The background with the head portrait of the young bird was completely smooth and creamy in part because I was very close to the bird and in part because the background was relatively far from the subject. And yes, the depth of field increases dramatically as the distance to the subject increases.
Wanted to Buy
If you have a Canon 400mm f/5.6 L Lens sitting on a shelf unused for years and would like to sell it, please shoot me an e-mail.
What’s Up?
Tuesday and Wednesday mornings were fair at best. Both afternoons were a lot better with Wednesday afternoon being superb. If you knew where to be.
Today is Thursday 19 October and I will be heading to DeSoto for one last morning session before heading back to ILE. I head to Sebastian Inlet on Friday afternoon.
Wherever you are an whatever you are doing, I hope that you too have a great day.
Please remember to use the B&H and Amazon links that are found on most blog pages and to use the BIRDSASART discount code at checkout when purchasing your new gear from Bedfords to get 3% back on your credit card and enjoy free second-day air FedEx. Please, also, consider joining a BAA IPT. You will be amazed at how much you will learn!
You can find some great photo accessories (and necessities, like surf booties!) on Amazon by clicking on the Stuff tab on the orange/yellow menu bar above. On a related note, it would be extremely helpful if blog-folks who, like me, spend too much money on Amazon, would get in the habit of clicking on the Amazon logo link on the right side of each blog post when they shop online. As you might expect, doing so will not cost you a single penny, but would be appreciated tremendously by yours truly. And doing so works seamlessly with your Amazon Prime account.
If an item — a Delkin flash card, or a tripod head — for example, that is available from B&H and/or Bedfords, is also available in the BAA Online Store, it would be great, and greatly appreciated, if you would opt to purchase from us. We will match any price. Please remember also to use my B&H affiliate links or to earn 3% cash back at Bedfords by using the BIRDSASART discount code at checkout for your major gear purchases. Doing either often earns you free guides and/or discounts. And always earns my great appreciation.
Thinking of a 2024 Homer IPT?
If you have been dreaming of attending one or both of the 2024 Homer IPTs, please shoot me an e-mail; I will do my very best to get you there with a large discount.
Clockwise from the upper left back around to center: Osprey gaining altitude after missed strike; school of mullet under attack from below; Wood Stork with Southern Whiting; Osprey with Menhaden; Wood Stork with small lobster; Royal Tern with large baitfish; Osprey with Menhaden; juvenile Osprey directly overhead “t-shot”; Osprey taking flight with freshly caught Mullet.
Sebastian Inlet In-the-Field Sessions
Join me for 3 hours of morning or afternoon In-the-Field Instruction at Sebastian Inlet for only $300.00/session (or $500 for a full day with two sessions). The main target will be fishing Ospreys hunting for a variety of migrating saltwater fish that visit the inlet each fall. Back-up subjects include fishing gulls, terns, and Brown Pelicans, Wood Stork, a variety of herons and egrets, shorebirds in the afternoon, sunrise cloud-scapes, and the occasional sea turtle or manatee.
October Dates: 21, 22, 24-29, 2023.
November Dates: 6-10, 2023.
Please get in touch via e-mail to book one or more sessions.
Tracking Zone/AF-C with Bird Face/Eye detection enabled performed perfectly. Be sure to click on the image to enjoy the larger, sharper, high-res version.
Image #1: Non-breeding plumage Laughing Gull flapping after bath
No Chance?
When I saw the gull dipping its breast in the water, my first thought was “It’s too close — there’s no way to avoid clipping the wings.” But I followed my own oft-given advice and tried anyway. I did chop off the wingtips in all but one of the ten frames. I was glad that I tried.
Tracking: Zone/AF-C with Bird Face/Eye detection enabled performed perfectly. Be sure to click on the image to enjoy the larger, sharper, high-res version.
Image #2: Common Tern non-breeding ruffling
Zebras Rule!
Check out the capture times with the first two images. At 9:09:38am it was cloudy. I cheated a bit on the shutter speed at 1/1600 second and dialed the ISO up to 1600 when I saw a few zebras on the breast of the gull. When the sun broke through less than 4 minutes later, I raised the shutter speed and cut way back on the ISO. At 640, I saw a few faint Zebras on the tern’s very white breast and knew that I had another perfect exposure.
When I am working in changing light, I often feel sorry for folks not using Zebras or those using Sony who are not on the wagon.
Common Tern Non-breeding Plumage
Note the black carpal bar, the half rear cap that extends just to the eye, the red legs, and a hint of red in the bill. I believe that both the legs and the bills tend to become black on many or most birds.
Tracking: Expand Spot/AF-C with Bird Face/Eye detection enabled performed perfectly. Be sure to click on the image to enjoy the larger, sharper, high-res version.
“When photographing preening birds, press the shutter button when the bird’s face and bill are square to the imaging sensor and when you have a clear view of the eye.”
Works every time!
Sandwich Tern Non-breeding Plumage
Note the rear cap that makes its way down the nape and the relatively long and slim black bill with the yellow tip.
This image was created on 18 October 2023. Seated on damp sand with the lens hood on the ground, I used the handheld Sony FE 400mm f/2.8 GM OSS lens with the Sony FE 2.0x Teleconverter, and The One, the Sony Alpha 1 Mirrorless Digital Camera). The exposure was determined via Zebra technology with Exposure Compensation on the thumb dial. ISO 500: 1/3200 sec. at f/5.6 (wide open). AWB at 8:41:32am in Manual mode.
Tracking: Zone AF-C with Bird Face/Eye detection enabled performed perfectly. Be sure to click on the image to enjoy a larger, sharper, high-res version.
Image #4: Royal Tern worn juvenile
Lowest of the Low Perspectives!
Unless you dig a hole to put your lens in, you cannot get any lower than you can by placing the lens hood right on the ground. Hold the camera from below with your left hand while your right index finger is on the shutter button. Be sure to wear your reading glasses if you need them whenever you are working off the tilted rear monitor. With the level activated, you rotate the rig to square with your right hand.
Then you trust the AF system.
Royal Tern Worn Juvenal
Juveniles of this species always have an orange bill. The leg color is variable orange to blackish. Adults in breeding plumage usually have bills that range from orange to orange-red. One in a hundred birds has a red bill that approaches the intensity of the bills of breeding plumage Caspian Terns.
This image was created 5 October 2023 ankle-pod technique with the handheld Sony FE 200-600mm f/5.6-6.3 G OSS lens (at 600mm) and The One, the Sony Alpha 1 Mirrorless digital camera. ) The exposure was determined using Zebra technology with ISO on the Thumb Dial. ISO 800. 1/4000 second at f/6.3 (wide-open) in Manual Mode. AWB at 6:21:39pm on a sunny, 2500-flight image afternoon. RawDigger showed the exposure to be perfect.
Tracking: Zone/AF-C with Bird Face/Eye Detection performed perfectly. Be sure to click on the image to enjoy a larger, sharper, high-res version.
Both non-breeding adult and young Forster’s Terns feature black eye patches; note that the eye patch does not get anywhere near the crown or the rear of the head.
This bird was photographed on an early October visit.
All images from SEPT/OCT/NOV at Fort DeSoto.
Click on the image to enjoy a larger, sharper high-resolution version.
Clockwise from upper left to center: Piping Plover flapping after bath, juvenile Laughing Gull with feather, American Oystercatcher with sea urchins, Willet foraging in surf, American White Pelican juvenile swimming, skimmer/tern/shorebird blast-off blur, American White Pelican in flight, Black-bellied Plover stealing lugworm from Marbled Godwit, Roseate Spoonbill staring.
The Fall 2023 Fort DeSoto Instructional Photo-Tours
Fall 2023 Fort DeSoto Instructional Photo-Tour #3
3 1/2 Days: Tuesday 31 October through the morning session on Friday 3 November 2023. $1899.00 includes three working lunches. Limit six photographers.
Fall 2023 Fort DeSoto Instructional Photo-Tour #4
3 1/2 Days: Tuesday 14 November through the morning session on Friday 17 November 2023. $1899.00 includes three working lunches. Limit six photographers/Openings: three.
Fall Bird Photography at Fort DeSoto
Fort DeSoto, located just south of St. Petersburg, FL, is a mecca for migrant shorebirds, terns, and gulls in fall. There they join hundreds of egrets, herons, and night-herons that winter on the T-shaped peninsula. With any luck at all, we should get to photograph one of Florida’s most desirable shorebird species: Marbled Godwit. Black-bellied Plover and Willet are easy, American Oystercatcher is pretty much guaranteed. Great Egret, Snowy Egret, Great Blue Heron, Tricolored Heron, and White Ibis are easy as well and we will almost surely come up with a tame Yellow-crowned Night-Heron or two. And there should be some quality Brown Pelican flight photography. In addition, Royal, Sandwich, Forster’s, and Caspian Terns will likely provide us with some good flight opportunities as well. Though not guaranteed, Roseate Spoonbill and Wood Stork might well be expected. And we will be on the lookout for a migrant passerine fallout in the event of a thunderstorm or two.
On this IPT, all will learn the basics and fine points of digital exposure. Nikon and Canon folks will learn to get the right exposure every time after making a single test exposure, and SONY folks will learn to use Zebras so that they can be sure of making excellent exposures before pressing the shutter button. Everyone will learn how to approach free and wild birds without disturbing them, to understand and predict bird behavior, to identify many species of shorebirds, to spot the good situations, to choose the best perspective, to see and understand the light, and to design pleasing images by mastering your camera’s AF system. Most importantly, you will surely learn to evaluate wind and sky conditions and understand how they affect bird photography. And you will learn how and why to work in Manual mode (even if you’re scared of it). The best news is that you will be able to take everything you learn home with you so that you will be a better photographer wherever and whenever you photograph.
Clockwise from upper left to center: Long-billed Curlew, juvenile Tricolored Heron, Marbled Godwits, Great Blue Heron, juvenile Pectoral Sandpiper, Wood Stork, smiling Sea Scallop, Ruddy Turnstone scavenging needlefish, Great Blue Heron sunset silhouette at my secret spot, and southbound migrant tern flock blur.
The Details
There will be a Photoshop/image review session during or after lunch (included) each full day. That will be followed by Instructor Nap Time.
These IPTs will run with only a single registrant (though that is not guaranteed). The best airport is Tampa (TPA). Once you register, you will receive an e-mail with Gulfport AirBnB/VRBO information. If you register soon and would like to share an AirBnB with me, shoot me an e-mail. Other possibilities including taking a cab to and from the airport to our AirBnB and riding with me for $50/day. This saves you both gas and the cost of a rental car.
A $600 deposit is due when you sign up and is payable by credit card. Balances must be paid by check one month before the trip. Your deposit is non-refundable unless the IPT sells out with six folks, so please check your plans carefully before committing. You can register by calling Jim during weekday business hours at 863-692-0906 with a credit card in hand, or by sending a check as follows: make the check out to: BIRDS AS ART and send it via US mail here: BIRDS AS ART, PO BOX 7245, Indian Lake Estates, FL 33855. You will receive a confirmation e-mail with detailed instructions, clothing, and gear advice. Please shoot me an e-mail if you plan to register or if you have any questions on lodging.
Up Early, Stay Out Late!
Obviously, folks attending an IPT will be out in the field early and stay late to take advantage of the sweetest light and sunrise and sunset colors (when possible). The good news is that the days are relatively short in early fall. I really love it when I am leaving the beach on a sunny morning after a great session just as a carful or two of well-rested photographers are arriving. On cloudy days, we may — at the leader’s discretion, stay out in the morning for a long session and skip the afternoon session. To ensure early starts, breakfasts will be your responsibility. And so that we can get some sleep, dinners will sometimes be on your own as well.
Typos
With all blog posts, feel free to e-mail or to leave a comment regarding any typos or errors.